Do you want to create a website but don't know where to start?
If so, you're not alone. Many people want to create a website but are intimidated by the process.
The good news is that you don't need to know how to code to create a website.
With Dorik, a no-code website builder, you can create a professional-looking website without coding knowledge.
In this guide, we'll show you how to create any type of websites with Dorik, step-by-step.
Let's get started!
How to Create a Website Step-by-Step with Dorik
Using Dorik is the most convenient way to build your website, and it requires no other technical knowledge or skills.
So, let's start building your website.

1) Set Your Purpose of Creating a Website and Register a Domain Name (or use Dorik subdomain)
Before starting to build a website, you should have solid preparations. It will make the journey smooth. So, consider the following factors to avoid any inconveniences.
i) Identify the Types of Website You Want to Create
Creating a website becomes much more manageable once you identify the type of website you want to make. There are many different types of websites, each with its unique purpose and audience.
Now, we will go through some of the most common types of websites and their respective purposes, so you can choose the one that fits your needs best.
-
Personal & Portfolio Website
-
Health & Wellness Website
-
Multimedia Website
-
Event Management Website
We hope you have better understood the various websites you can create. So, it's time to jump on to the next step.
ii) Register a Domain Name
Choose a domain registrar to register your domain name and check if your desired domain name is available. Once you find an available domain name, select the registration period and provide your personal and payment information.
When selecting a domain name, consider brand-ability, memorability, simplicity, and relevance factors.
2) Creating and Designing Your Website with Dorik
The most exciting news is that Dorik has launched its AI website builder to fasten the website building process. It's the best AI website builder in the market.
With just a single prompt, you can create a full functional website in seconds. Dorik AI will also provide you with engaging website copy and pixel-perfect images.
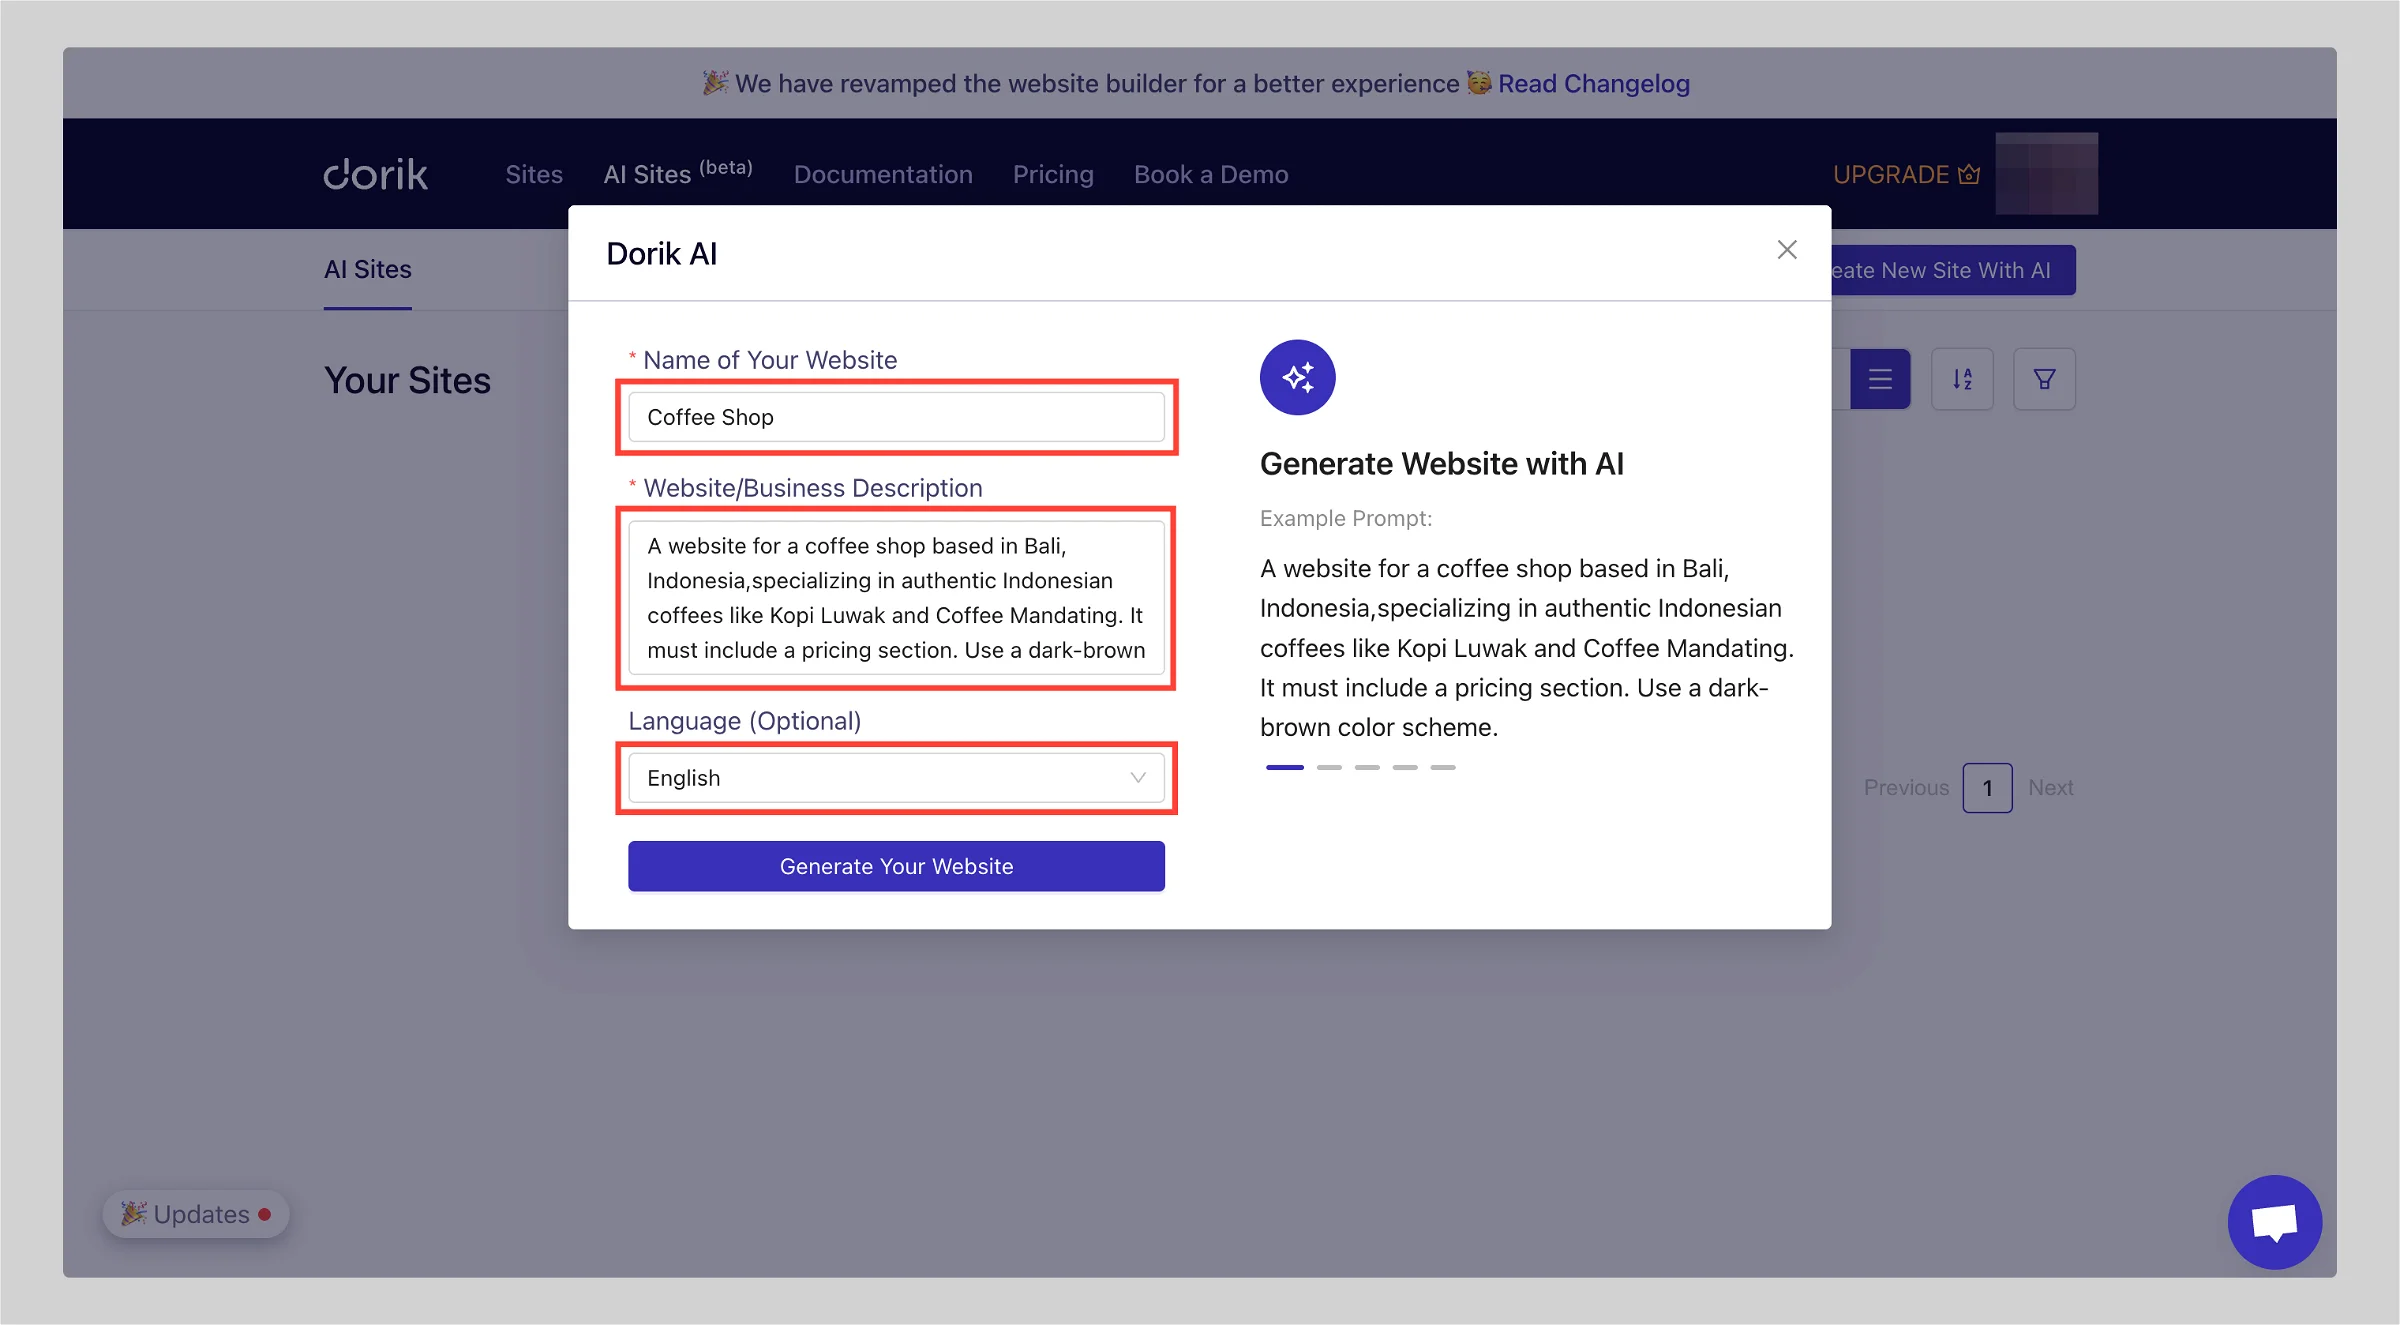
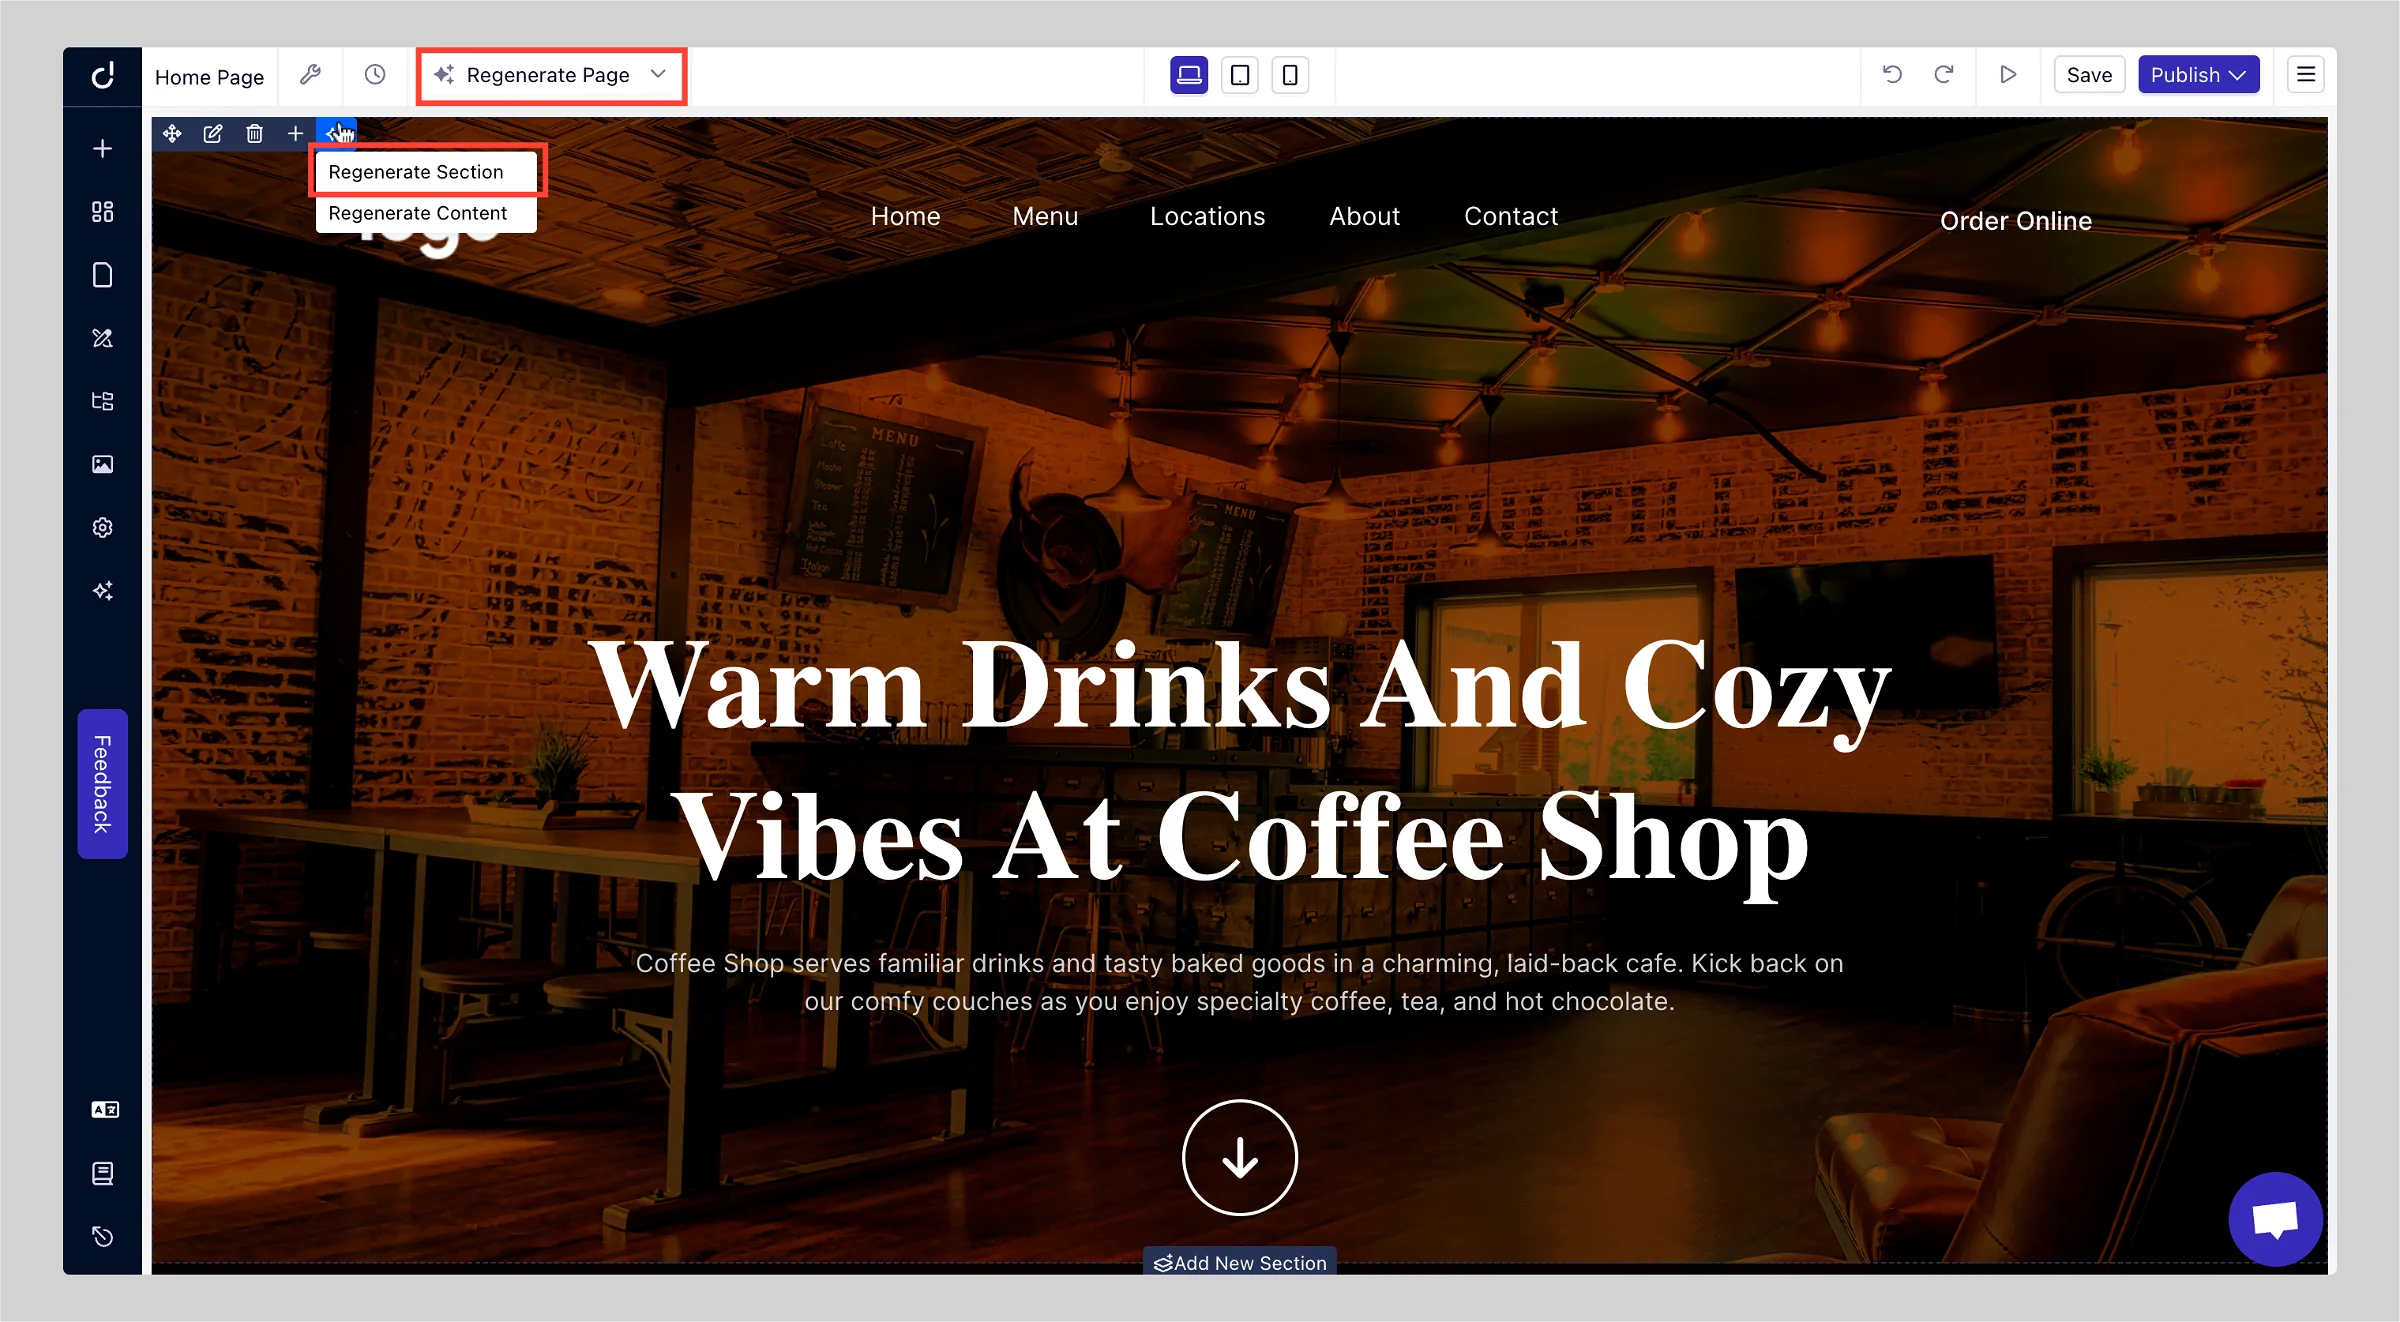
If you don't like any specific section of the AI generated site, you can instantly regenerate it in a single click. You can even regenerate the full page in the same way. Dorik AI does not stop here. You can also regenerate the copies and images by writing prompt. It'll give you what you want.
Related Read: How to Create a Website with Dorik AI
In the above section, I've show you that you can create your website with Dorik AI. If you want to use Dorik website builder, below are the process for you. Follow the below steps to build your own website.
i) Create an Account
-
Visit Dorik, the most user-friendly website builder, as it is the first step of your website-building process.
-
Head to the Sign-Up button and click on it.
-
Follow the on-screen instructions to complete the sign-up process.
-
Alternatively, you can click on the "Try Dorik Now" button to explore the website builder before committing to signing up.
Note that you must be logged in or signed up to publish your site. We recommend completing the sign-up process to ensure you can publish your website.
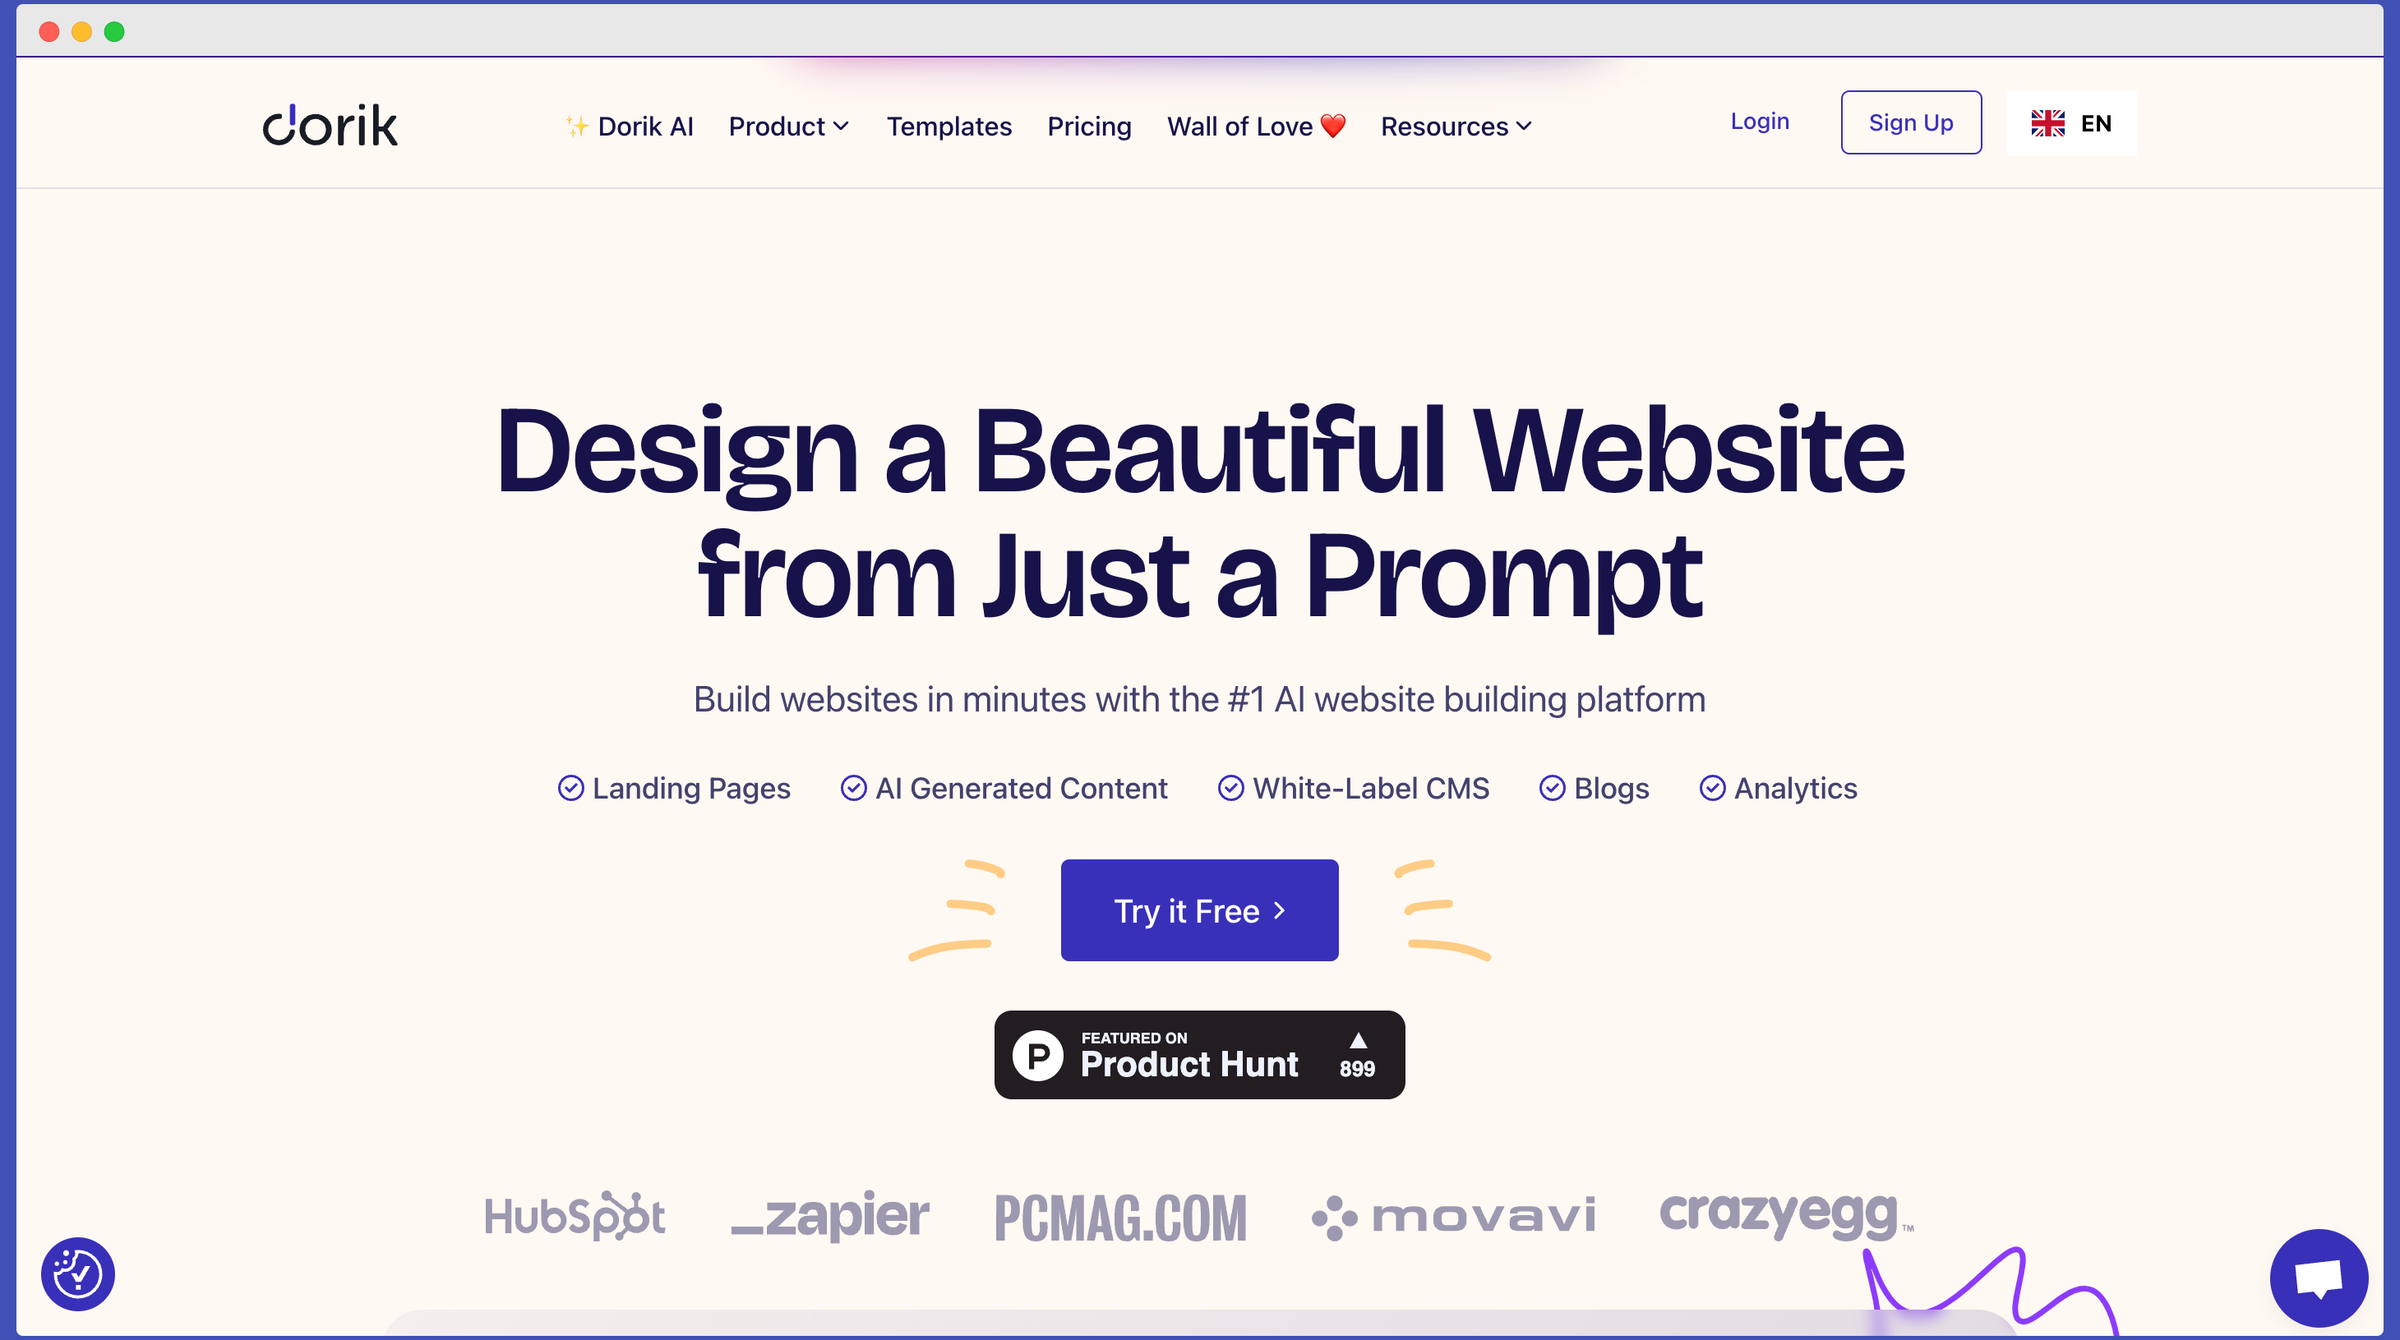
Suppose you want to customize the design later. In that case, you can again easily access your site at any time by simply typing app.dorik.com or (your website name).dcms.site/dashboard on your browser's address bar.
ii) Pick A Built-In Template or From Scratch
You will be redirected to the Dorik Dashboard after completing the sign-up process. You can manage all of your other website creation projects from this central hub and access the website settings.
Dorik offers two different website-building options: Dorik Classic and Dorik CMS. You can build static sites using Dorik Classic. On the other hand, Dorik CMS provides more flexibility for managing and updating content.
-
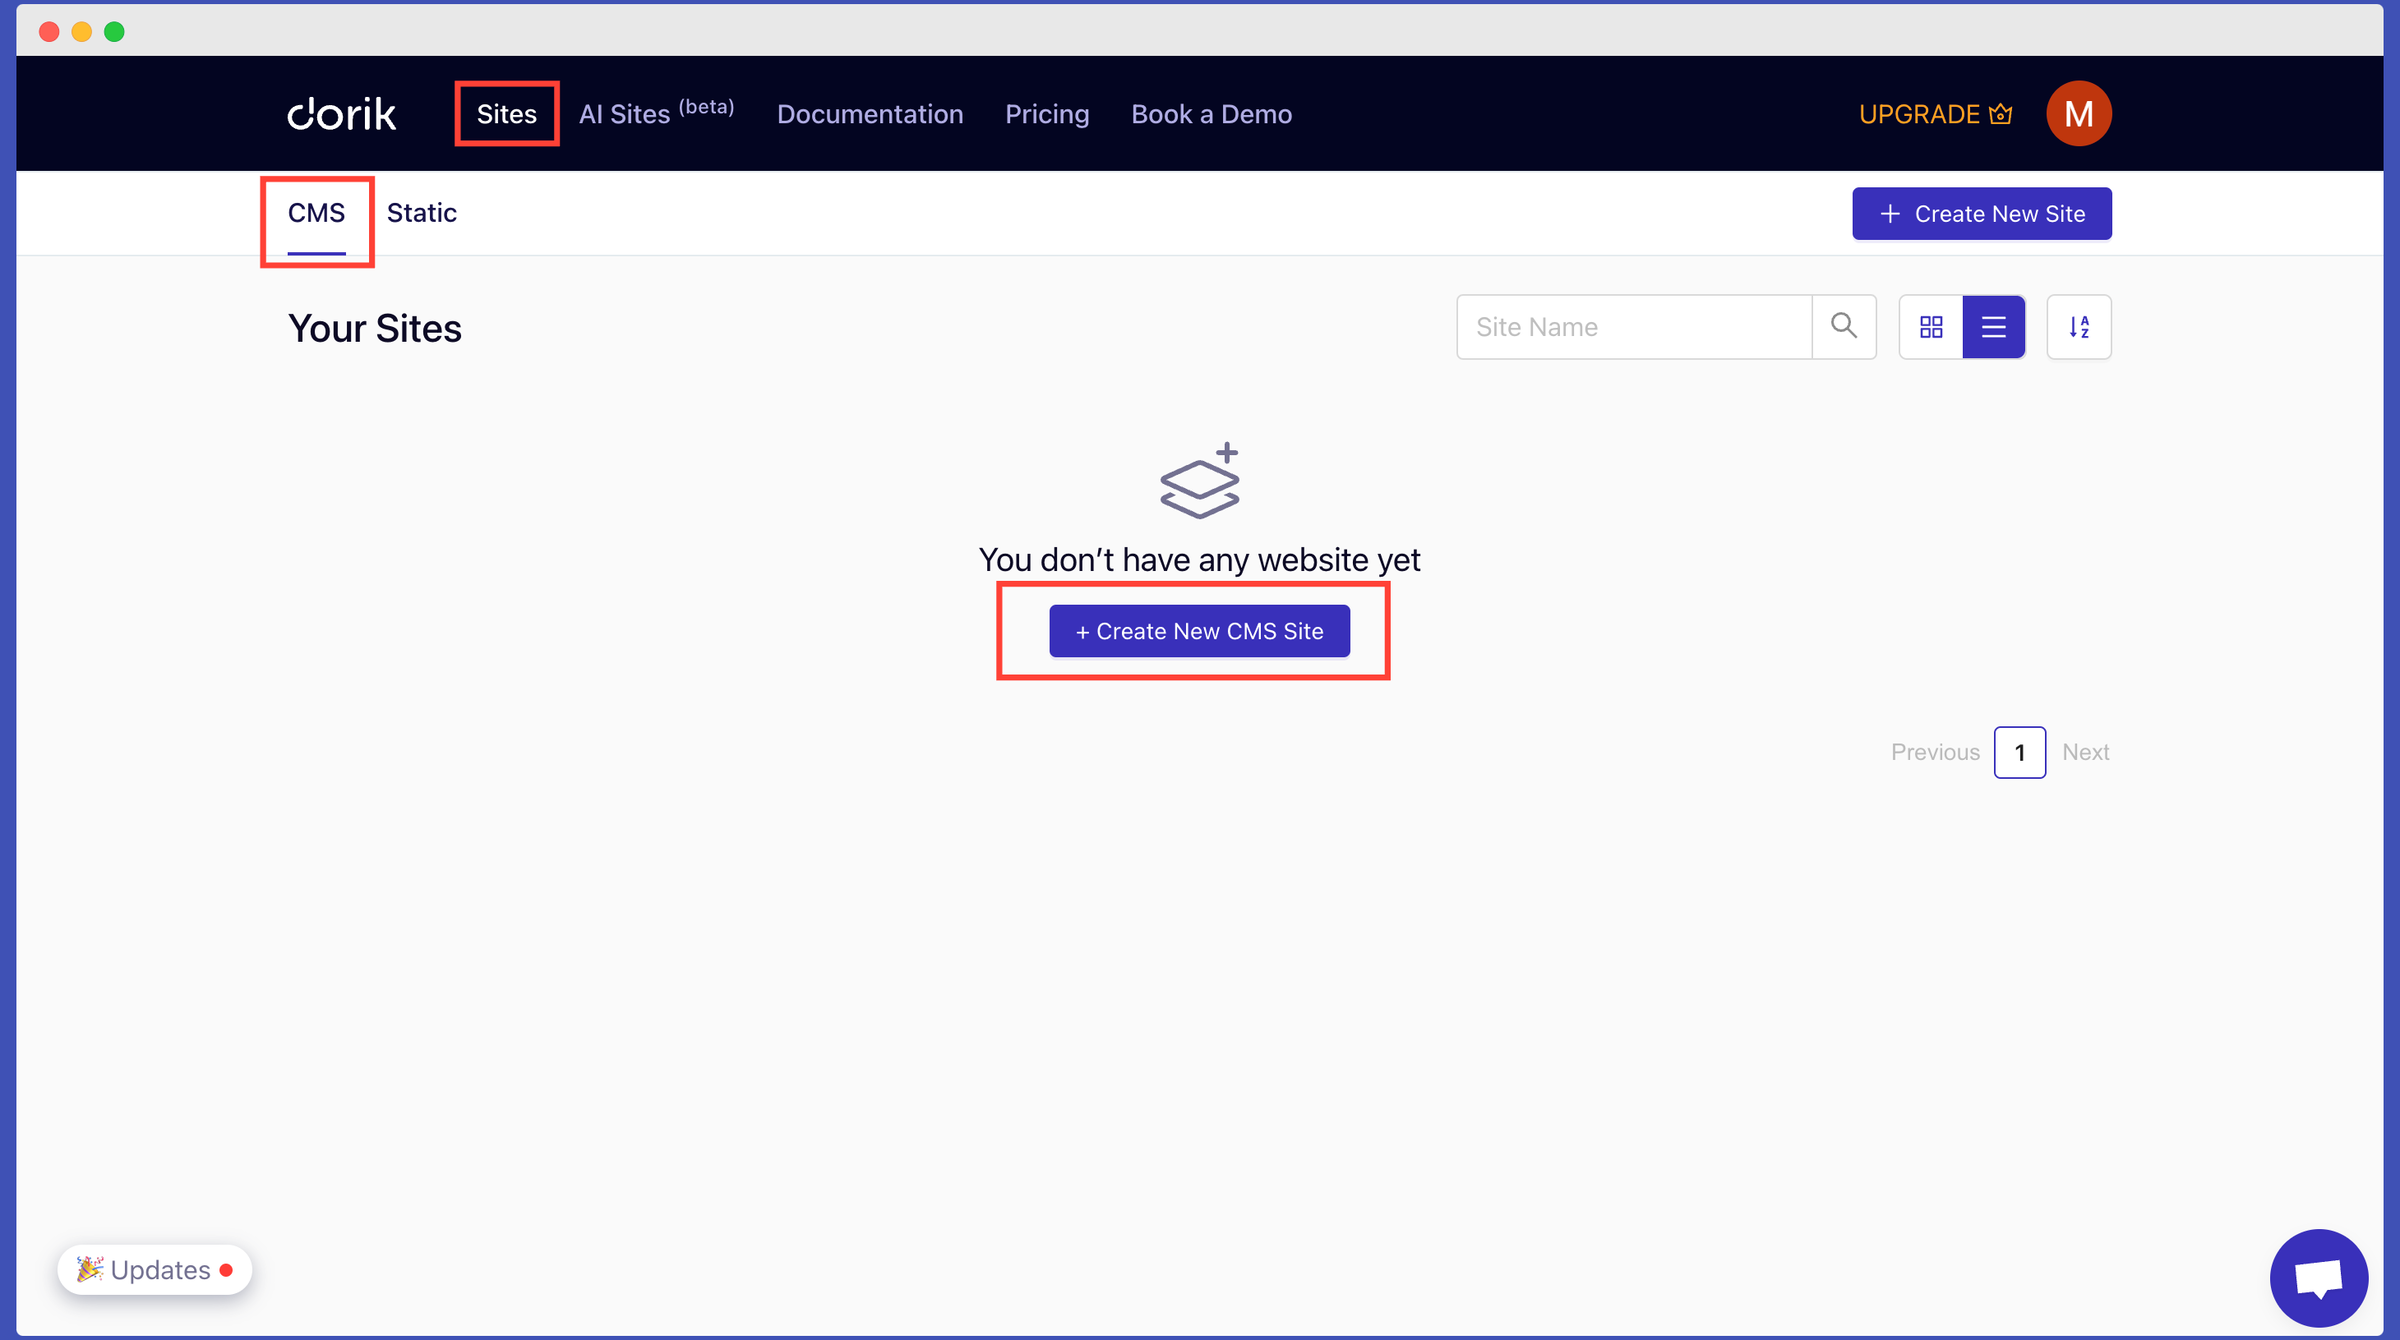
Navigate to the Dashboard and select the 'Sites' and then 'CMS' option to begin building your website using Dorik CMS.
-
Click the "Create a New CMS" button to access your starting point.
-
After accessing the website builder, you will be presented with a variety of professionally designed templates to choose from. Once you have identified a template that suits your needs, click the "Preview" button to explore it further.
-
If you are satisfied with your selection, click the "Select" button to proceed.
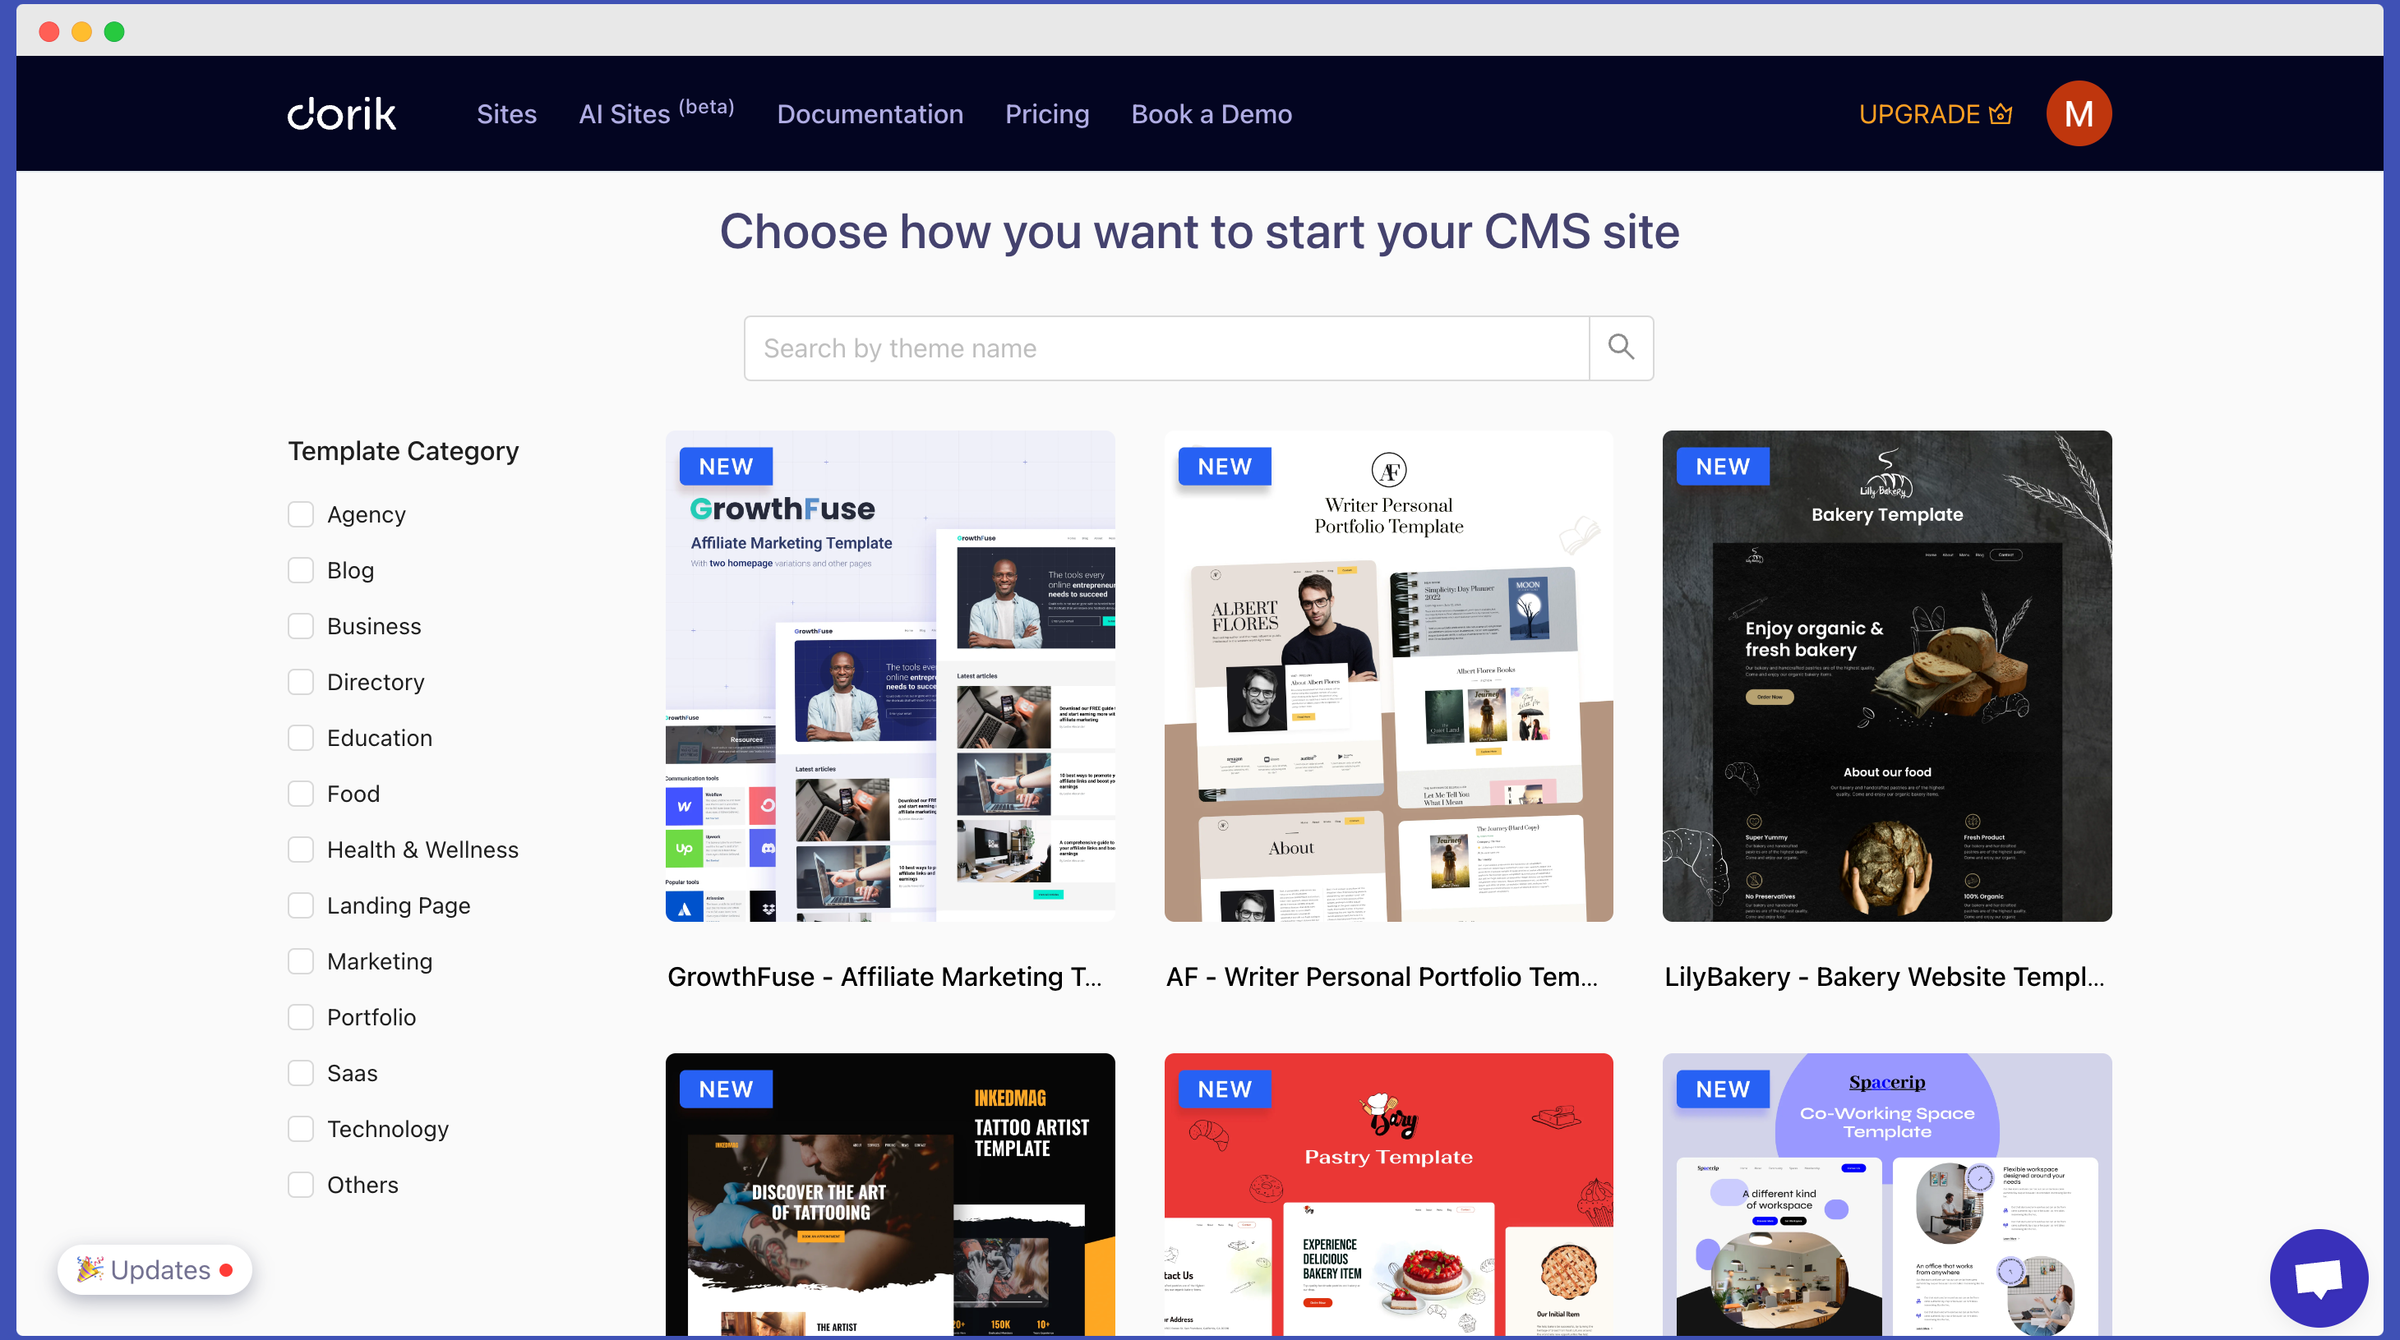
Related Read: Best Free Website Templates to Create Stunning Websites
In addition to selecting a pre-designed template, Dorik also allows you to import JSON files or start from scratch with a completely custom web design.
However, for this guide, we will not be exploring these options. Nevertheless, feel free to explore these possibilities at your leisure.
-
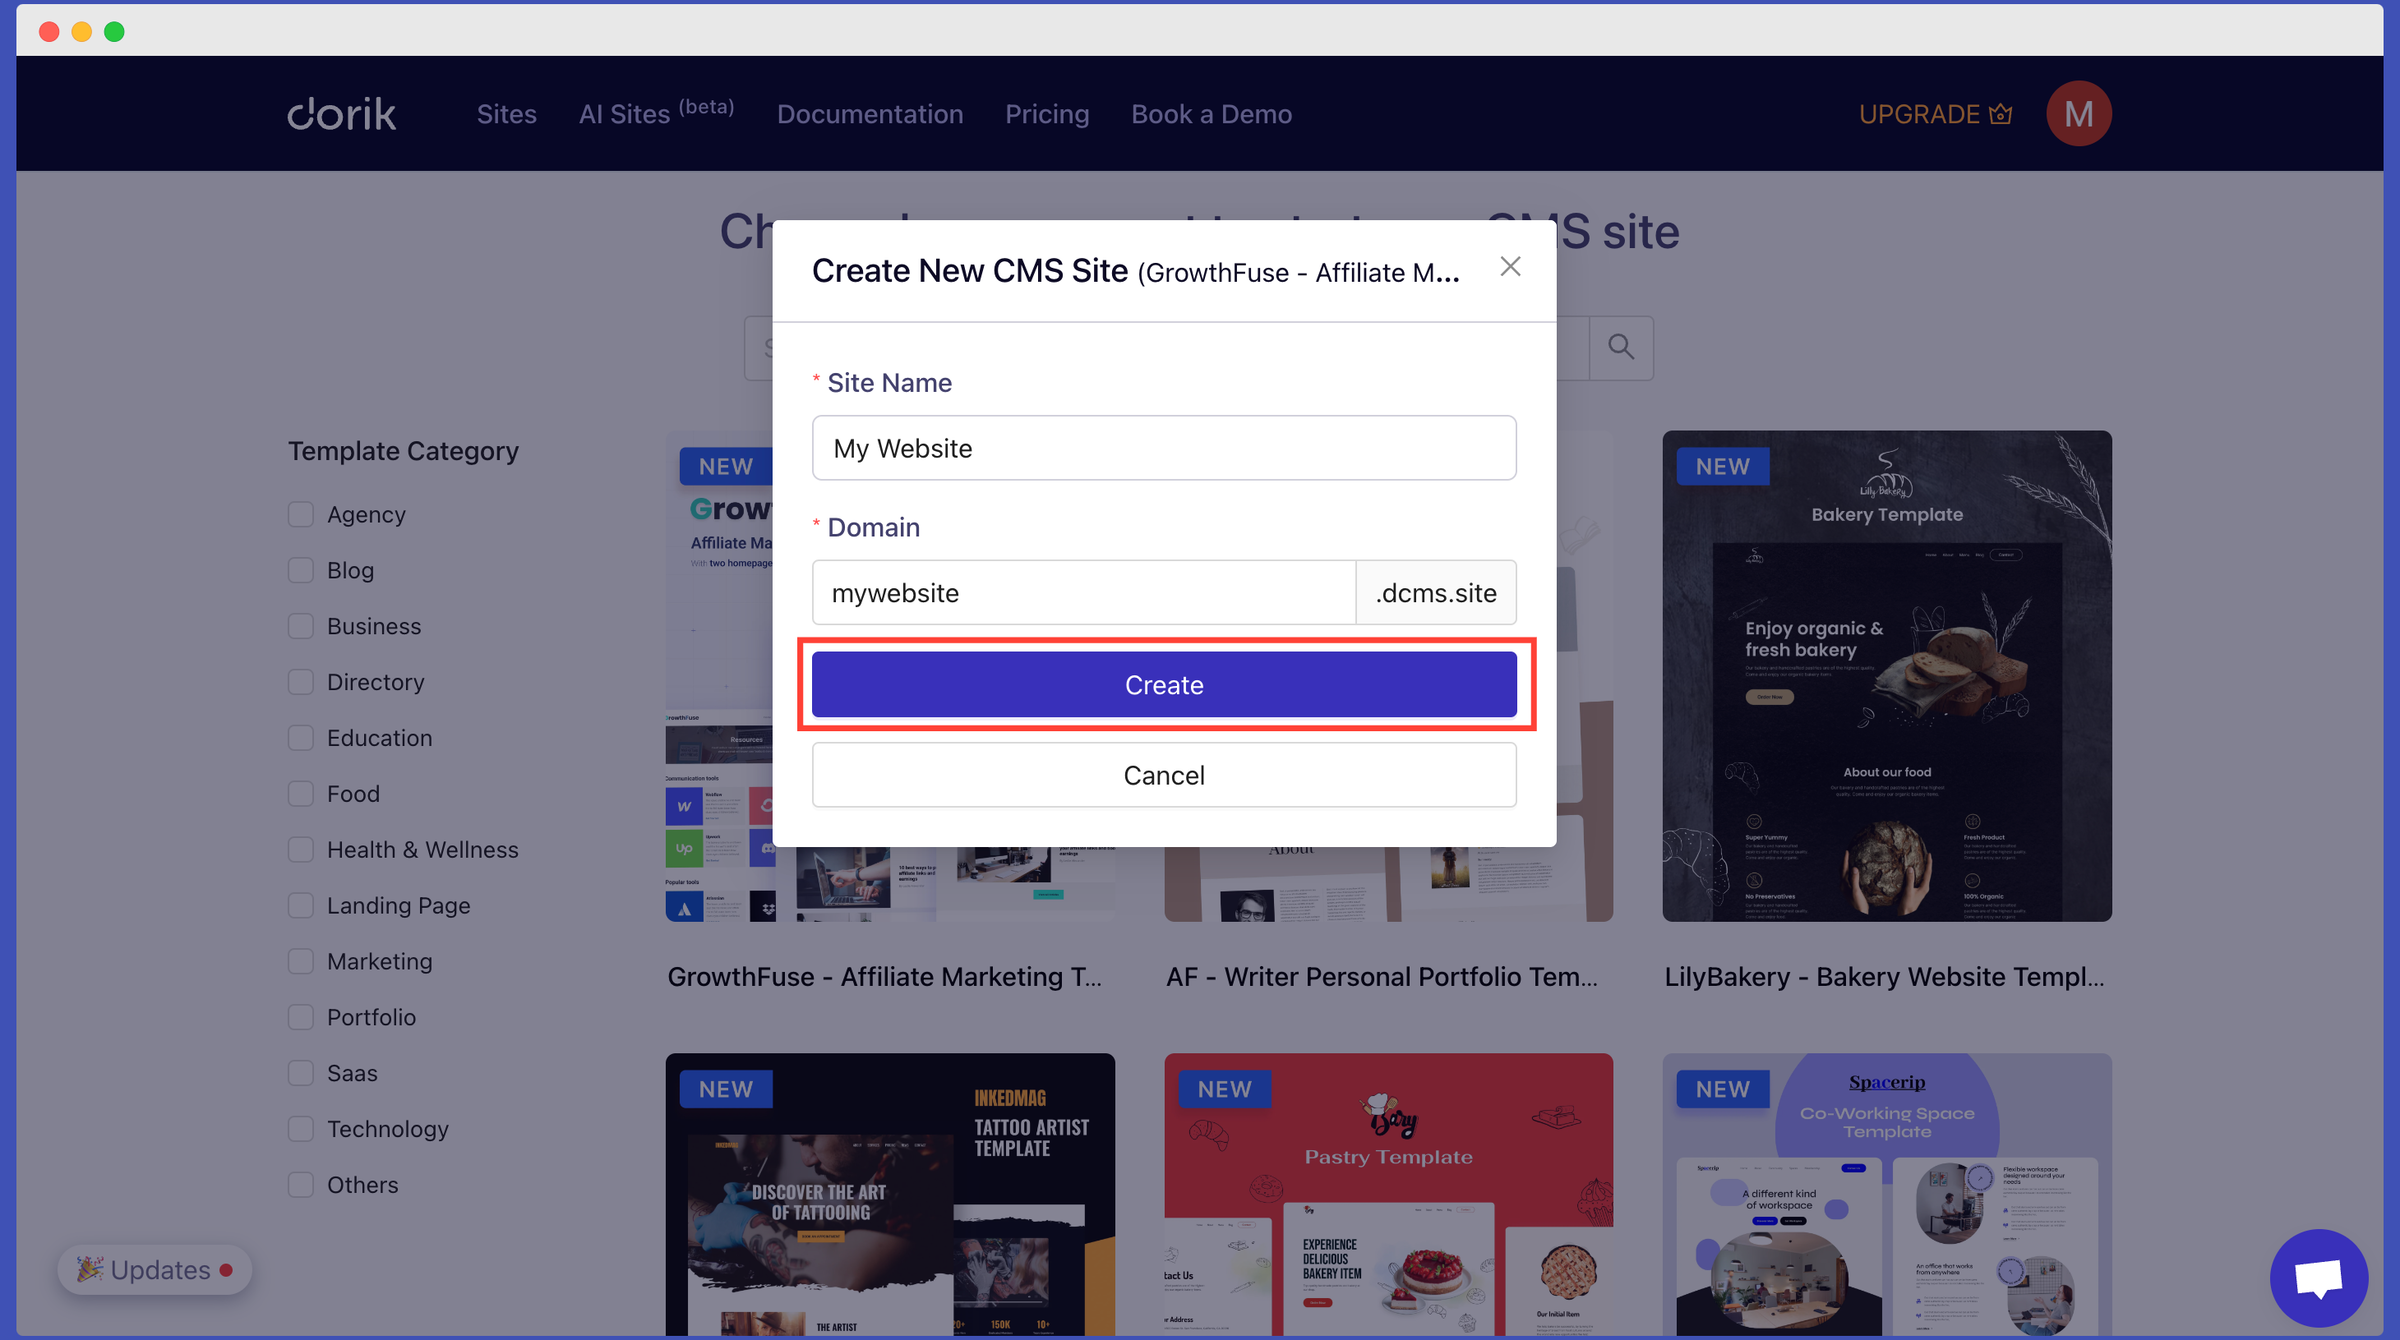
Once you have selected your desired template, a pop-up window will appear, prompting you to set a title for your project and a domain name for your website.
-
Please note that if you use the free version of Dorik, your site's URL will be ".dcms.site" by default. It is a free domain name provided by the builder at the time of site creation.
However, if you upgrade to a premium plan, you can add a custom domain through Dorik, the easiest website builder. After entering the necessary information, click on the "Create" button.
Congratulations! 🎉
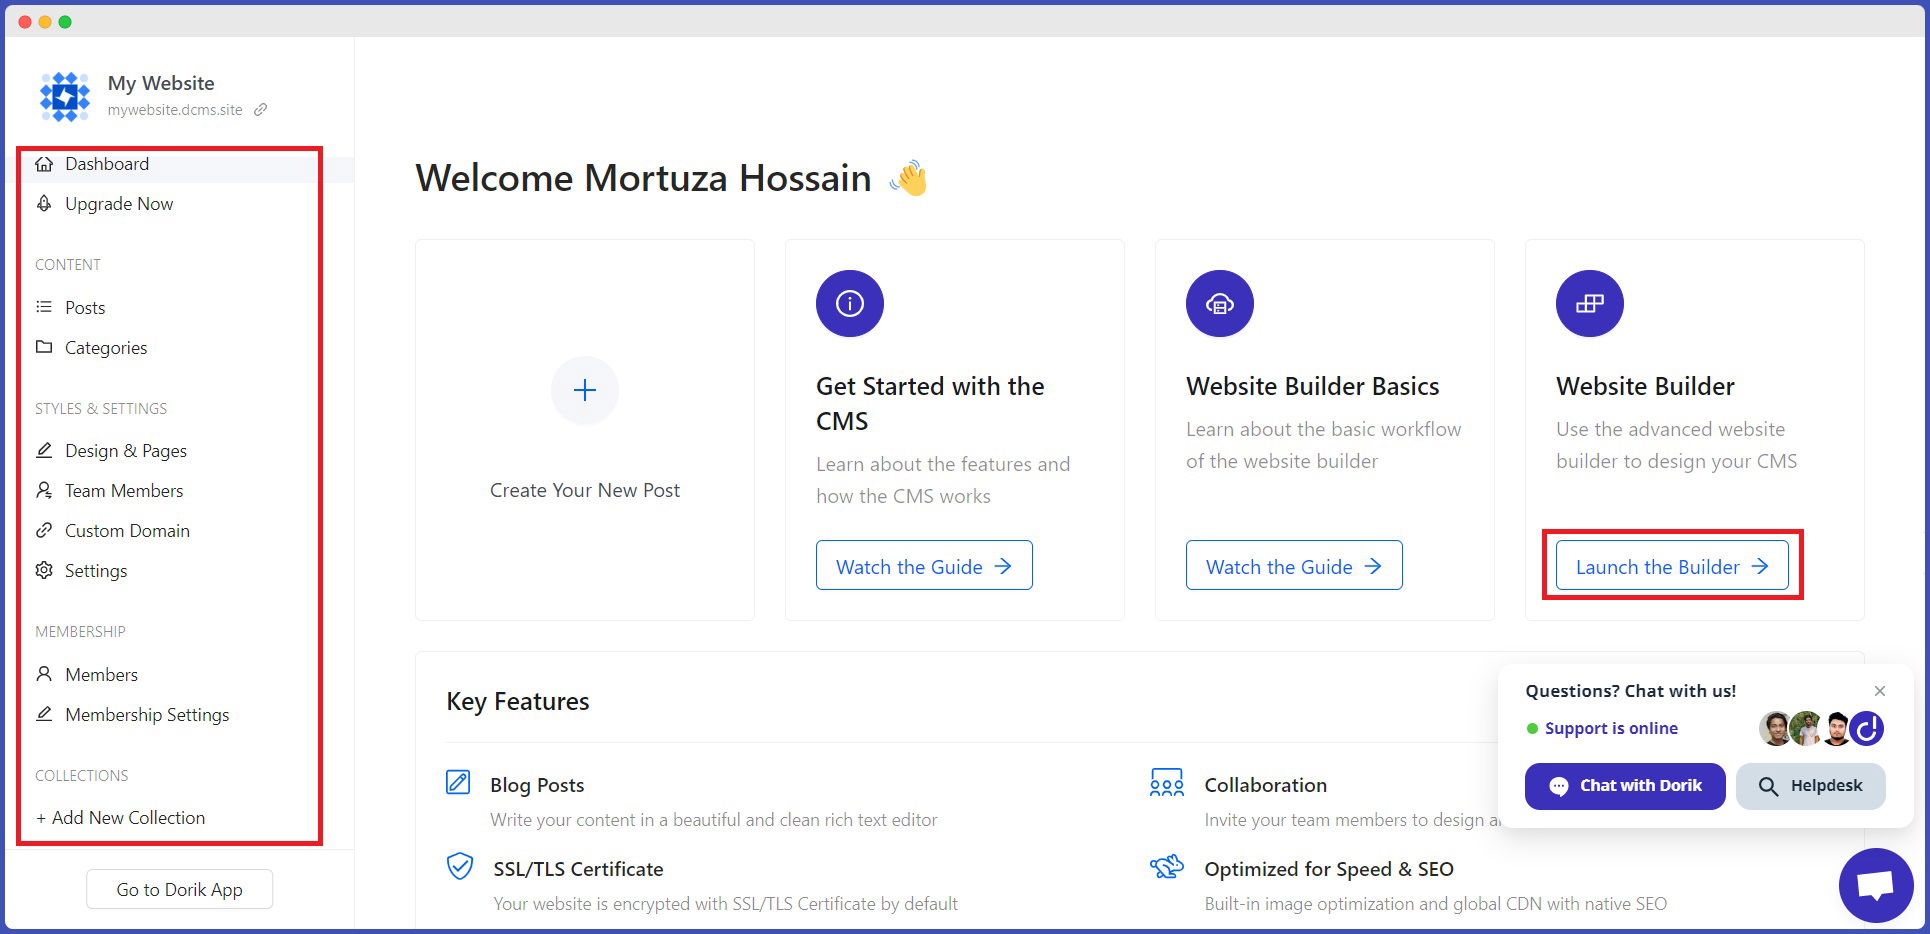
Your website has been successfully created (Not published), and you will now be directed to the Dorik CMS Site Dashboard. It's essential to take the time to examine each element and feature of the drag-and-drop interface to optimize your workflow. The left-sidebar editing panel is crucial since it contains all the options required to customize your site.
For instance, the Team Collaboration feature allows you to add multiple team members and collaborate with them on various tasks related to your small business website. Additionally, the Membership option enables you to offer exclusive features or services to your customers and even control access to your website content.
Another noteworthy feature is "COLLECTIONS." Depending on your needs, you can either use the default collections or create custom ones to save time and efficiently make any necessary changes.
Once you are OK with all the features and options, click the "Launch the Builder" button to start.
3) Start Editing Your Website: An Overview of Dorik Editing Panel
Once you've launched the builder, you can customize your website. Before making any changes, we recommend familiarizing yourself with the editor user interface.
You will find various options at the top of the editor, including Page Settings, Device Responsiveness Checker, Undo, Redo, Version History, Preview, Save, and Publish buttons.
The left-sidebar editing panel features Pages, Global Settings, Site Settings, and Navigation Tree. We encourage you to explore each option on your own to become comfortable with the available customization tools.
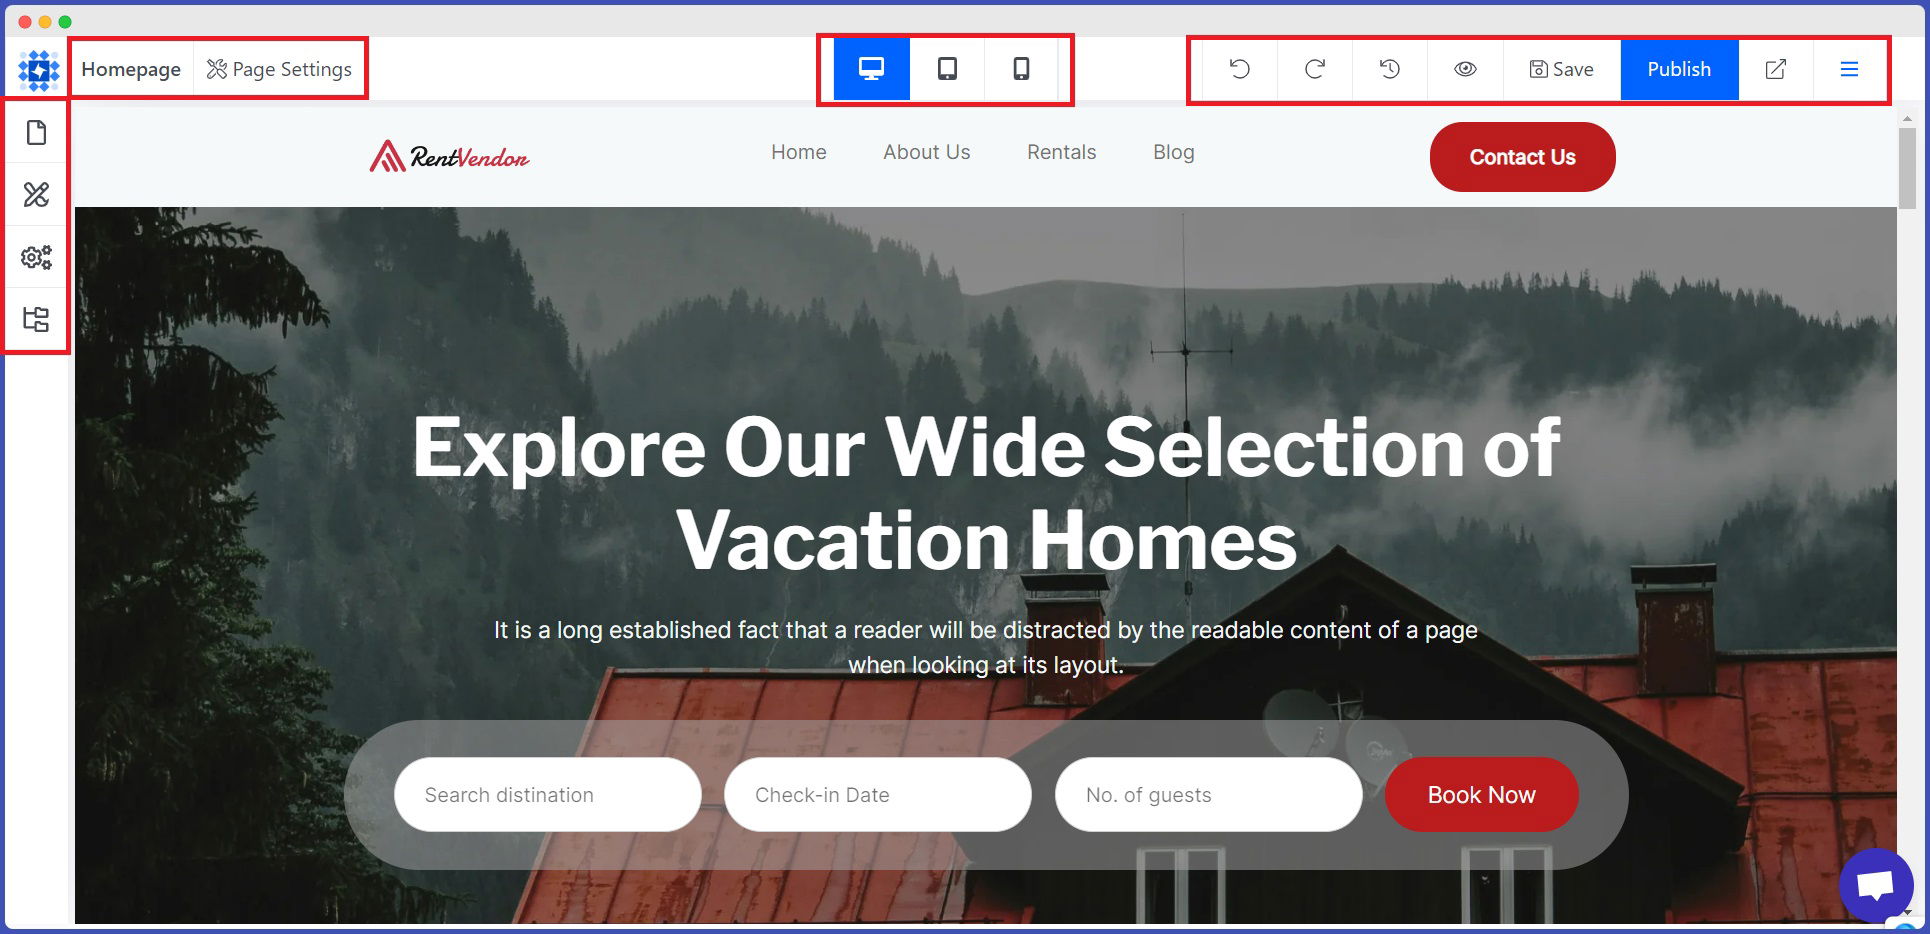
You can edit, add, drag and drop, and delete any element. You need to hover your cursor over any specific part, and the builder will provide you with all the options.
4) Enhance Your Website's Features & Functionality by Adding Dorik Custom Collections
Custom Collections is a database that stores information about various topics, categories, and listings. This information can be displayed wherever you want it to appear on your webpage. With Collections, you have the flexibility to create custom fields that define the structure of your content. These fields accommodate various data types, including text, images, links, and numbers.
By using Collections, you can create individual entries or pieces of content called items. Each item comprises the fields you defined and can be tailored to your specific needs. For example, if you have a custom collection item named 'Articles,' you should consider adding fields like Author's name,' 'Article Summary, "Thumbnail,' etc.
This feature gives you greater control over how your content is displayed on your website. Overall, Custom Collections offer a powerful tool for organizing and presenting your data in a structured and user-friendly way.
To create a Custom Collection, follow the below steps.
-
Go to your Dorik Dashboard.
-
Navigate to "COLLECTIONS" on the left-hand panel.
-
From there, click on the "Add New Collection" button. It will show you a pop-up modal with information like Collection Type, Plural Name, Singular Name, Slug, and the Editing Layout.
-
Click on the drop-down arrow of Collection Type to expand all the default custom collection templates.
-
Select one depending on your requirement. For example, Article. All the other fields will be populated automatically.
-
Then, press the "Add Collection" button.
To utilize the magic of Custom Collections, read the following blog.
Related Read: How to Use Dorik Collections: The Ultimate Guide
5) Test Your Website Before Going Live
Before launching your website, it must be tested to ensure everything is working correctly.
Here are some steps to test your website before going live:
Proofread: Go through all the content on your website and check for typos, grammar errors, and spelling mistakes.
Functionality: Check all links, buttons, forms, and interactive elements to ensure they function correctly.
Responsiveness: Test your website on different devices, including desktop, tablet, and mobile, to ensure it is responsive and displays correctly on all devices.
Speed: Test your website's loading speed using online tools like Google PageSpeed Insights to optimize your website's performance.
Security: Assure your website hosting service is secure and protected against malware and viruses.
Compatibility: Check your website's compatibility with different browsers like Chrome, Firefox, Safari, and Internet Explorer.
Thus, you can ensure that your website, whether a portfolio, personal blog, business, ecommerce website, or online store, is ready to launch and will provide a positive experience for your visitors.
6) Publish Your Website
Once you have checked everything, you can go live by clicking the "Publish" button. You can then view the live version of your website by clicking on the upward-facing arrow icon next to the "Publish" button.
Take some time to go through your website and ensure everything is functioning correctly. With a live website, you can share it with the world and start growing your business online.
Related Read: Ultimate Website Launch Checklist: 10 Steps to Success!
FAQs on How to Create a Website, Answered
How Do I Build a Website for Free?
There are a few options for creating a website for free. Most website builders, such as Wix, Weebly, and Squarespace, allow you to build a website at no cost. These platforms offer free plans with basic features. However, you must upgrade to a paid plan for more advanced features and a custom domain name.
Another option is to use WordPress to create a WordPress website for free. You must purchase a domain name and web host plan, but the WordPress software is free.
Related Read: Best Wix Alternatives
How Much Does It Cost to Create a Website?
The cost of creating a website varies depending on your needs and preferences. If you hire a professional web designer or developer, the cost can range from a few hundred to thousands of dollars. However, the price can be significantly lower if you use a website builder. Most website builders offer different pricing plans based on your needs and budget.
How long does it take to build a website?
Building a website can take anywhere from 30 minutes to several months, depending on its complexity. You have two options: do it yourself or hire professionals. Using a no-code website builder is the easiest and most effective way if you choose to create it on your own.
With a website builder, you simply pick a template and customize it to your liking. This process can be completed in as little as 30 minutes. If you're an expert, it'll take even less time. Additionally, there are impressive website builders with AI functionality that can create a website in just a couple of minutes.
👉 Check details on how long does it take to build a website.
What are the fundamentals for making a website?
The fundamentals of making a website comprise:
-
Choosing the right website builder or platform.
-
Selecting a domain name.
-
Designing the website layout and structure.
-
Creating content.
-
Optimizing the website for search engines.
-
It's also essential to consider factors like process web hosting, security, and website maintenance.
What are the benefits of having a website?
You will enjoy the following advantages after having a website.
-
Increased online visibility and accessibility for your business or brand.
-
Ability to reach a wider audience, including potential customers and clients outside your local area.
-
Opportunity to showcase your products, services, and expertise through multimedia content.
-
Enhanced customer engagement and interaction through features such as contact forms, chatbots, and social media integration.
-
Ability to gather and analyze data on website traffic and user behavior for informed business decisions.
-
Improved customer service and support through online resources and FAQ sections.
-
Cost-effective marketing and advertising through search engine optimization (SEO), email marketing, and social media promotion.
Related Read: Core Benefits of Having a Website
Concluding Words
With the right website builder and proper strategy, anyone can make a website in minutes.
Following the steps mentioned in this blog and staying up-to-date with the latest web development trends and technologies, you can create a website that stands out and achieves your desired goals.
Try Dorik today to make a professional-looking website!
Related Reads
How to Build a Personal Website
How to Build a Professional Restaurant Website
How To Create a Photography Website
How to Create a Small Business Website
How to Create an Affiliate Marketing Website
How to Create a Beautiful Wedding Website
How to Build an Artist Website


