

Today, we will discuss "COLLECTIONS," a unique feature of Dorik. Dorik's Collection is a game-changer in the world of website builders. It offers unparalleled customization options and allows you to easily manage and organize your website data.
So, today, we'll explain how to use Dorik Collections.
To make the process easier, we have segmented the blog into two different parts:
-
Part 1: Creating & Optimizing Dorik Collection
-
Part 2: Presenting Data From Collections into Your Webpage
Let's explore them and take your website to the next level!
What Do We Mean by Dorik Collections?
Collections in Dorik refer to a feature that allows you to organize and manage your website data. You can store and manage various types of data, create custom fields, design layouts, and add filter functionality to your website. Adding custom collections and fields can help you extend and build any CMS.
Each Collection contains a set of fields that define the structure of the content it stores. For example, a blog post collection might contain fields for the post title, author name, published date, and body content.
Collections provide a user-friendly way to manage and maintain dynamic websites without coding experience.
How Do Dorik Collections Work?
Collections work like a database. In the Custom Collection database, you can store information about any topic, category, listing, etc. Then you can present data from the Collection on your webpage wherever you want it to appear.
Collections allow you to create custom fields to define the structure of your content. These fields can be used to store different data types, such as text, images, links, numbers, and many more.
You can then create items within the Collection, which are like individual entries or pieces of content. Each item comprises the fields you defined and can be customized as needed.
How to Use Dorik Collections
Using Dorik Collections is easy and simple. First, create a collection with your preferred items and fields. Secondly, you need to fetch data from the Collection on your website.
The good news is that the process requires no coding expertise. All you need is to follow the below part-by-part instructions.
Part 1: Creating & Optimizing Dorik Collection
In this part, we will show you how to create and optimize collections. So, let's get started.
How to Create a New Custom Collection
To create a Custom Collection, follow the below steps.
-
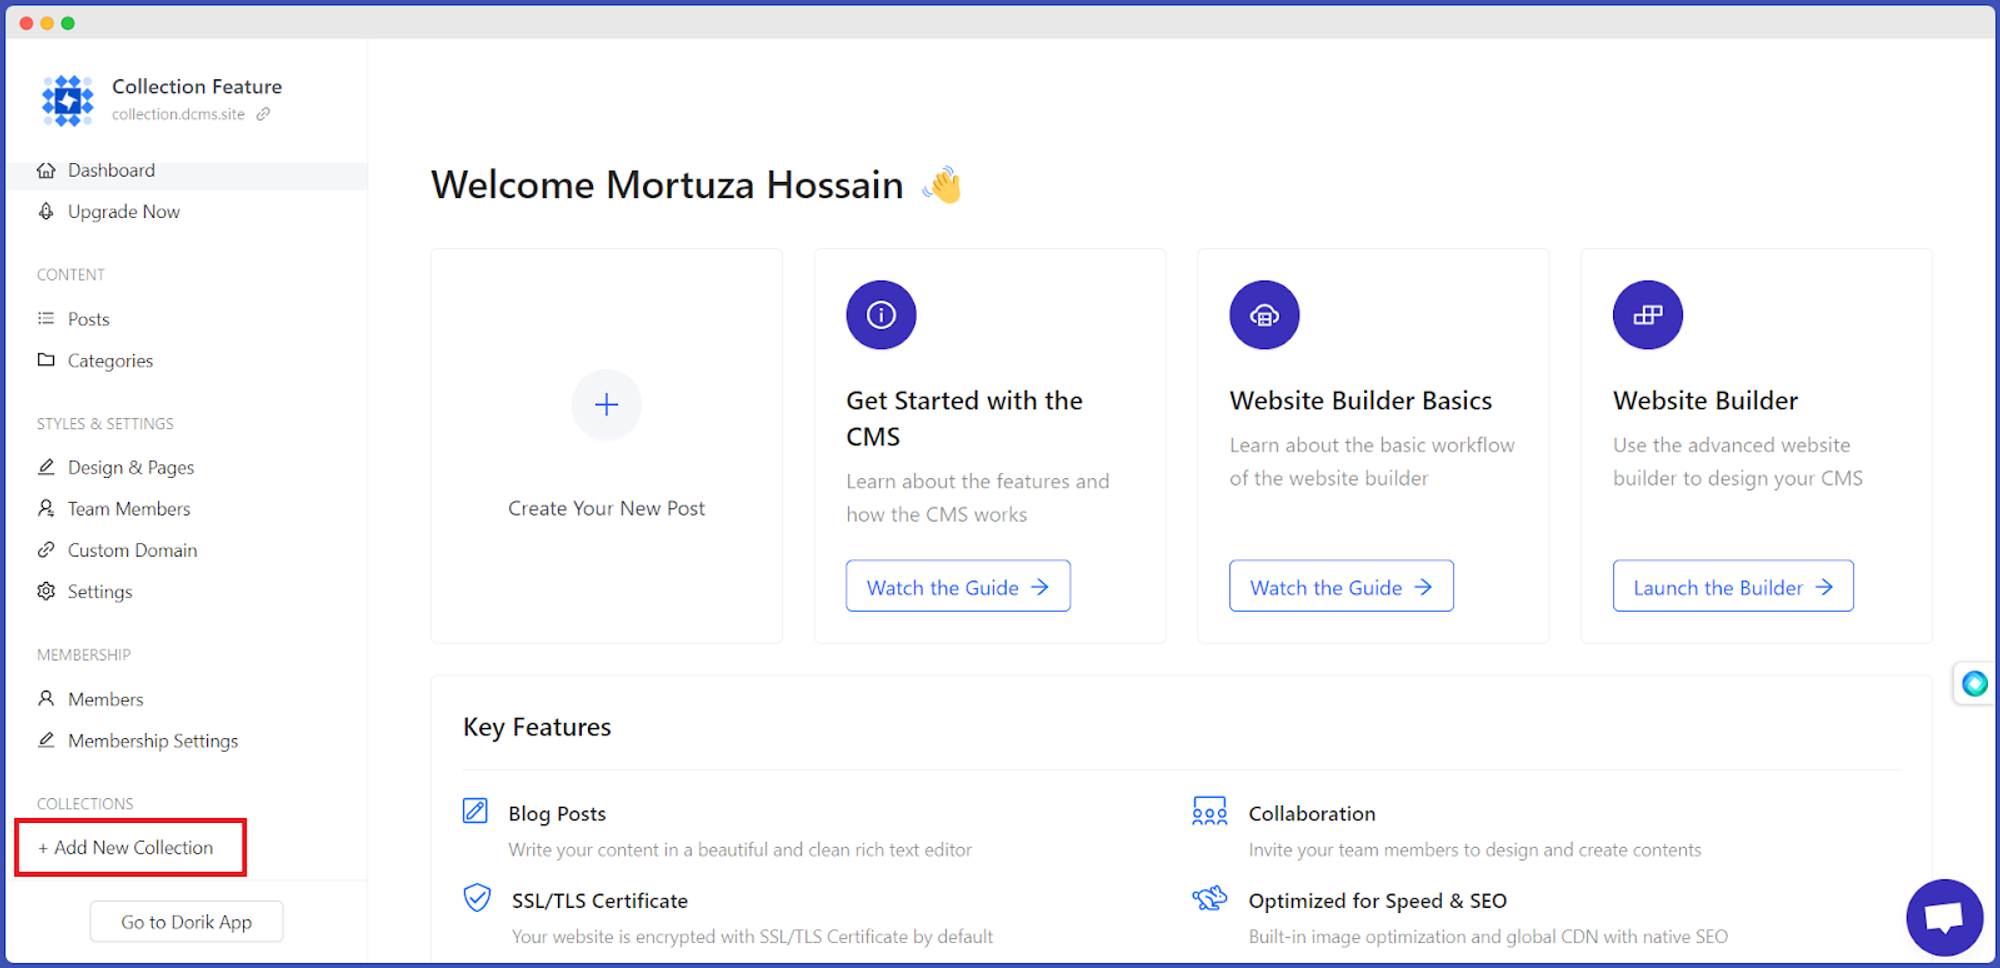
Log in to your Dorik Dashboard.
-
Navigate to "COLLECTIONS" on the left-hand panel.
-
From there, click on the "Add New Collection" button. It will show you a pop-up modal with information like Collection Type, Plural Name, Singular Name, Slug, and the Editing Layout.
-
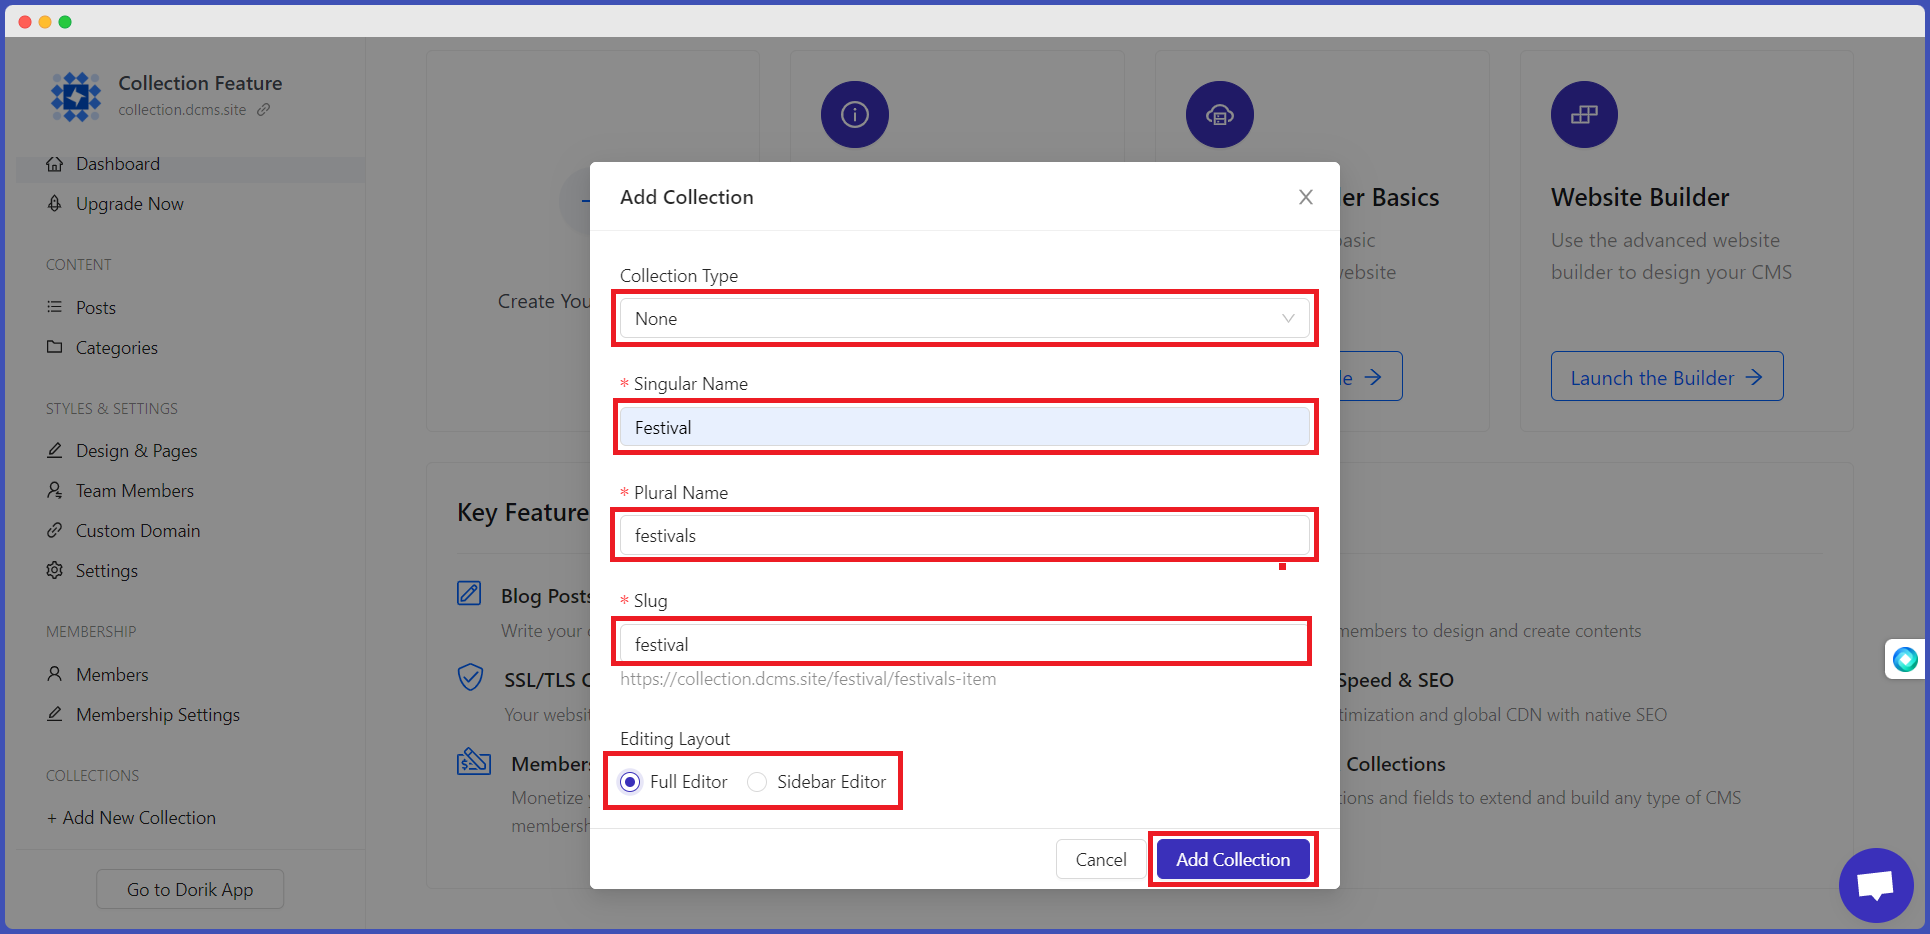
Select None from the Collection Type to make a Custom Collection from scratch.
-
Provide a Singular name for the Collection (Example: Festival), and the other fields like Plural Name and Slug will be populated automatically. However, you can also customize them depending on your needs.
You may ask why it requires a plural name. We need a plural name as you will store data for different items under this Collection. It would be assigned to each item of the Collection.
-
Then, select your Editing Layout. You can choose the Full Editor or the Sidebar Editor based on your preferences.
-
Finally, hit the "Add Collection" button.
Congratulations! You have created your first Custom Collection from scratch.
However, there is also a quick and easy way to create a Custom Collection. Follow the below instructions to save a lot of time.
-
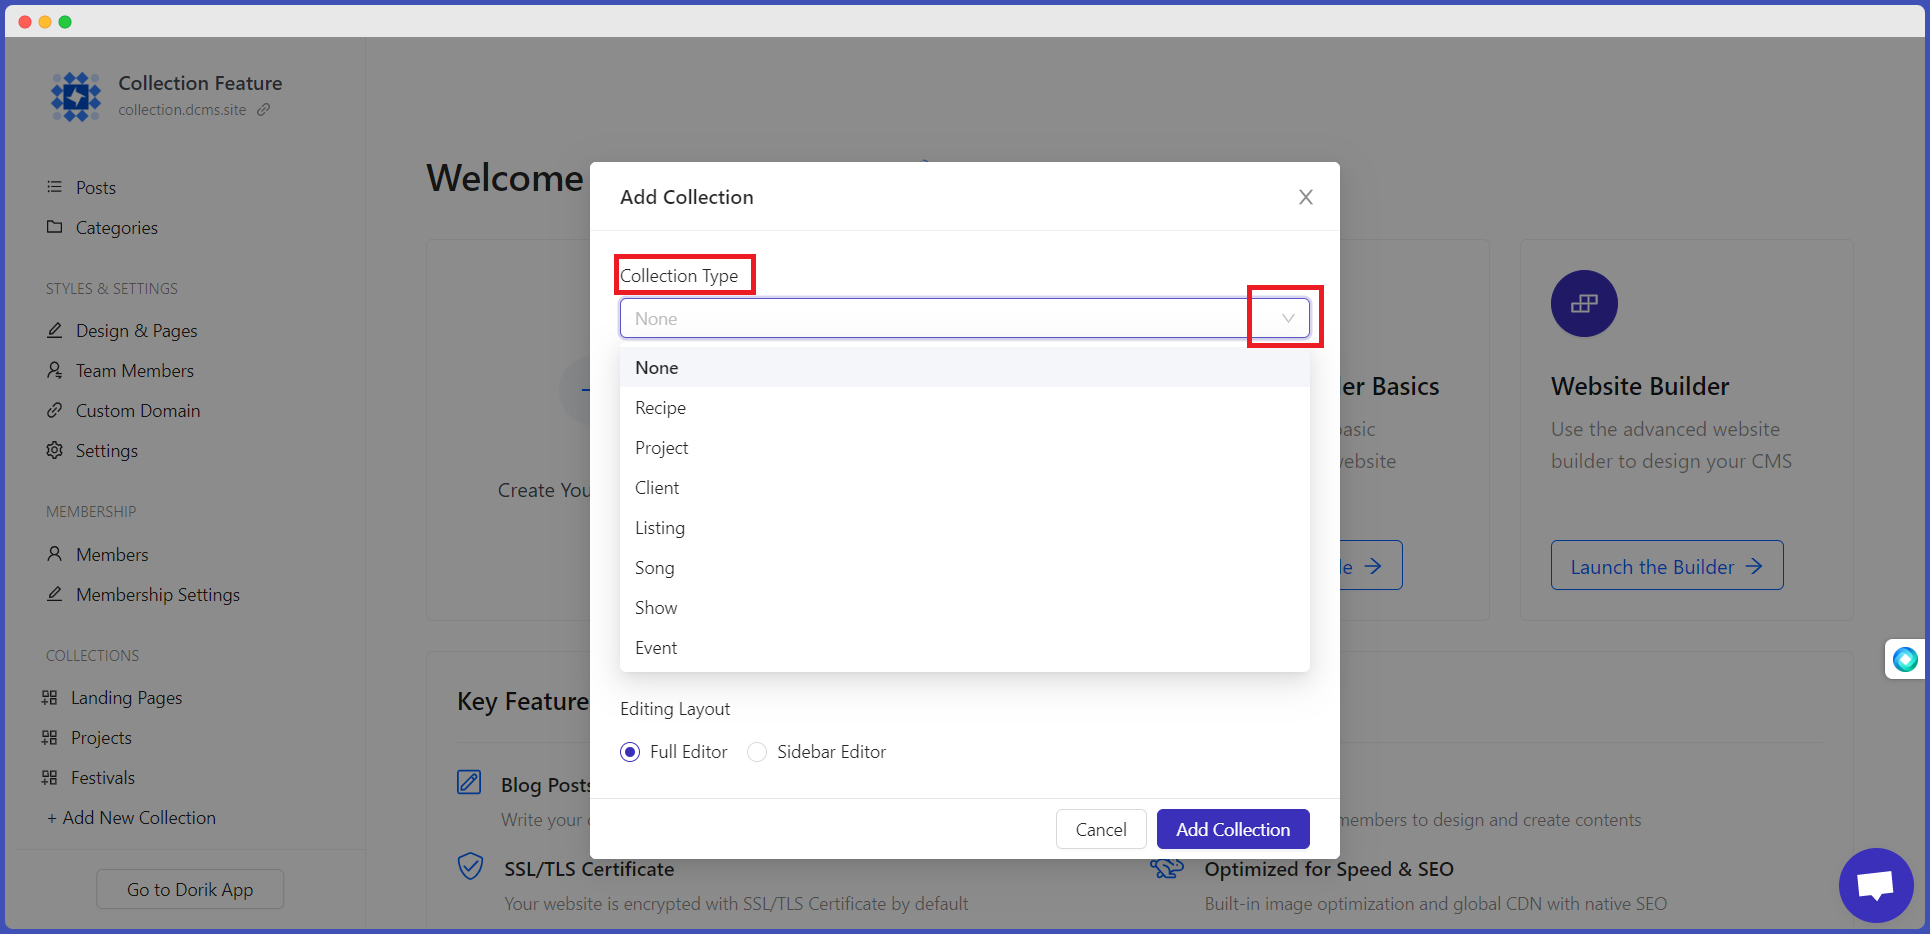
After hitting the "Add New Collection" button, click on the drop-down arrow of Collection Type. It will show you the default custom collection template.
-
Choose a default template from the available options that meet your demand.
-
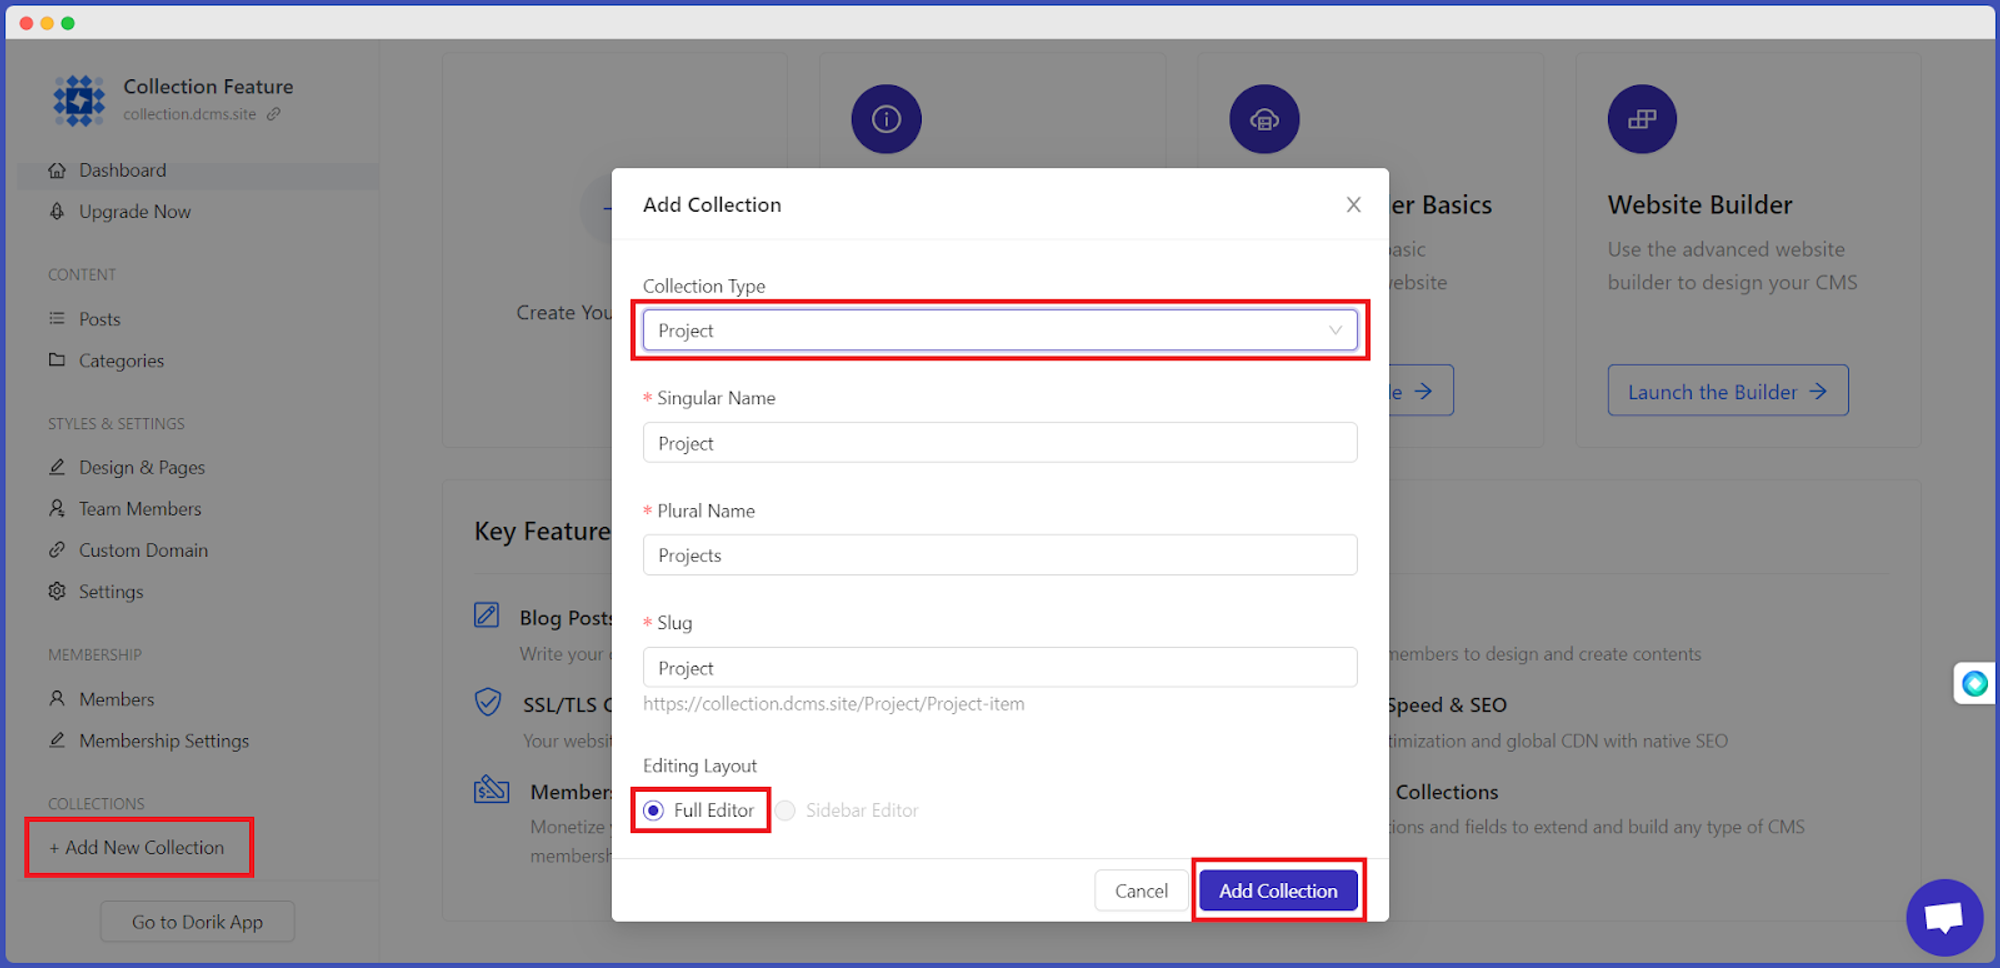
Here, we are selecting Project, for example. All the other fields will be populated automatically.
One thing to mention, the Sidebar Editor won't be available if you pick a built-in template.
-
Then, press the "Add Collection" button.
That's it! A new collection will be added to your list. In this way, you can create collections from the built-in template.
We have discussed in detail about all the pre-built custom collection templates in the Dorik Collection Use Cases section of this blog. So, keep reading to learn more!
How to Add New Items to a Custom Collection
After creating a collection, you can add new items under it.
In Dorik, "Items" stand for specific content under each Collection. For example, if you have a collection named Course, there might be items like Basic English Course for Beginners, Complete Digital Marketing Course, Best SEO Guide, etc.
You can easily add as many items as you want to your Collection. Label them depending on your needs.
So, let's learn the process of adding a new item to a custom collection. A new item can be added and customized using a sidebar or full editor.
To add a new item inside a custom collection, follow the steps given below:
-
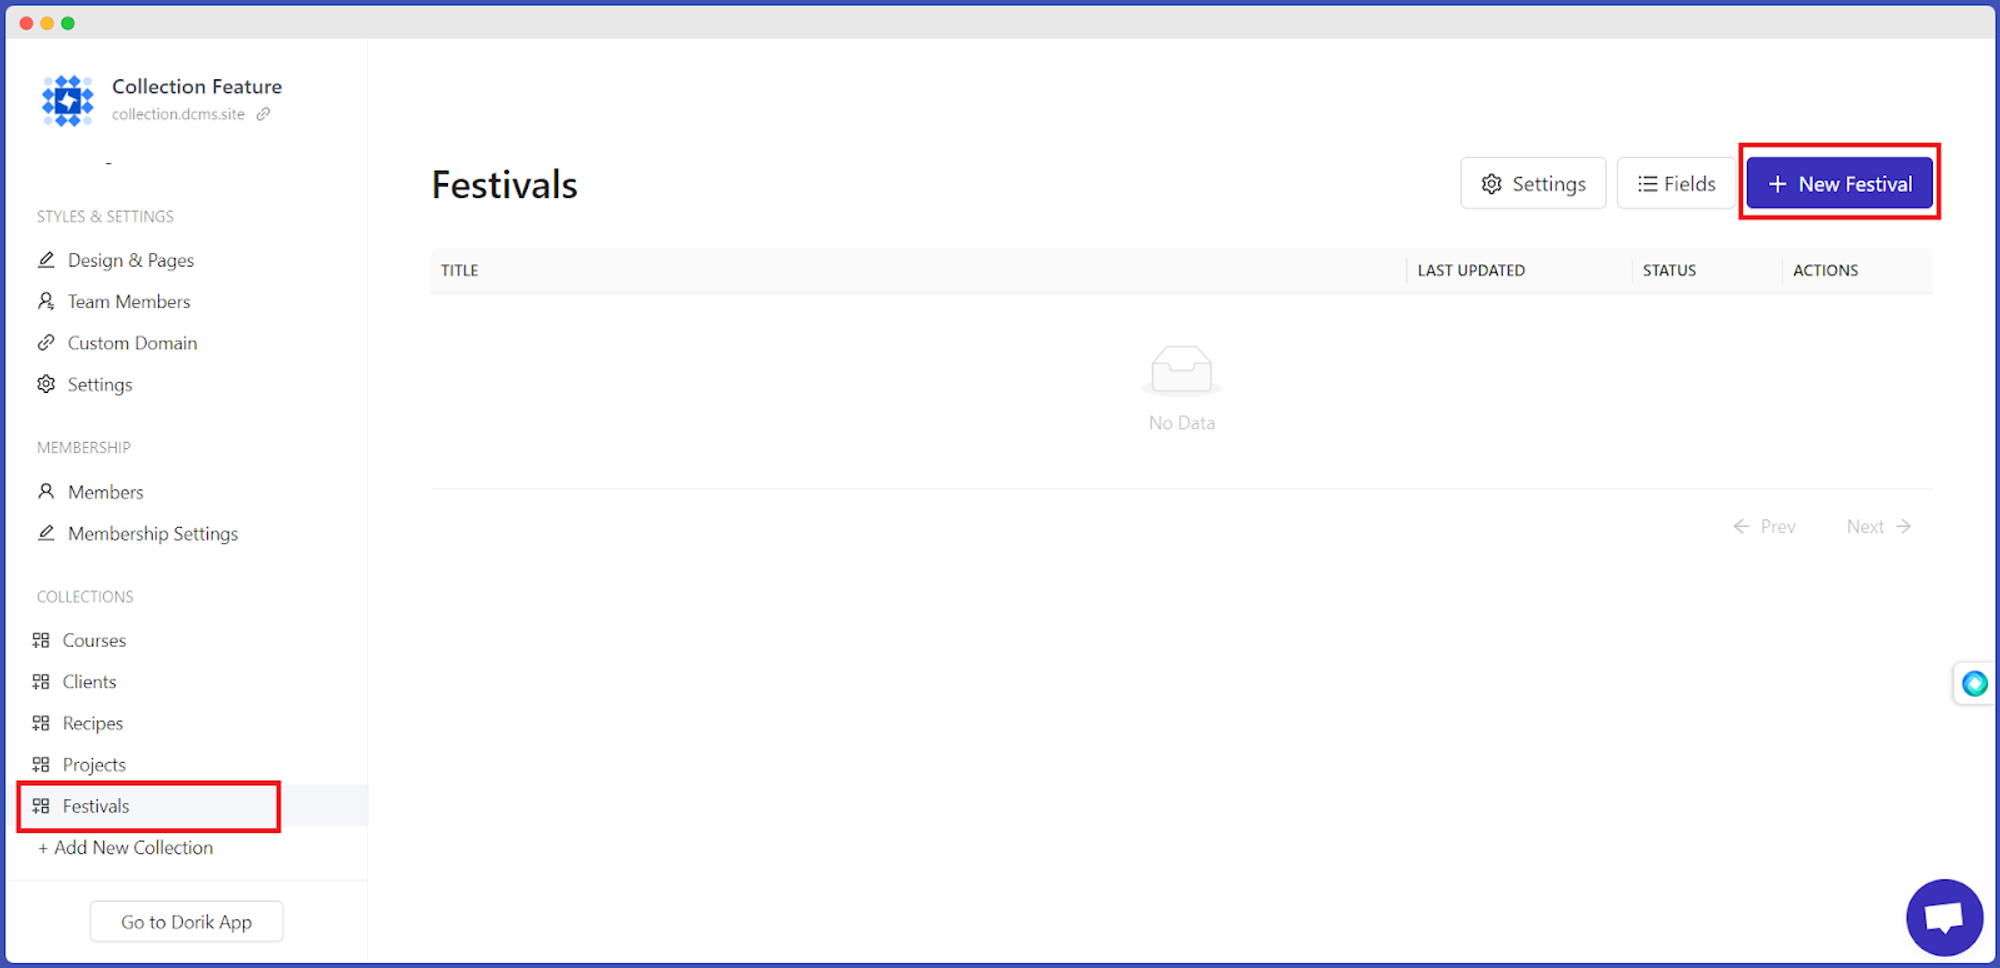
Go to a custom collection list. For example, "Festivals."
-
Click on the "+New Festival" button.
-
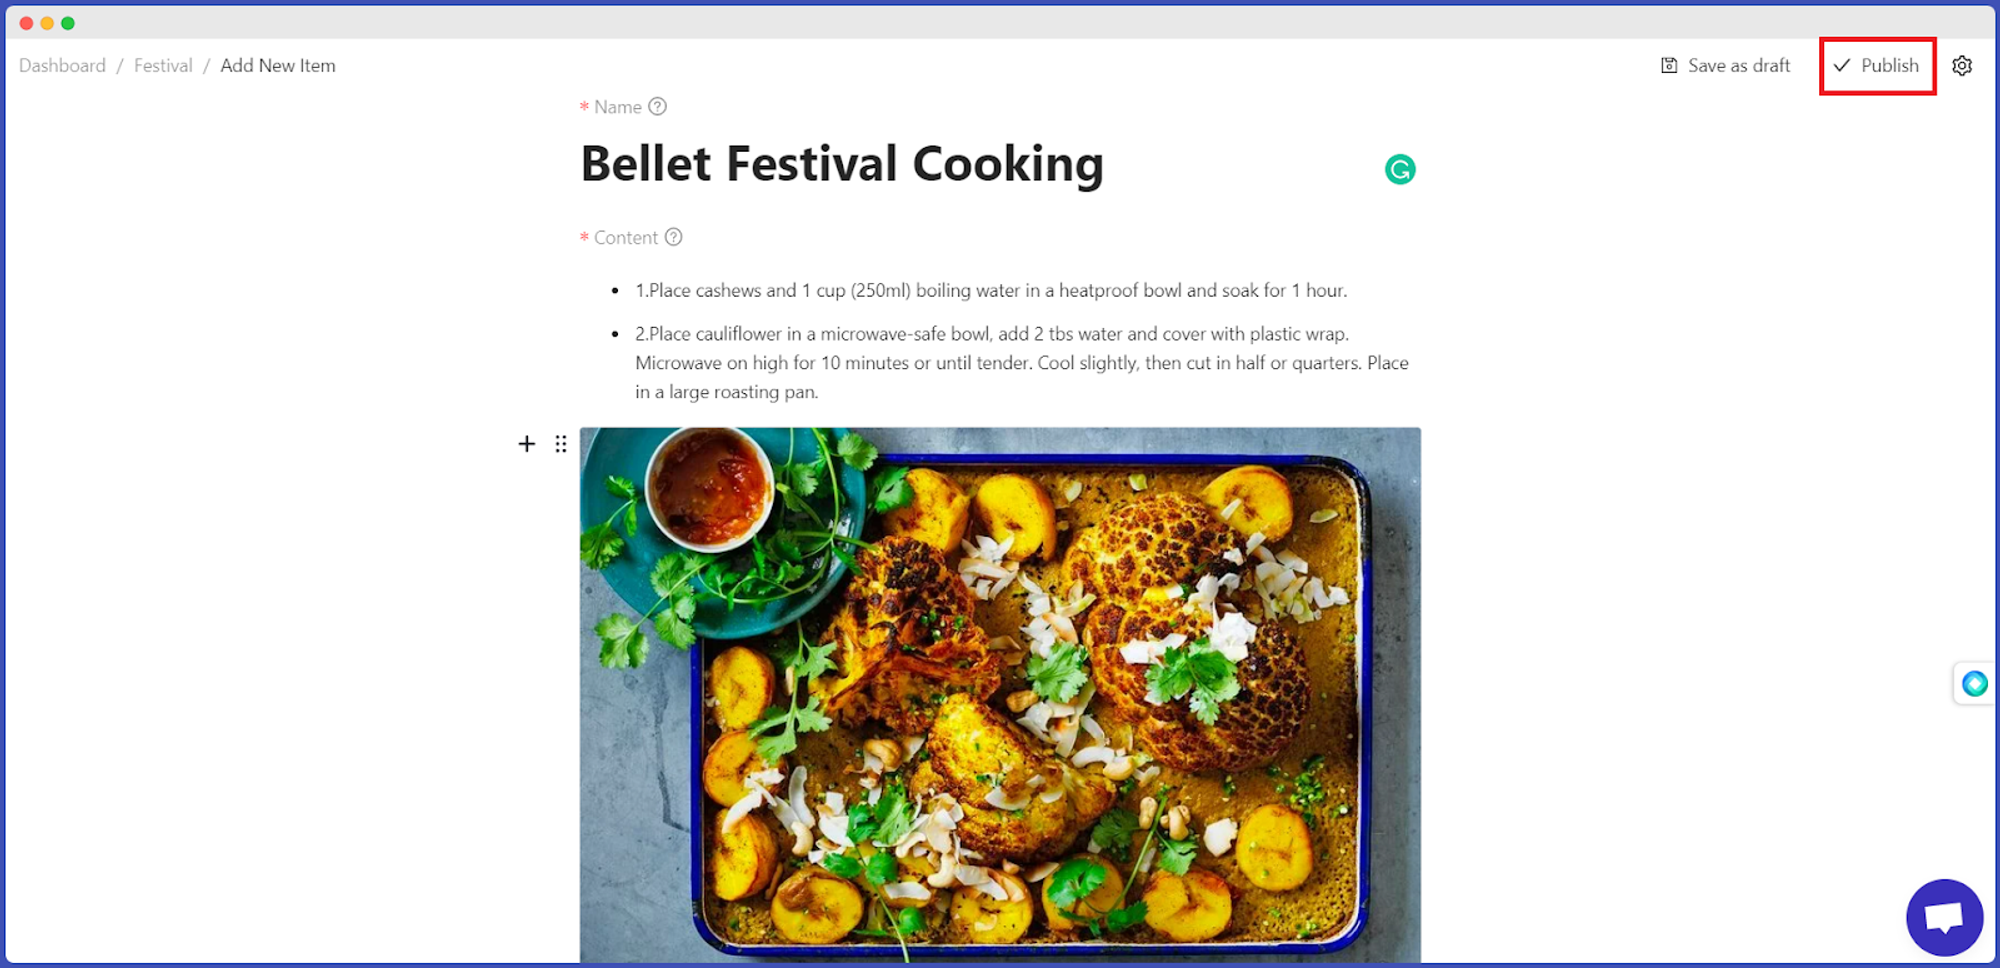
If you are using the Full Editor, start writing your post and click on Publish.
-
Or, if you are using the Sidebar Editor, input all information and click on Publish.
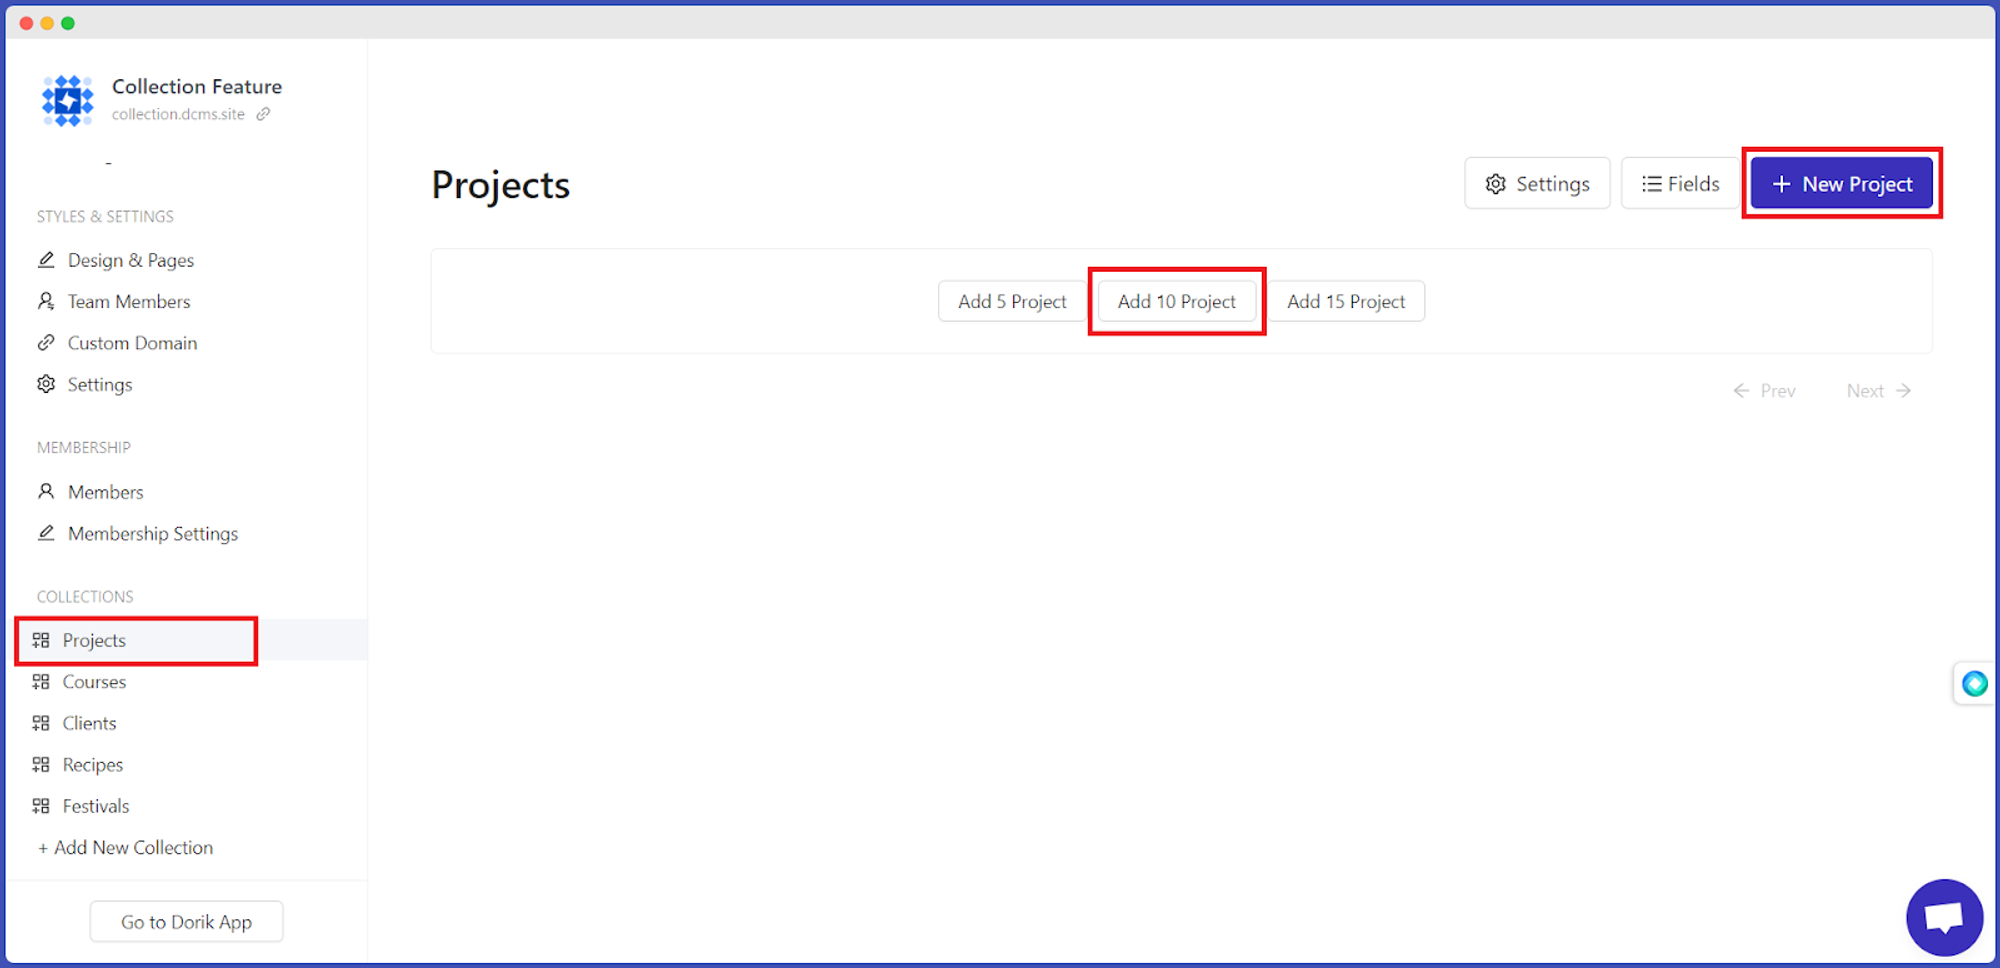
However, if you have chosen a default collection template (Example: Project), you can add some built-in demo content. It will speed up your process for sure.
Important Note: Do not forget to Publish them. The items will not work if they are not published.
How to Add and Customize Fields in a Custom Collection
Fields help you add essential extensions and enhance your custom collection lists. For example, if you have a custom collection list on 'Articles,' you might want to consider adding fields like 'Image,' 'Article Summary,' 'Thumbnail,' etc.
Here is the process to do it.
-
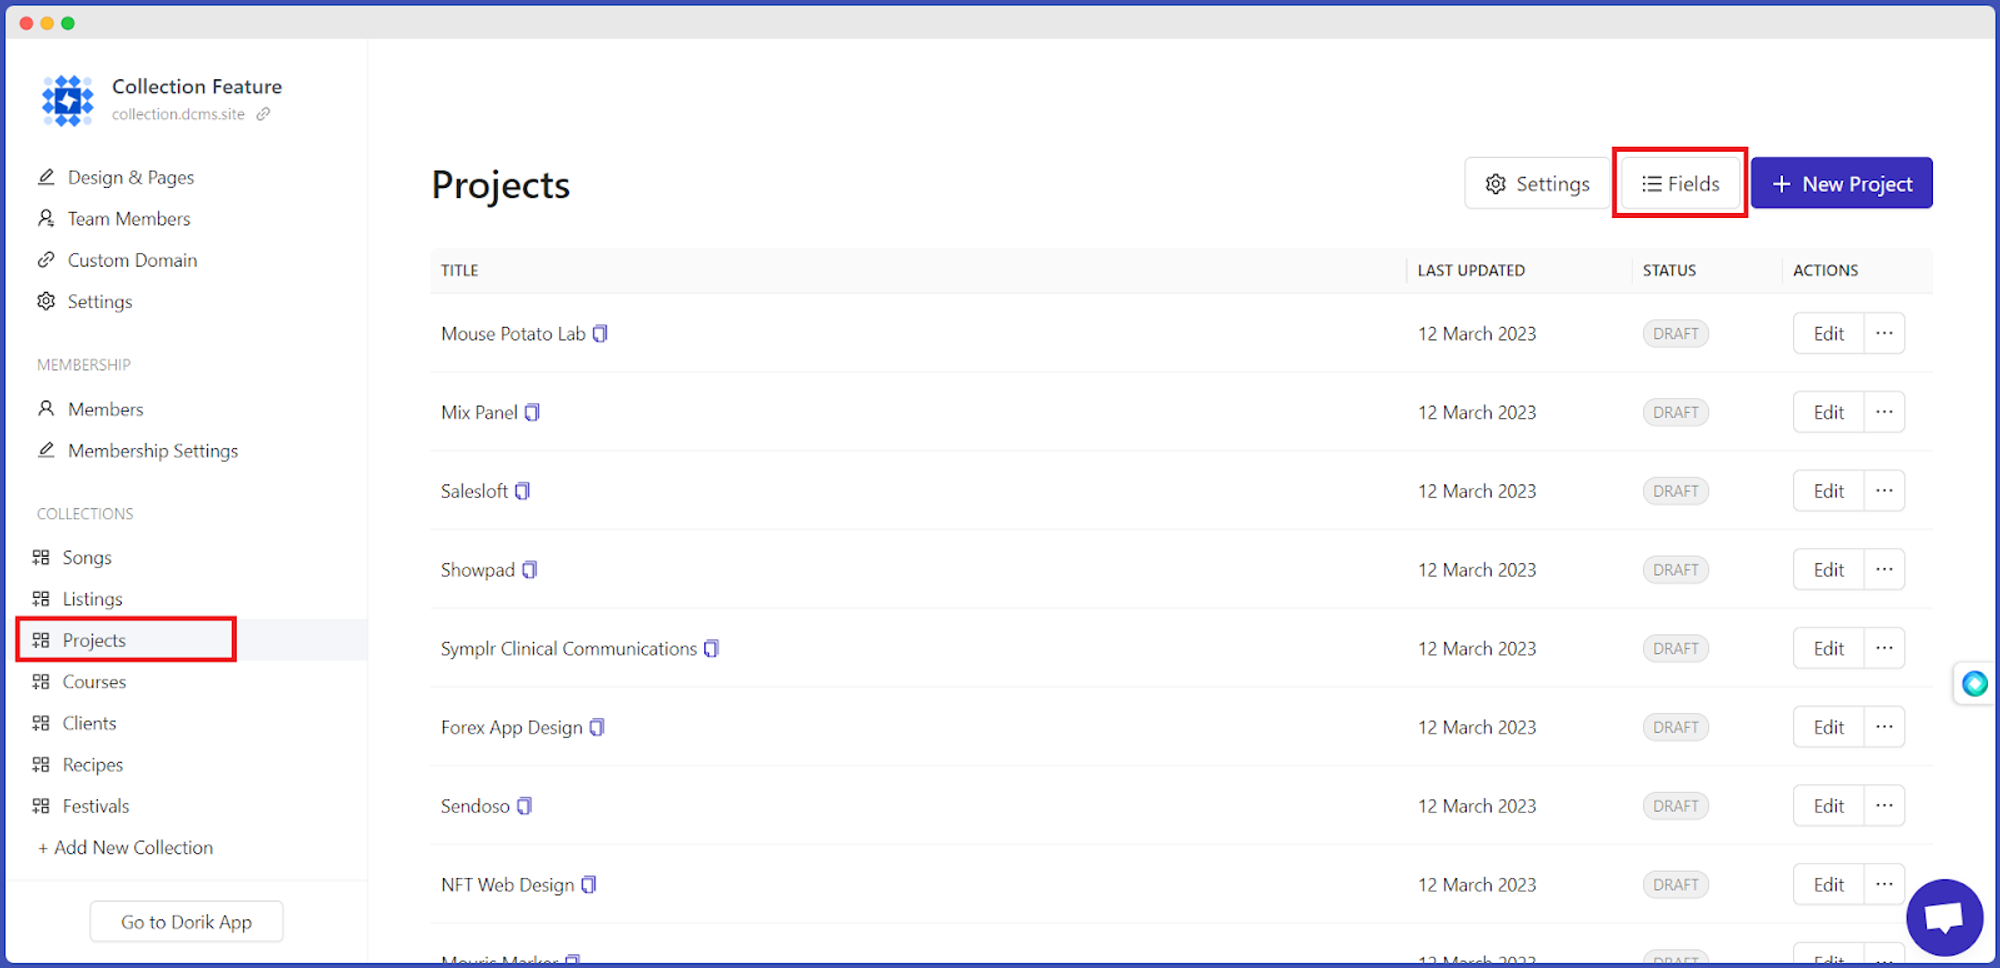
Click on any Custom Collection under the Collections panel.
-
Click on the Fields button.
-
Then click on the "+Add New Field" button.
-
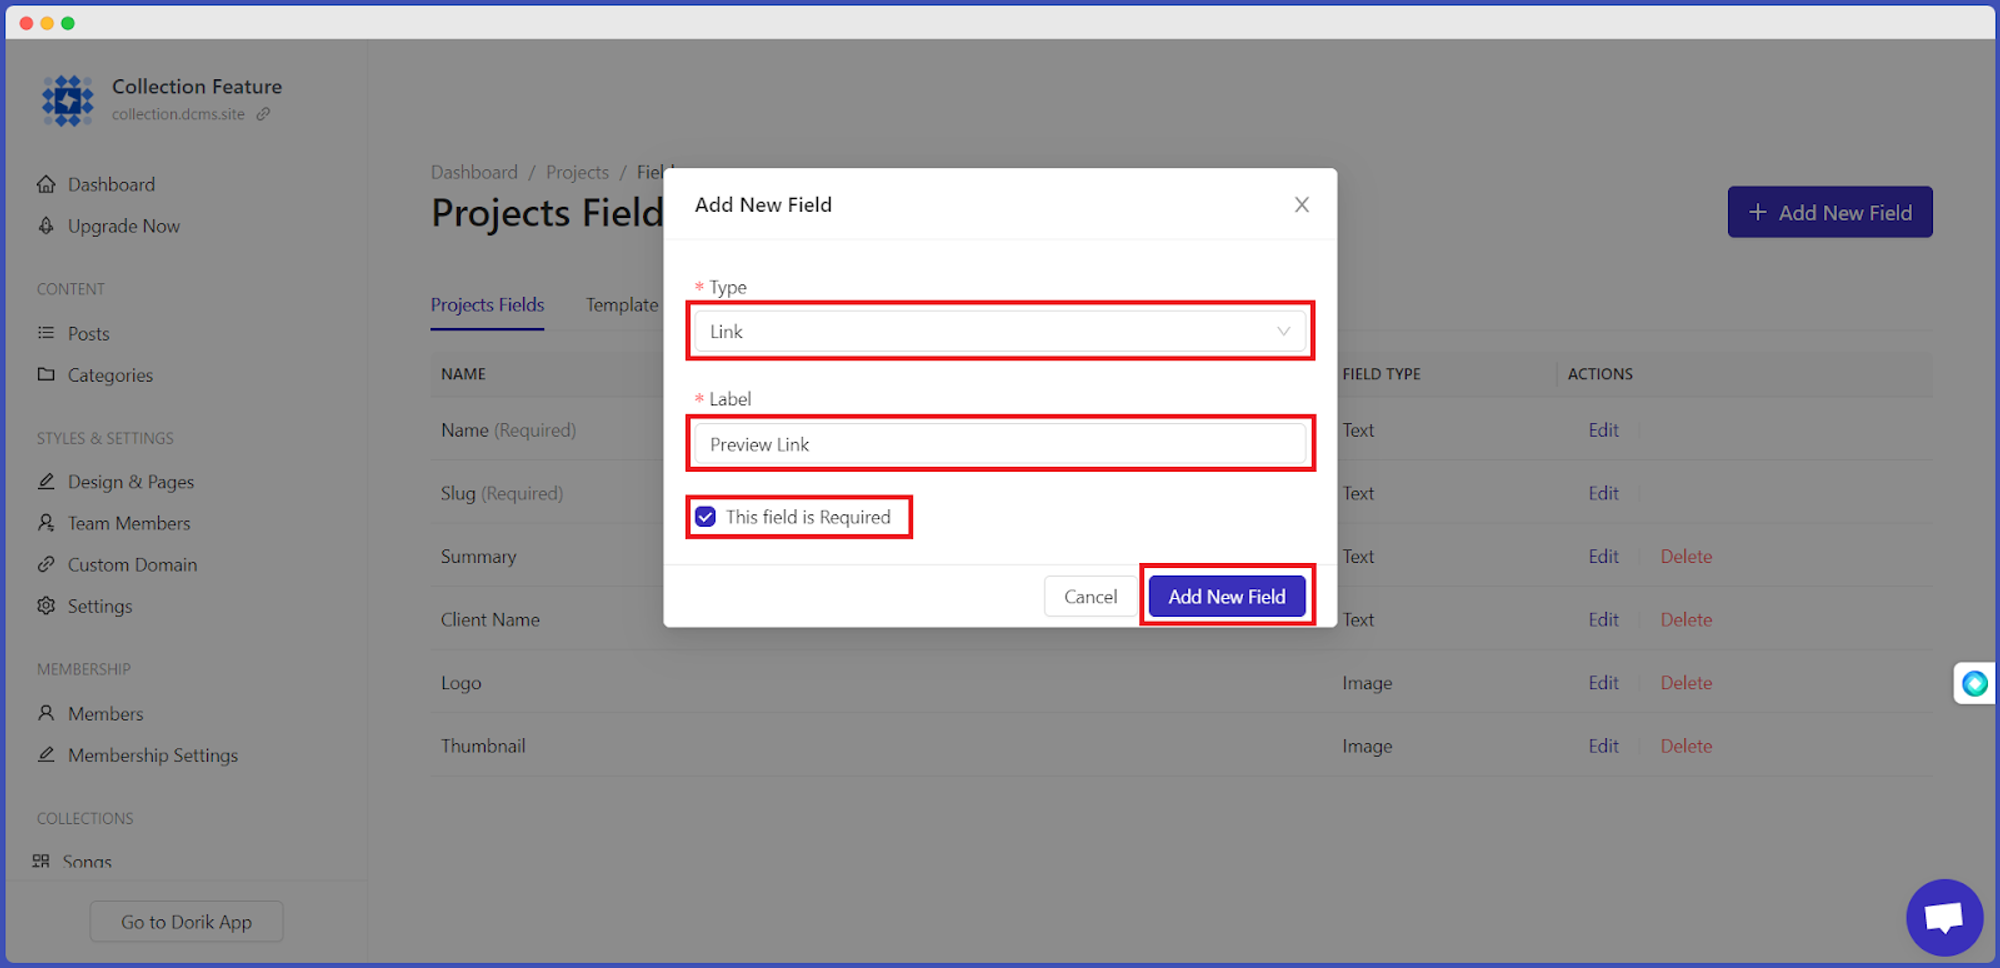
Start adding the Field type and Label. You can add different field types (Text, Link, Image, Email, Number, Rich text, Select single, and Select reference) by clicking the drop-down arrow.
-
Pick one that you need.
Let's say you want to add a preview link to your Project. So, first, select Link, then label it as Preview Link.
-
You can also make this field mandatory by check-marking the "This field is Required" box.
-
At last, press Add New Field when done.
Thus, you can add a new field to your custom collection.
Customizing Fields in a Custom Collection
After creating a field in a custom collection, you can Edit or Delete it.

-
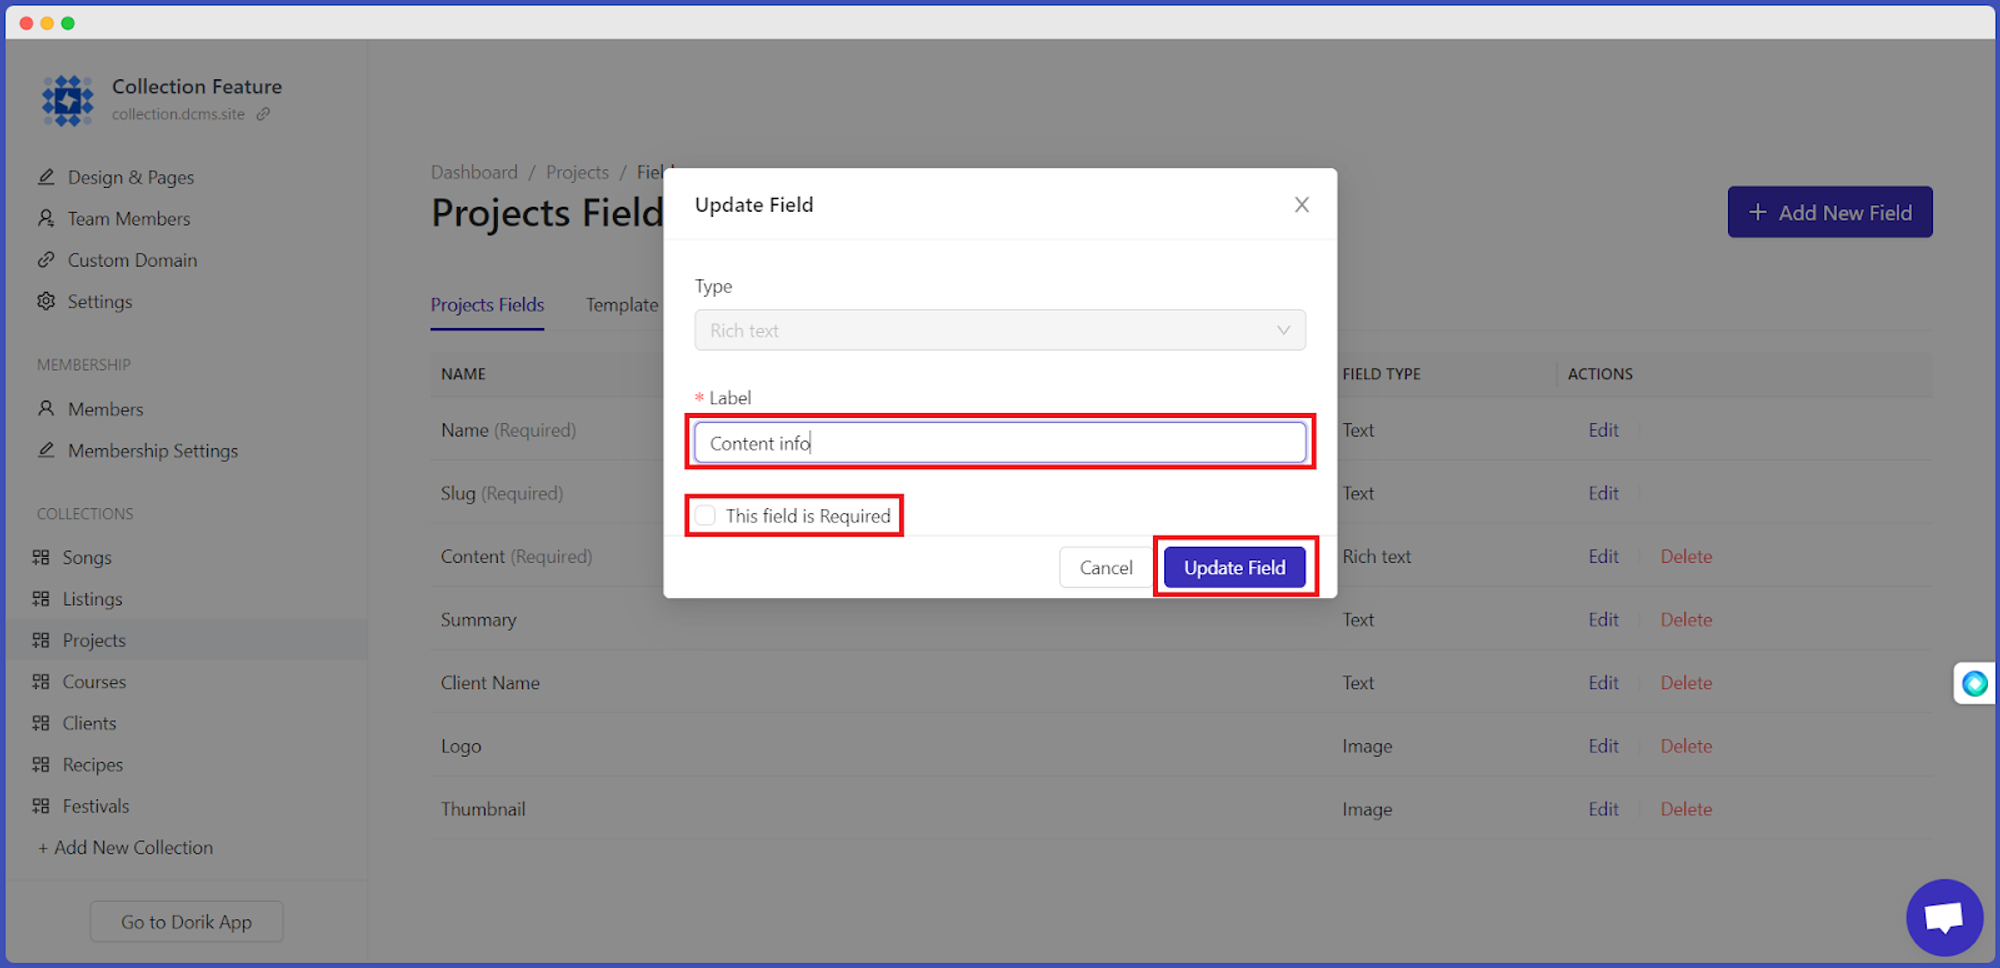
To edit a field, click on the Edit option. A pop-up modal will appear, allowing you to change the Label.
-
If the field is no longer required, uncheck the box.
-
After that, hit the Update Field button.
Part 2: Presenting Data From Collections into Your Webpage
Once you have published items with correctly filled-out fields to your Collection, you can present this data on your webpage.
Let's learn them one by one.
Connecting to Database
Here is the technique to carry it out!
-
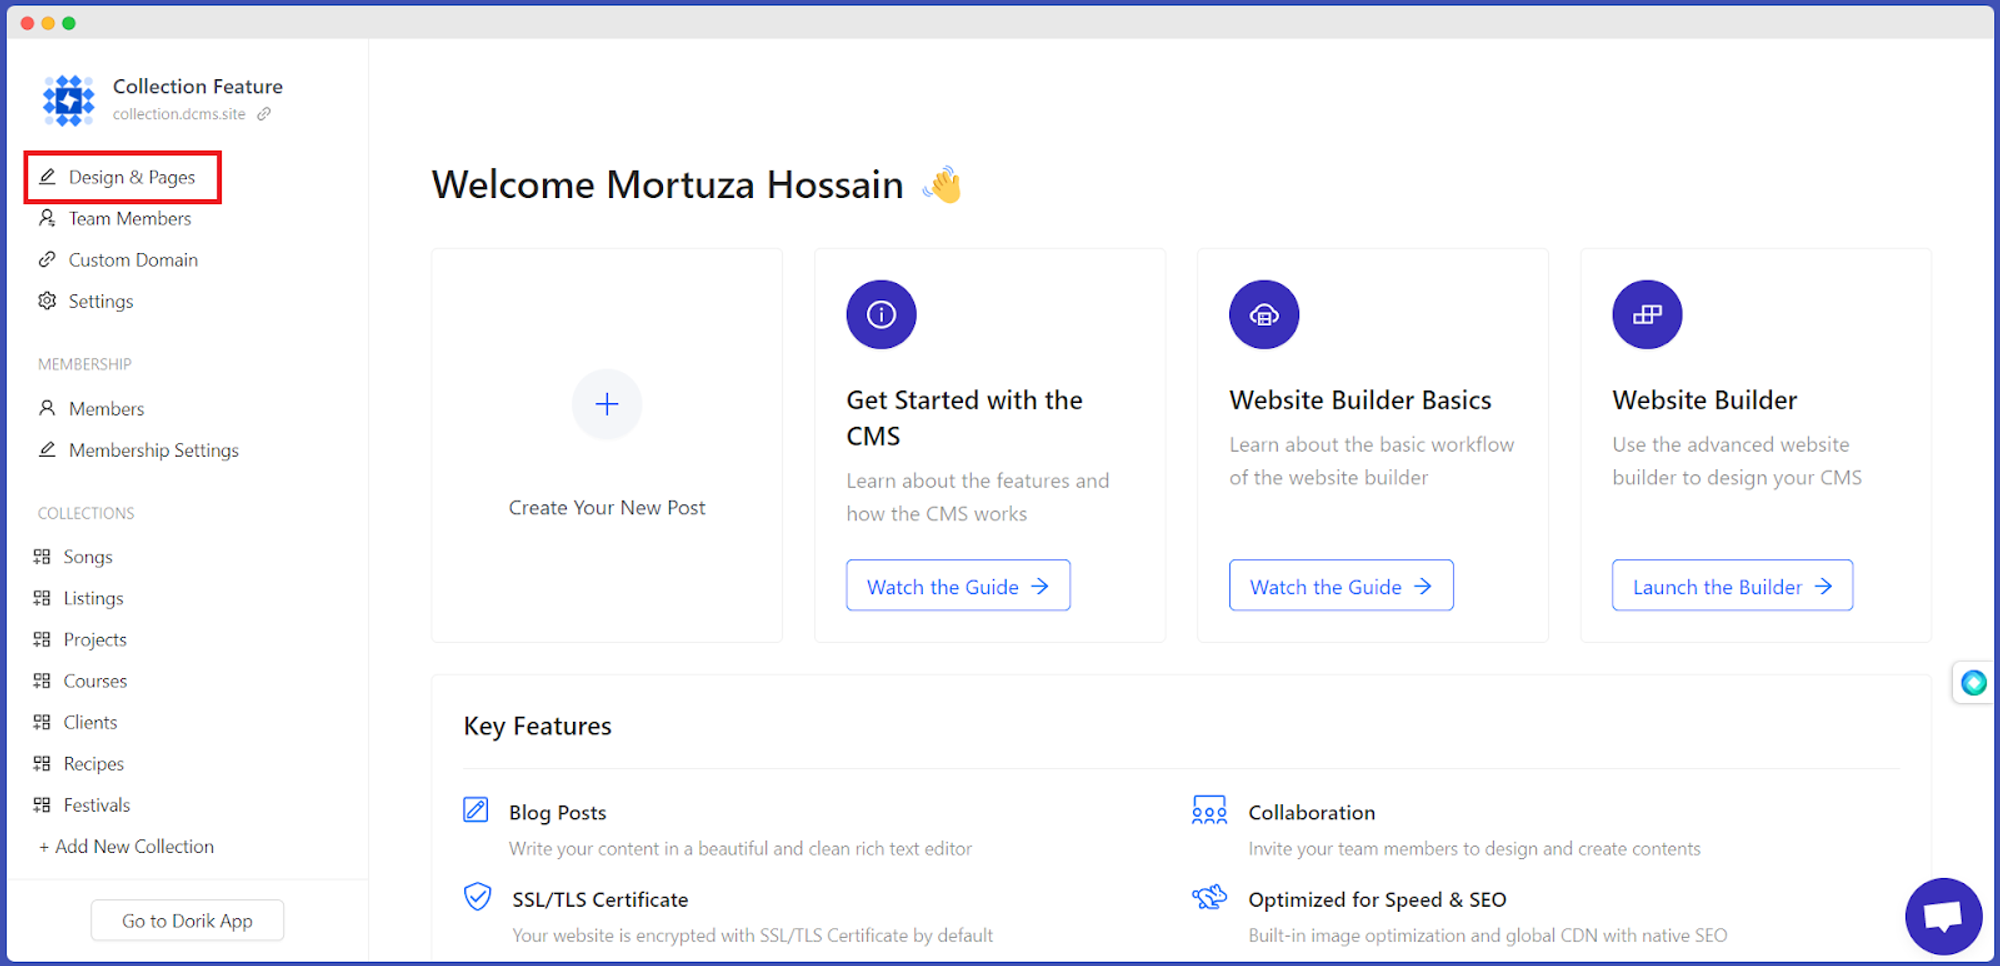
Click on the Design & Pages from the Dashboard. It will divert you to the Editing Panel of your webpage.
-
Navigate to the exact section of your webpage where you want to add your collection data.
-
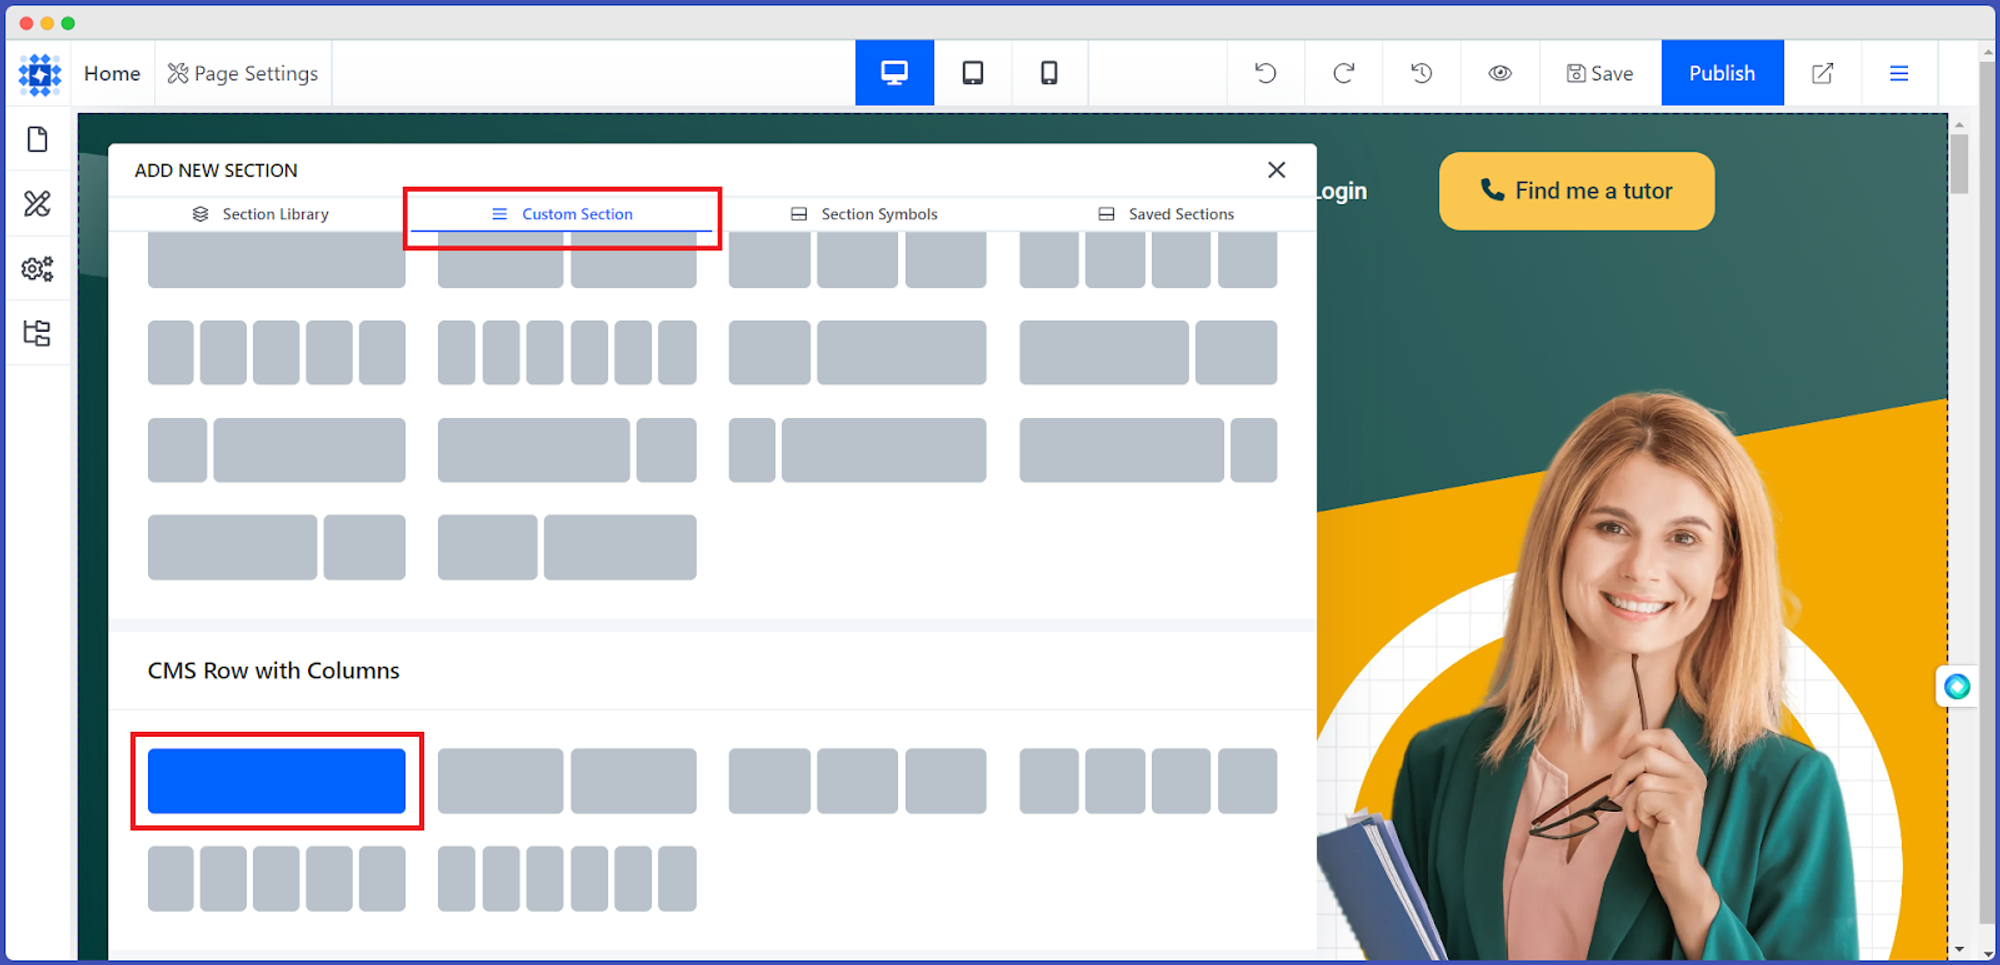
Click on "Add New Section"
-
Hit the Custom Section option and select a CMS Row with Columns. You need not worry about the column count as you can increase or decrease the number of columns. Just pick one based on your requirement.
-
A new section has already been created, and now you have to click on Connect To Database option. You will see a Configuration panel at once.
-
Then, click on the drop-down arrow of Data Source, and select Custom Collection.
-
After that, from the Select Collection option, choose a specific Collection that you want to showcase on your webpage. As an example, we are going after Project.
Kudos! It's now connected to your database.
Populating Data from the Collection into Your Website
Before fetching data from the database, it's worth mentioning that we will work on a single column, but it will take effect on the rest of the columns under the CMS Row. It saves you time and is one of the most impressive and unique features of Dorik.
Therefore, without any further delay, let's get into the process.
-
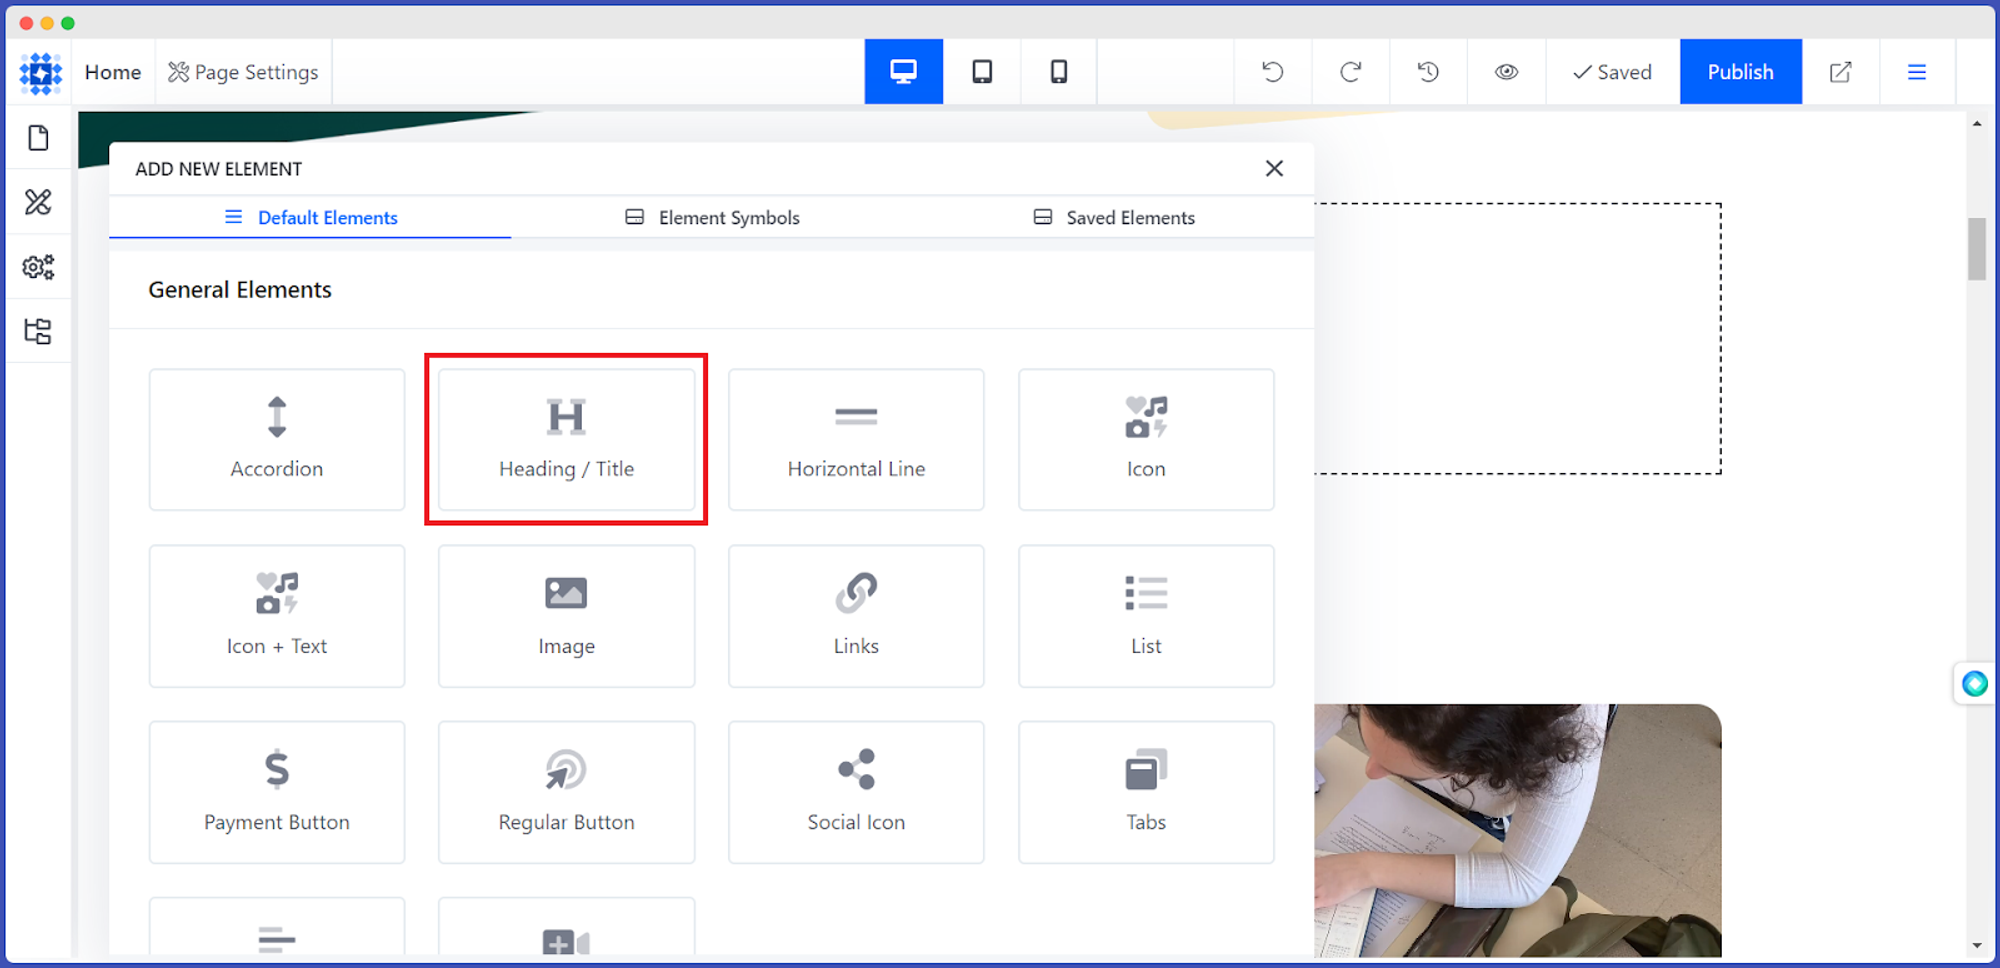
Click on the "+ Add Element" button from the webpage.
-
After that, pick an element that you want. Let's say we are going to show our project title. So, click on Heading/Title.
-
Then delete the default text and click on Add CMS Fields.
-
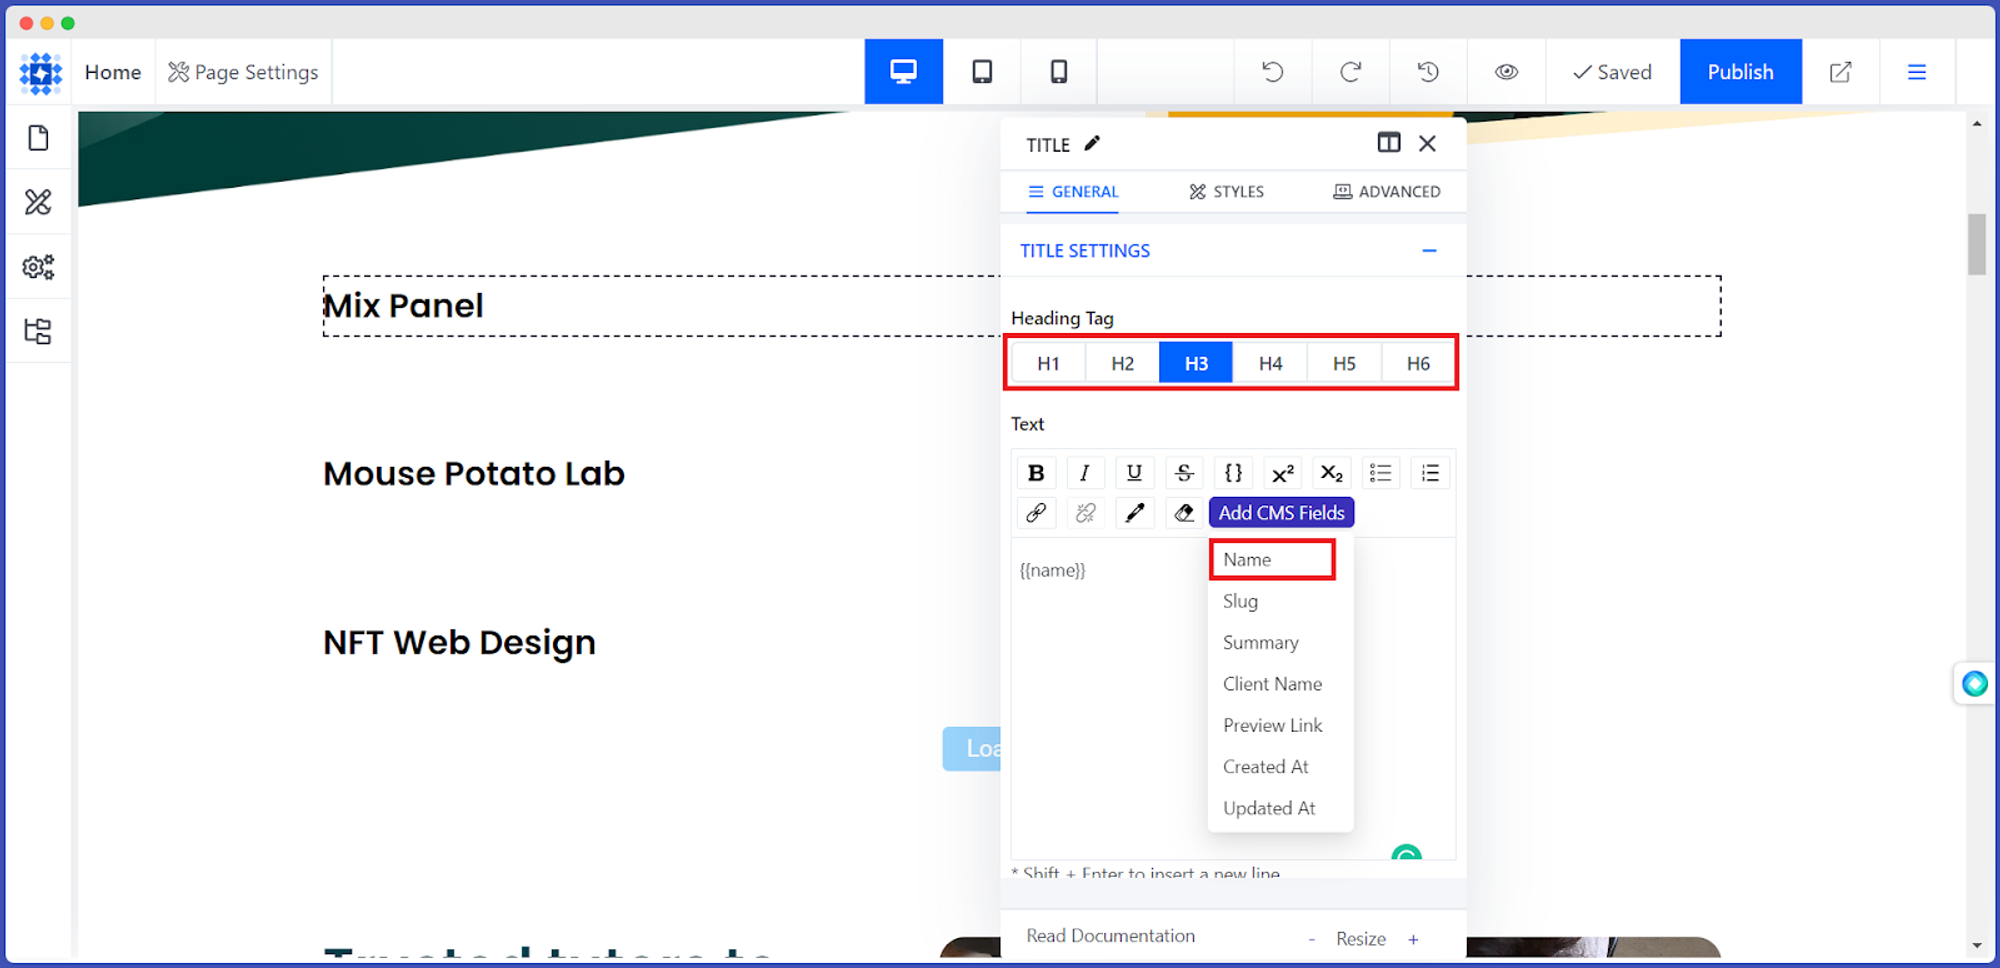
Select Name from the available options. Here is the magic. The Name of each Project will appear instantly in all the columns.
-
You can also change the Heading tag from H1 to H6.
-
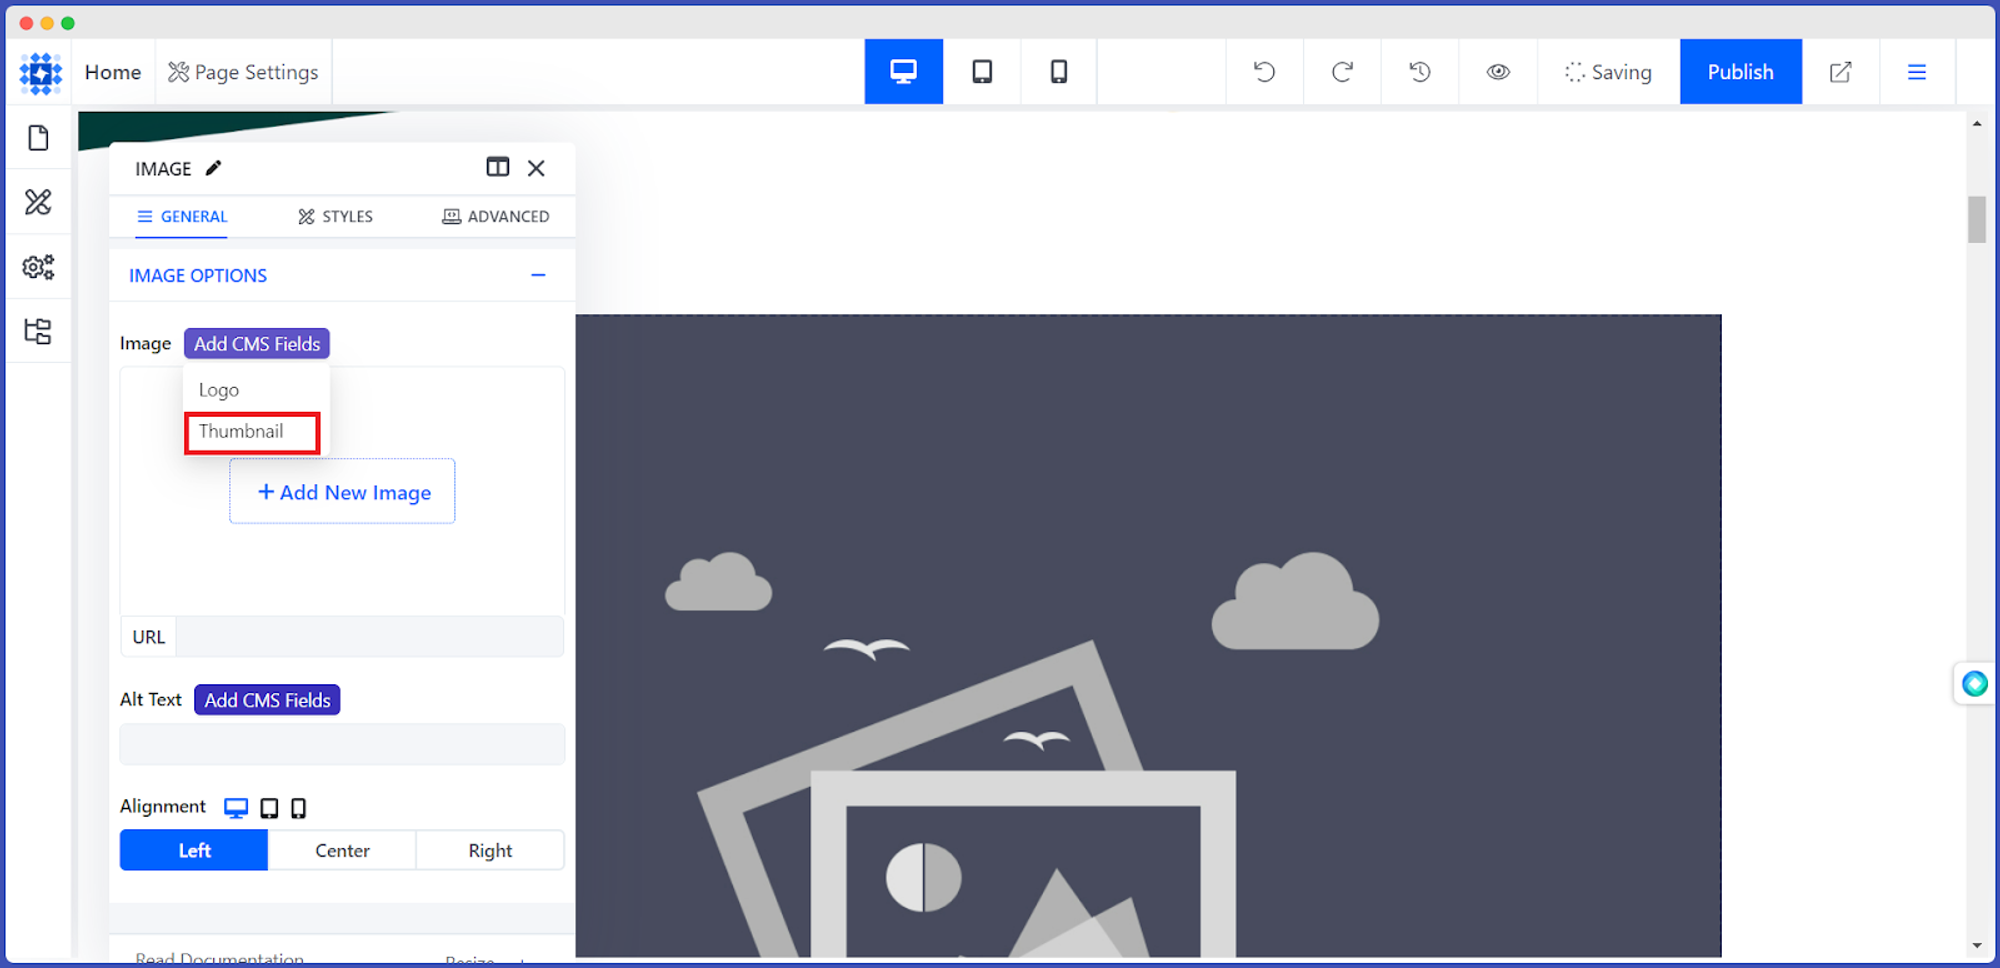
So, you have got the name of your projects. Now, it's time to display the thumbnail image of each collection item. Therefore, hover your mouse over the title and click on the Add New Element Below sign.
-
Then select Image from the Default Elements option.
-
Click on the "Add CMS Fields" button to specify the source.
-
After that, select Thumbnail. It's done. The thumbnail image of the collection item will be displayed under the title.
But have you noticed that the images are too large? No worries; in this blog's next section, we will show you how to customize them. So, sit tight and continue reading!
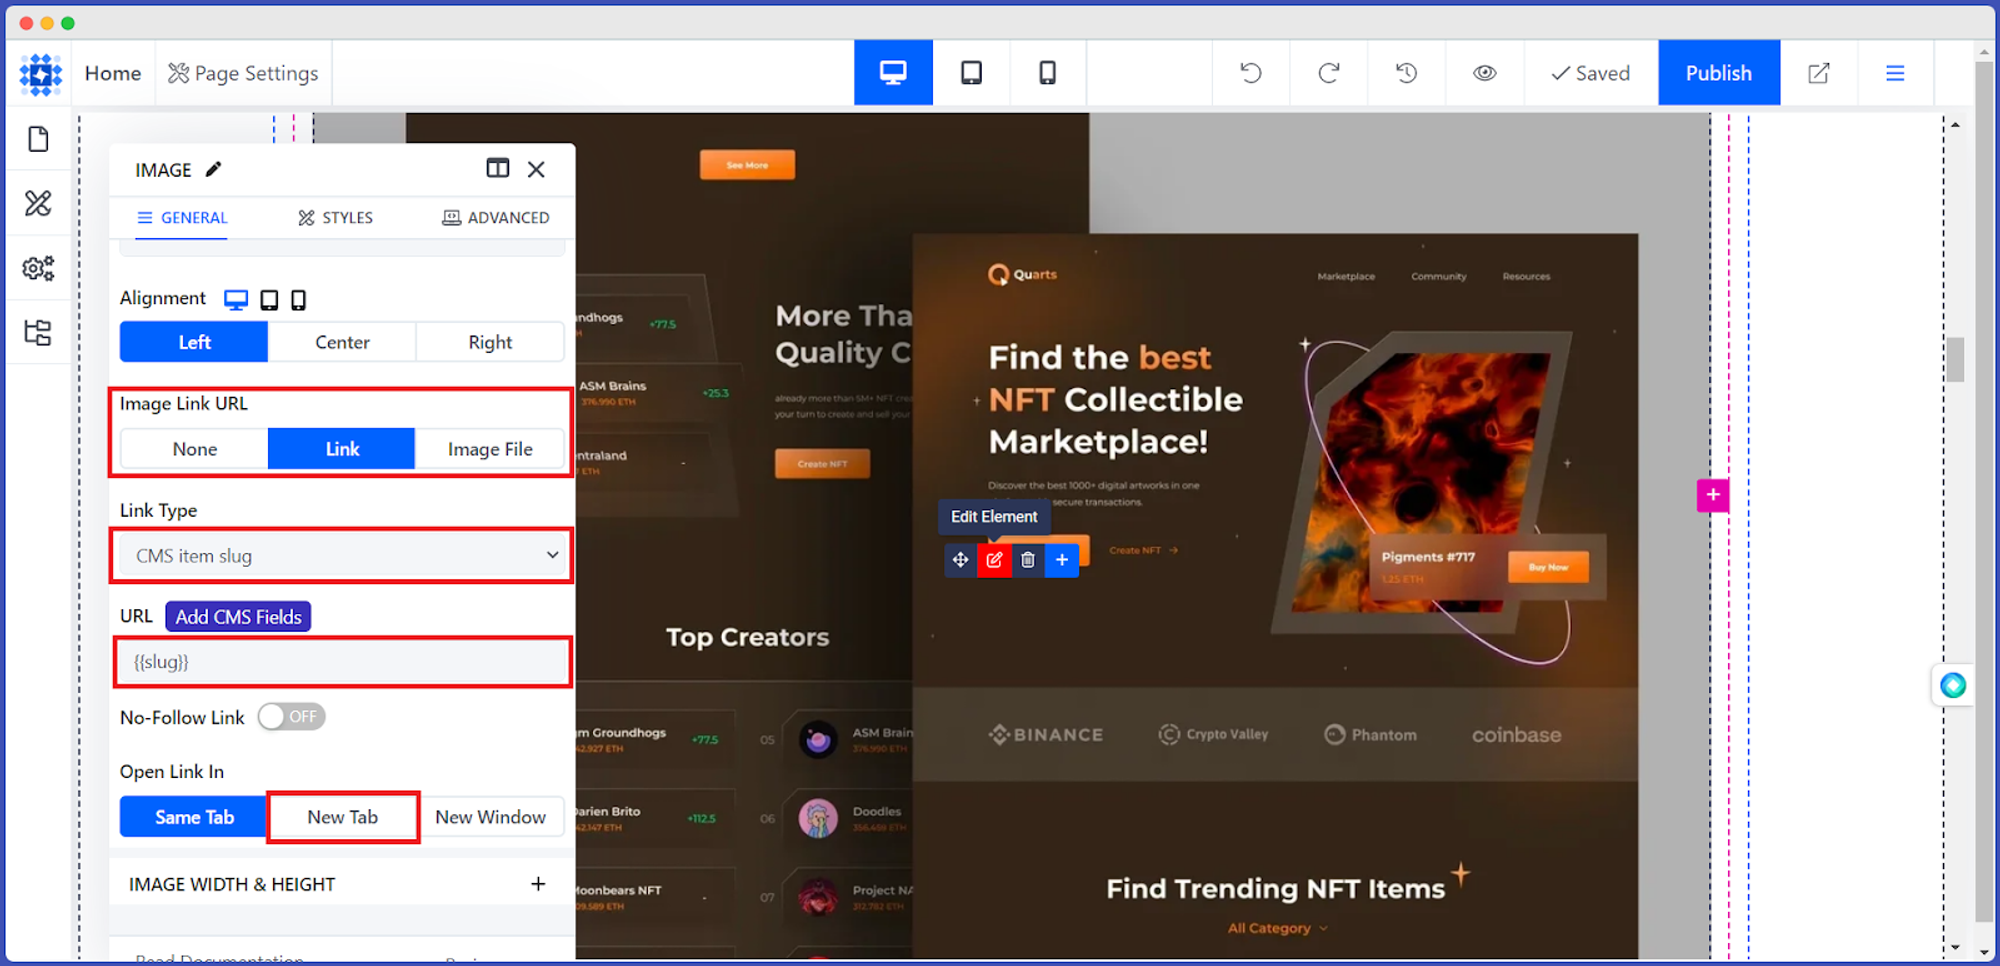
Let's say you want to add a link to your thumbnail image so visitors can click on it to learn more about the collection item.
But how to make it? Here is the way:
-
Hover your mouse over the image, and click the Edit Element icon.
-
Navigate to the Image Link URL option and select Link.
-
Then choose CMS item slug from Link Type.
-
Now, click the Add CMS Fields button under the URL and pick slug from the list.
-
You can also specify whether you want to open the link in the same tab, a new tab, or a new window. So, select one depending on your need.
Thus, following the process, you can add necessary elements and show your collection items in a more organized way on your webpage. We have just scratched the surface here. There is a lot more you can do with this awesome Collection feature.
How to Customize Collection Layout & Design on Your Webpage
The default layout and design may look less appealing. Therefore, Dorik allows you to design your webpage and display the collections how you want. This can include adding or removing columns, changing the spacing between items, and adjusting the size of images.
Let's show your creative zeal and give a unique look to your webpage with the custom design.
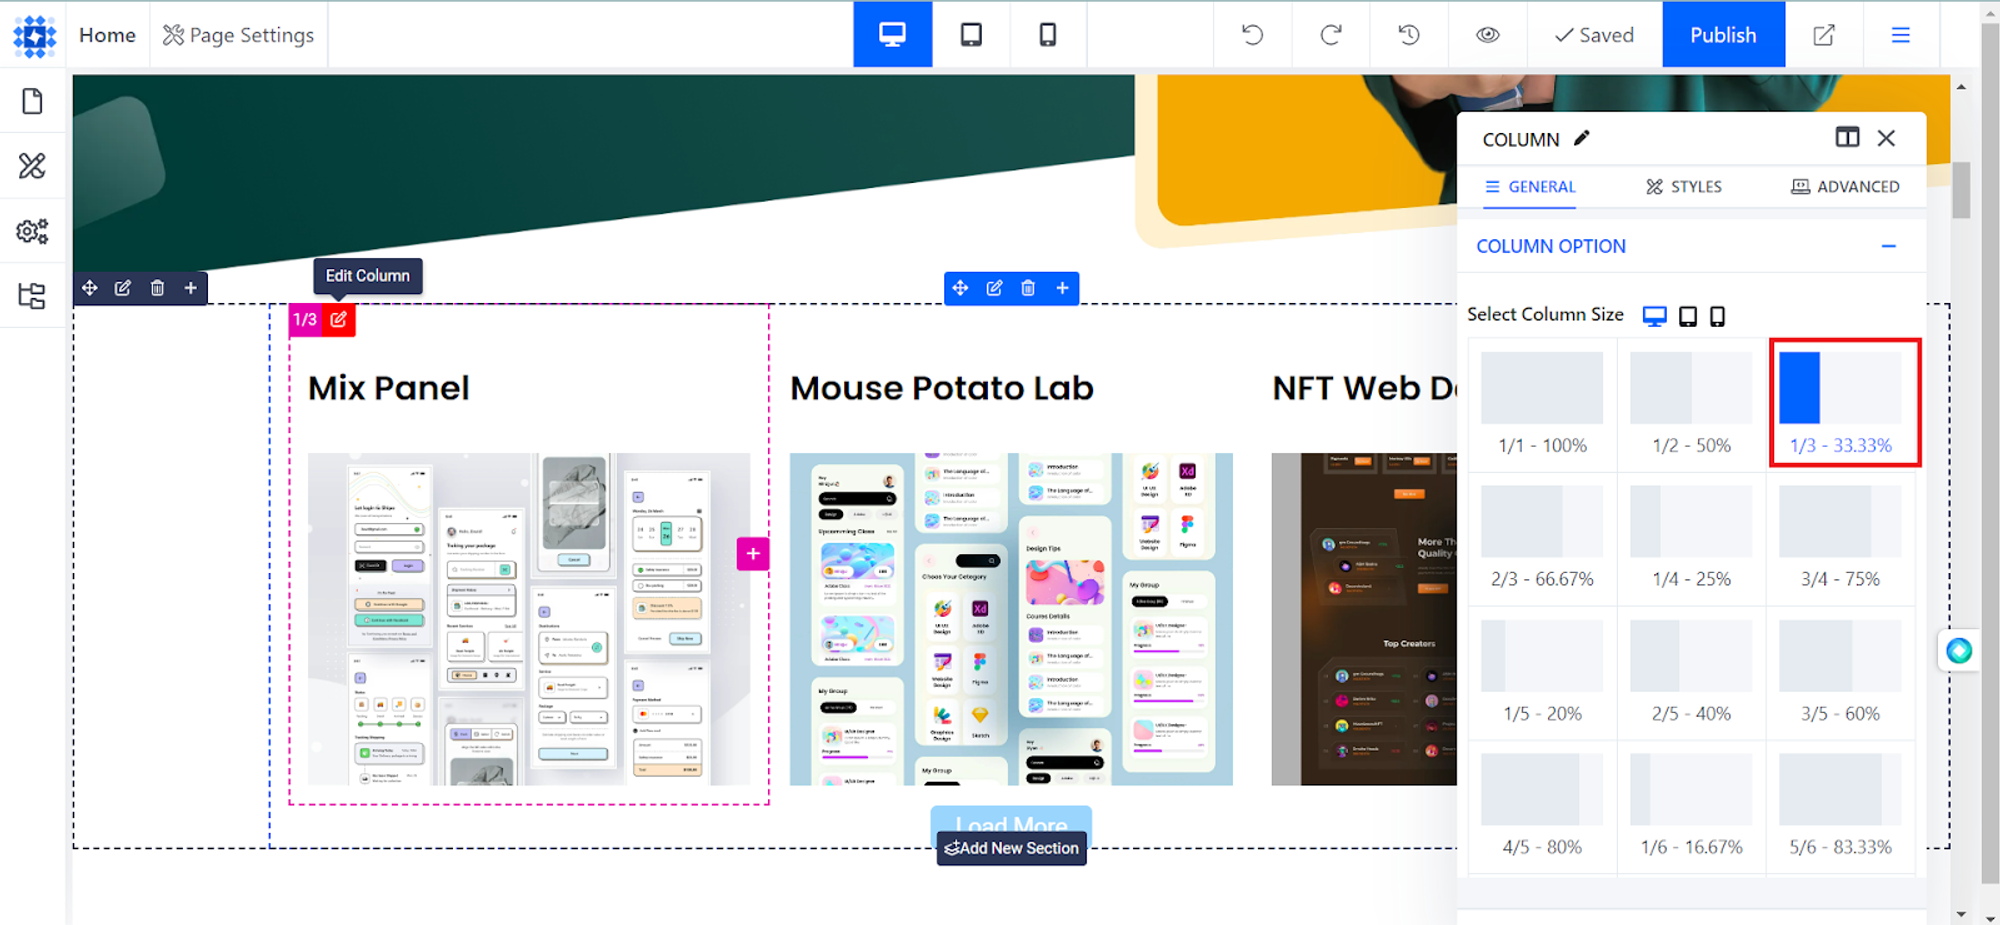
Customizing the Columns
-
First, click on the Edit Column option.
-
A pop-up modal will appear, showing all the possible Column Sizes.
-
Select one that you want to use.
-
Once you have selected the Column Size, the Collection items will appear on your webpage in the selected format.
-
You can change the Column Size again in the same way when needed.
-
Then change Content Alignment and Background from the same editing modal. You can add a solid color, gradient, and even an image as the background of your columns.
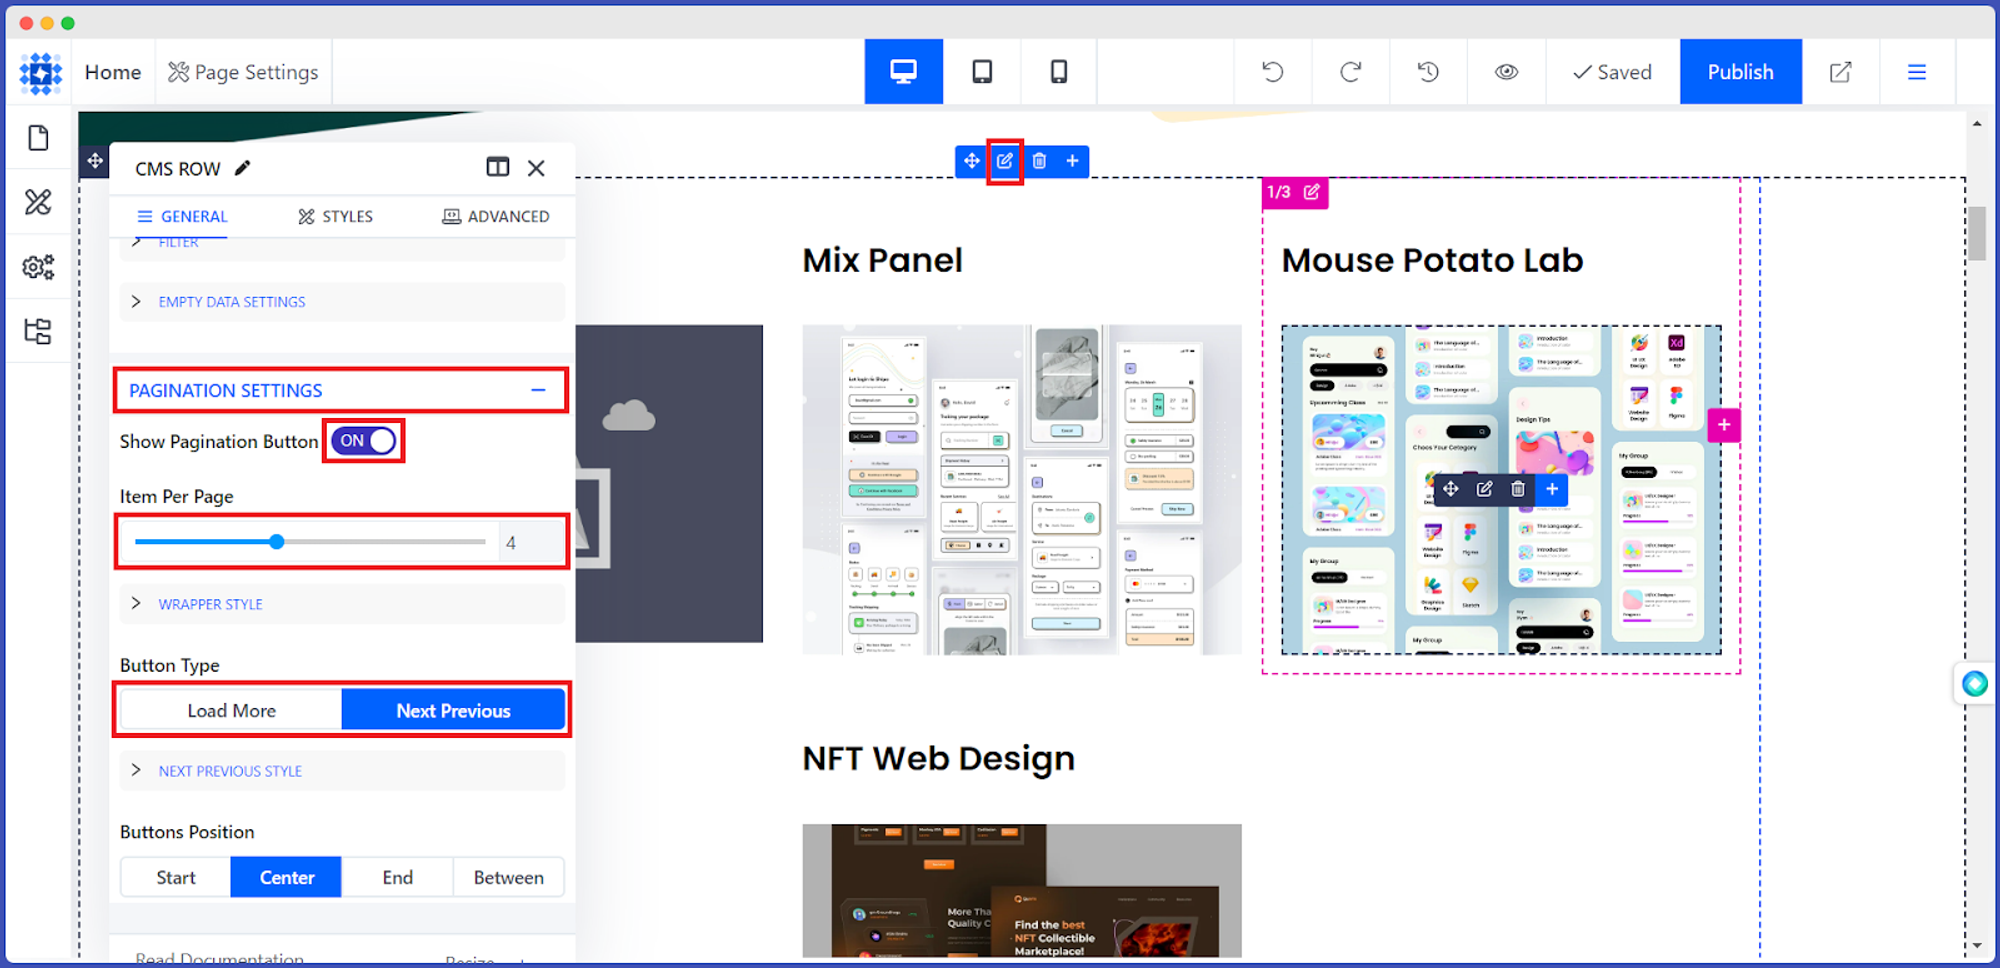
Configuring Collection Pagination
Dorik's Pagination feature lets you break up large collections into multiple pages. It can be handy for collections with hundreds or even thousands of items. By breaking up the Collection into smaller chunks, visitors can more easily navigate the content and find what they want.
So, let's see how to accomplish it!
-
Click on Edit CMS Row Style.
-
Select the "PAGINATION SETTINGS" option from the editing modal.
-
Now increase or decrease the number of Items per Page you want to show.
-
You can also enable the "Show Pagination Button."
-
At last, set the Button Type (For example: Load More or Next Previous) and the Button Position.
-
Plus, you can also customize the NEXT PREVIOUS STYLE. So, modify it as you wish.
How to Add Filters in Custom Collections
Do you want to show certain Custom Collection items on your webpage? Yes! It's possible through the Filters feature of Dorik.
Filters can help you select Custom Collection items you want to showcase on your website. If you have a custom collection already and would like to be more specific about the items you wish to showcase on your website, that is where Filters come in handy.
So, now we will show you how filters work and how you can use filters on custom collection items on a CMS Row.
Follow the steps below:
-
Add a CMS Row to any section.
-
Connect the Database to Custom Collection as the Data Source.
-
Select any Collection Item you want to filter. Here we are selecting Articles, for example.
-
Add any element and populate it with CMS fields.
-
We have shown the up to these processes earlier in the blog. So, it would not be a problem for you.
-
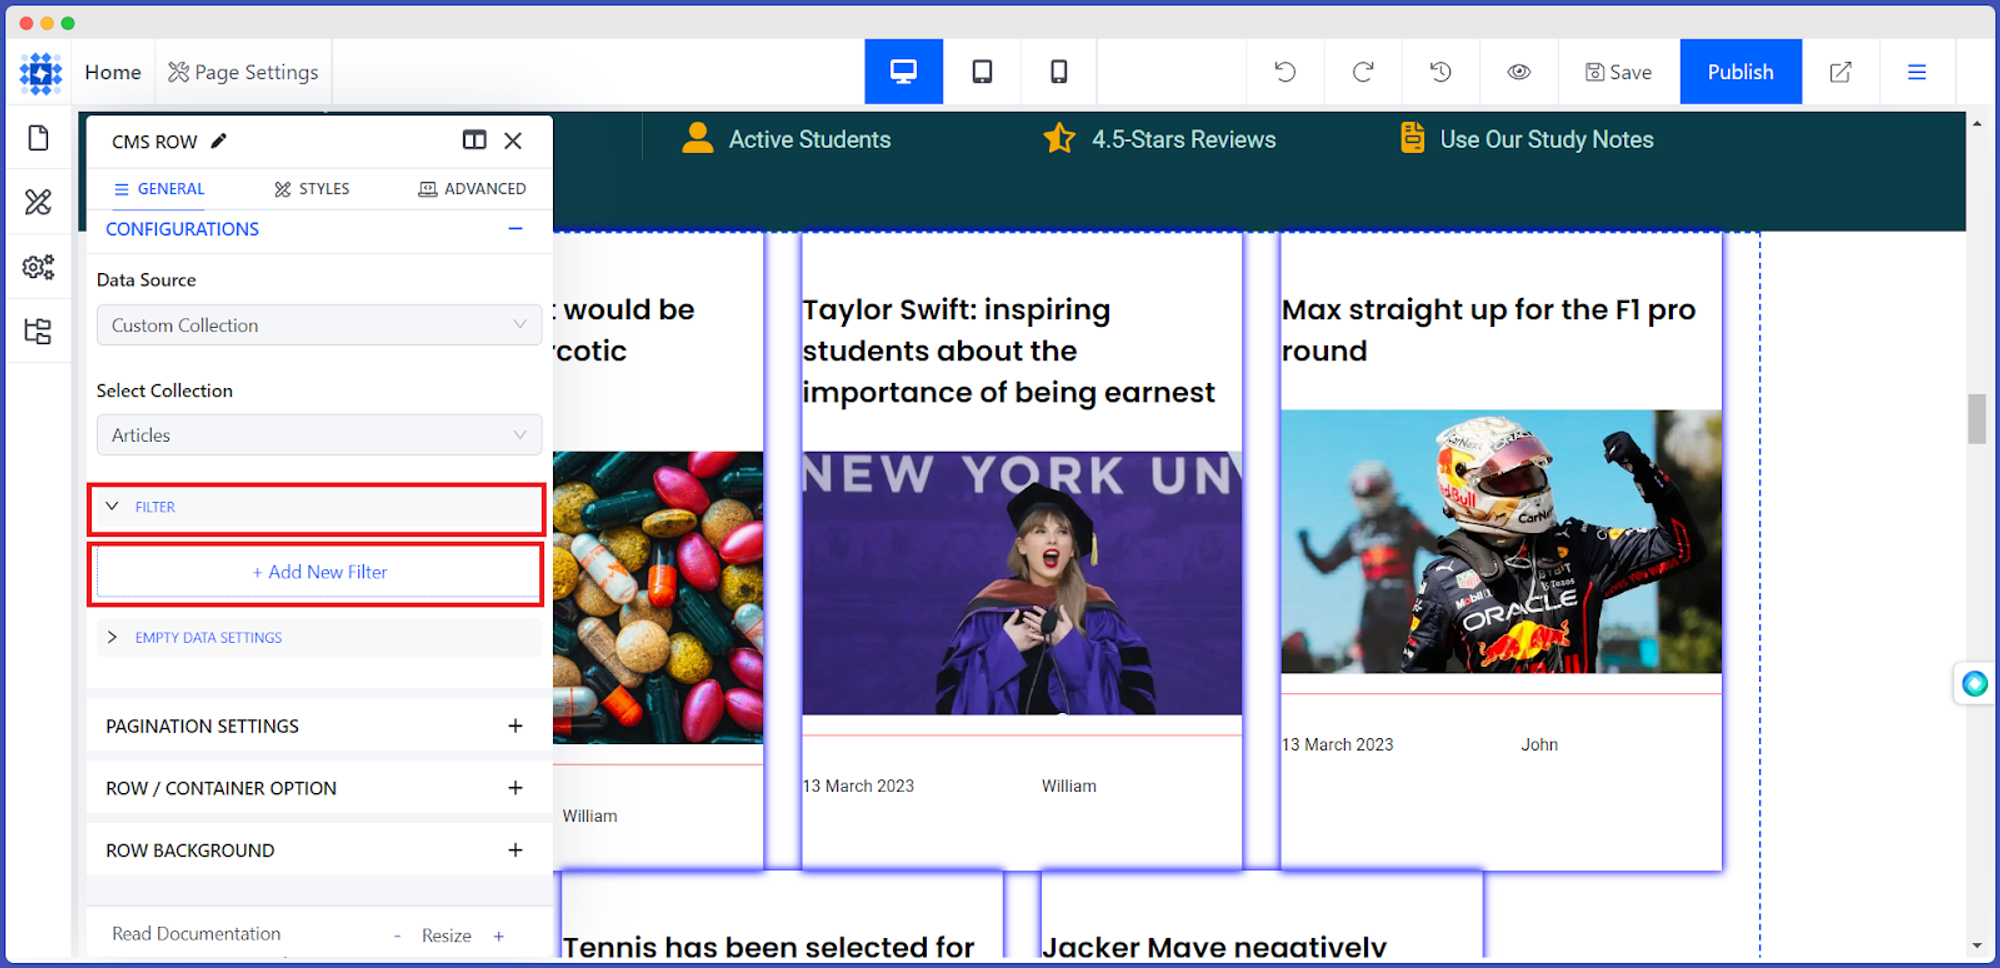
After populating the elements with CMS Field Data, click on Edit CMS Row.
-
Now, click the Filter option and then "+ Add New Filter."
-
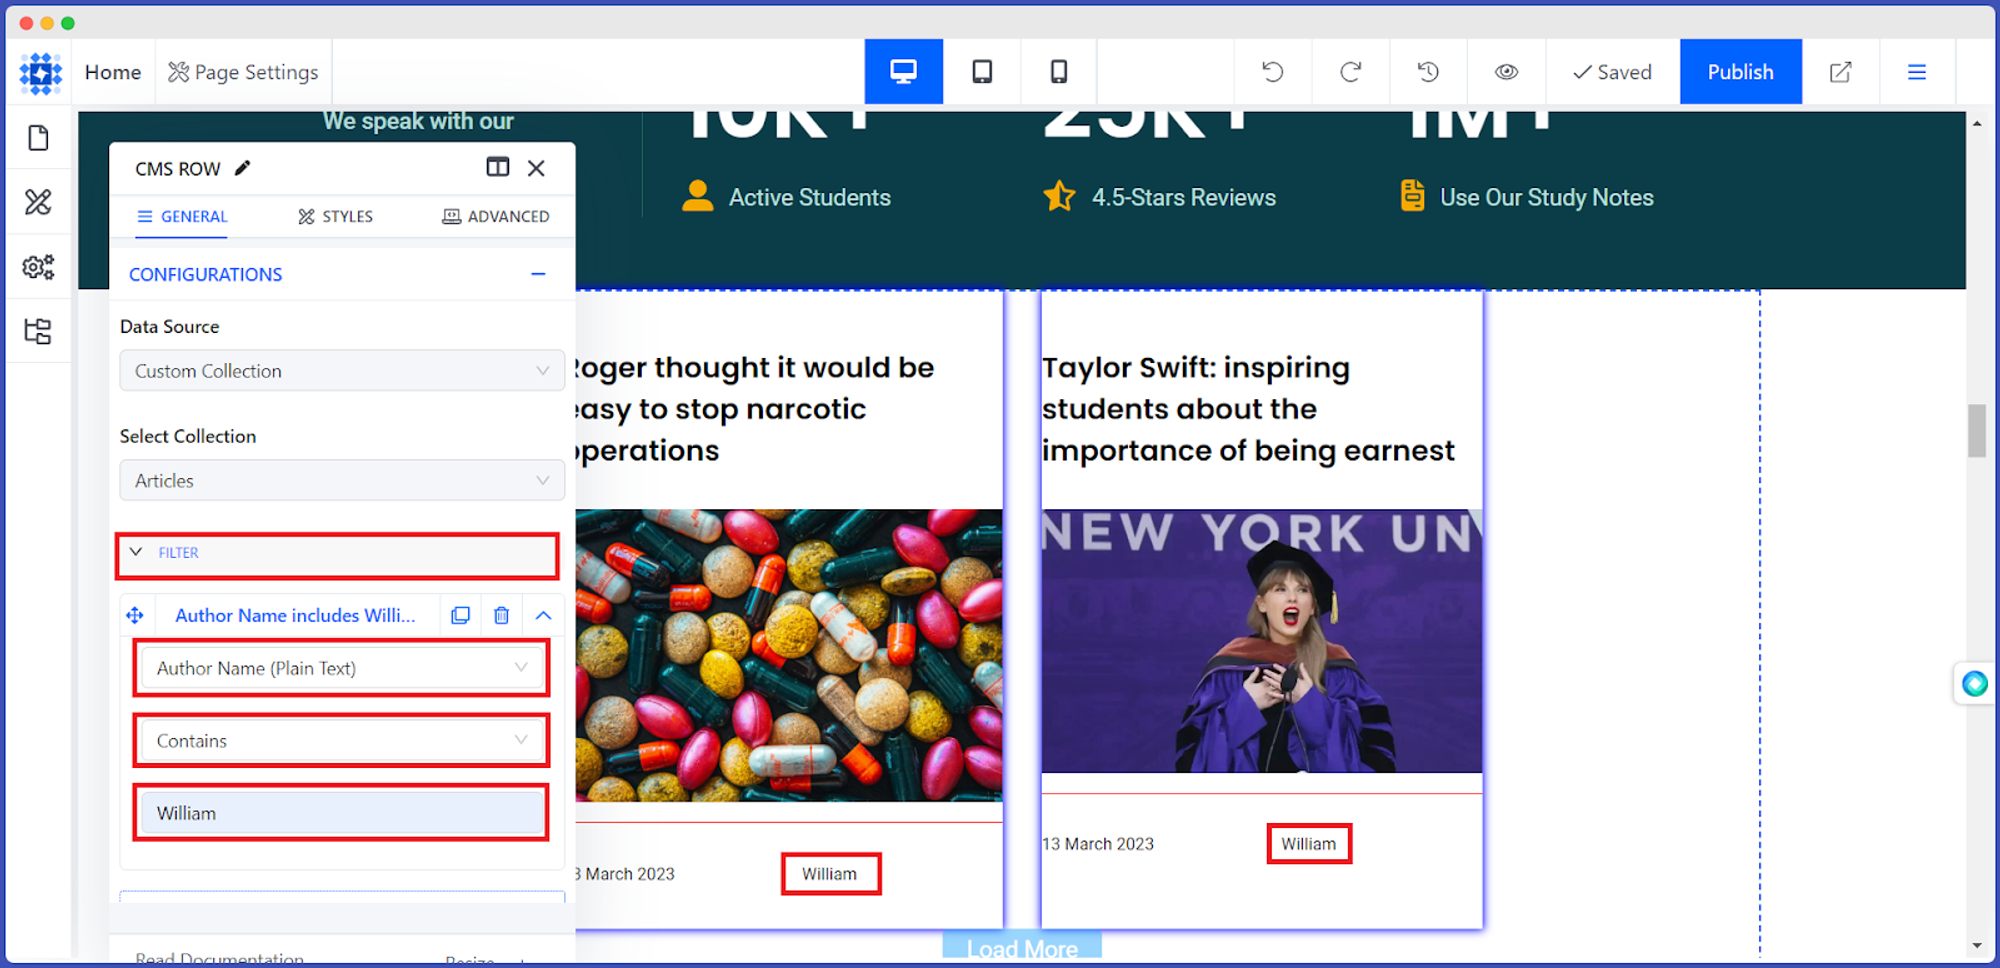
Click on the down arrow beside the blank filter item and select a custom collection field you wish to present on your webpage. Here we want to show the articles written by a particular author. So we are setting the Author Name field.
-
Now, be more specific. So click on the following field to see some Filter Types.
-
Pick one that fulfills your demand. We are selecting Contains.
In the next section, we will explain all the Filter Types so you can use them without any confusion.
-
Lastly, type down the author name you want to filter out and showcase on the webpage. In our case, we will write William, and instantly the Filters will display only the articles that contain the name. Articles from the other authors will be hidden.
However, you can watch the following video tutorial to avoid any inconveniences.
Filter Types that You Can Use
You can use fifteen filters for Custom Collection fields, which can be applied to ten different data types.
Here is the list. Let's have a clear understanding!
-
Equal
-
Does Not Equal
-
Is Between
-
Is Less than
-
Is Less than or Equal
-
Is Greater than
-
Is Greater than or Equal to
-
Contains
-
Does Not Contain
-
Is Set
-
Is Not Set
-
Is Before
-
Is Before or Equal To
-
Is After
-
Is After or Equal To
Data Types in Custom Collection Fields
Data type means which kind of data you can store in your Custom Collection fields. For example, you may need to use an image, text, or URL in your content. Therefore, Dorik supports the following data types in a custom collection to make your journey more smooth.
Let's know them:
-
Text
-
Rich Text
-
Image
-
Single Select
-
Date
-
Link
-
Number
-
Email
-
Select (single)
-
Single Reference
How to Refer Custom Collection Fields
Referencing Custom Collection fields can help you refer data from one custom collection item to another.
Let's say you have two custom collections labeled Courses and Authors. There is a good number of published items also in these collections.
Now, you want to refer to the Author's name in every Course item.
So, without wasting time, let's learn how to refer custom collection fields.
To simplify the process, we have divided it into three sections:
-
First, we will show you how to add a single reference field.
-
Second, we will let you know how to input the single reference field value.
-
Thirdly, we will populate an element with a reference field value on the webpage.
Adding Single Reference Field
Follow the below instructions to make it happen.
-
Go to your CMS Dashboard
-
Select any Custom Collection. Example: Courses
-
Click on the Fields button
-
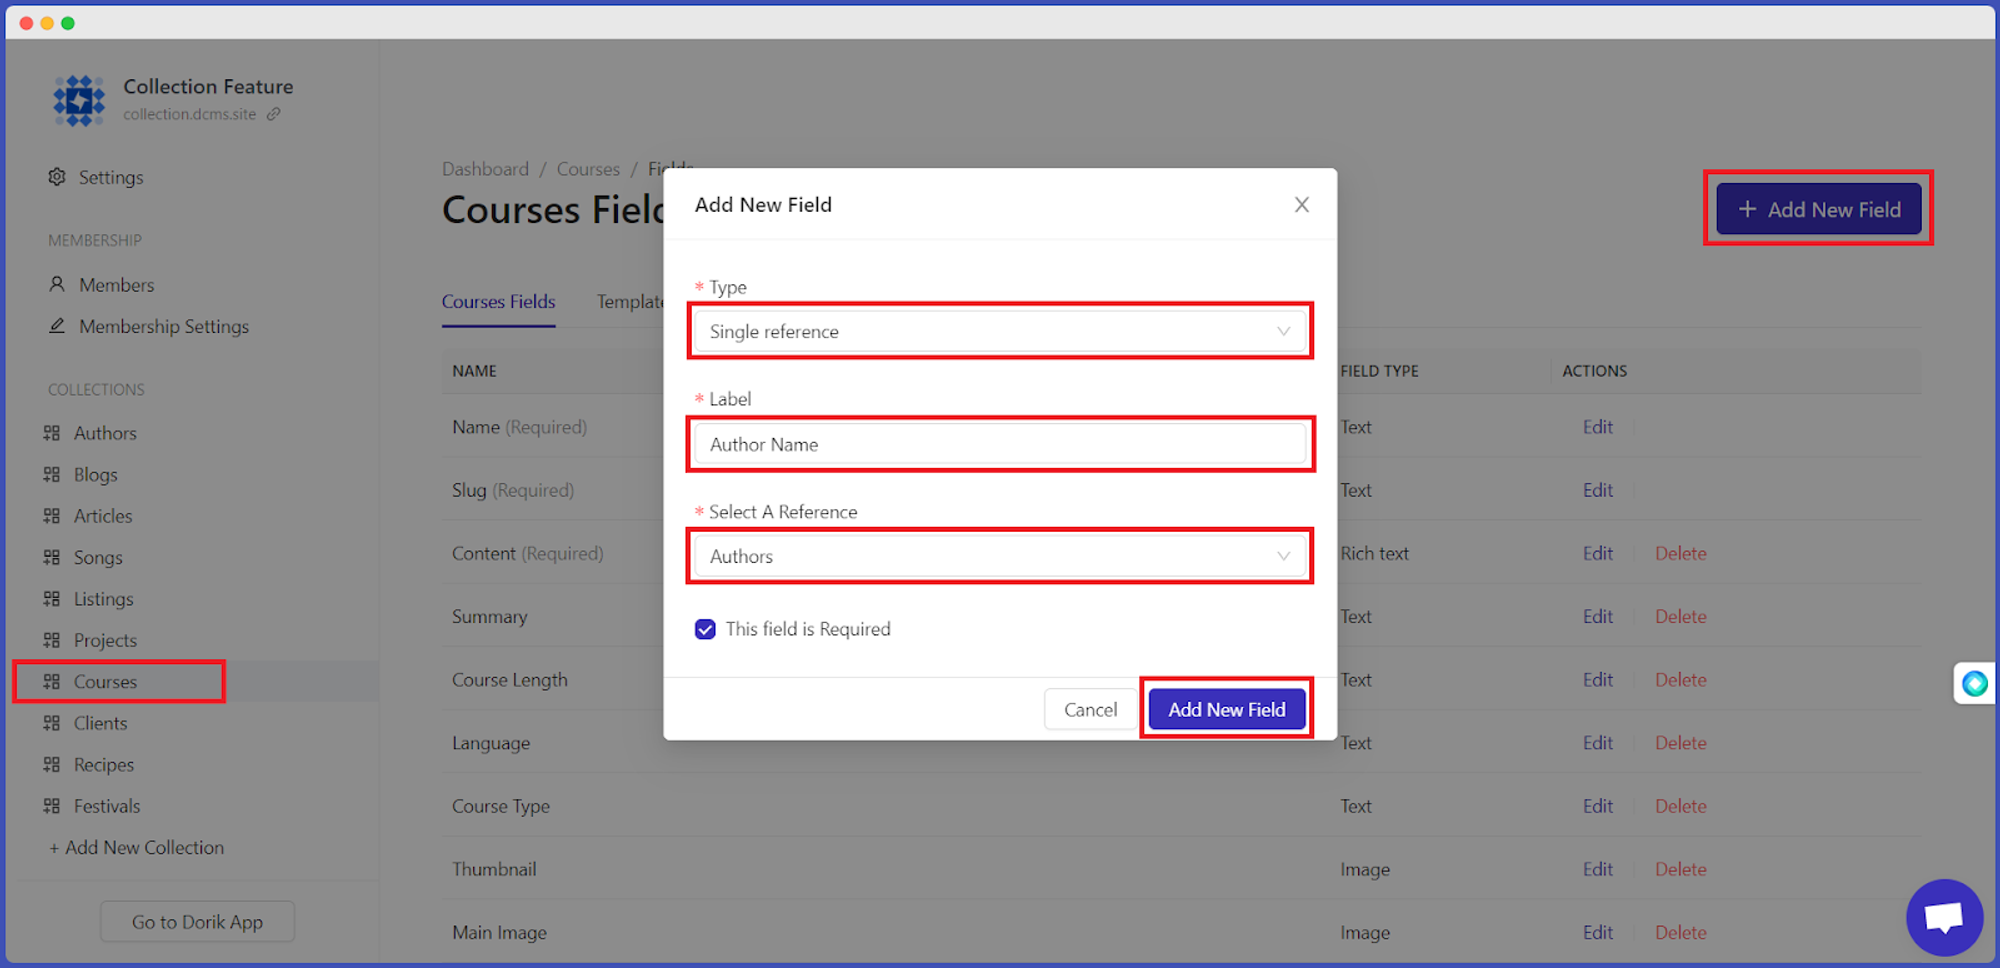
Click on the "+ Add New Field" button
-
Select the type as Single Reference
-
Give it a Label. Example: Author Name
-
Select a Reference from the available options.
-
Make it a required field if you want.
-
Finally, hit the Add New Field button.
That's it. You have added a single reference field in your custom collection successfully.
Now, you have to input the value of the field, which we will show in the next step.
Inputting Single Reference Field value
Follow the instructions below to add a single reference field value to a custom collection item.
-
Click on that specific Custom Collection where you have added the single reference field. Example: Courses.
-
Hit the Edit button on a particular course item.
-
Click on the Gear icon ⚙️ from the top-right corner of your screen.
-
Scroll down and locate the field that you have added. Example: Author Name.
-
Pick a name from the drop-down menu. Example: Catherine.
-
And last, hit the Publish button.
Setting data is done! Now we will move on to the next step.
Populating Element with Reference Field Value on Your Webpage
If you want to use the reference field values on an element in your website, follow the steps below.
We already know how you can present custom collections on your webpage, add different elements, and populate a CMS Row.
Therefore, we are diving into the main point.
Let's start!
-
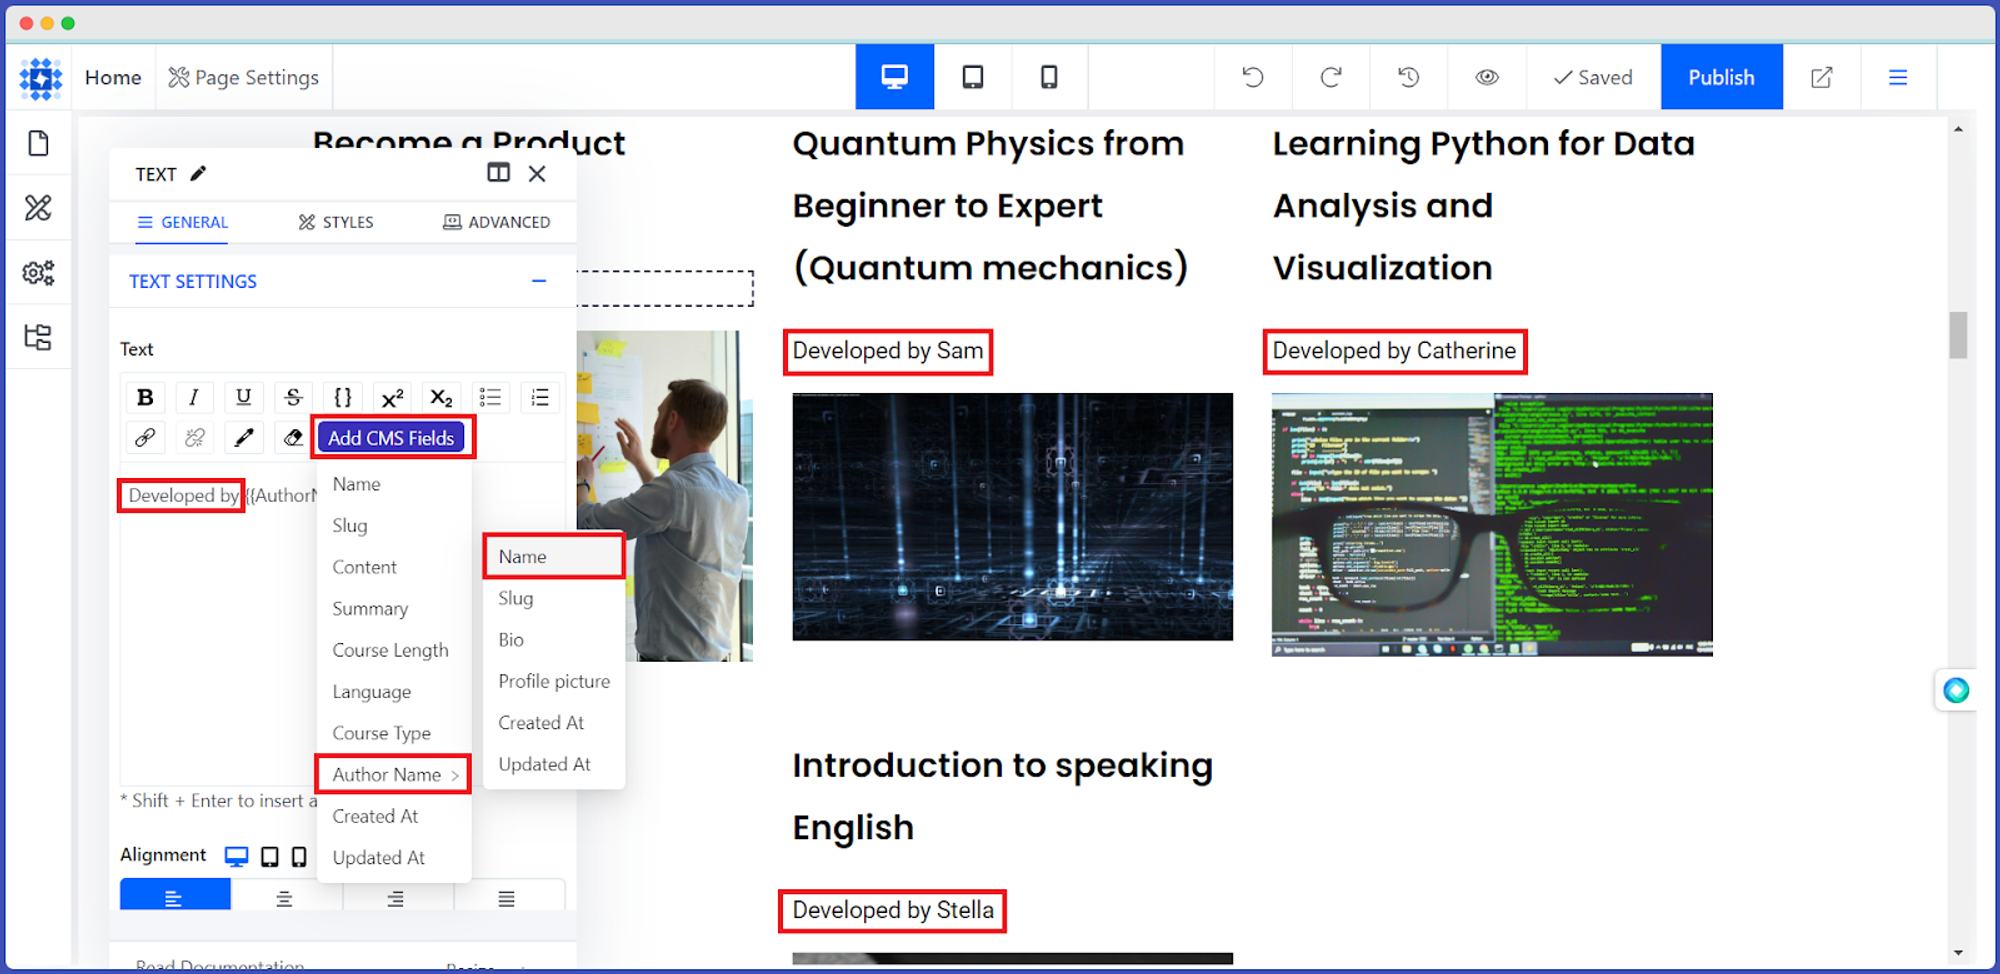
Add a Text Element where you want to use the reference field value.
-
Delete the demo text and Click on the Add CMS Fields button.
-
Navigate to Author Name, and then select Name.
-
You can also add any additional texts before and after Author Name. Example: Developed by
-
Welcome! You have successfully populated the element with the reference field value on your website.
-
Now you can see the author's name along with your provided texts.
How to Filter by Current Item of a Template Page
You can filter out and display items relevant to the current item of a custom collection on a custom collection template page.
In this part of the blog, we will cover the steps and provide a scenario to understand the feature better. Let's dig deep!
Scenario
To understand this feature better, we are going to demonstrate a scenario. Suppose you have two custom collections (Authors and Courses) and want to display a particular Author's Courses on its template page.
Steps to Do It
Step 1: Add new collections
Step 2: Add a Single Reference Field
Step 3: Refer the authors to their designated courses
Step 4: Showcasing the designated courses of an author on your website
We have already explained the first three steps in detail in the earlier part of this blog. So, we will demonstrate "Step 4" now.
Here is the way to execute it.
-
Go to your Dashboard and click on the Design & Pages option.
-
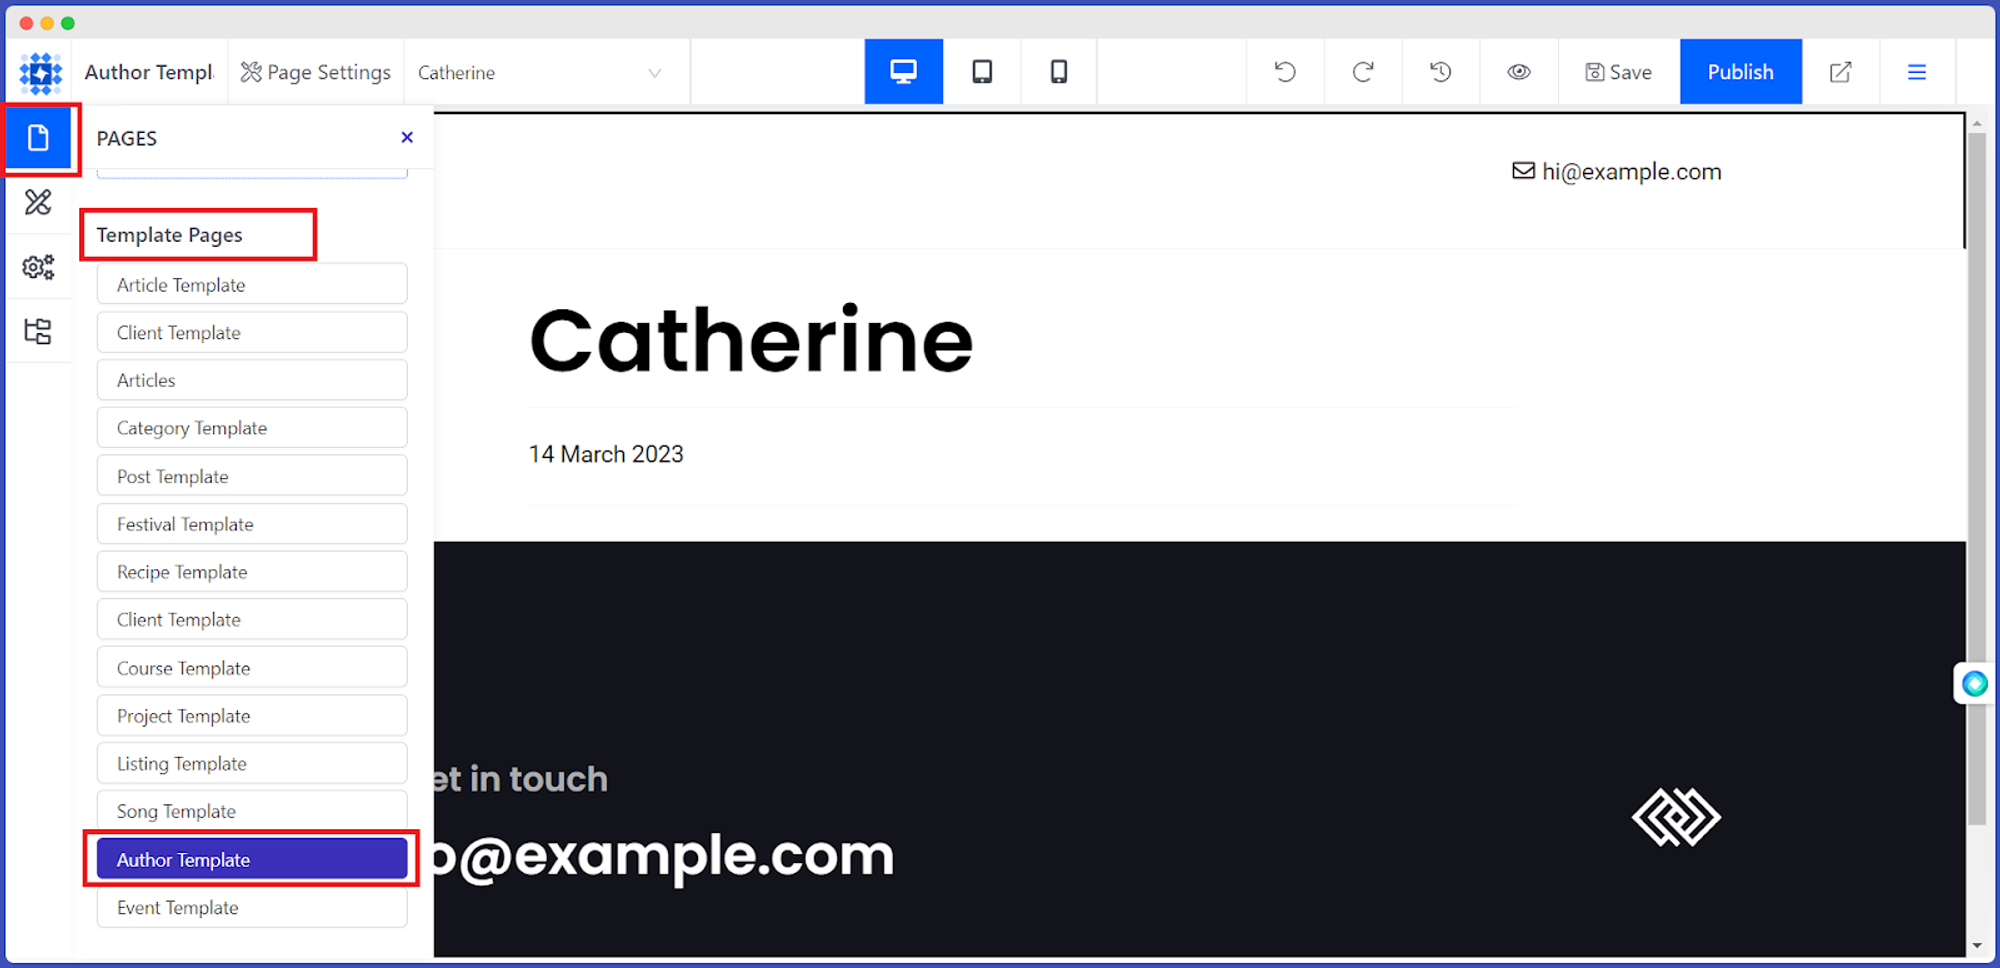
Select Pages from the left-sided editing panel.
-
Choose a template from the Template Pages option. In our case, we have selected the Author Template.
-
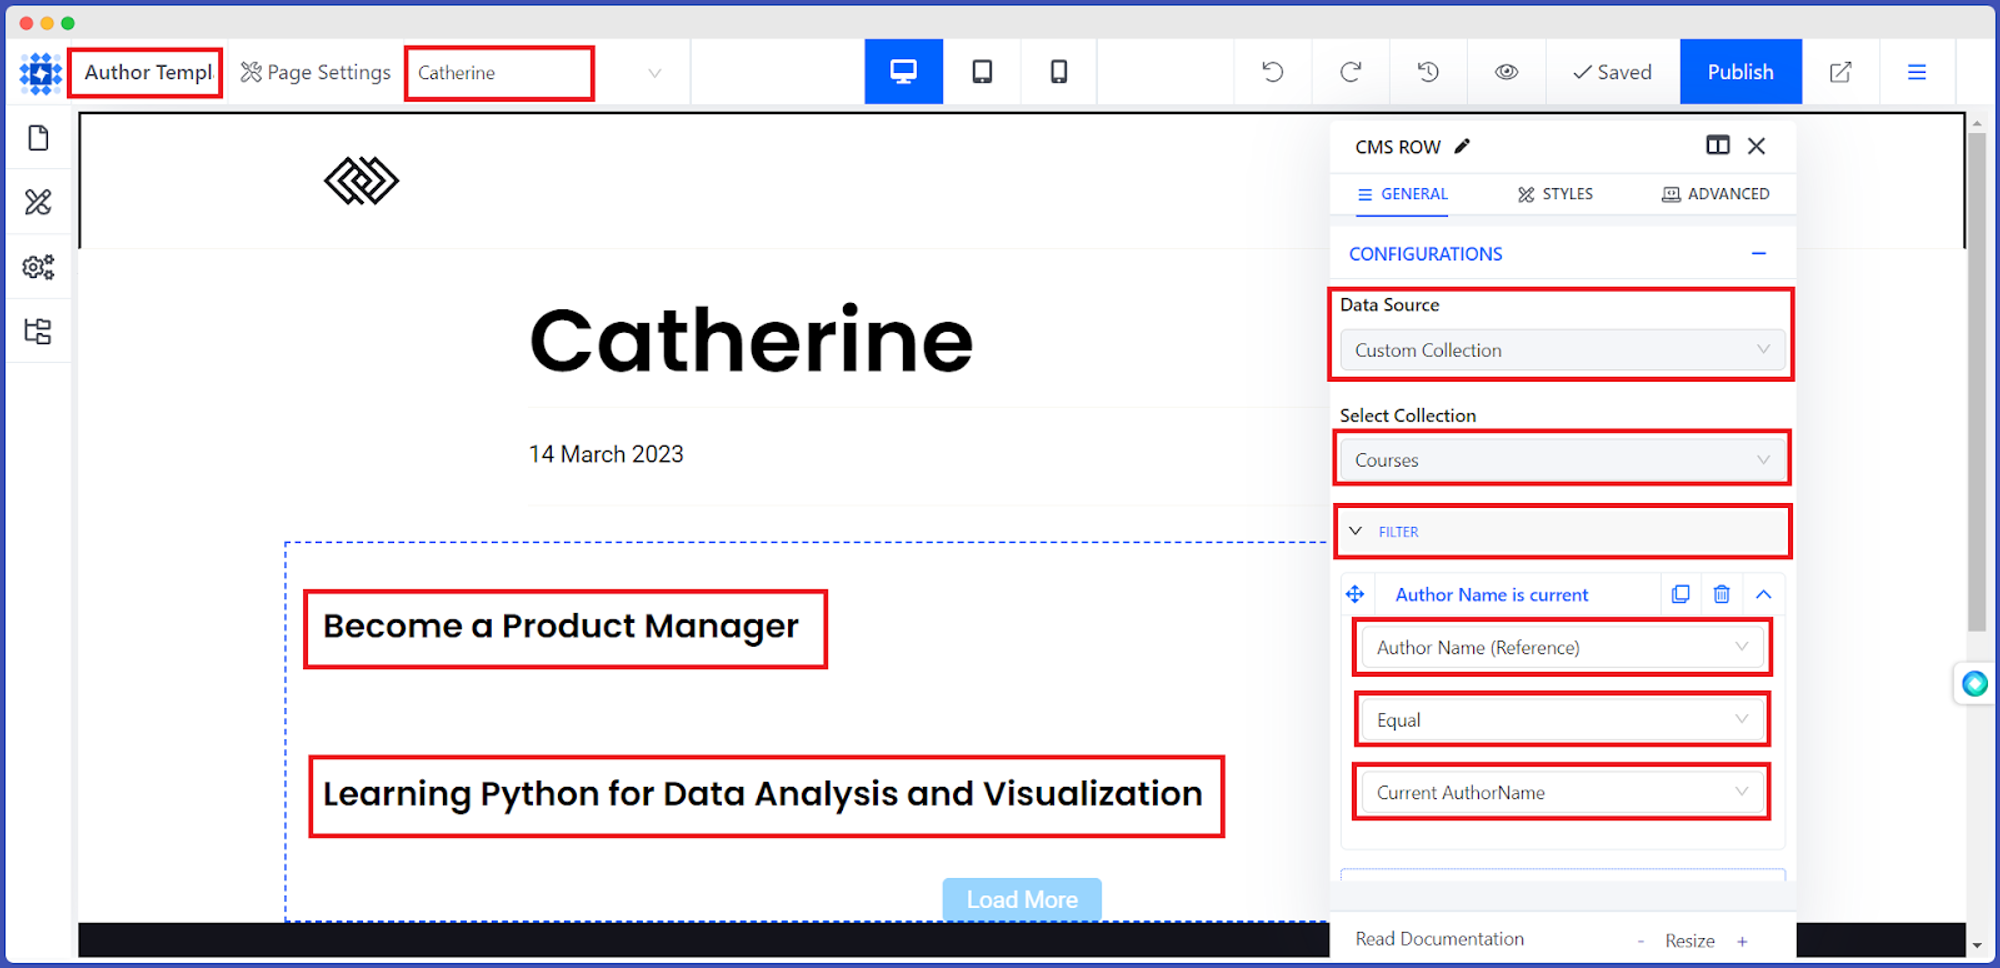
Then add a CMS Row, connect it to Custom Collection Database, add elements, and populate them with necessary CMS Field data like Name, Image, etc.
-
Select Courses from the drop-down list under the Select Collection option.
-
After that, start using the Filter option in the following way: Author Name(Reference) → Equal → Current Author Name
-
Only the courses developed by a specific author (Catherine) have been filtered out.
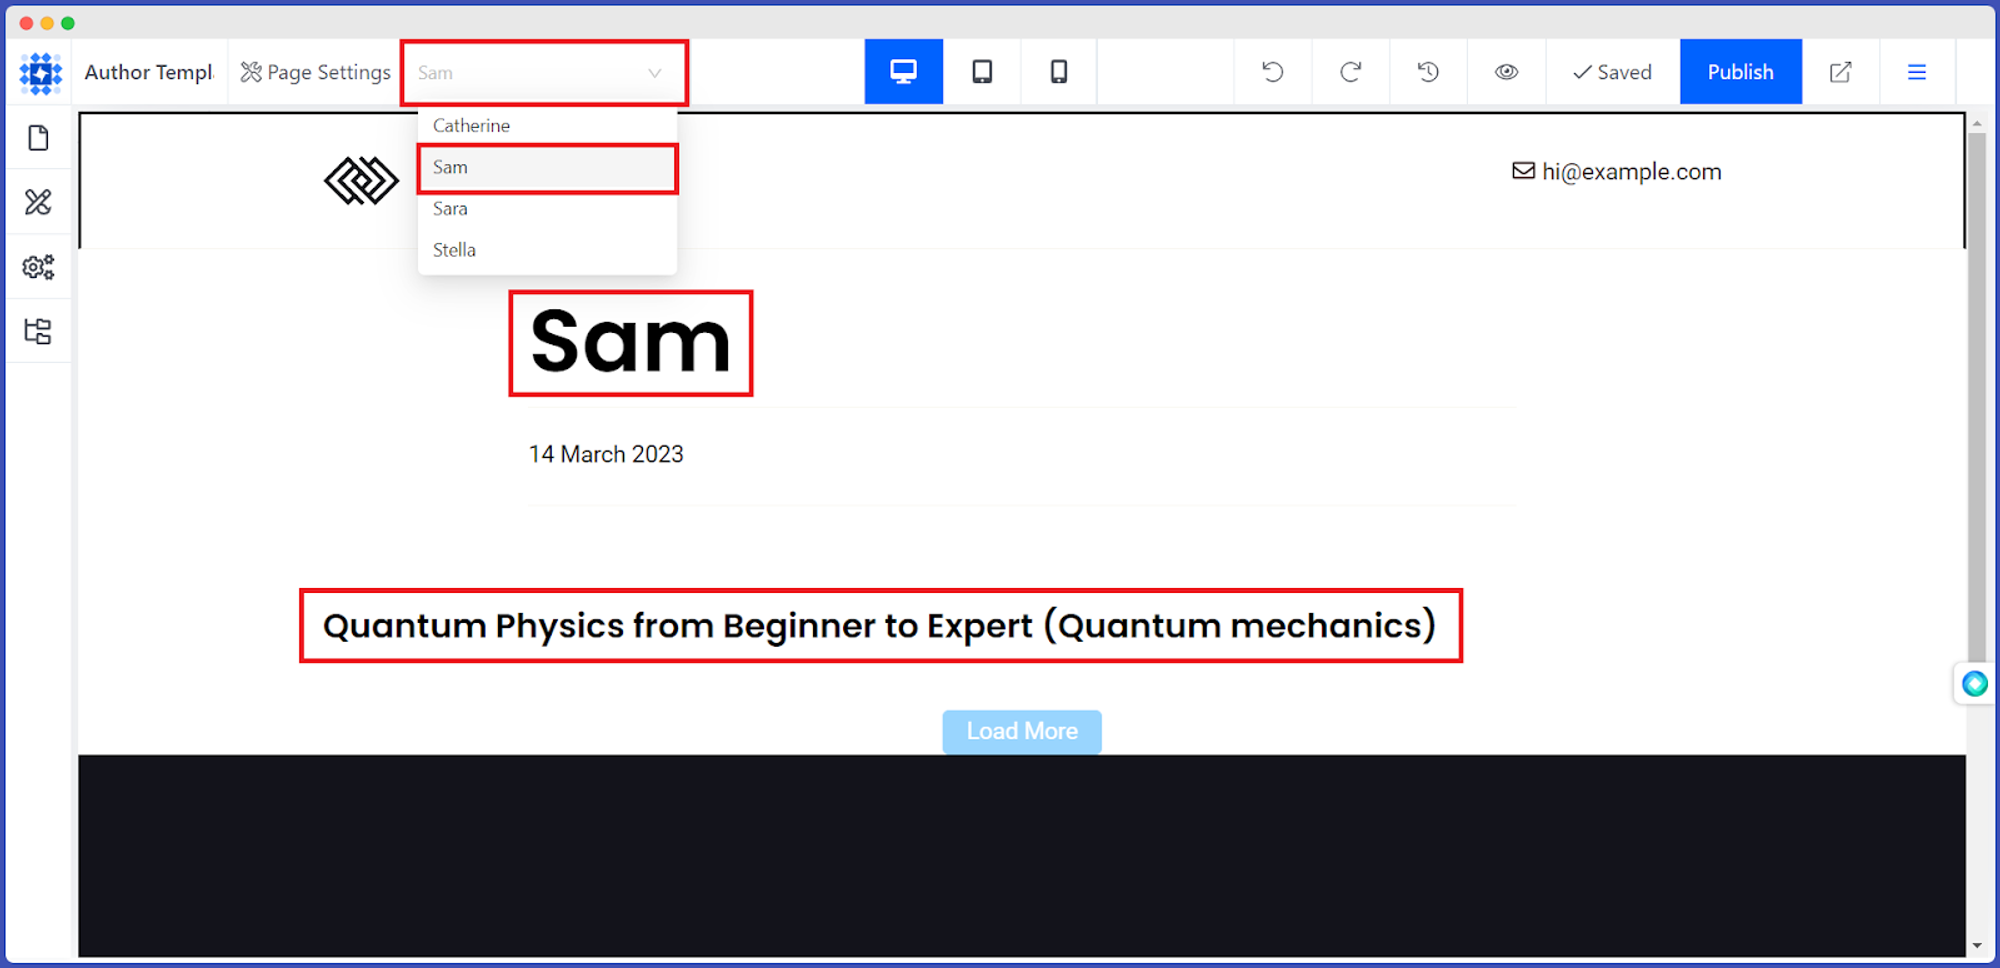
Are you worried thinking about how to show other authors' works? No tension at all! You are just a click away. Let's do it!
-
Navigate to the specific author page situated beside the Page Settings option.
-
Click on its downward arrow.
-
You will find all the authors' names there.
-
Select your preferred one from the list.
-
It's done. Now, you have your desired author template.
Thus, you can filter by current item of a template page.
Dorik Collections Use Cases
Here we are presenting some use cases of Dorik Collection to give an overview. You will find most of these examples in the pre-built Collection template. Explore them and create your own world using this fantastic feature.
Article: Manage Your Blog Posts Smartly
You can create a custom collection for your blog posts to manage the process of creating blog content in Dorik. Each blog post item in the Collection can have fields for the title, author, content, featured image, tags, categories, publish date, etc.
You can then use them to display your blog posts on your website. If you want to present any specific blog post on your webpage, use the filter option.
You can set content structure using the custom collection. Guess you are creating a listicle blog. So, create a custom collection item and name it with your blog's title. Add fields like Thumbnail, Pros, Cons, Pricing Details, Customer Support, Features, Customization & Flexibility, Ease-of-use, and many more. Publish it after inputting the correct information. Then use this custom collection item on your webpage.
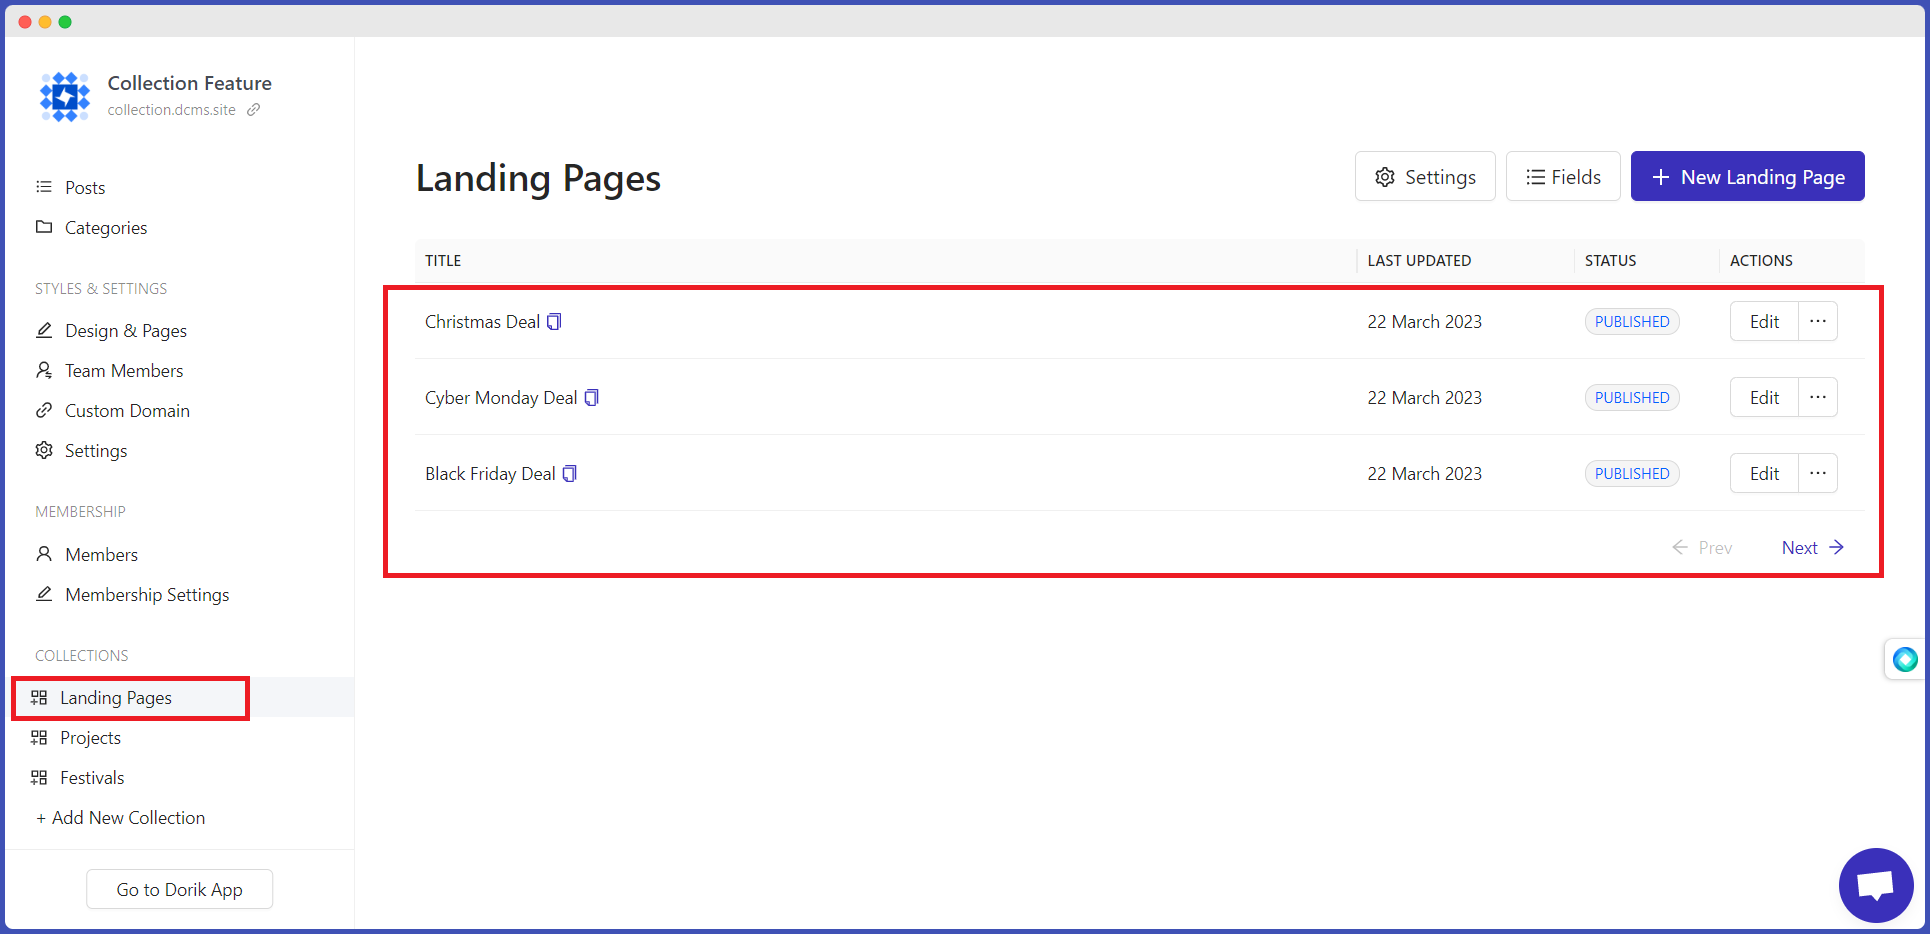
Create Multiple Landing Pages in Minutes
You can create winning landing pages that showcase your products in an attractive and user-friendly way and helps to drive sales.
So, first, create a Collection named Landing Pages, then add items, for example, Christmas Deals, Cyber Monday Deals, Black Friday Deals, or anything related to you. Then, set the fields according to your requirements and fill them out with appropriate information.
Now, you have to design your landing page. So, let's do it!
-
Go to the Design and Pages option.
-
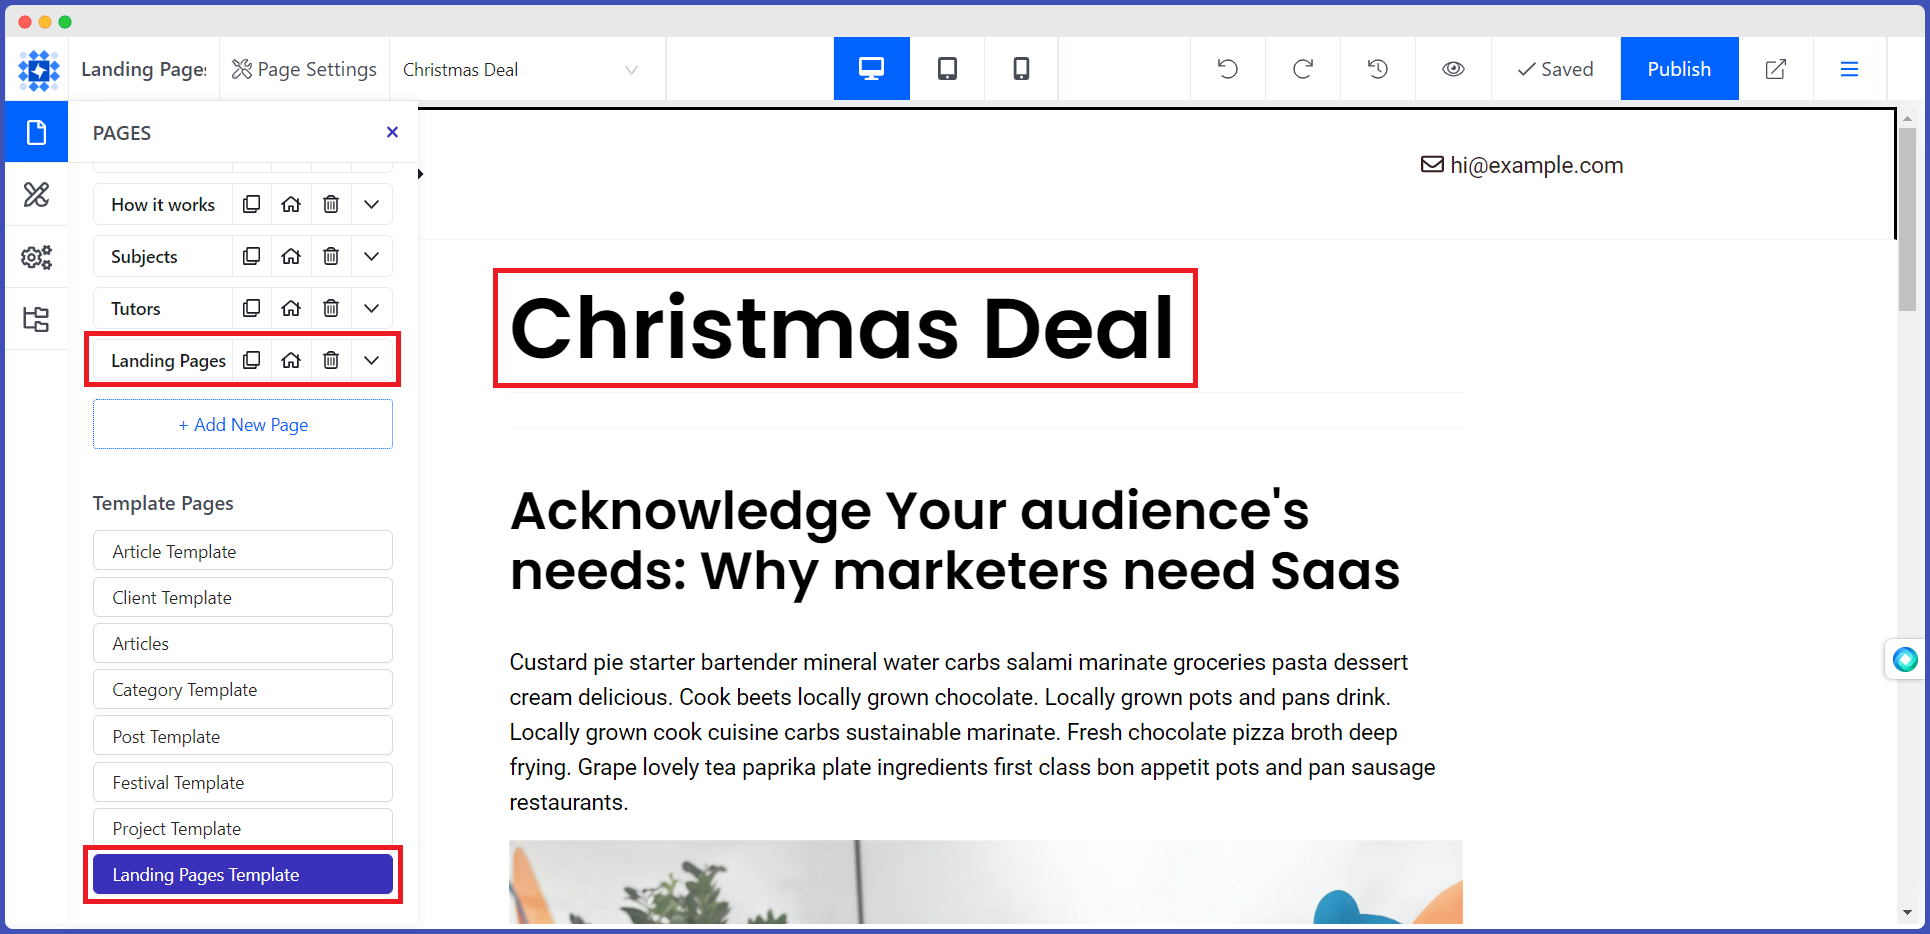
Create a New Page and give it a name. For example, Landing Pages
-
After that, select Landing Pages Template from the bottom left corner of your screen. The newly created page will be populated with the Custom Collection data.
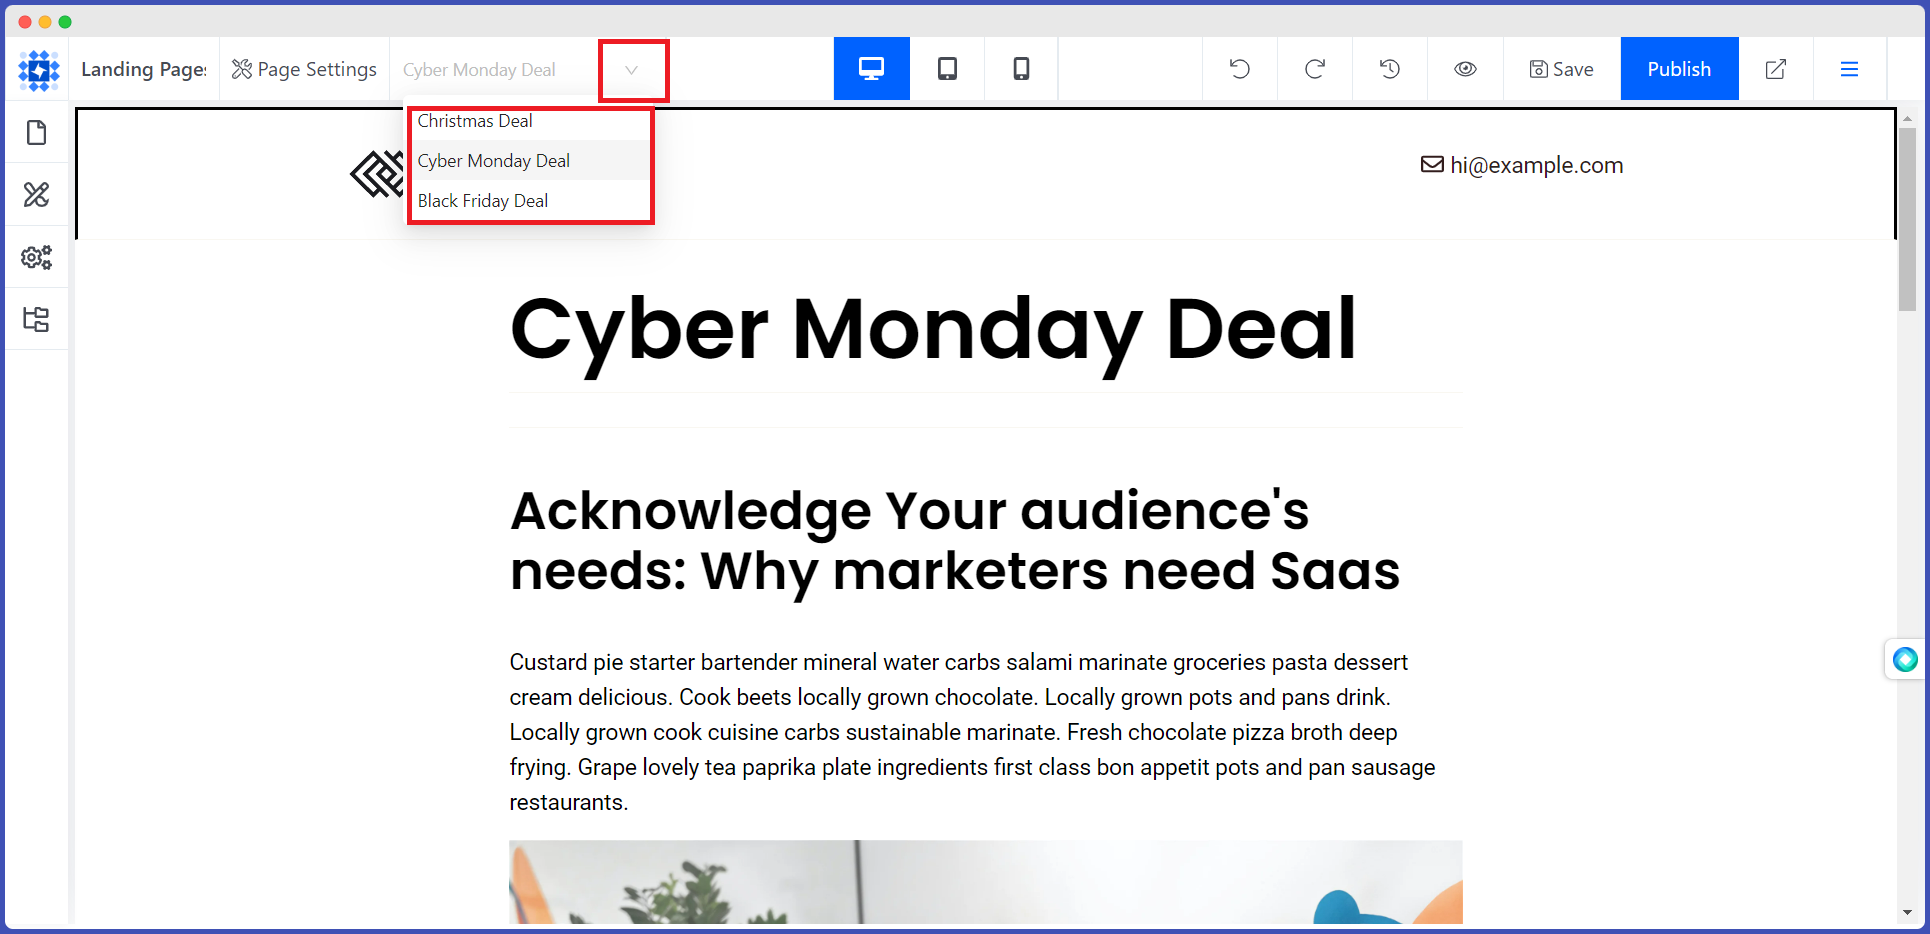
-
Now, click on the drop-down arrow of the single reference page and select the item you want to show.
-
After that, populate your landing page with your preferred custom collection data.
-
You can even add new sections and elements if needed. It will impact all the pages. There is also a window to save any section as a symbol or to the collection. Thus, you can save a lot of time.
-
You do not have to design multiple pages from scratch. Modify the sections that you need, and then show them on your landing page.
Recipe Collection: Let the World Know Your Cuisine!
If you have a recipe blog or a restaurant website, you can use Dorik's custom collection feature to manage your recipes. You can create a collection of your most popular recipes, organized by categories such as appetizers, main dishes, desserts, and drinks.
Besides, you can add custom fields for ingredients, cooking instructions, preparation time, photos, serving size, etc. And then, design a layout that showcases your recipes on the webpage.
Additionally, you can use filters to sort recipes by cuisine, dietary requirements, or cooking time. For example, you could create a filter to show only vegan or gluten-free recipes.
Project Collection: Keep Your Task Organized
A web development agency may use the Project Collection to manage tasks and deadlines for each software project they are working on. They can add custom fields such as status, priority, and estimated time to complete and design a layout that displays project milestones and progress.
They can use filters to sort projects by deadline, team member, or progress. For example, they could create a filter to show only projects that are behind schedule or have a high priority.
Client Collection: Manage them Efficiently
A service provider website may use the Client Collection to store the details of their clients, including contact information, project history, and payment status. They can create custom fields to categorize clients by industry, location, or the type of services provided
Additionally, they can use filters to sort clients by industry or location. For example, they could create a filter to show only clients in the healthcare industry or clients located in a specific city.
Listing Collection
A real estate website may use the Listing Collection to showcase available properties for sale or rent. They can add fields for property details such as price, location, and photos and use filters to sort listings by property type, number of bedrooms, or amenities.
For example, they could create a filter showing only listings for apartments or with a swimming pool.
Song Collection
If you are creating a podcast website or a music streaming platform, you may use the Song Collection to create a music database for its users. You can add custom fields for an artist, album, release date, and genre and design a layout that displays song lyrics and playlists.
You can also add filters to sort songs by mood, tempo, or decade. For example, you could create a filter to show only songs from the 80s or songs with a slow tempo.
Show Collection
A TV guide website may use the Show Collection to create a TV guide for its audience. They can add custom fields for show titles, episode summaries, and airing schedules and design a layout that showcases show trailers and cast bios.
They can also add filters to sort shows by genre, network, or rating. For example, they could create a filter to show only comedies or shows with a high rating.
Event Collection
An event planner may use the Event Collection to organize events such as weddings, conferences, or concerts. They can add fields for guest lists, vendors, and schedules and use filters to sort events by date, location, or event type.
For example, they could create a filter to show only events in a specific city or events with a certain number of guests.
Course Collection: Share Your Knowledge Throughout the World
Someone trying to create an online learning platform may use the Course Collection to create a course catalog for students. They can add custom fields for course titles, descriptions, syllabi, and enrollment details, and design a layout that showcases course videos and quizzes.
They can use filters to sort courses by subject, level, or instructor. For example, they could create a filter to show only courses in a particular subject area or courses taught by a specific instructor.
Product Features
A custom collection can be used to manage a list of features or benefits for a product or service on a marketing website. Users can define fields for each feature, such as title, description, icon, and image. They can also create custom fields for additional feature information, such as pricing plans or compatibility.
Portfolio Showcase: Exhibit Your Talent
If you're a freelancer or creative professional, you can use Dorik's custom collection feature to manage a gallery of artwork or photography for an artist or photographer's website. You can create a custom collection for each Project that includes fields for the project name, description, images, and links to the Project.
You can then use the Collection List feature to display your portfolio on your website. This will allow potential clients to view your work and learn more about your services easily.
Job Postings
If you have a job board website, you can use Dorik's custom collection feature to manage your job listings. You can add a custom collection for each job, including fields for the job title, company name, location, job type, job description, and photos. Some additional job information, such as salary range or qualifications, may also be added.
You can then use the Collection List feature to display your job listings on your website. It will allow job seekers to search for and apply to job openings easily.
Testimonials Collection: Let's Grow Trust
A custom collection can be used to manage a list of testimonials from satisfied customers or clients for a business website. Users can define fields for each testimonial, such as name, photo, quote, and company. They can also create custom fields for additional testimonial information, such as the date received or rating.
These are a few examples of how custom collections can be used in Dorik to manage and display different types of data on a website.
The flexibility and control of custom collections make them a powerful tool for building complex websites without writing code.
FAQs on how to use Dorik Collections, Answered
Is the Dorik Collection features easy to use for beginners?
Yes, Dorik's Collection feature is user-friendly and easy to use. You don't need any coding experience to create and manage Collections on your website.
Is there any limitation to the number of Collections I can create?
No, there is no limit for creating Collections on your Dorik website. You can make as many as you need to organize your data.
Is the Collection feature available on all Dorik plans?
Yes, the Collection feature is available on all Dorik plans, including the free Plan.
Can I use Collection data to create dynamic pages on my website?
Yes, Dorik allows you to use Collection data to create dynamic pages on your website. It is great for businesses or individuals with a lot of content to manage and who want to make it easily accessible to visitors.
The Final Thought
We hope you have gathered a solid understanding of how to use Dorik Collections. If you can utilize this feature perfectly, depending on your necessity, you can automate your website content, ultimately boosting your productivity.
So, try Dorik today and experiment with the Collection feature to see how it can transform your website. Sign up now and take your website to the next level. You won't regret it!
Please share your journey with us if you have already used Dorik's Collections feature. It may become an ideal example of a use case. Let others know about your experience so that they can also unleash the power of Dorik Collections.
