Creating a professional website is now easier than ever with the uprising of website builders and AI tools. You can get a website up and running within hours without any web development skills with the help of them.
In this guide, we’ll show you the step-by-step process to create a real estate website that will bring more clients and boost your revenue.
Let’s get started.

How to Create a Real Estate Website: Step-by-Step Guide
To create a website for your real estate business, follow the steps below:
-
Decide on Your Website Type
-
Choose a Website Builder
-
Select a Domain and Hosting Service
-
Create the Website
-
Customize the Look of Your Website
-
Add Search and Filtering
-
Add Your Property Collection with Visuals
-
Include Must-Have Real Estate Website Features
-
Test and Publish Your Website
-
Promote Your Website
[Note: You can literally build any website, including a real estate website, with Dorik in just 4 steps. However, to perfectly optimize and personalize your real estate website, adhere to all the steps we discuss here.]
Now that we know what we need to do, let’s go into the details.
Step 1: Decide on Your Website Type
Before jumping into design and development, take time to map out your strategy. This will ensure that your website looks great and serves its intended purpose effectively.
Real estate websites come in various forms, each catering to different needs. Let’s explore the most common types:
1. Property Listing Website
This type is ideal for real estate agents or agencies that manage multiple properties. It should include:
-
Advanced search filters,
-
Detailed property descriptions
-
High-quality images and videos, and
-
Possibly virtual tours.
The focus should be on providing visitors with all the information they need to make an informed decision.
2. Real Estate Agency Website
This website type is more about showcasing your agency’s services, team, and success stories. You’ll want to include sections like “About Us,” “Our Team,” and “Testimonials” to build credibility.
Property listings can still be a part of this website, but the main emphasis should be on your brand and expertise.
3. Real Estate Marketplace
These websites act as platforms where buyers, sellers, renters, and landlords can connect. They typically feature:
-
Listings from multiple real estate agencies.
-
Advanced filters for buyers or renters to find properties based on their preferences.
-
Tools to compare properties side-by-side.
The focus is on offering users a wide variety of choices from various agents or owners.
4. Real Estate Consultancy Website
This type of real estate website is ideal for those offering consultancy services. The website should focus on your expertise and the solutions you provide for this type. Include case studies, client testimonials, and detailed service descriptions to attract potential clients seeking expert advice.
5. Property Management Website
This type of website is designed for property managers who oversee rental properties. These websites help manage listings, collect rent, and track tenant information.
Key features include:
-
Tenant portals for communication.
-
Online rent payment systems.
-
Maintenance request forms.
-
Detailed property management services.
A property management website makes the management process smoother. It offers a professional platform to handle multiple properties efficiently.
6. Realtor Personal Brand Website
If you’re an individual realtor, then this type is for you. This personal website should highlight your personal achievements, client testimonials, and a portfolio of the properties you’ve handled. This type of website is all about building trust and showcasing your unique value proposition.
7. Real Estate Aggregator Website
Real estate aggregators pull property listings from various sources, such as real estate agencies, individual sellers, and property portals. These websites focus on:
-
Offering comprehensive search tools.
-
Consolidating property listings from multiple platforms.
-
Providing extensive data and market insights.
Their goal is to give visitors a full view of the real estate market.
8. Selling and Buying Website
This type of website focuses on facilitating property sales. It’s ideal for agencies or individuals looking to help clients buy or sell properties. Important features include:
-
Dedicated sections for both sellers and buyers.
-
Tools for property valuation and market analysis.
-
Contact forms for inquiries.
-
Showcasing recent sales to build trust.
The emphasis is on streamlining the transaction process while showcasing expertise in buying and selling.
9. Property Renting Websites
These websites are designed specifically for listing rental properties. They should include:
-
Detailed rental listings with prices, availability, and lease terms.
-
Features for short-term and long-term rentals.
-
Tenant application forms.
-
Filtering options for property type, price, and location.
The focus of this type of website is on making it easy for renters to find properties to rent. It also offers landlords a platform to showcase their listings.
If you’re settled on your website type, let’s go to the next step.
Step 2: Choose a Website Builder
Now that you’ve planned your website type, it’s time to choose the best real estate website builder. We recommend using a website builder to create your website because it is the easiest and most cost-effective way to build a website.
You don’t need any coding or design experience to build your website.
Here are some features to look for in the website builder to create a real estate website:
-
Property Listing Management: A top-tier website builder should make it effortless to add, edit, and remove property listings. Look for features that allow you to include detailed property descriptions, high-quality images, videos, and even virtual tours.
-
Interactive Maps: Ensure your builder integrates with services like Google Maps to enhance the user experience by providing visitors with a clear understanding of the property’s location and surroundings.
-
SEO Tools: Choose a builder that offers built-in SEO tools.
-
Templates: Select a website builder that offers a wide range of pre-made templates to make the website-building experience simple and convenient for you.
-
Blogging Capabilities: Your website builder should offer an easy-to-use blogging platform. That way, you can regularly share market updates, real estate tips, and industry news to build an audience if you want.
-
Mobile Responsiveness: The website builder should ensure your site is fully responsive for all devices.
-
Security Features: Security is not a luxury but a necessity for any website. Ensure your builder provides SSL certificates to offer a secure browsing experience and protect your site from spam and potential threats.
-
Ease of Use: You should be able to build your website conveniently. Features like a drag-and-drop builder can ensure that.
-
Customization Options: Choose a website builder that allows flexible customization options.
-
Integration Capabilities: You should be able to integrate your social media and marketing tools into your website.
Now that you know what to look for in your real estate website builder, let me introduce Dorik, the best AI website builder that offers them all. On top of that, it offers some additional features that will make your website-building experience fun and interactive.
Here are some additional features of Dorik:
-
AI website builder to generate websites with prompts
-
AI text generator to write your website copy with AI
-
AI image generator to create relevant visual elements
-
Dedicated white-label content management system to efficiently manage your website content
Step 3: Select a Domain Name and Hosting
Choosing the right domain name and hosting service is an important step because they’re core parts of your website. So, take some time to do this step to make the right decision.
Selecting a Domain Name
Your domain name is your website’s address on the internet. So, choose one that is memorable, easy to spell, and reflective of your brand.
Here are a few tips for selecting a perfect domain name:
-
Keep it Simple: Opt for a domain name that’s short, easy to type, and easy to remember. Avoid complex words or phrases that could be easily misspelled. For example, if your business is called “Prime Properties,” consider a domain like “www.primeproperties.com.”
-
Include Keywords: If possible, include relevant keywords related to your real estate business, such as “homes,” “properties,” or your location. This can help with SEO and make your domain more descriptive.
-
Choose the Right Extension: While ".com" is the most popular extension, you might also consider other top-level domain options like ".realestate" or ".properties" to make your domain more relevant to your industry.
-
Check Availability: Before settling on a domain name, make sure it’s available. You can use domain search tools to verify this and explore alternative options if your first choice is taken.
To purchase your domain name, visit domain registrar websites like GoDaddy or Namecheap. Check the availability of your chosen name and secure it.
Choosing a Hosting Provider
Your hosting provider is where your website will live on the internet. The right hosting service ensures that your site is fast, secure, and always available to visitors. Here’s what to look for when choosing hosting for your real estate website:
-
Storage Space: Real estate websites typically need to store a lot of high-resolution images, videos, and possibly virtual tours. For your real estate website, you can start with a hosting plan that offers around 10 to 20 GB of storage and 2 to 5GB of bandwidth.
-
Uptime Guarantee: Your website needs to be accessible at all times, especially since potential clients could be browsing properties at any hour. Look for a hosting provider that offers at least a 99.9% uptime guarantee to minimize the risk of your site going down.
-
Loading Speed: A fast-loading website keeps visitors engaged and reduces bounce rates. Make sure the hosting provider offers fast server speeds and, if possible, a Content Delivery Network (CDN) to ensure your pages load quickly, even during peak traffic times. Aim for less than 3 seconds of load time.
-
Scalability: As your real estate business grows, your website may need to handle more traffic and content. Choose a hosting provider that offers scalable plans so you can easily upgrade as your needs evolve.
-
Security Features: Protecting your website from cyber threats is essential, especially when dealing with sensitive client information. Look for hosting providers that offer SSL certificates, regular backups, and protection against malware and DDoS attacks.
Dorik can help you avoid traditional hosting complexities like uptime, storage limits, or technical management. Dorik takes care of these aspects for you to provide a smooth website-building experience.
With Dorik's premium plans, you receive unlimited CDN hosting storage. It’ll allow you to add as many property images and videos, blogs, or client testimonials as you need without worrying about space limitations.
Plus, every Dorik site includes SSL certification to ensure website security and protect your clients' data.
We’ll discuss how to connect a custom domain with your website in detail in the “Test the Website and Publish” section of this guide.
Step 4: Create Your Website
Dorik is one of the best AI website builders available, and it is perfect for creating any type of website. You can easily create a professional real estate website with Dorik without breaking a sweat.
In this section, we'll explore three different ways to create your site using the Dorik AI Website Builder.
1. Create Your Real Estate Website with AI
Dorik’s AI Website Builder is the fastest and easiest way to get your website up and running.
Here’s how to create a stunning real estate website using Dorik AI:
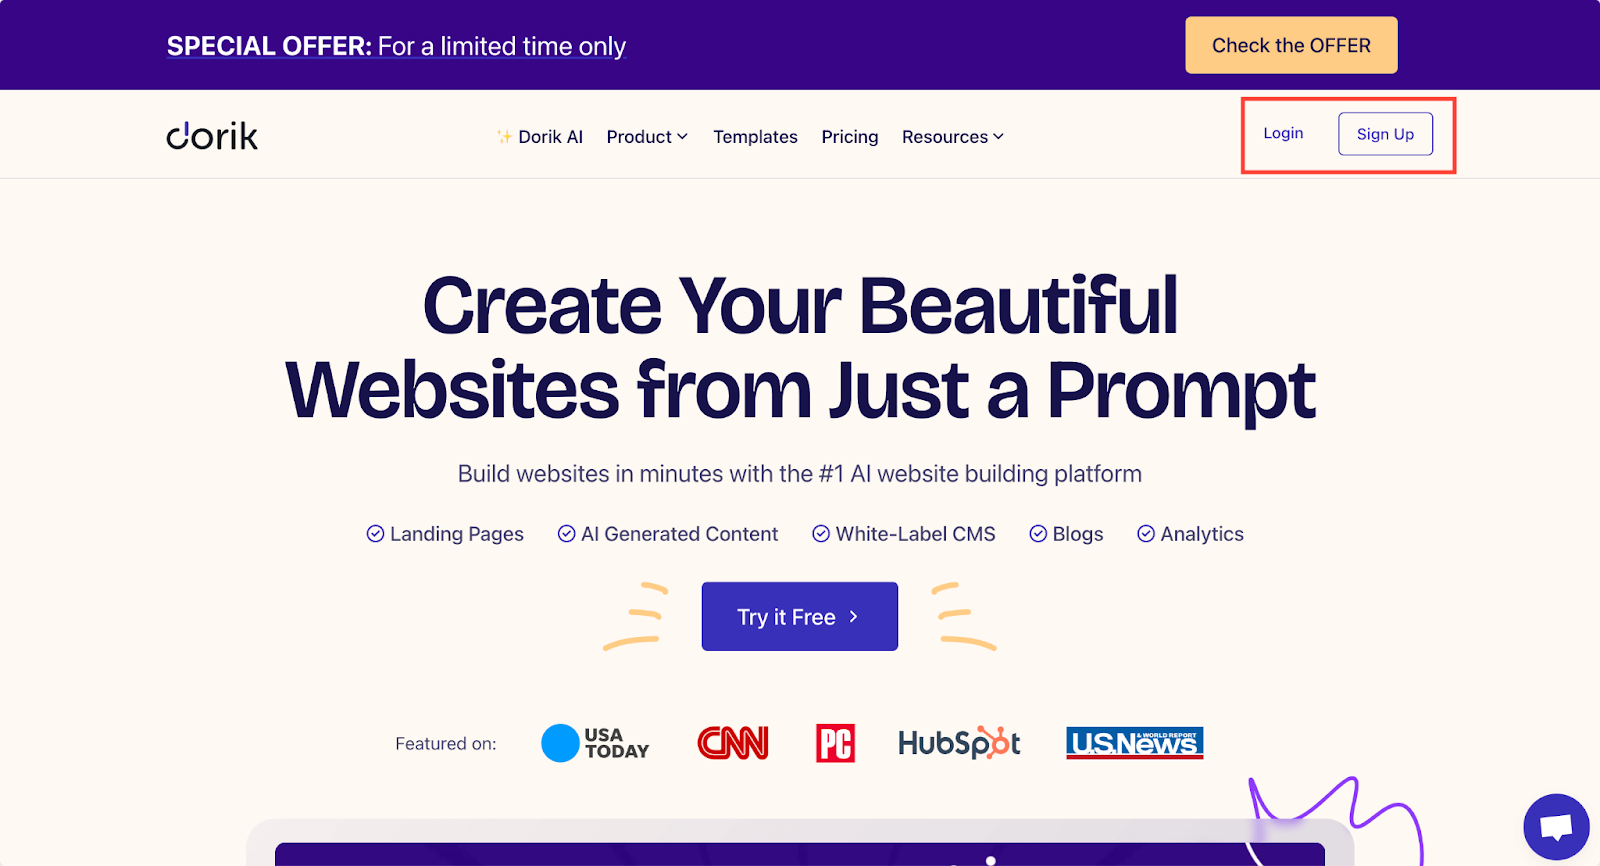
1. Sign up or log in to your Dorik account.
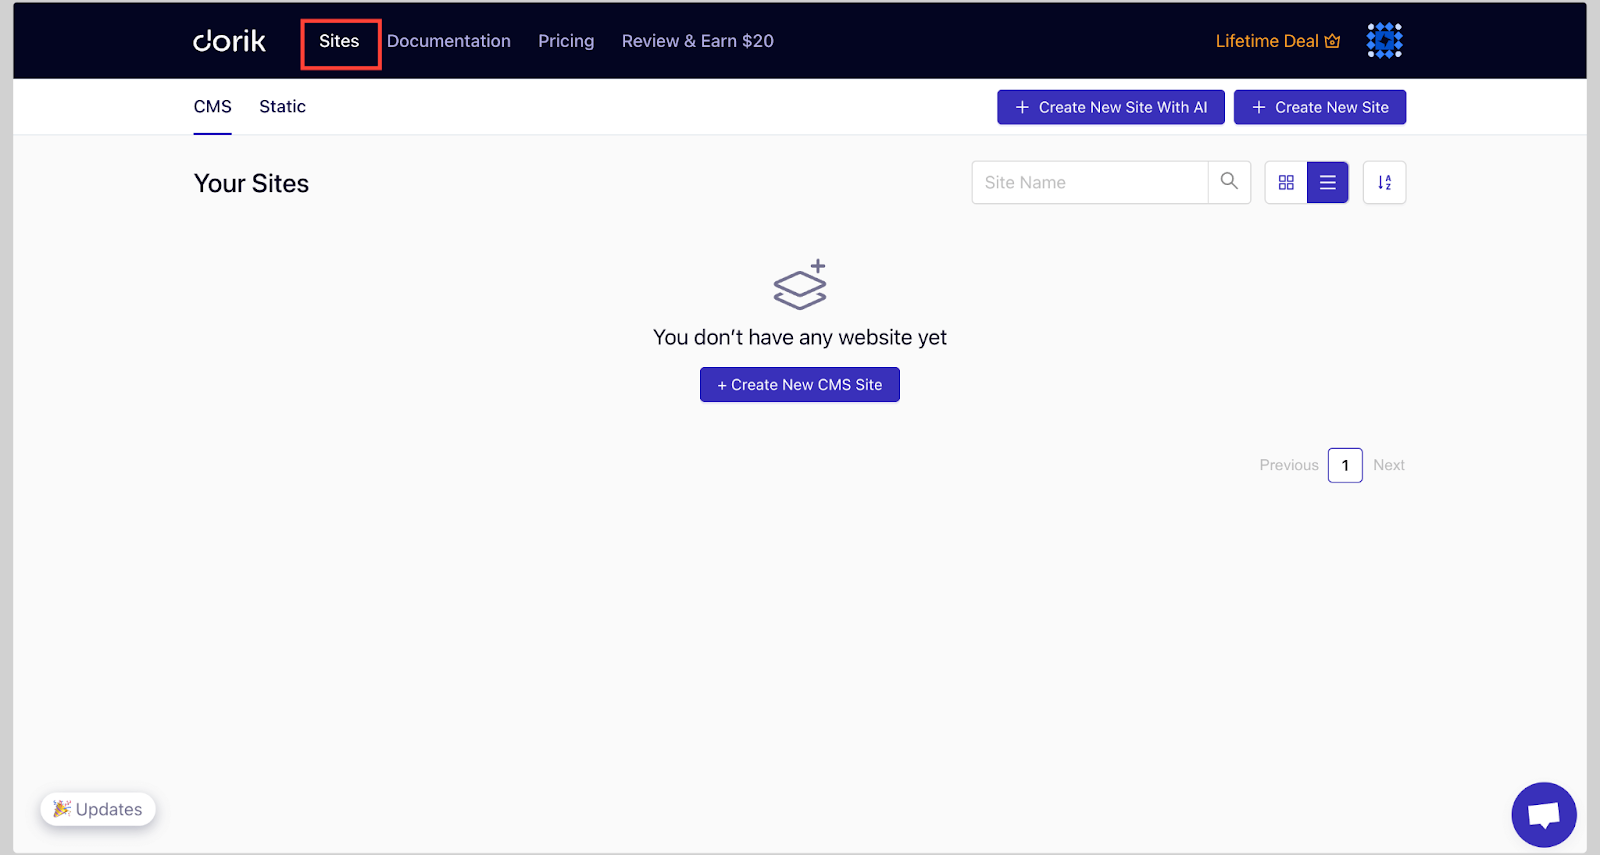
2. Navigate to 'Sites' on your dashboard.
3. Choose whether you want to create a CMS or a Static site (I’ve selected CMS here).
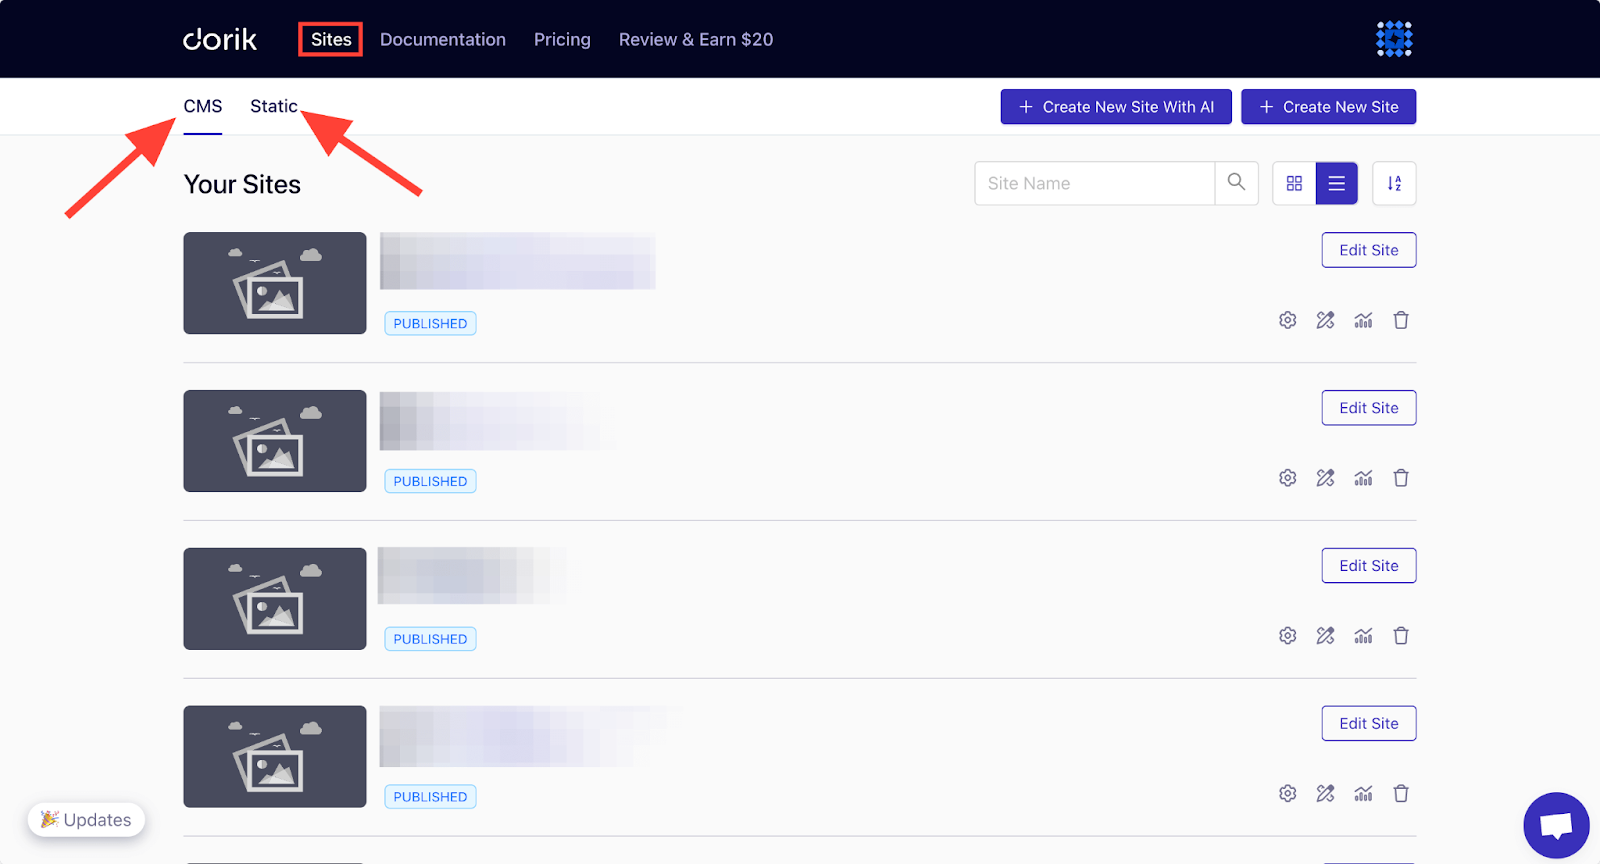
Opting for CMS allows you to create a dynamic website with features like membership, blogs, team collaboration, custom collections, and more.
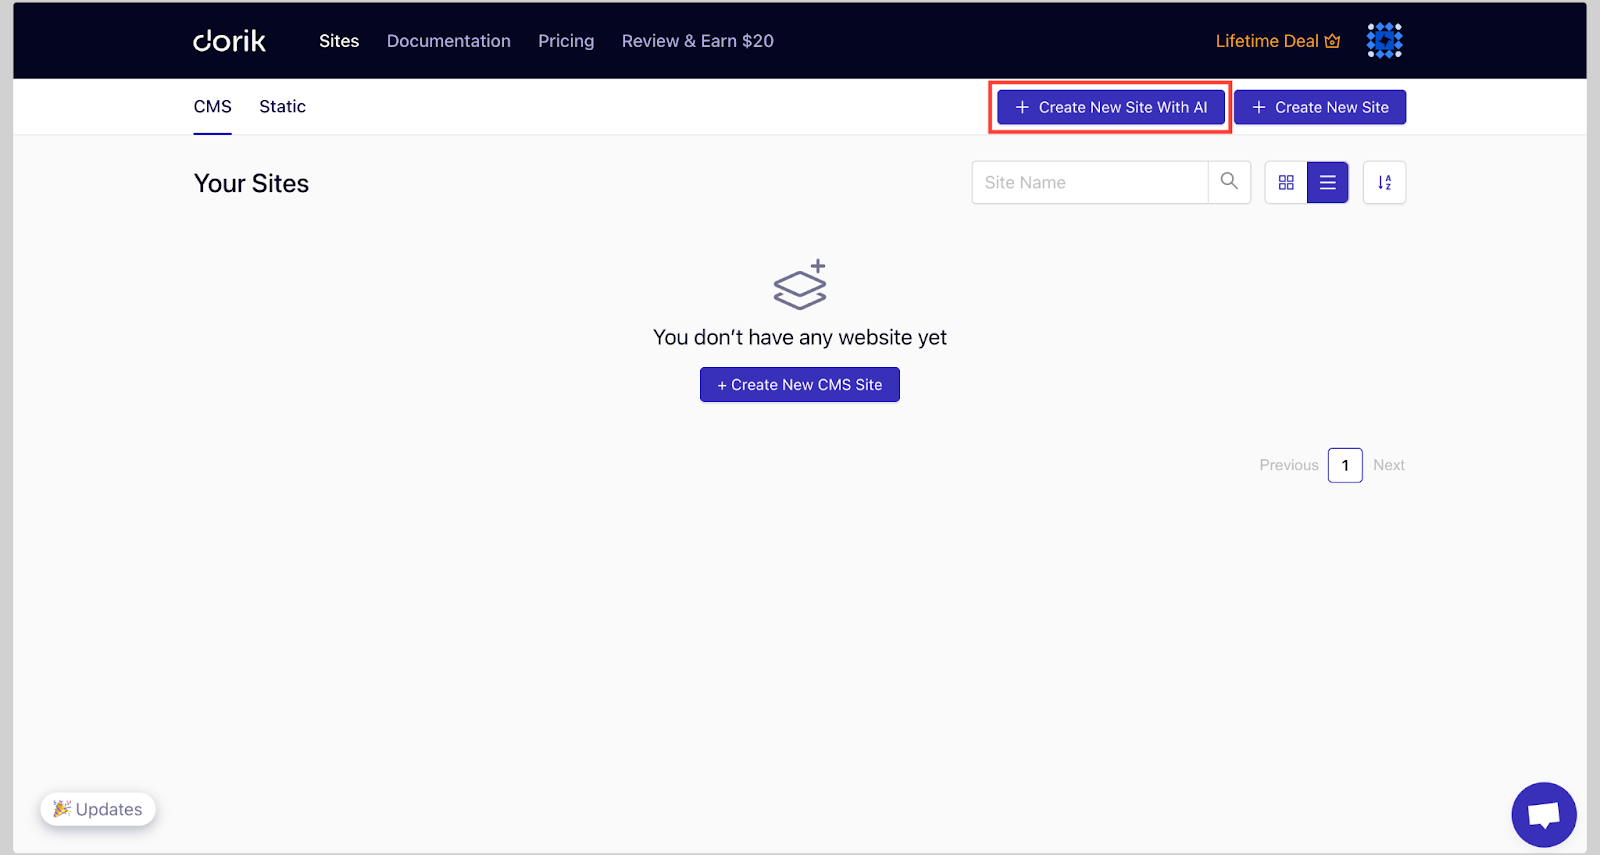
4. Click on "Create New Site with AI."
5. Enter your website name, write a detailed prompt describing your website requirements, and select your preferred language. You can also check out the example prompts to get an idea about how to write one.
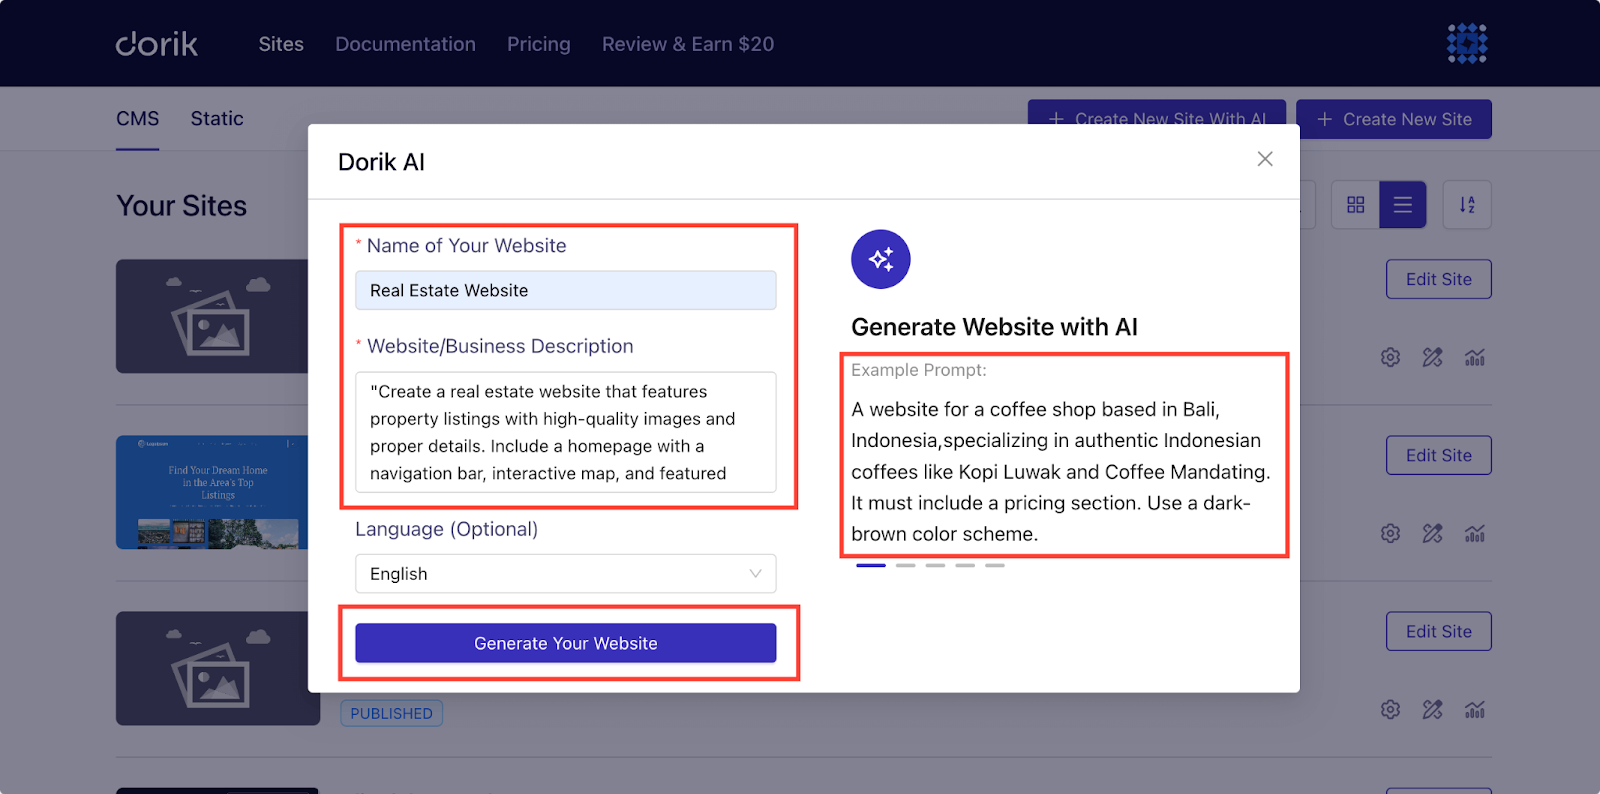
6. Click "Generate Your Website" and let Dorik AI work its magic.
For example, we used this prompt to create a real estate website with Dorik AI:
Prompt Example: "Create a real estate website that features property listings with high-quality images and proper details. Include a homepage with a navigation bar, interactive map, and featured listings. Add sections for an About Us page, client testimonials, and a contact form. Include relevant CTAs and use a clean, modern design with easy navigation and a professional look."
Here’s the result:

If you don’t like the AI-generated output, Dorik allows you to regenerate any section, content, or even the whole page using AI. You can regenerate as many times as you want until you find your desired result.
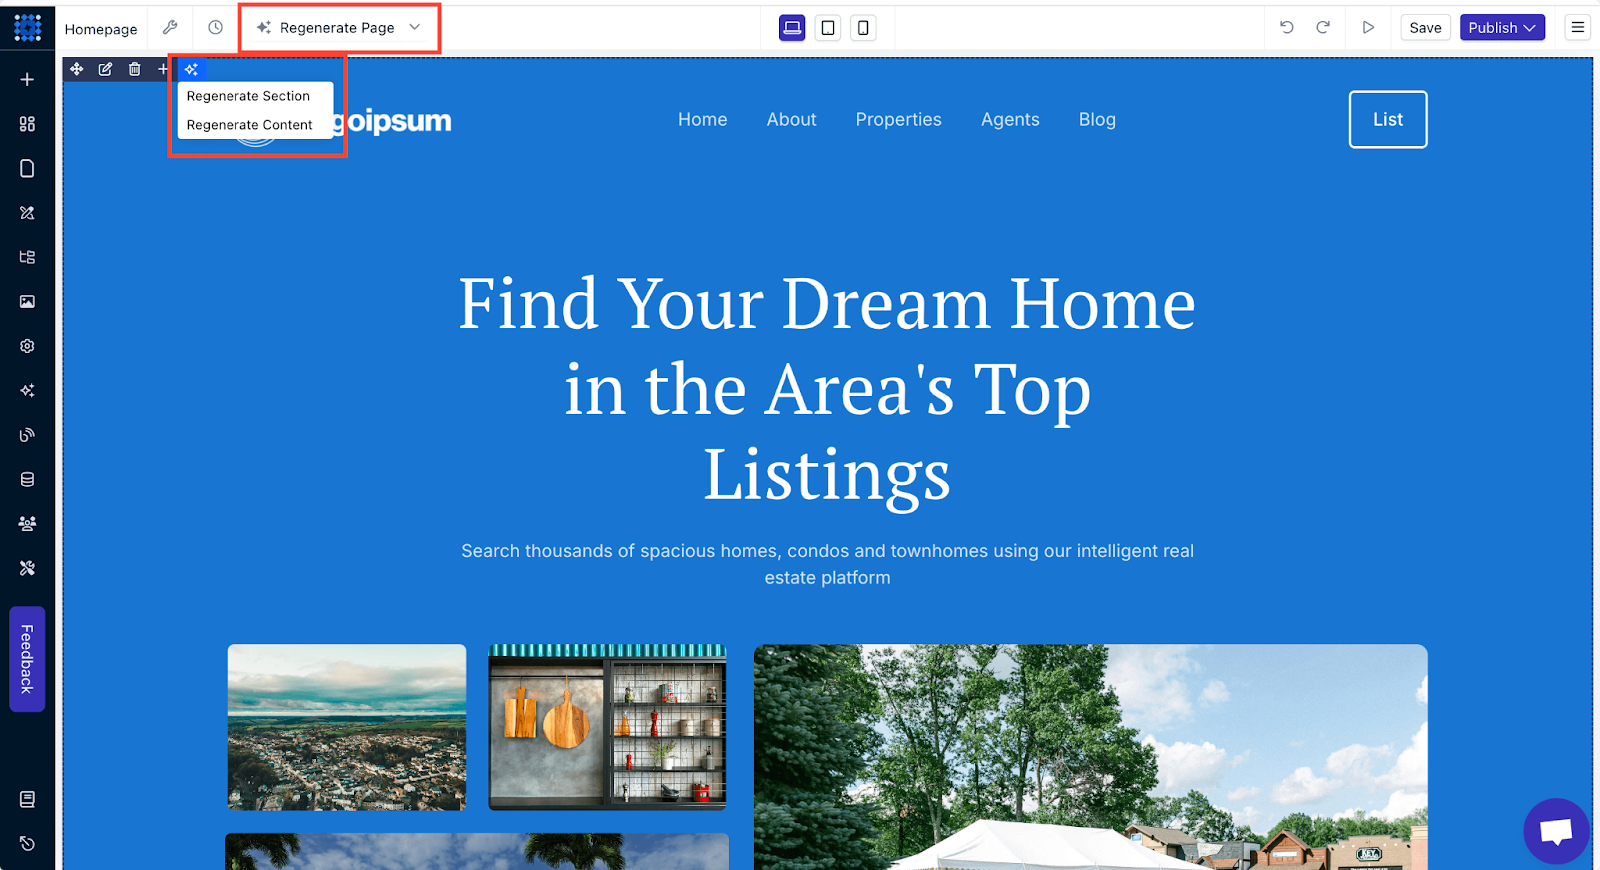
That’s convenient, right? You can also check out our video tutorial on how to use AI to build websites faster.
2. Create Your Real Estate Website with a Template
If you want more control over your website’s design, you can start with a template. Dorik offers dedicated templates for real estate websites. Using a template provides several advantages:
-
Expert-designed layouts ensure a professional and polished appearance.
-
Pre-built pages maintain consistency and save time during setup.
-
The pre-built sections are optimized for property listings, sharing client testimonials, and providing additional resources.
To create your real estate website using a template:
1. Log in to your Dorik account and go to the dashboard.
2. Navigate to 'Sites' on your dashboard. Choose between CMS and Static (we’re going with CMS here).
3. Click on “Create New Site”.
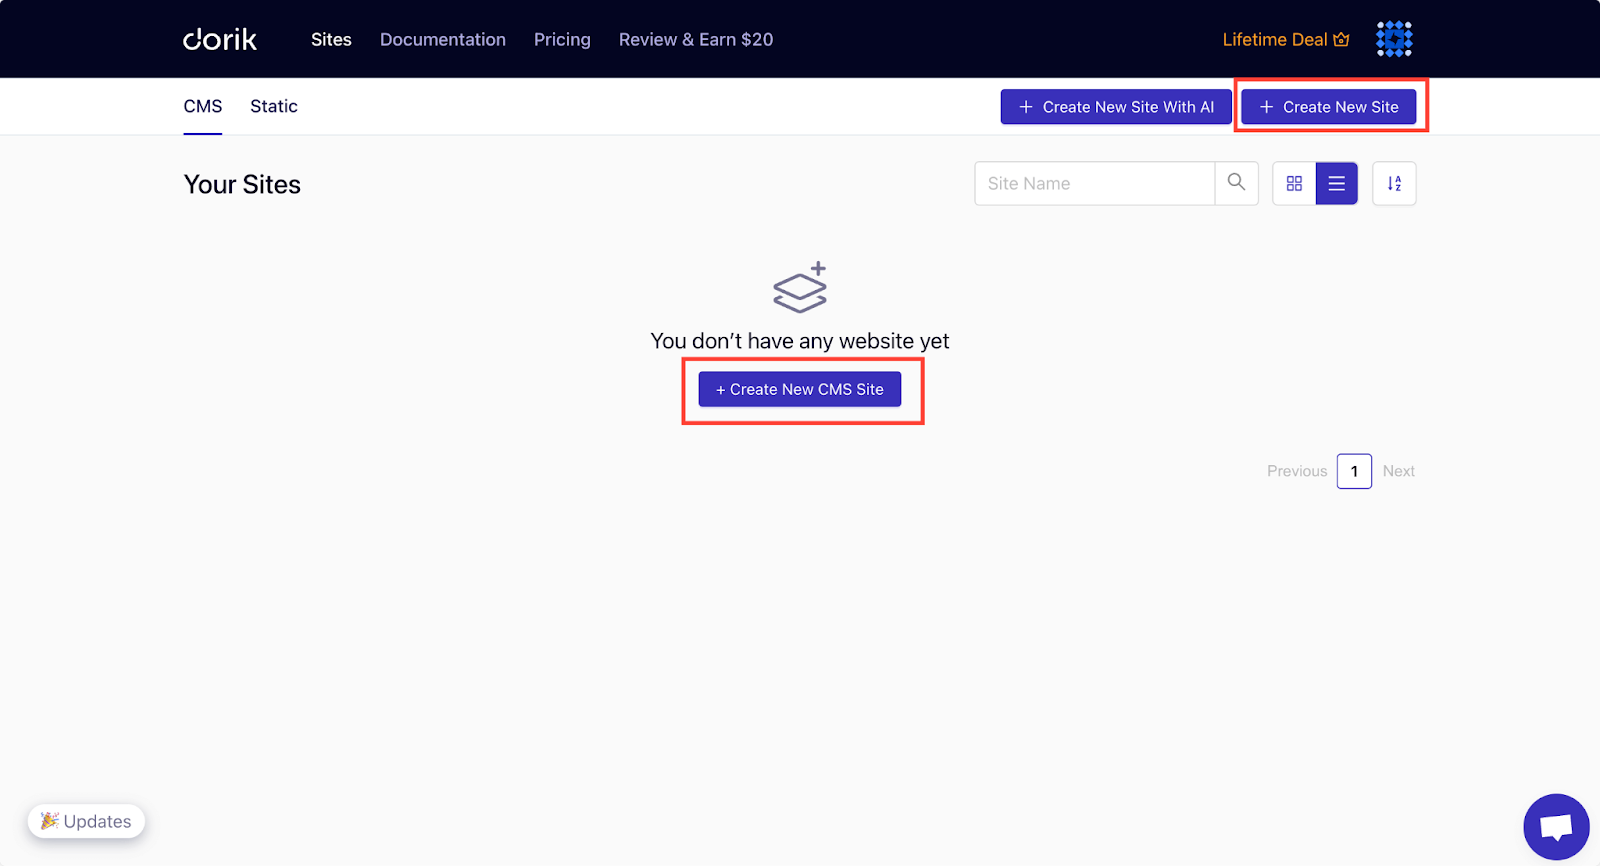
4. Use the search bar to find relevant templates.
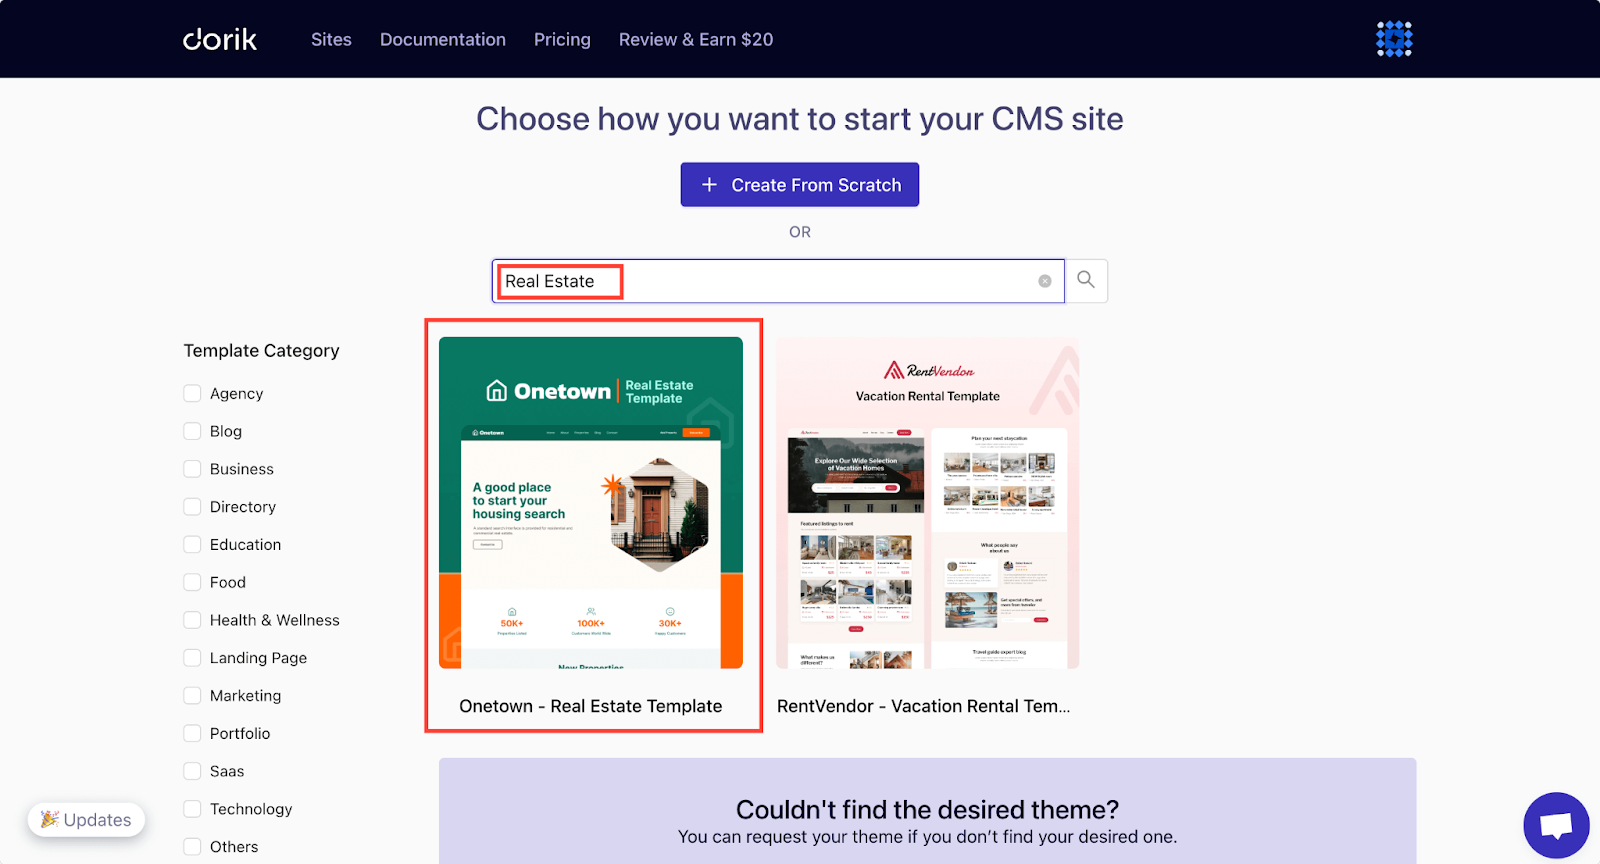
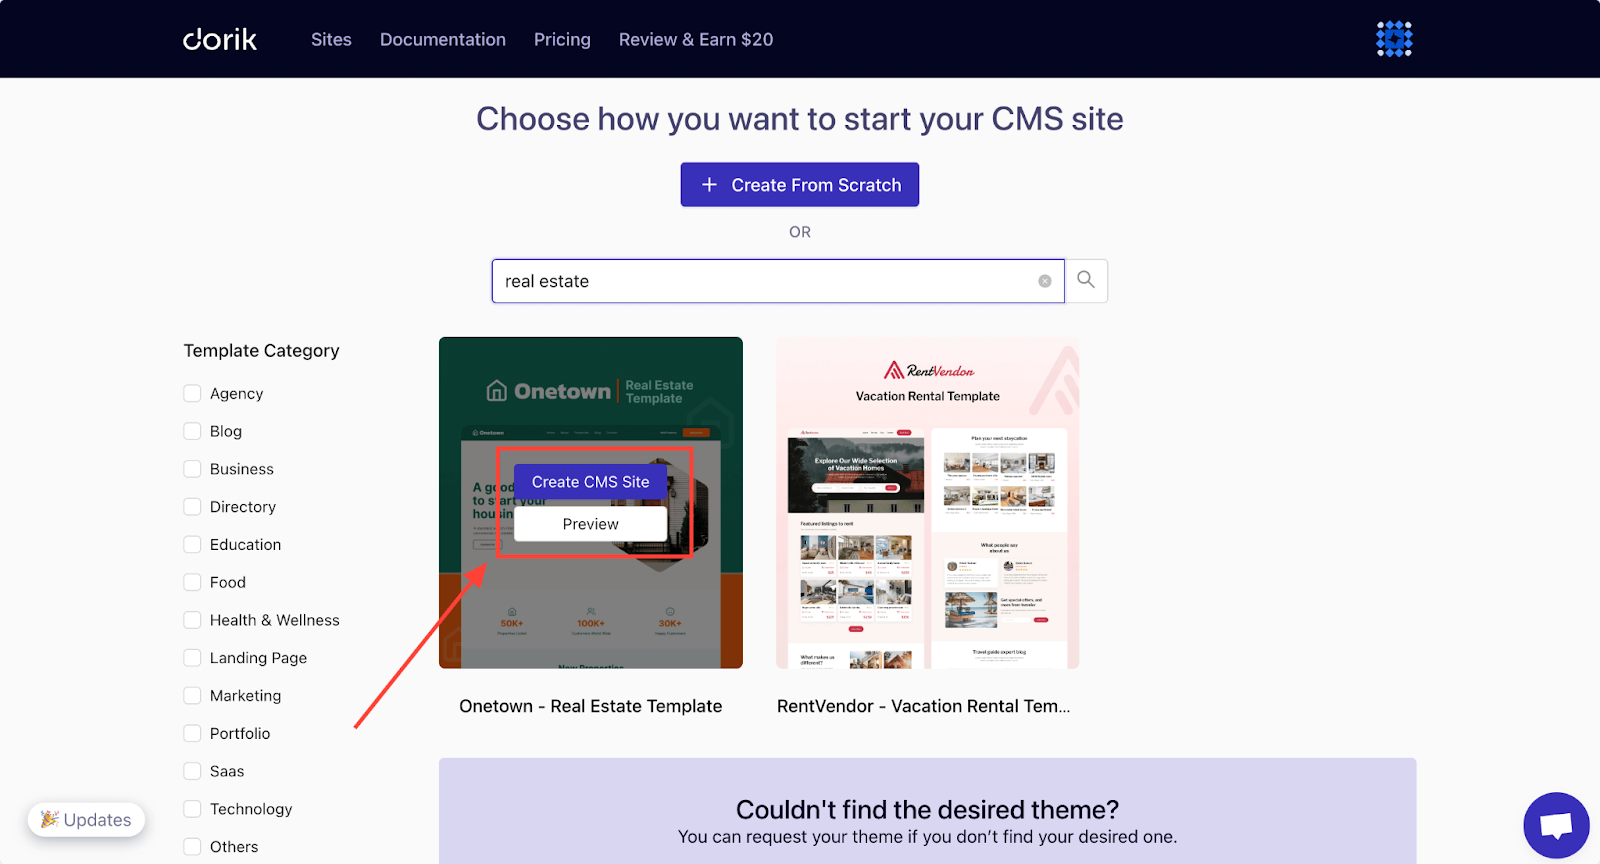
5. Preview the templates, and if you like one, click "Create CMS Site" to start designing your website.
You can always customize the template further to make it uniquely yours.
For this project, we’re selecting the “Onetown - Real Estate Template,” as it has all the necessary pages and elements for a real estate website.
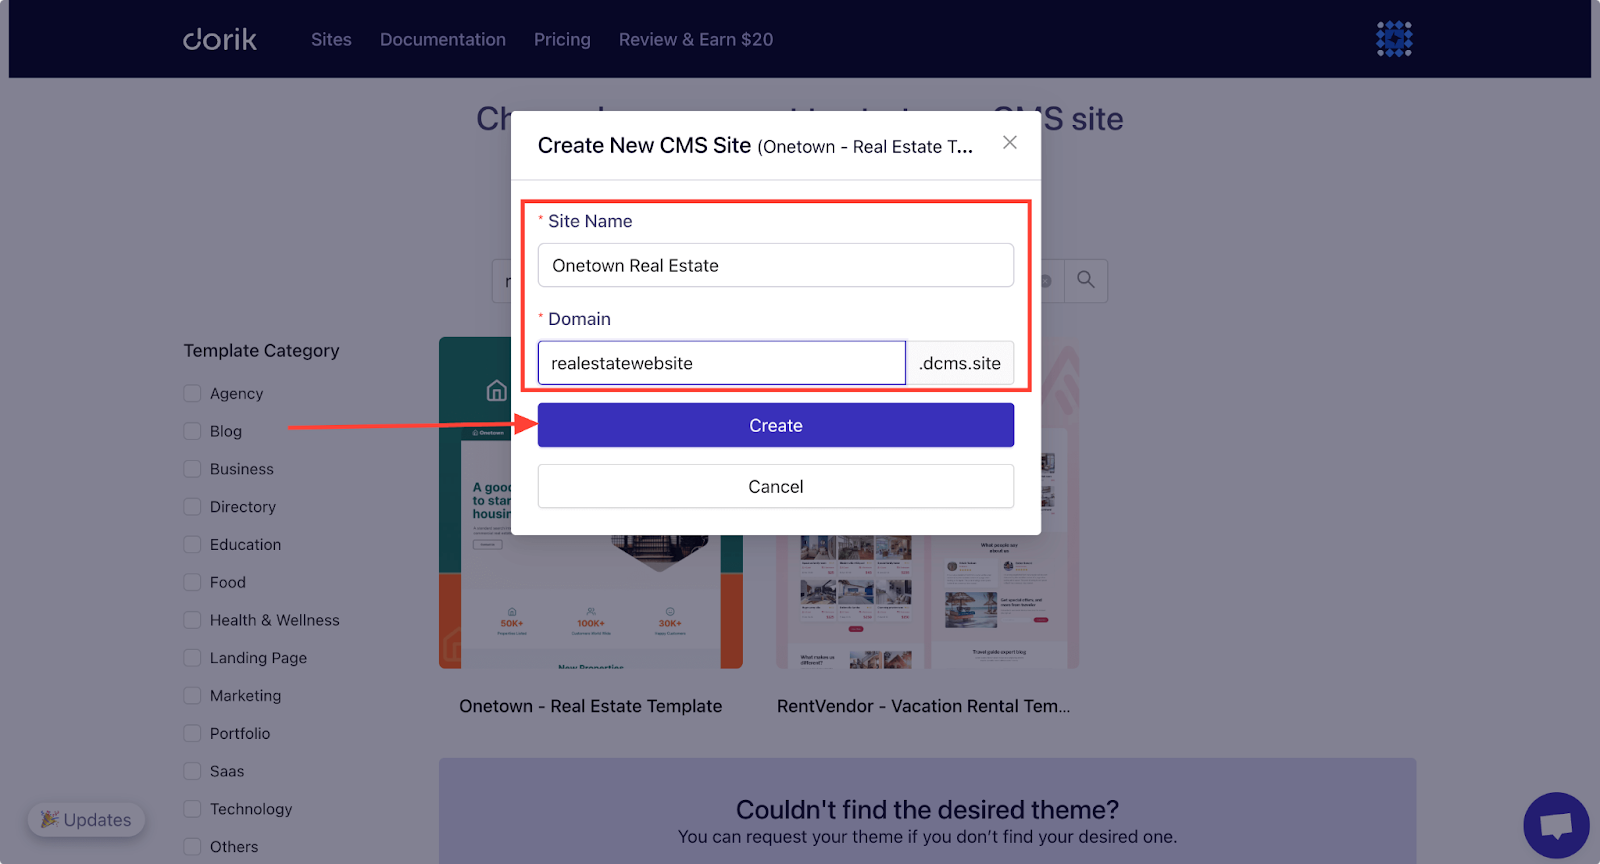
After clicking the “Create CMS Site” button, you’ll see a pop-up form asking you to set a project name and a domain name for your website. You can set up a subdomain to publish your website as a subdomain of Dorik.
After setting up, you’ll enter the website builder, where you can customize the design. We’ll talk about the design customization part in detail later in this guide.
3. Create a Website from Scratch
Building your website from scratch is the best option for those who want complete creative freedom. This approach is perfect if you have a specific vision in mind or need a highly customized website.
Here’s how to start from scratch:
1. Log in to your Dorik account and go to the dashboard.
2. Navigate to 'Sites' on your dashboard and choose either CMS or Static.
3. Click on "Create New Site."
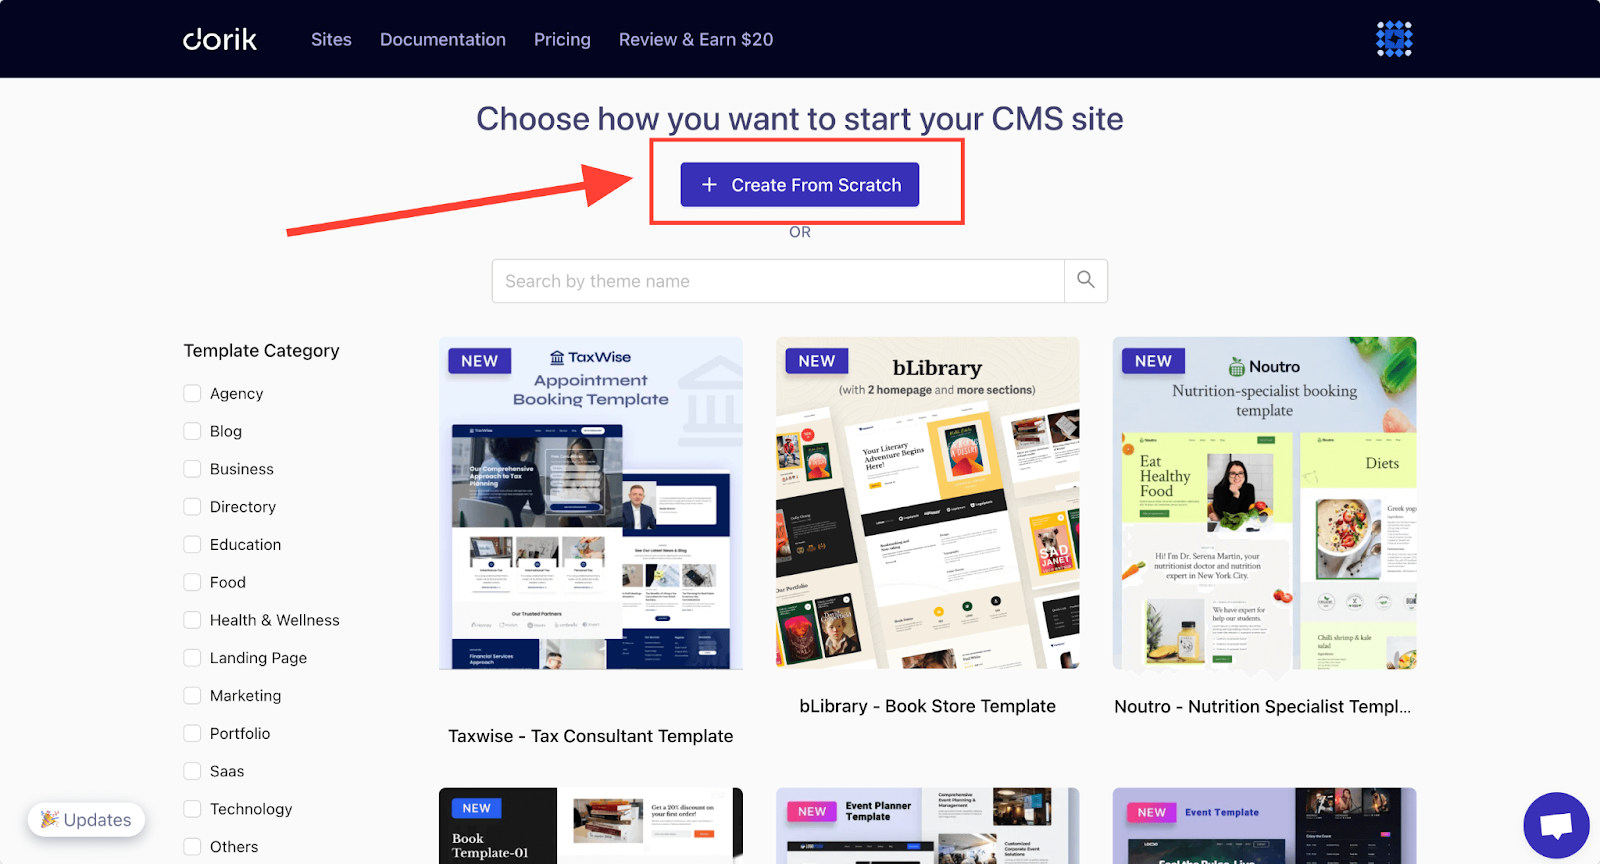
4. Click on “Create From Scratch.”
5. Familiarize yourself with the platform using the provided resources.
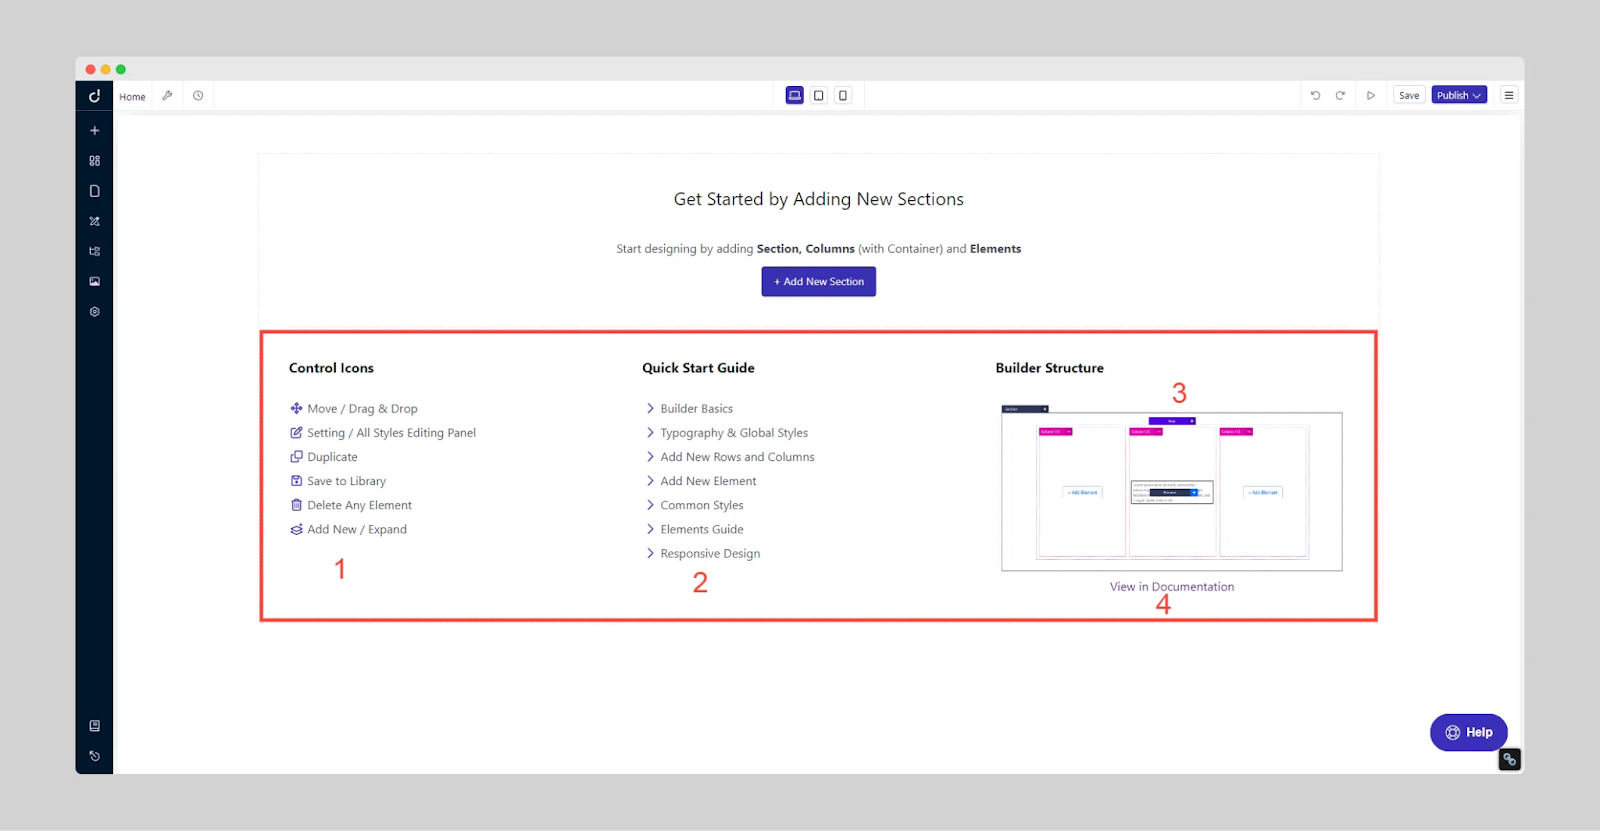
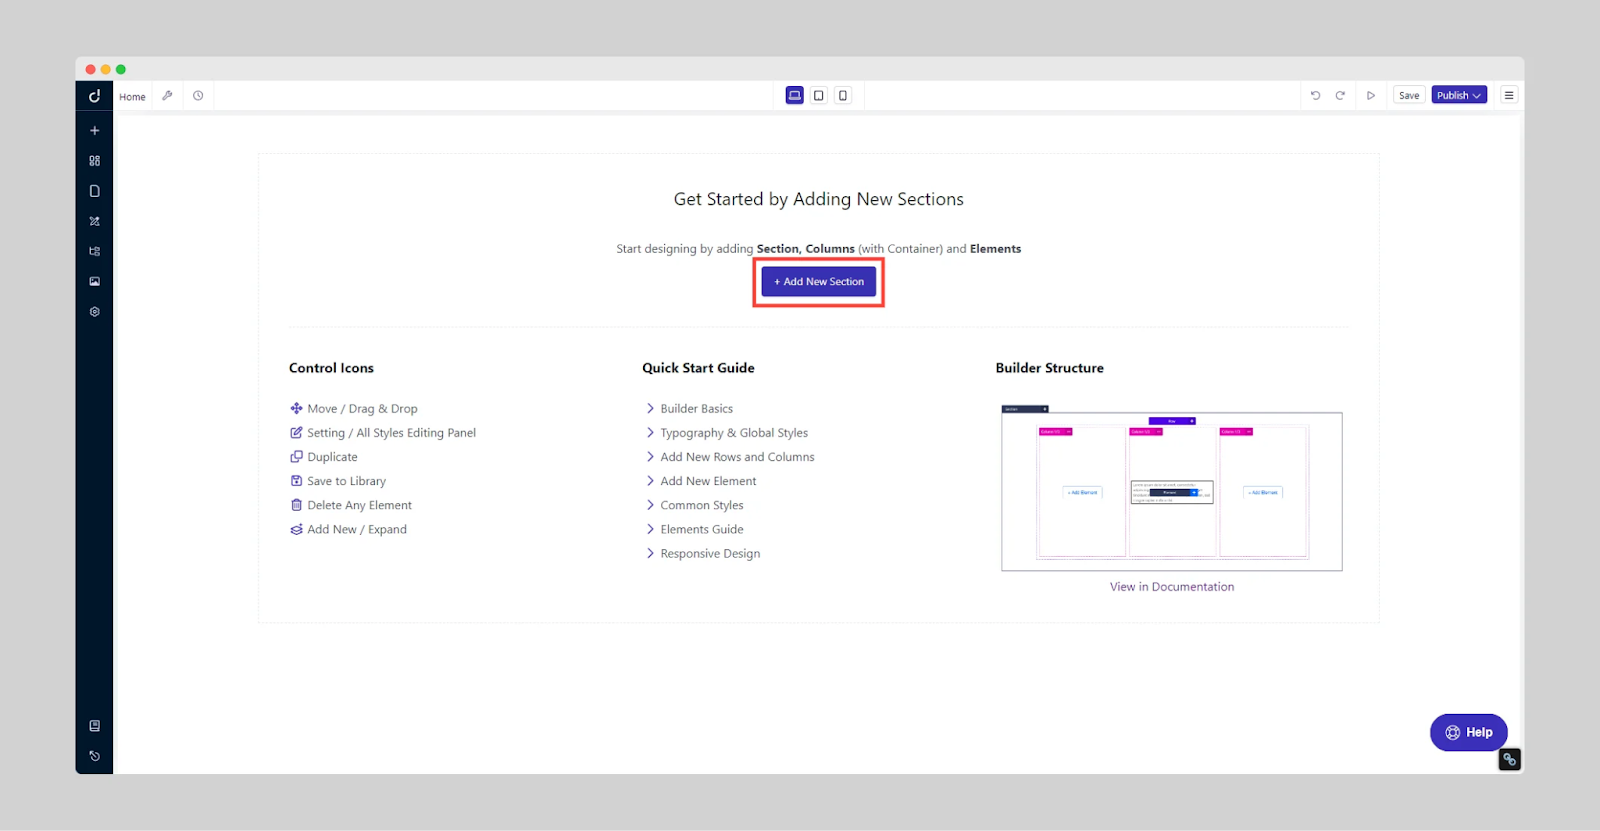
6. Click on “Add New Section” and use the drag-and-drop editor to add and edit sections and elements to reflect your services and brand.
7. Customize colors, fonts, and layouts to create a calming and professional environment.
Step 5: Customize the Look of Your Website
Dorik offers you complete customization flexibility no matter how you build your website. You can drag, move, edit, and delete all existing elements or add new ones to the website layout.
It is very convenient to edit your website with the Dorik website builder.
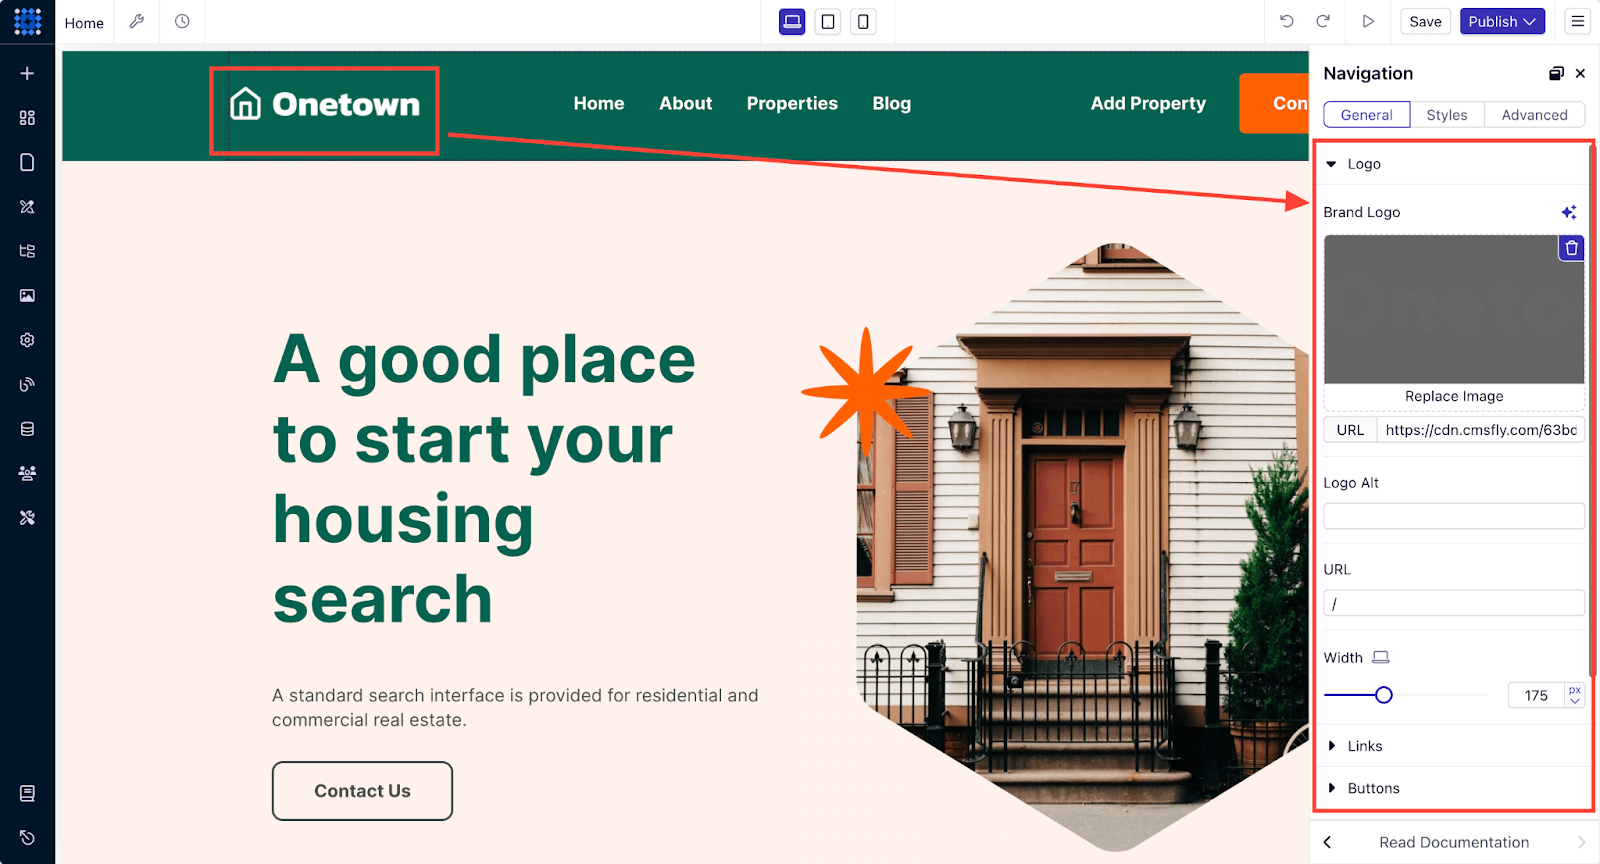
For example, if you want to change your website's logo, you can just click on it and replace the logo with a new one.
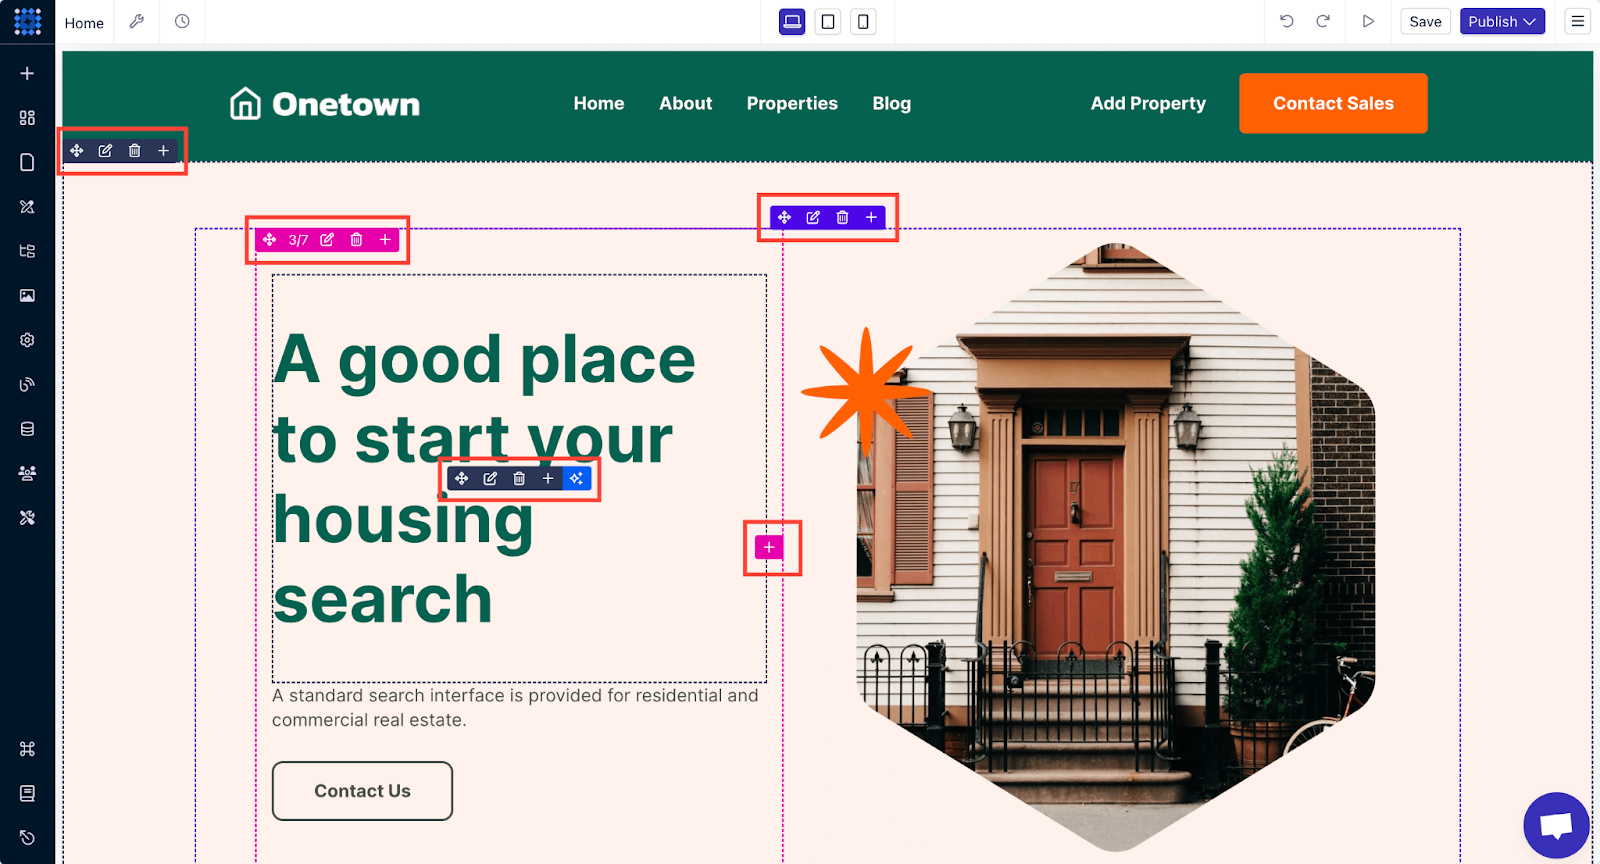
You can also hover over any block, and the editing options will become visible. Experiment with these options to familiarize yourself with the tools.
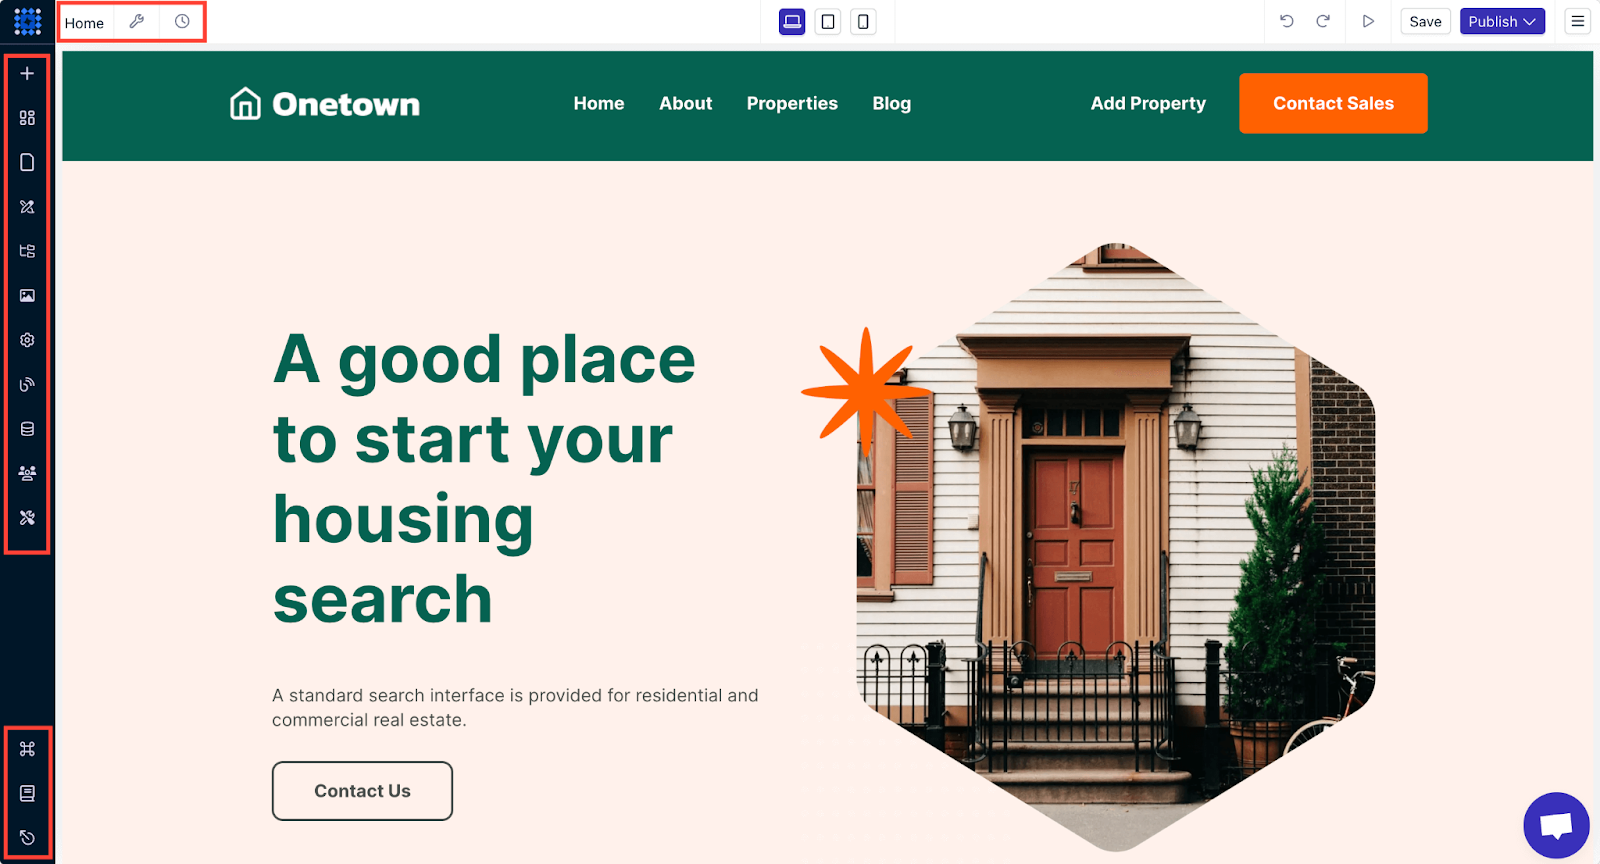
You’ll find all the settings you need to customize your site in the builder's sidebar and topbar. You can view all the pages in your template and add, remove, or modify them to fit your needs.
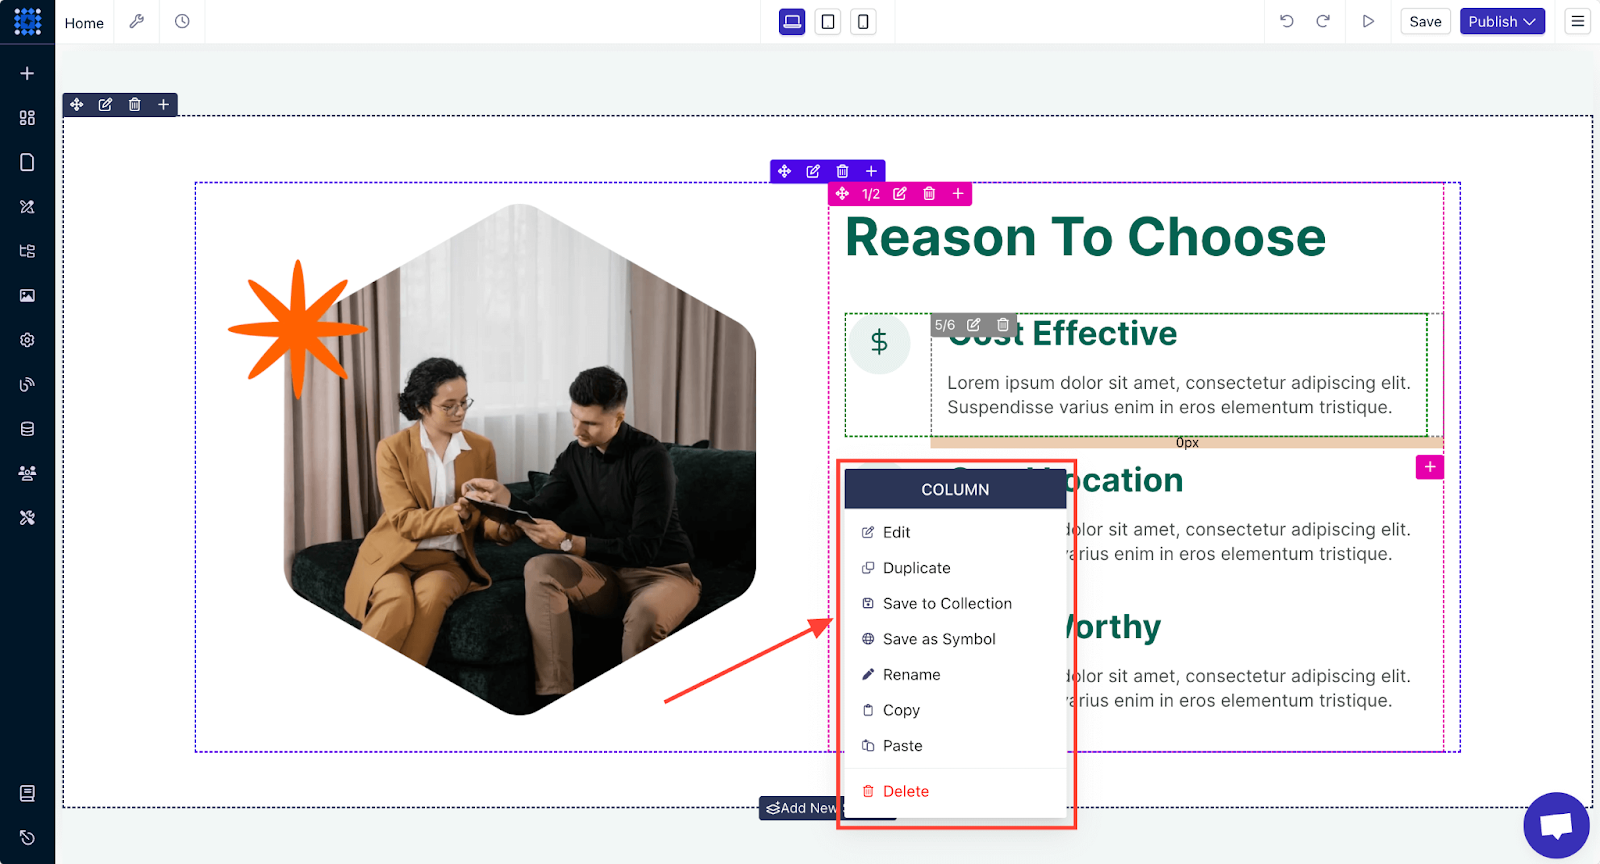
You can right-click on any sections or elements to duplicate or copy them along with the styling. You can also save them to your collection to use them later in another section.
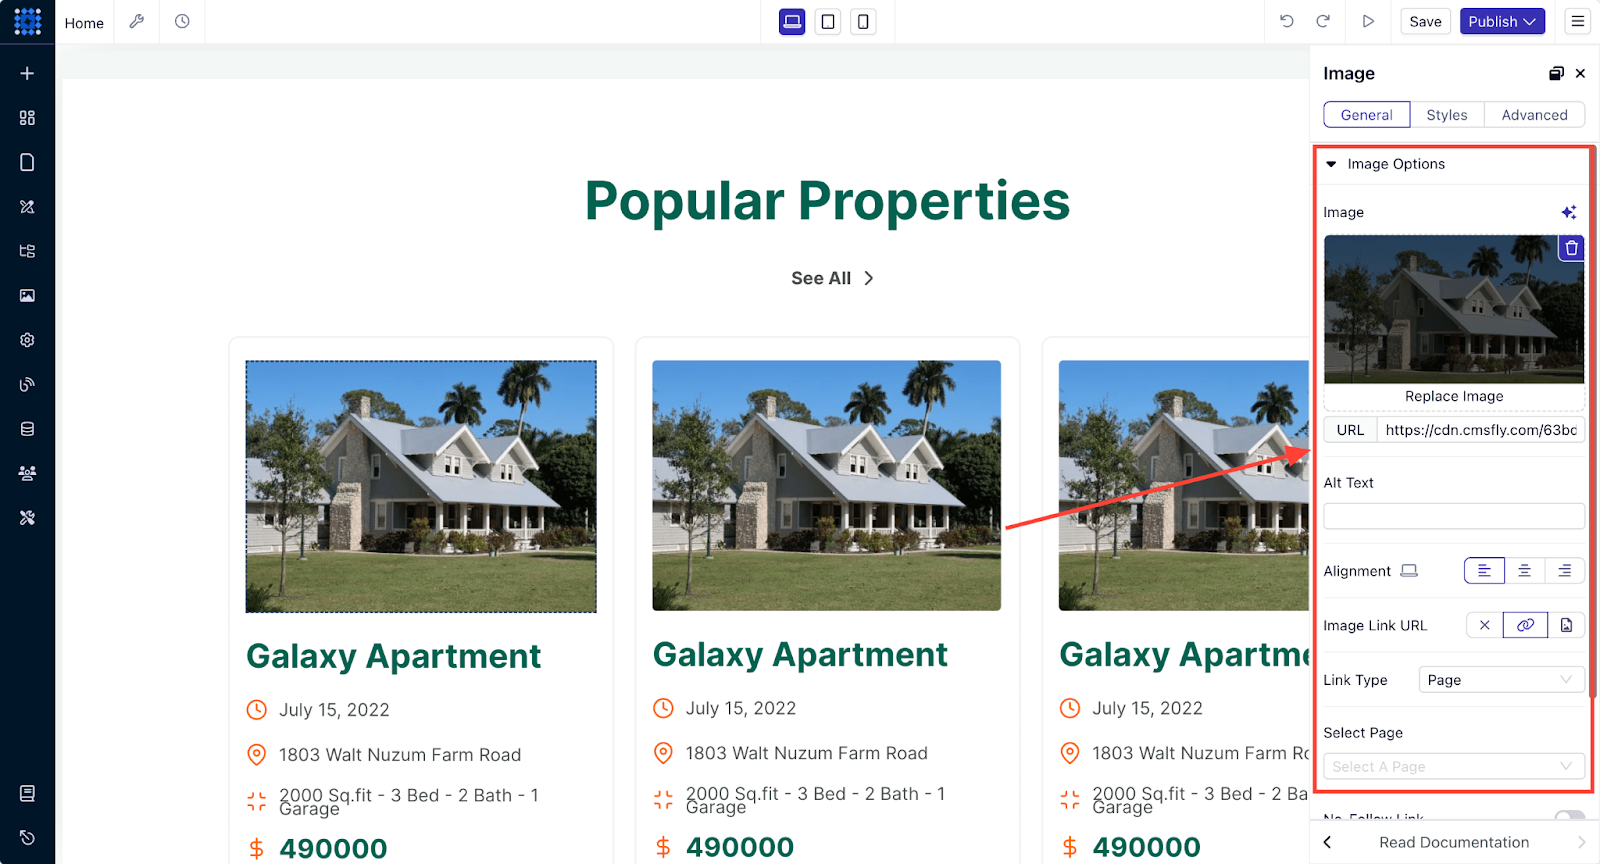
Changing text or images is also simple. Click on the element you want to edit, and a pop-up card will appear with all the settings options.
You can also set global styles from the sidebar, which will apply to all pages once set.
Additionally, you can explore the site settings and add integrations to enhance your website’s functionality and user experience.
Step 6: Add Search and Filtering
As mentioned earlier, if you want your real estate website to truly stand out and provide the best possible user experience, you need to add advanced search and filtering options. You can add these functionalities to your website by integrating Airtable into your Dorik website.
Here’s how to add search and filtering to your real estate website:
Prerequisites:
-
You have a Dorik account and are familiar with its website builder.
-
You have an Airtable account with a base containing your real estate listings.
Step 1: Create Property Categories in Airtable
1. Log into Airtable and create a new base for your property listings or use an existing one. You can also use a pre-made Airtable template for real estate listings as we did here. You can click on the selected template and then click the "Use Template" button to create a base with it.
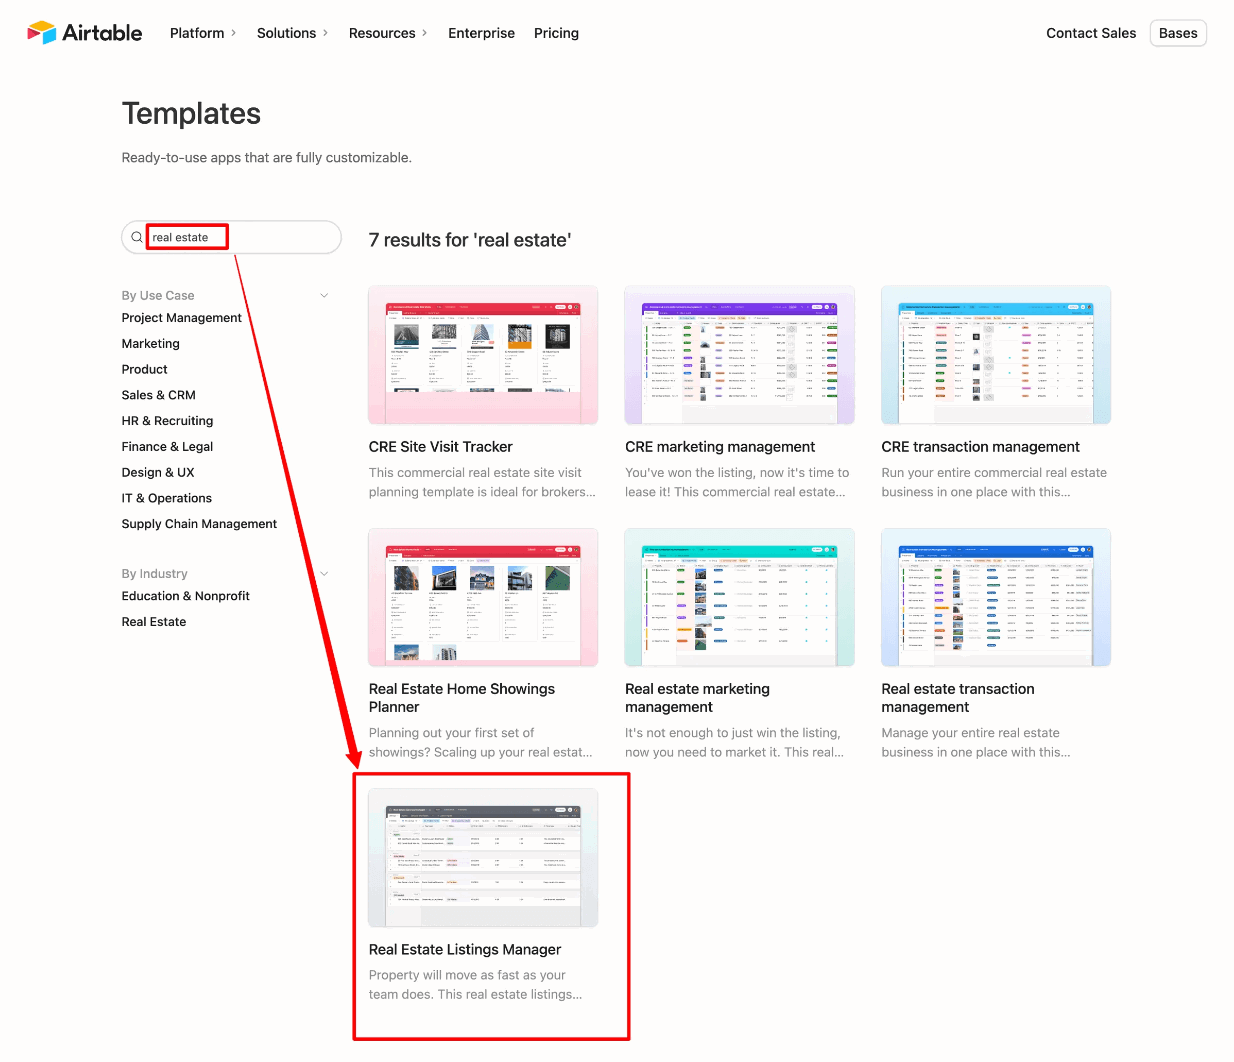
2. Check out all the available fields in the template. You can easily edit, add, or delete any element you want. You can create Property Categories such as Apartments, Bungalows, Rowhouses, Offices, Penthouses, etc.
3. Add Fields to your base to capture property details:
-
Property Name
-
Price
-
Property Type (use your categories)
-
Location (city, neighborhood, zip code)
-
Number of Bedrooms/Bathrooms
-
Square Footage
-
Amenities (e.g., pool, gym, garage)
-
Nearby Locations (hospitals, shopping malls)
-
Images
-
Descriptions
Step 2: Add Properties to Airtable
1. Populate Your Airtable Base with property listings. You'll get most of the fields already added in the template.
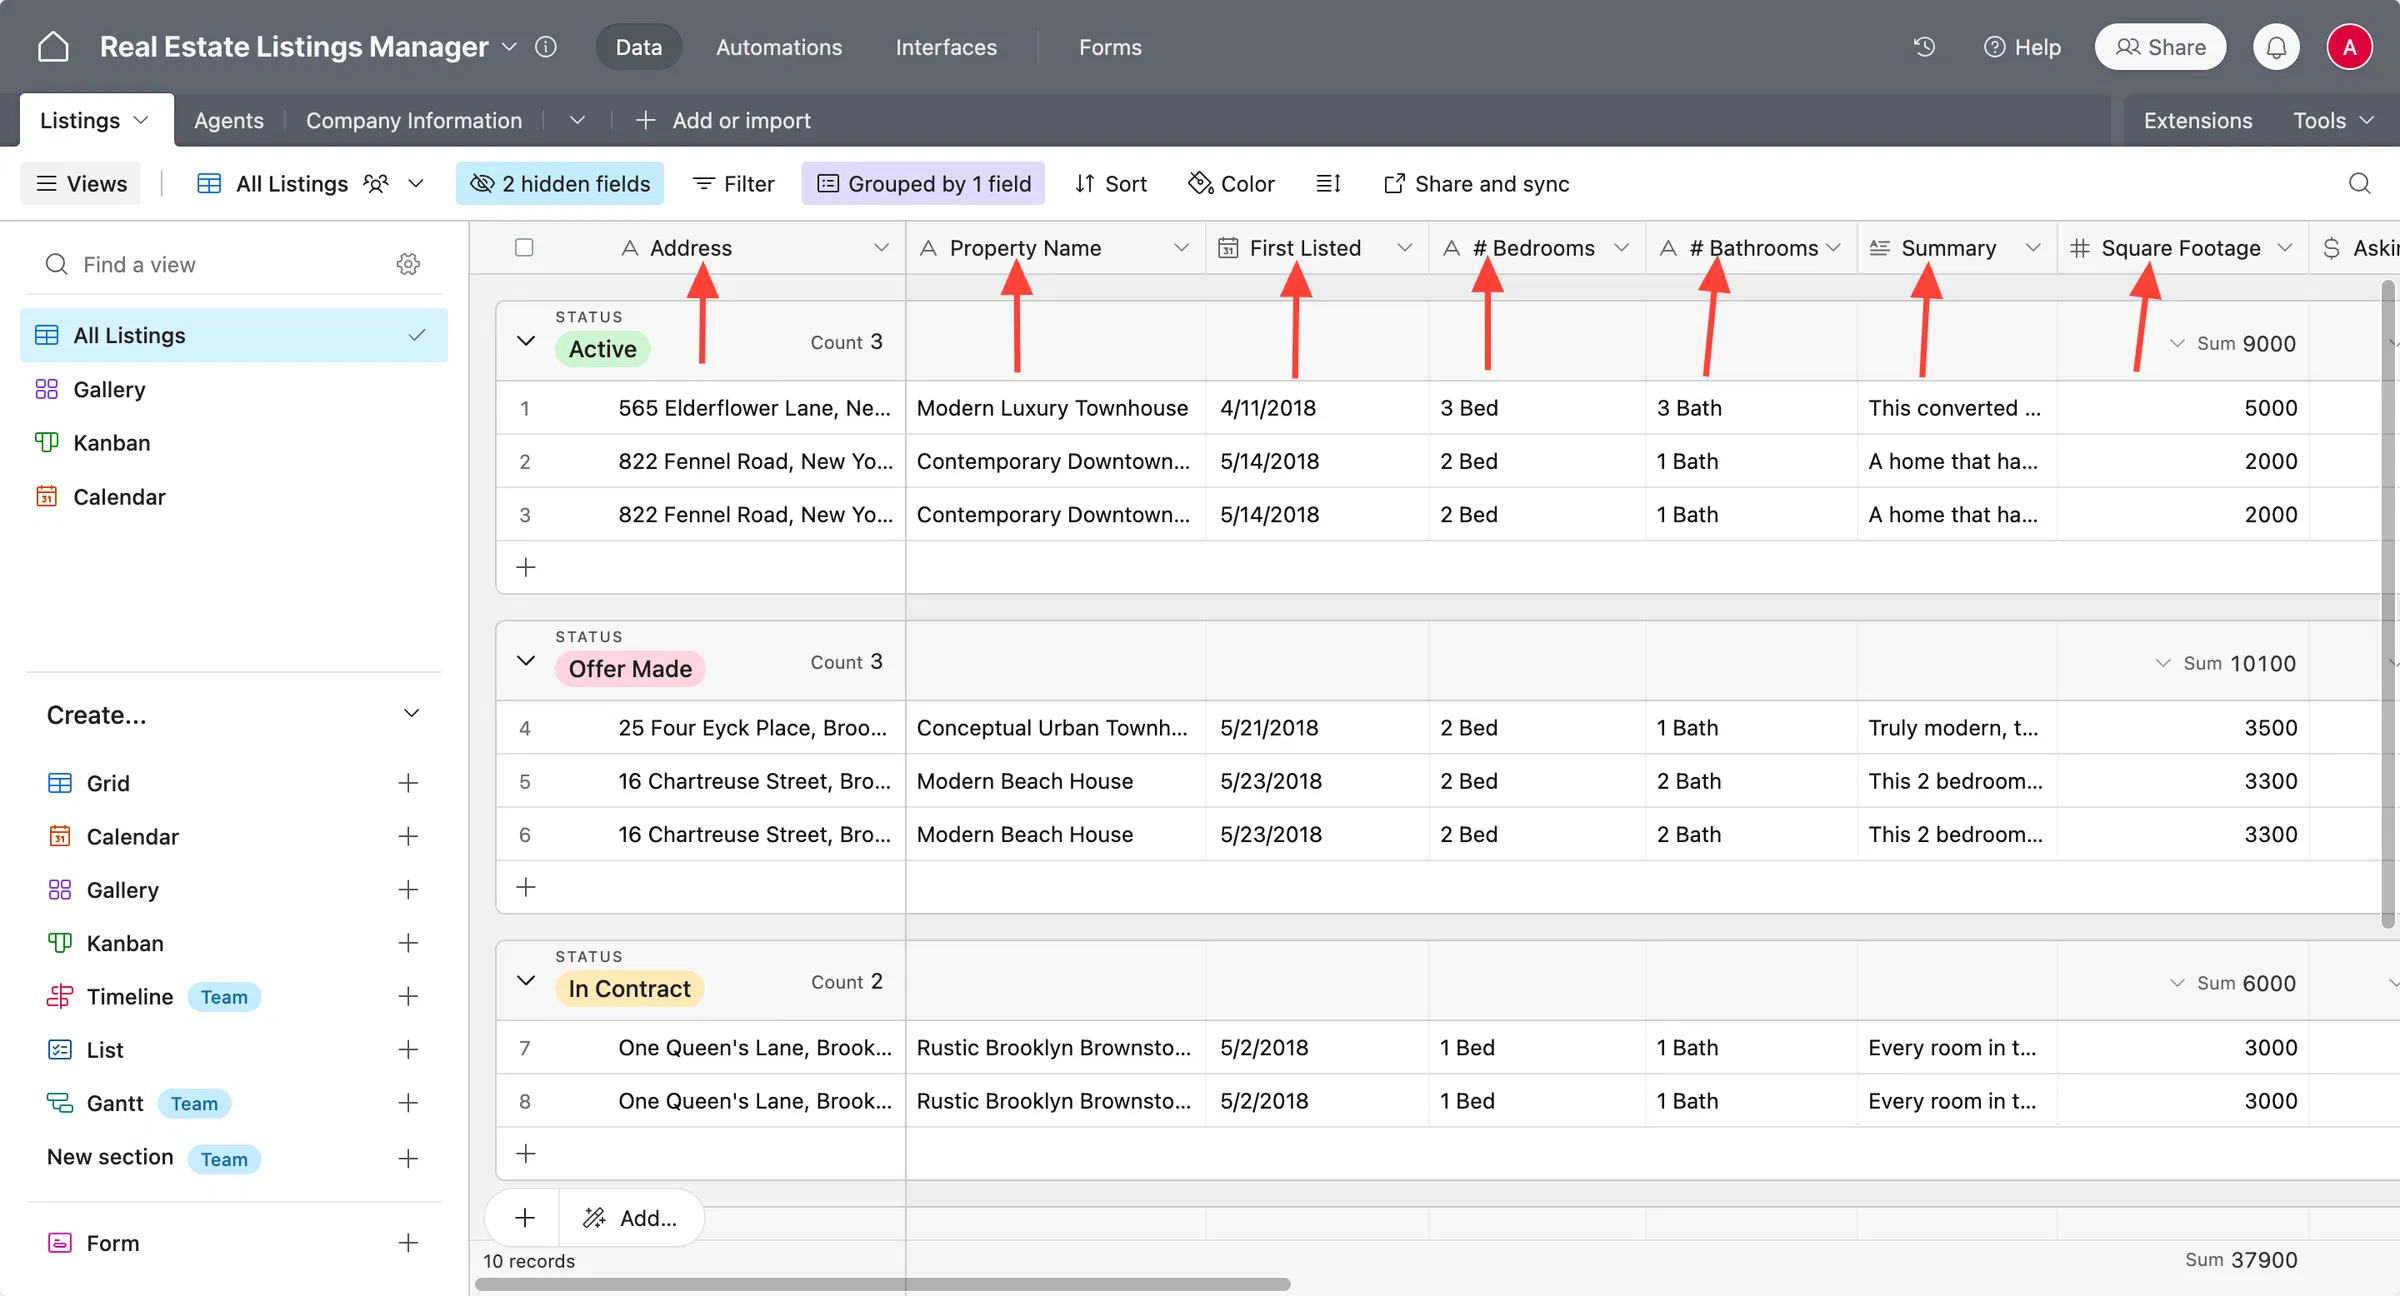
2. Enter Property Details for each listing:
-
Assign to the appropriate category.
-
Fill in all relevant fields accurately.
3. Upload Images in Airtable
4. Save Your Changes to ensure all data is up-to-date.
Step 3: Generate an Airtable API Token
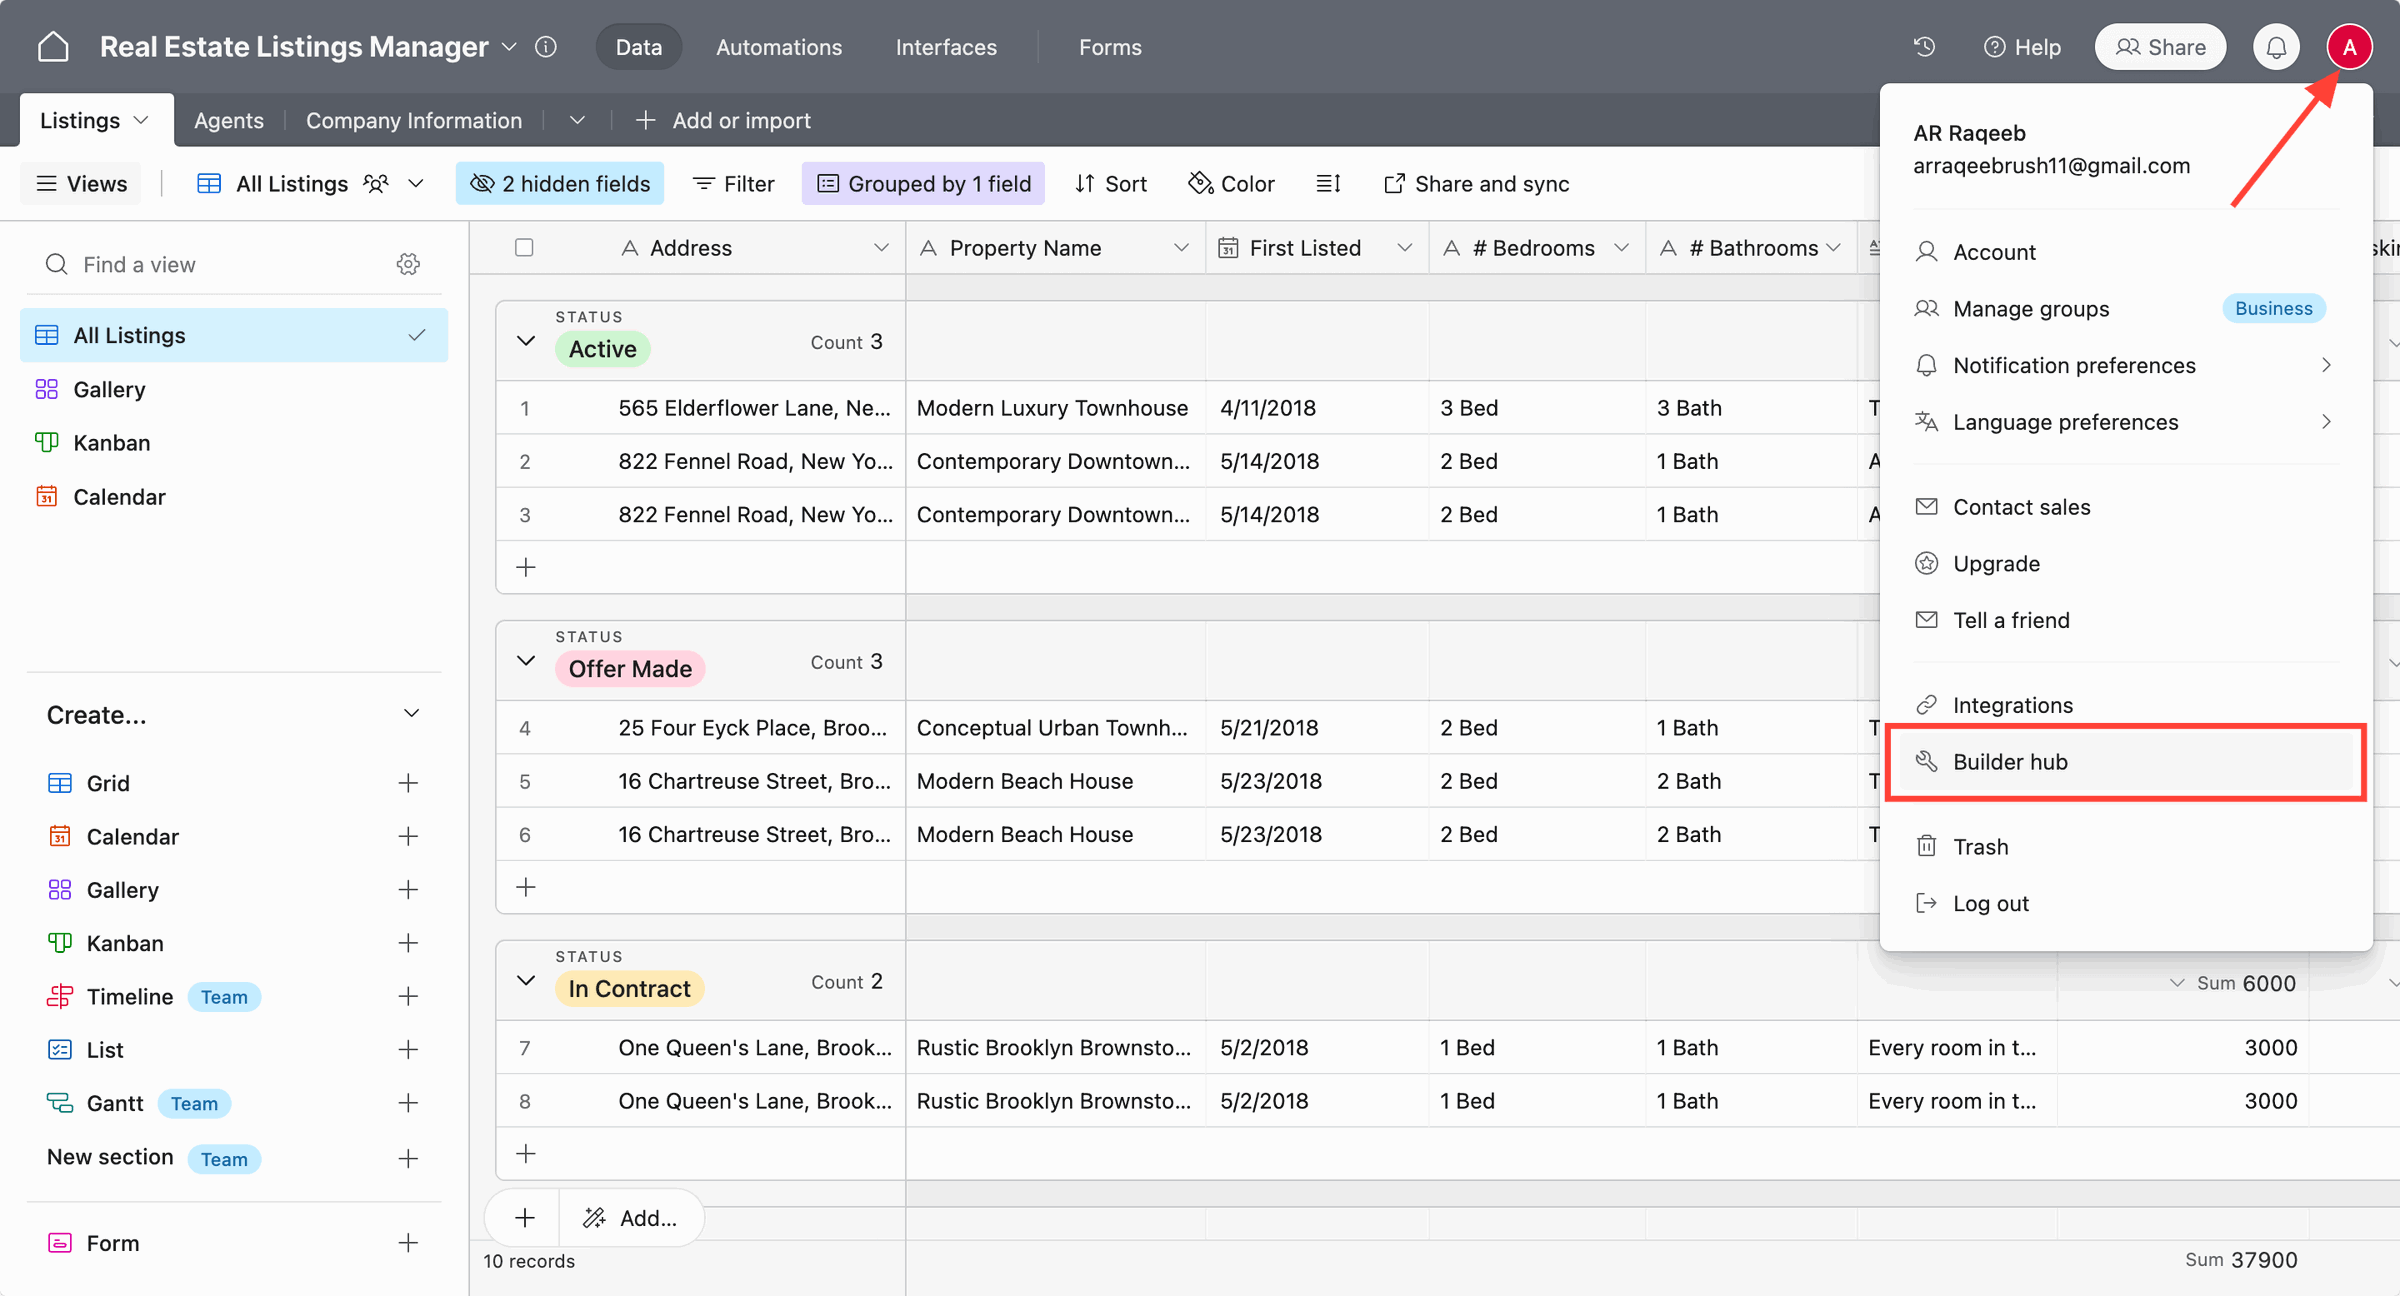
1. Access Airtable Builder Hub:
-
Click on your profile avatar in Airtable.
-
Select "Builder hub" or visit Airtable Tokens.
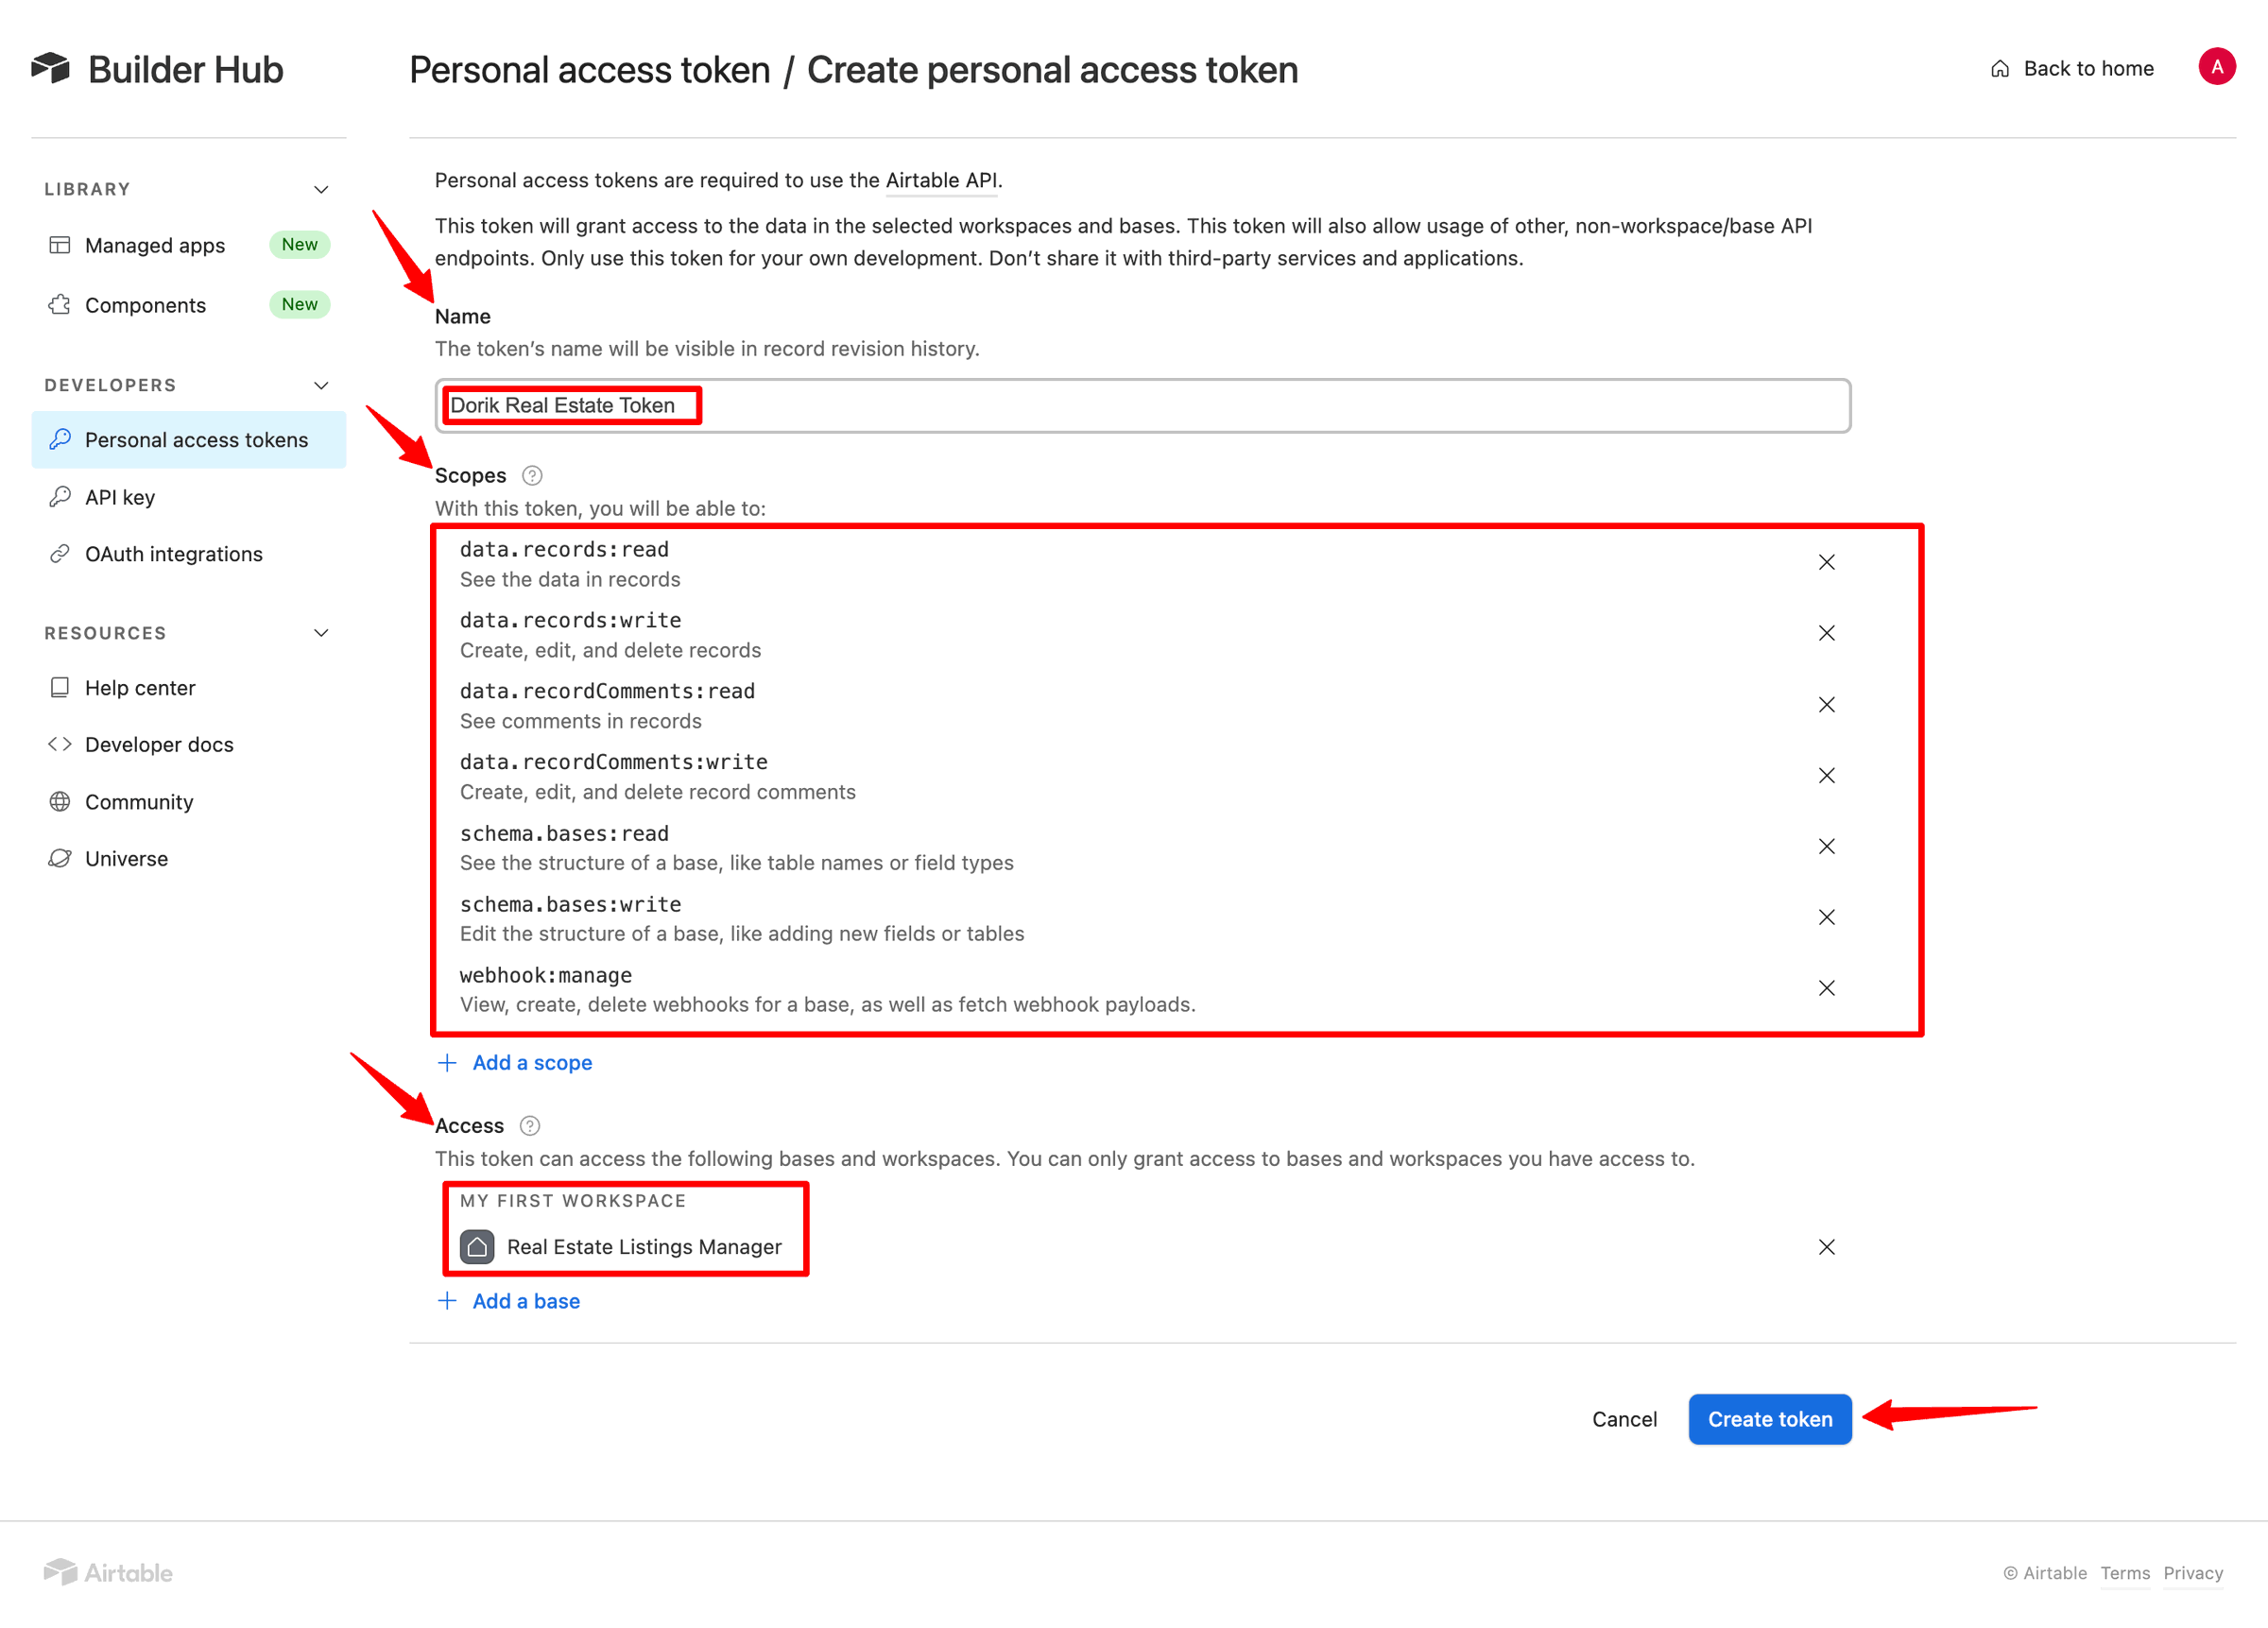
2. Create a New API Token:
-
Click on "Create token".
-
Name your token (e.g., "Dorik Real Estate Token").
-
Set the scopes and permissions.
-
Assign the token to the base you created.
-
Click "Create token".
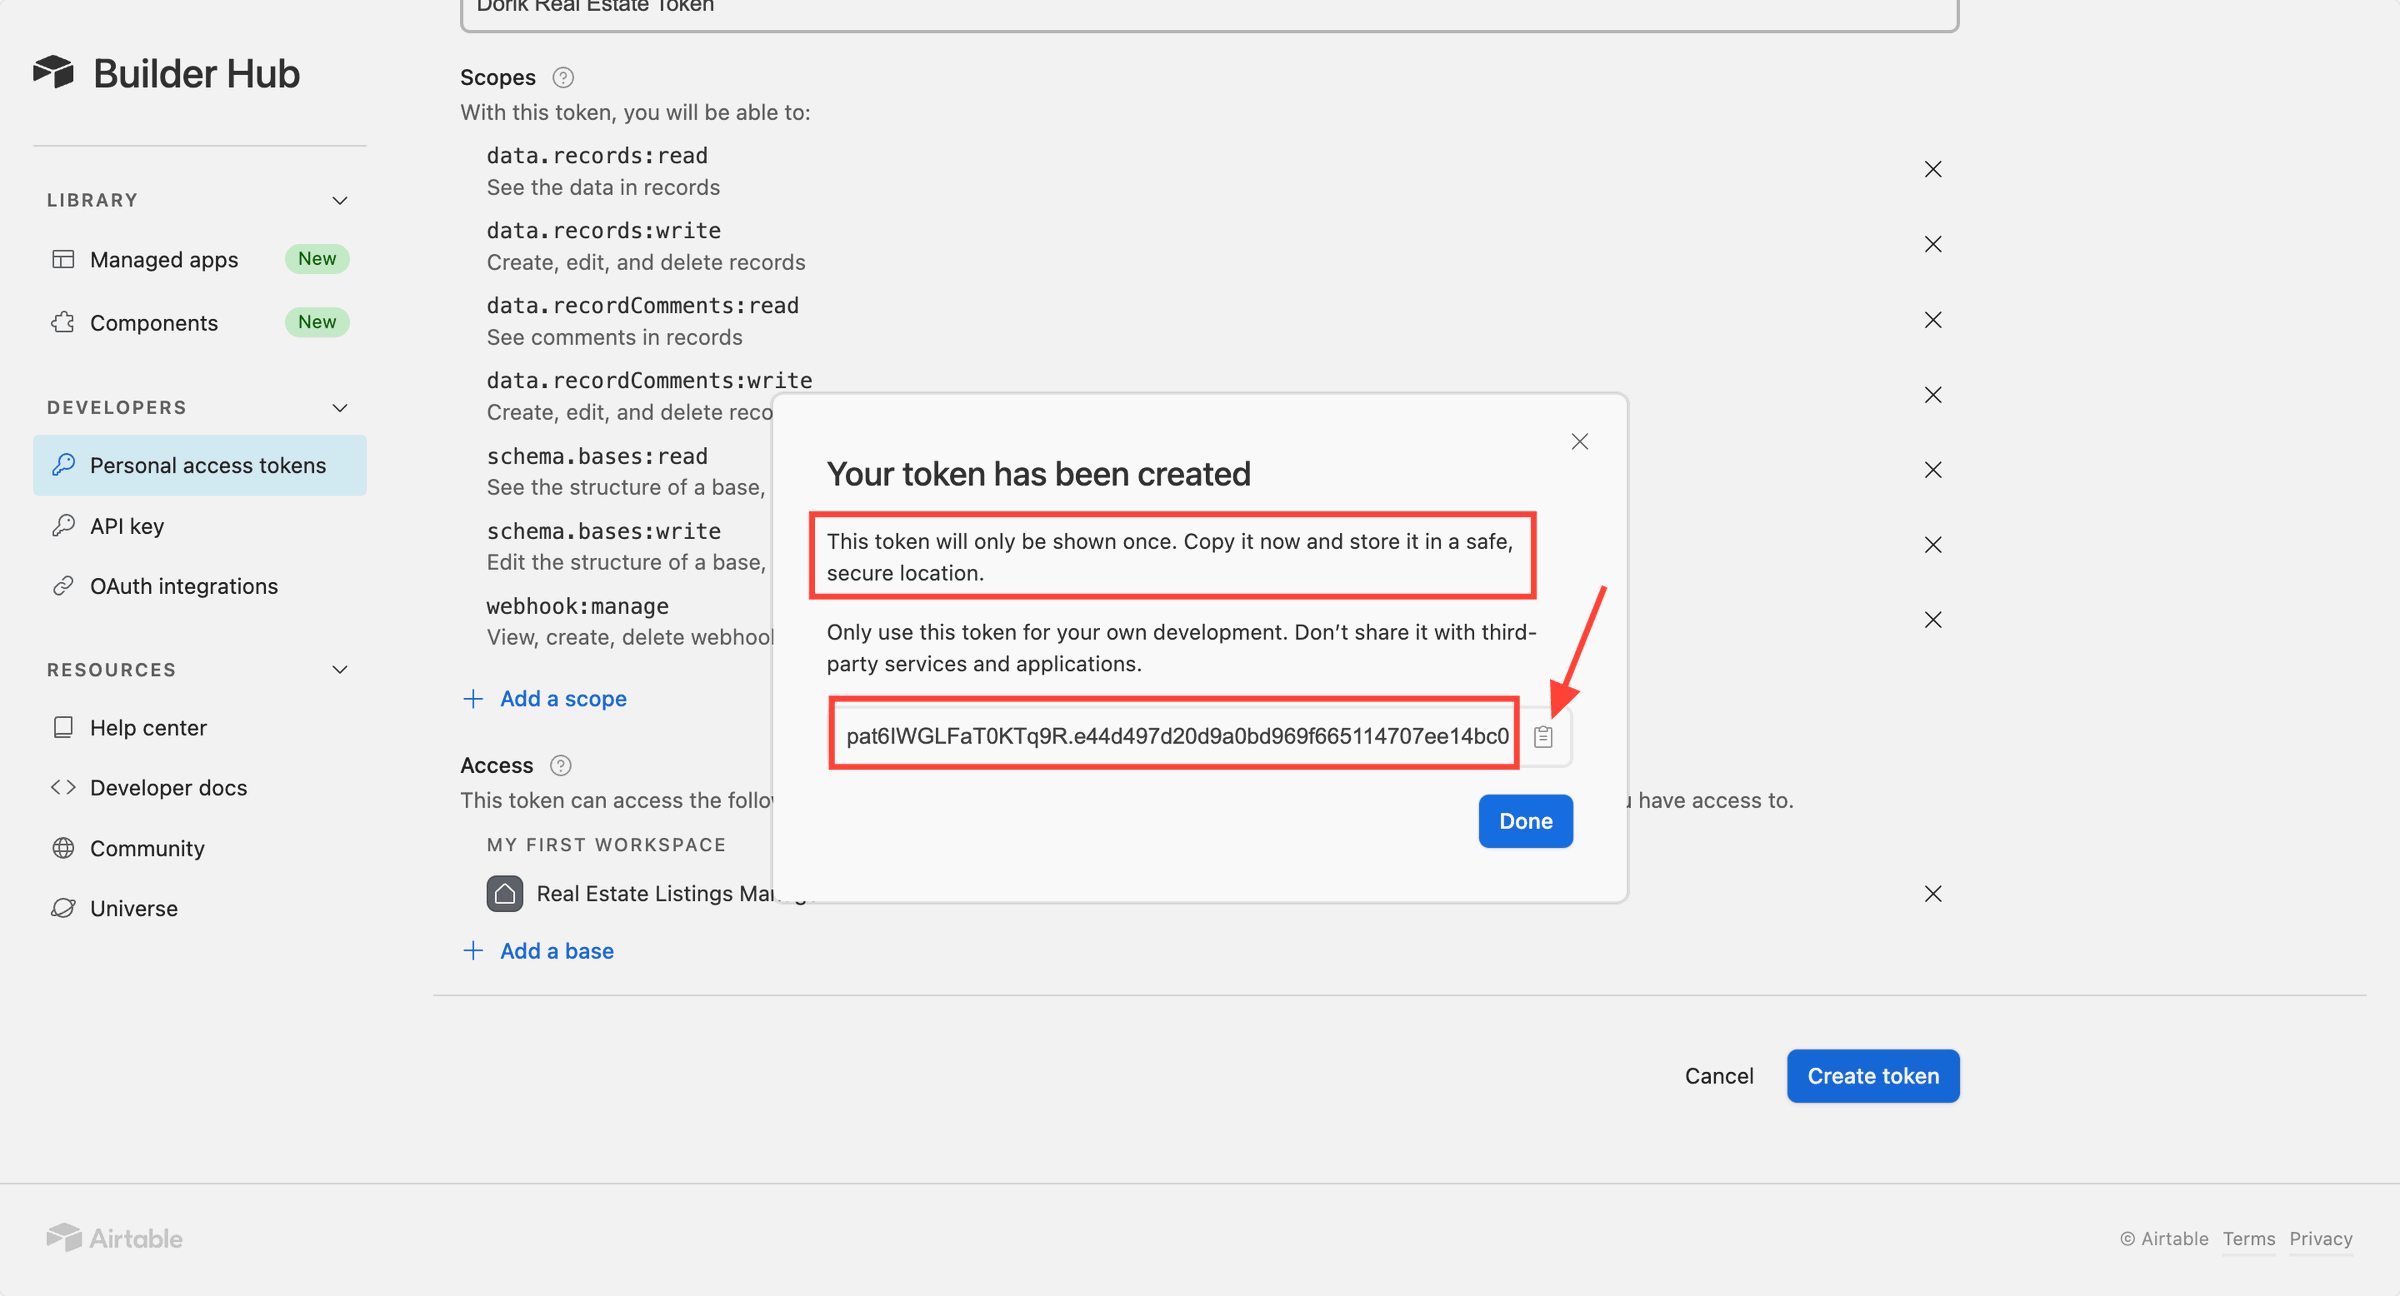
-
Copy the generated token. (very important)
Step 4: Add the Airtable Element in Dorik
1. Log into Dorik Builder:
-
Access your Dorik dashboard and open the website you are building.
2. Add a New Section:
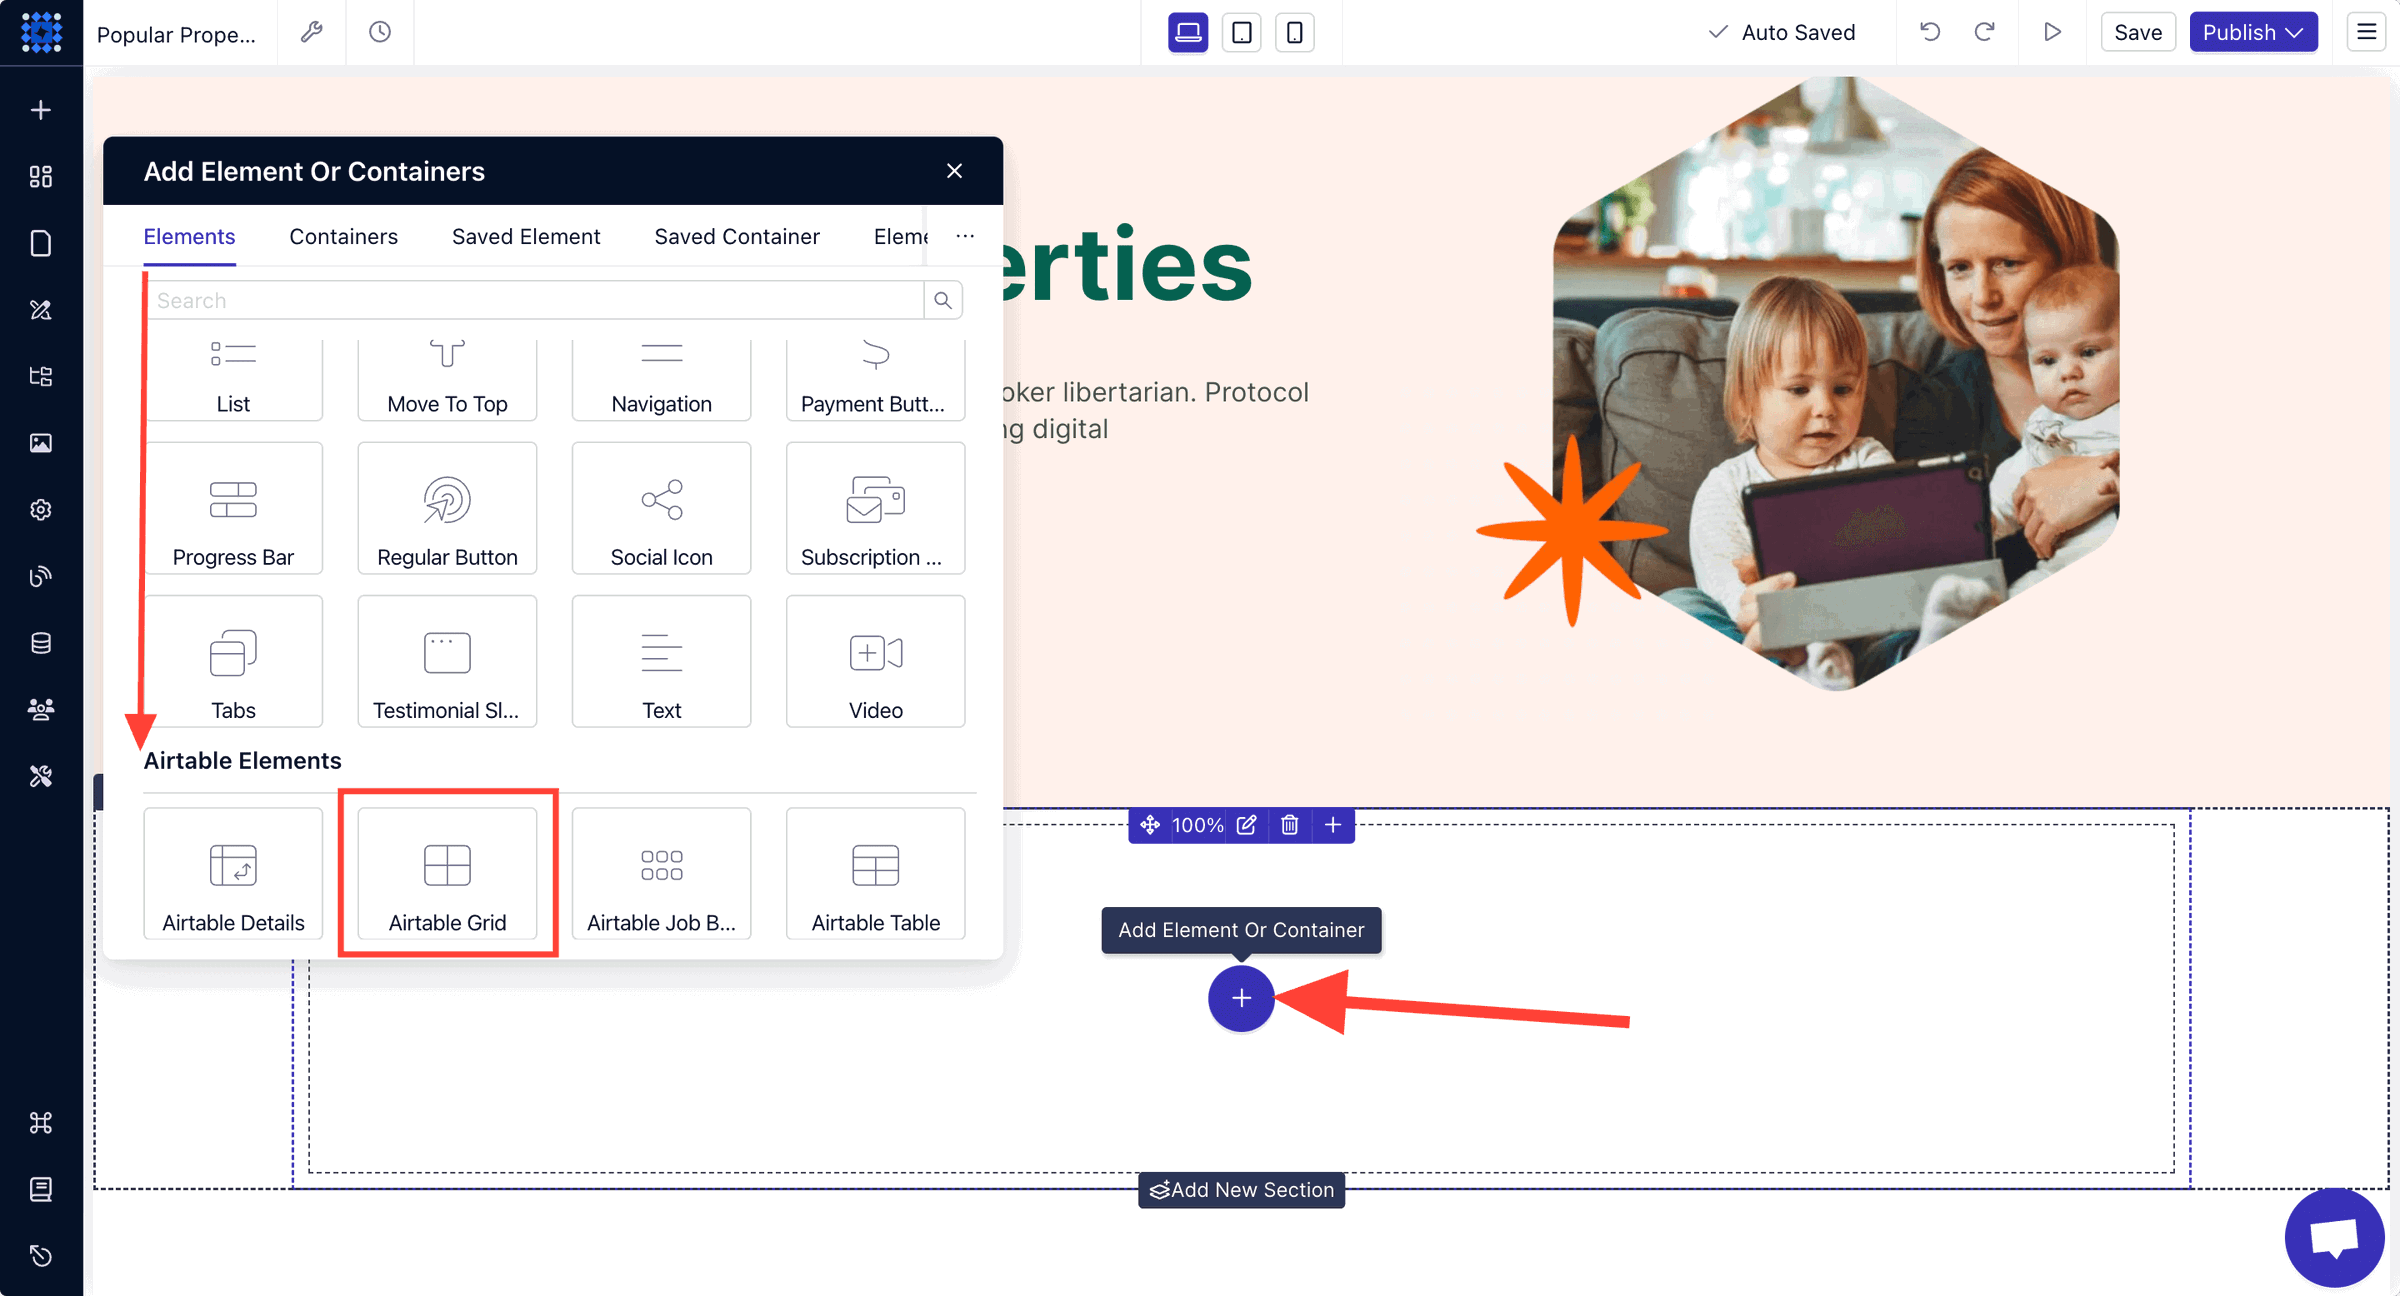
-
Click on the "+" button to add a new Section to your page.
3. Add the Airtable Element:
-
Inside the new section, click on "+" to Add Element.
-
Scroll down to the "Airtable Elements" section.
-
Choose "Airtable Grid" or "Airtable Table" (Grid is recommended for real estate listings).
Step 5: Connect Dorik to Your Airtable Base
1. Open Airtable Connection Settings:
-
Click on the Airtable element to open its settings panel on the left.
2. Add Your API Token to Dorik:
-
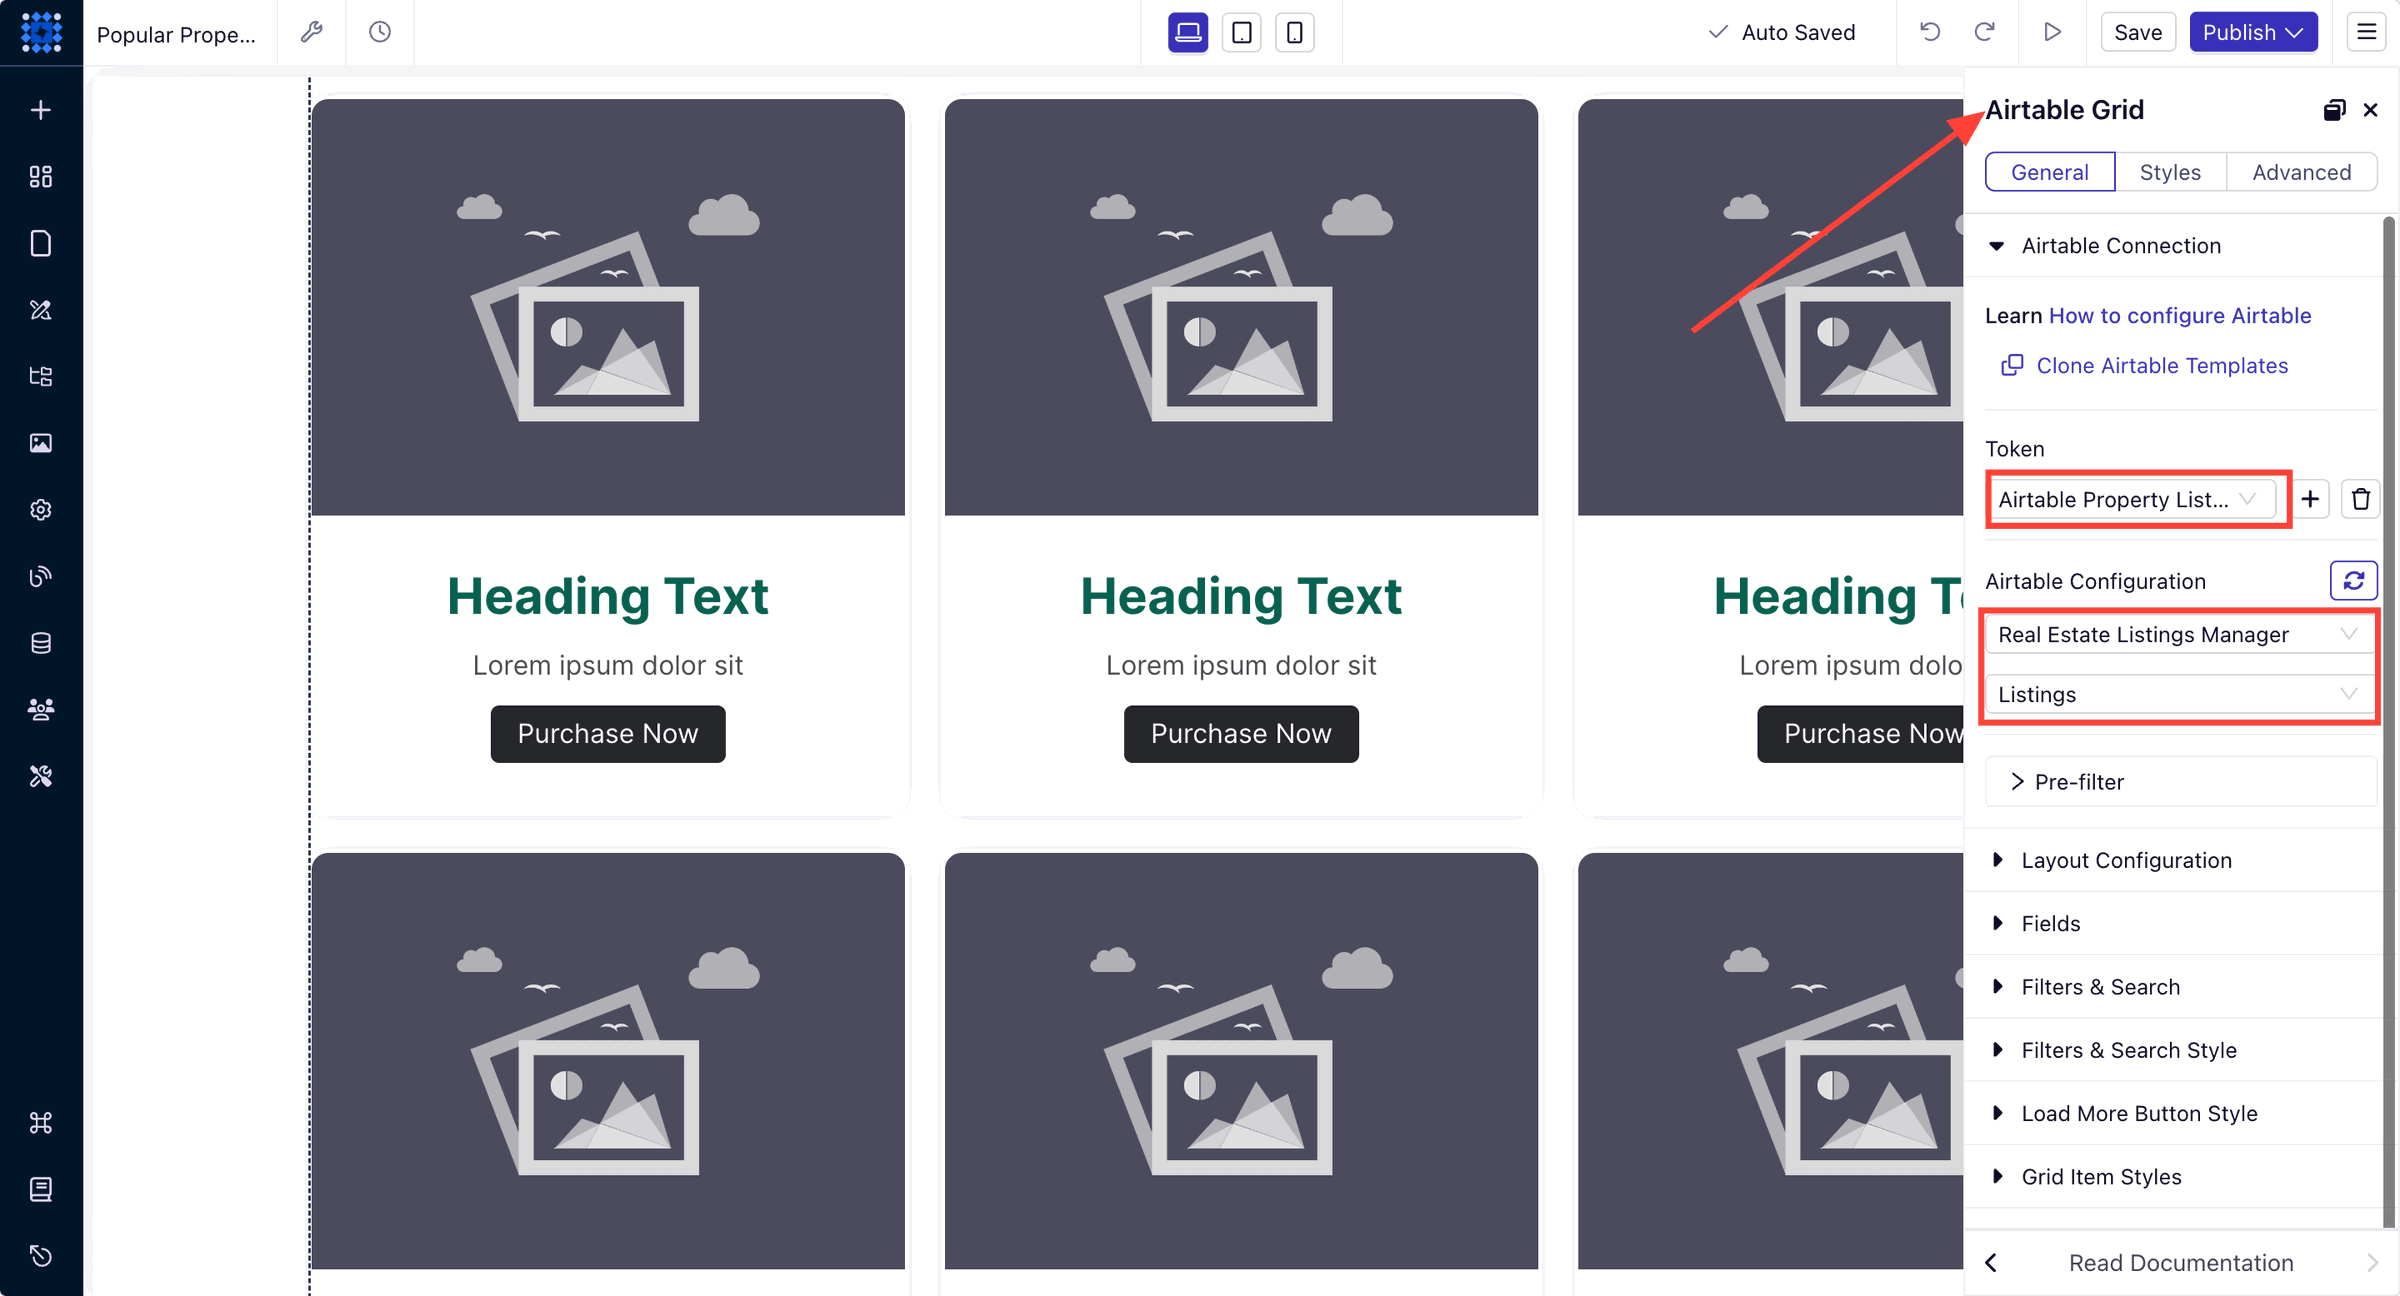
In the "Airtable Connection" section, click the "+" button next to Token.
-
Name the token (e.g., "Airtable Property Listings").
-
Paste the API token you copied from Airtable.
-
Choose your real estate base from the "Base" dropdown.
-
Select the table that contains your property listings.
-
Click "Save".
Step 6: Configure the Airtable Element
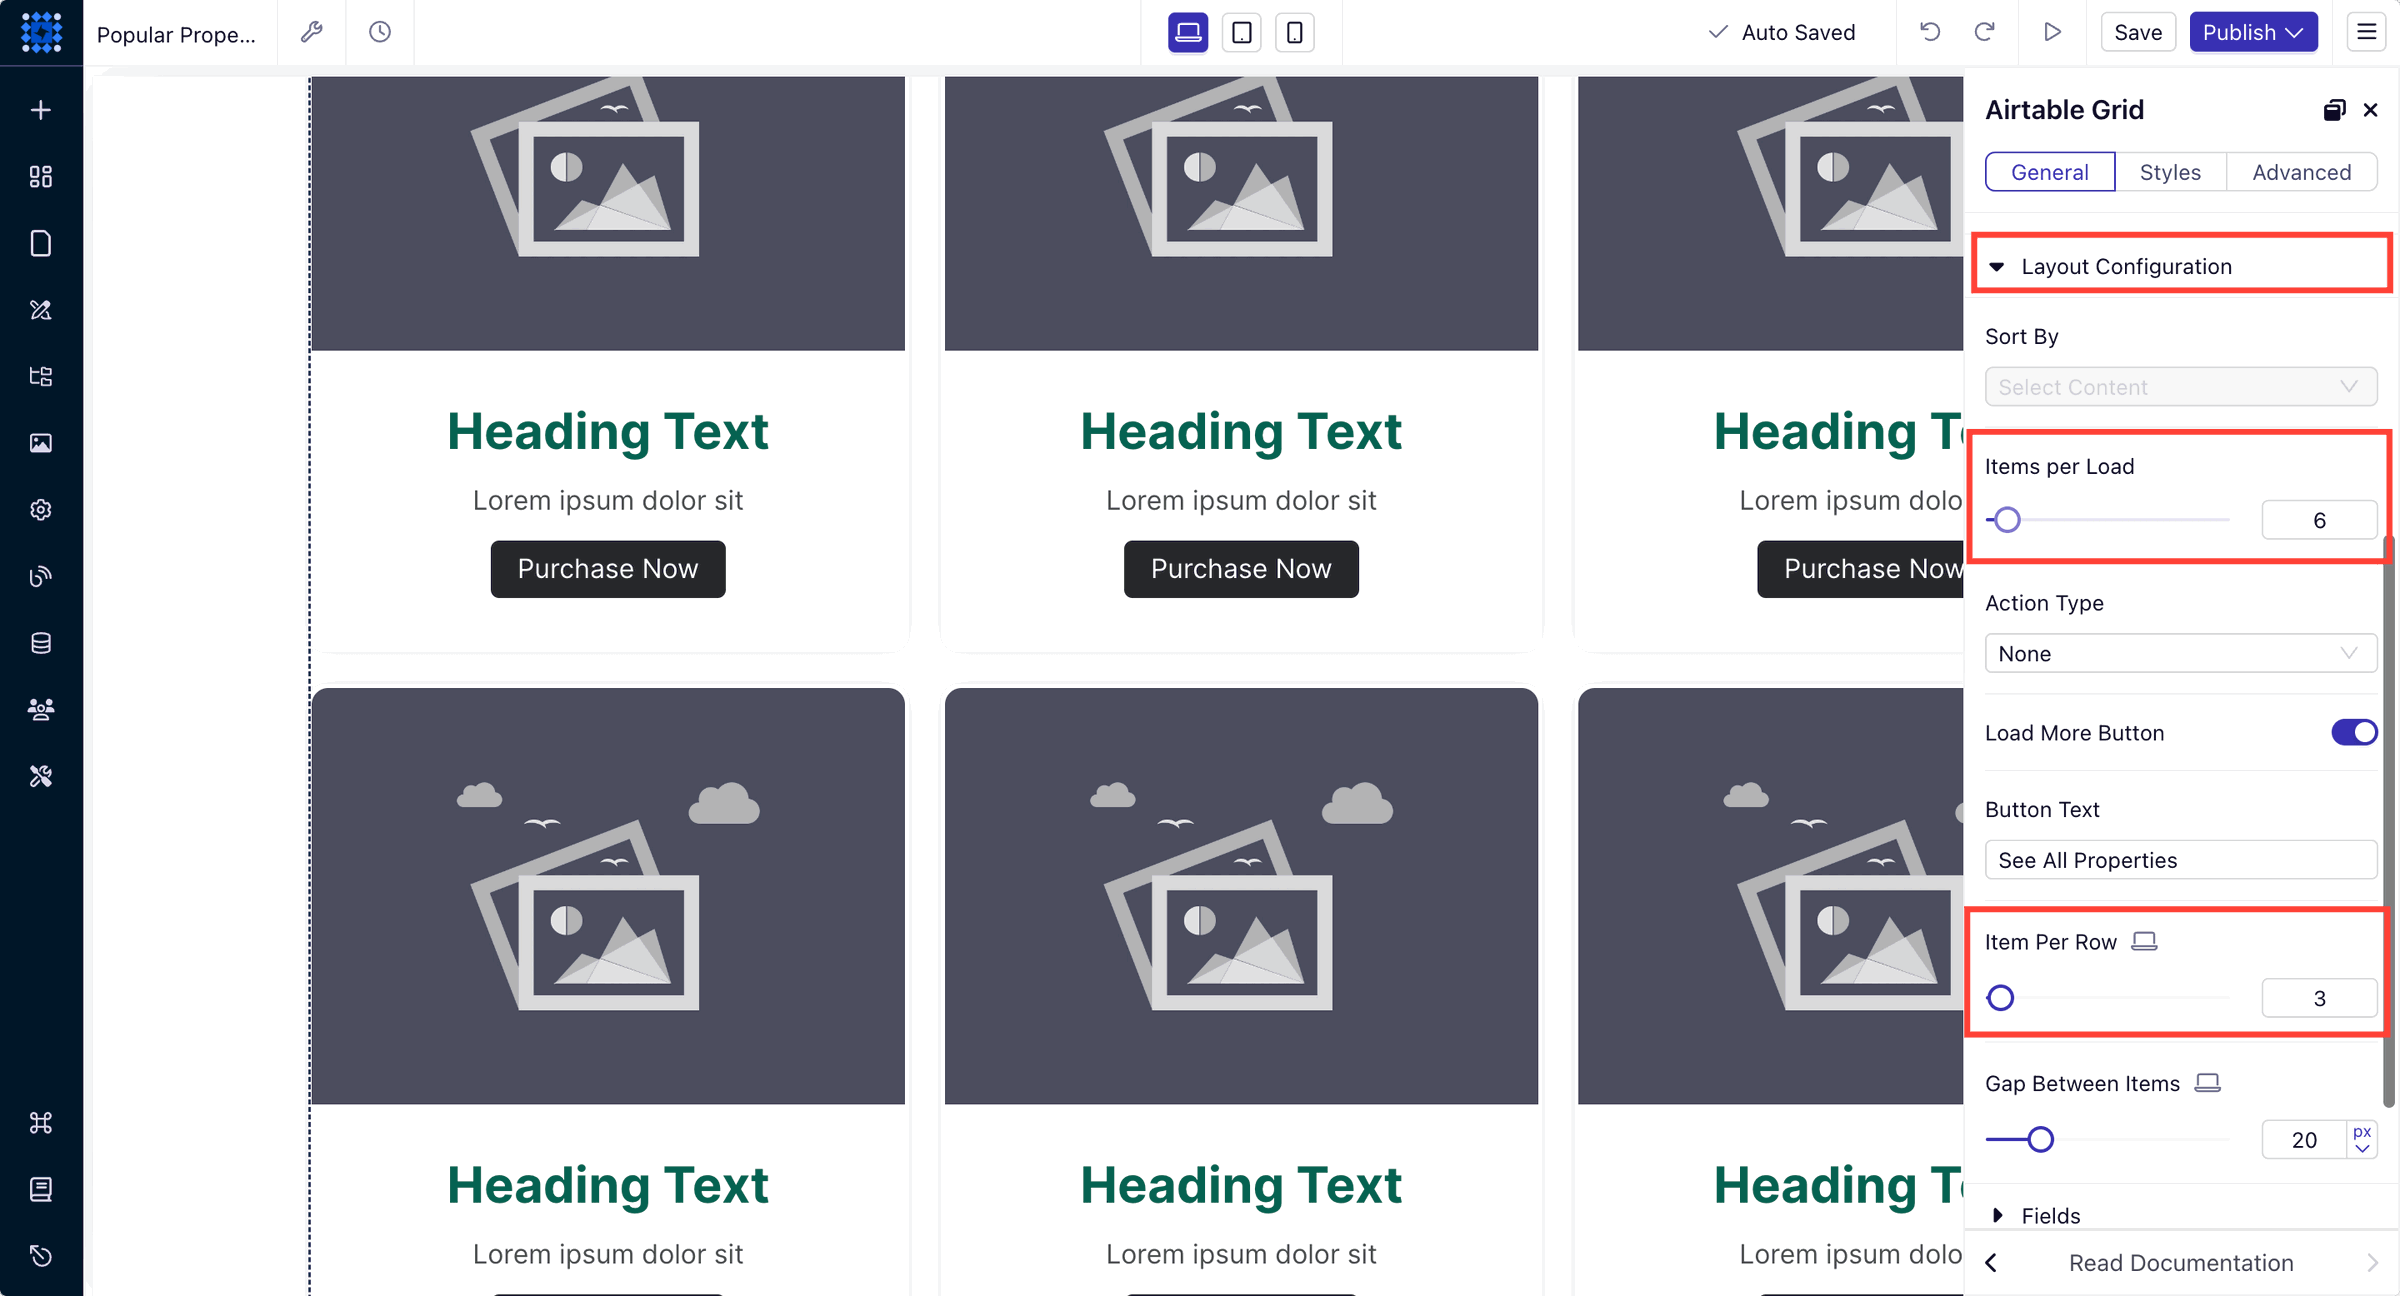
1. Layout Configuration: In the "Layout Configuration" section:
-
Set the number of items per page (e.g., 6, 9, or 12).
-
Choose the number of columns (e.g., 3 for a grid layout).
-
Decide whether to enable pagination or a Load More button.
2. Map Your Default Fields: Expand the "Fields" section, and you’ll find the following as the default fields:
-
Title Field: Map to your property name.
-
Image Field: Map to your property images.
-
Description Field: Map to a brief description or summary.
-
Link Field: Map to your property details.
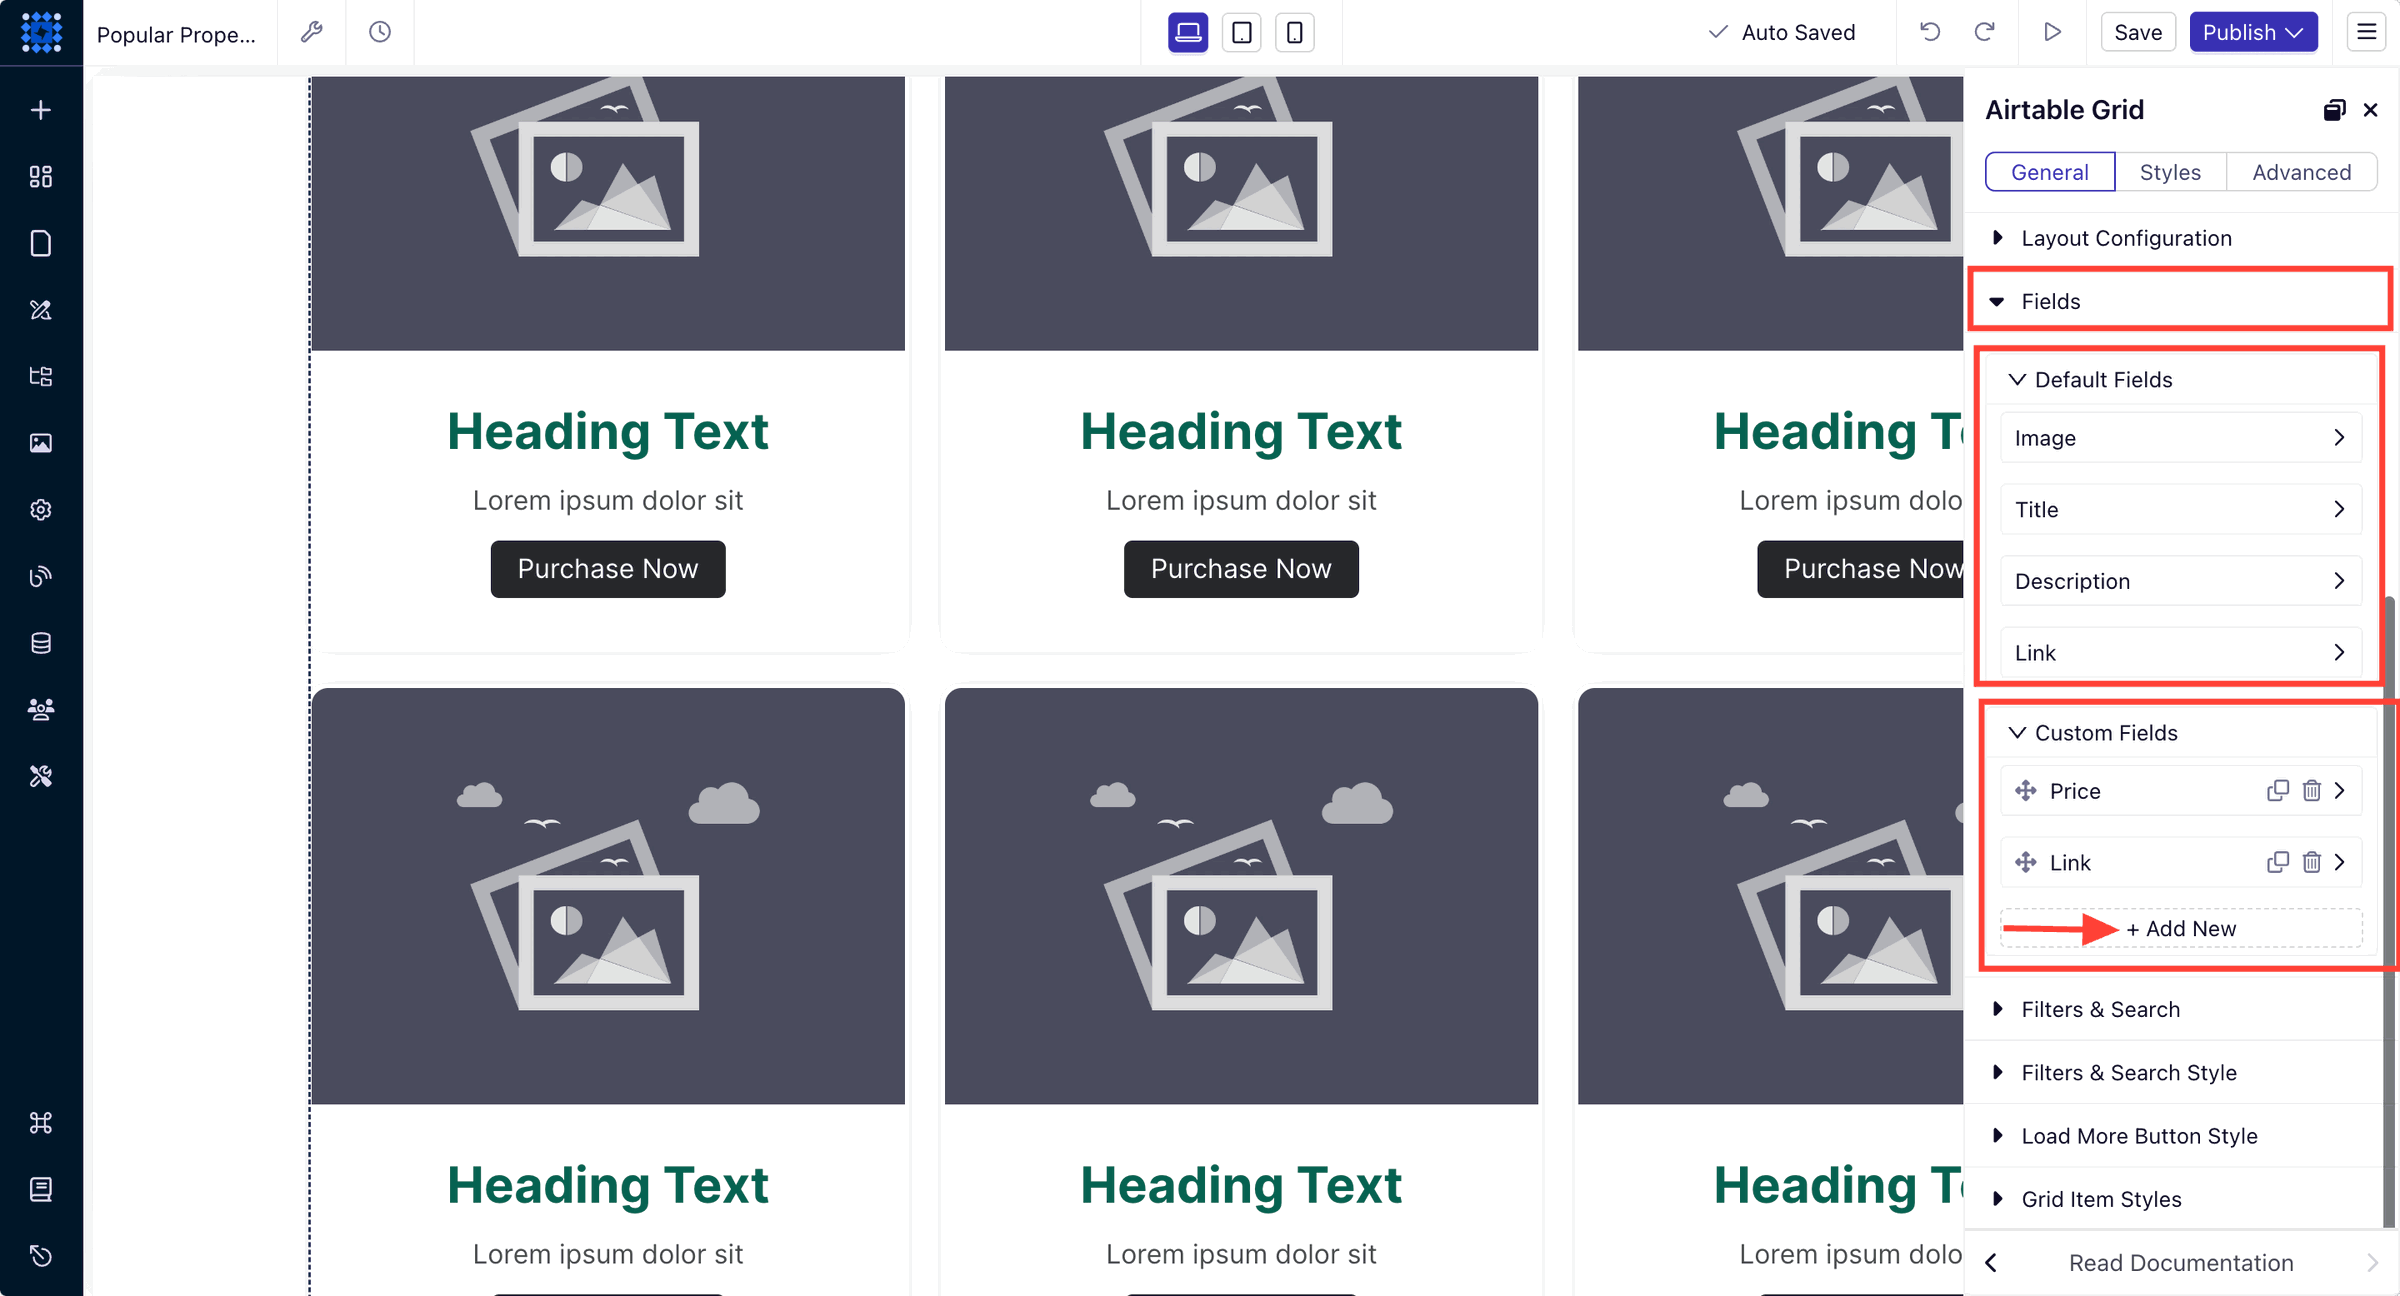
3. Map Your Custom Fields: Click "Add Custom Field" for additional data like price, location, etc. For each custom field:
-
Label: Name of the field (e.g., "Price").
-
Field Type: Choose the appropriate type (e.g., Text, Number).
-
Select Field: Map to the corresponding Airtable field.
Step 7: Enable and Configure Search Functionality
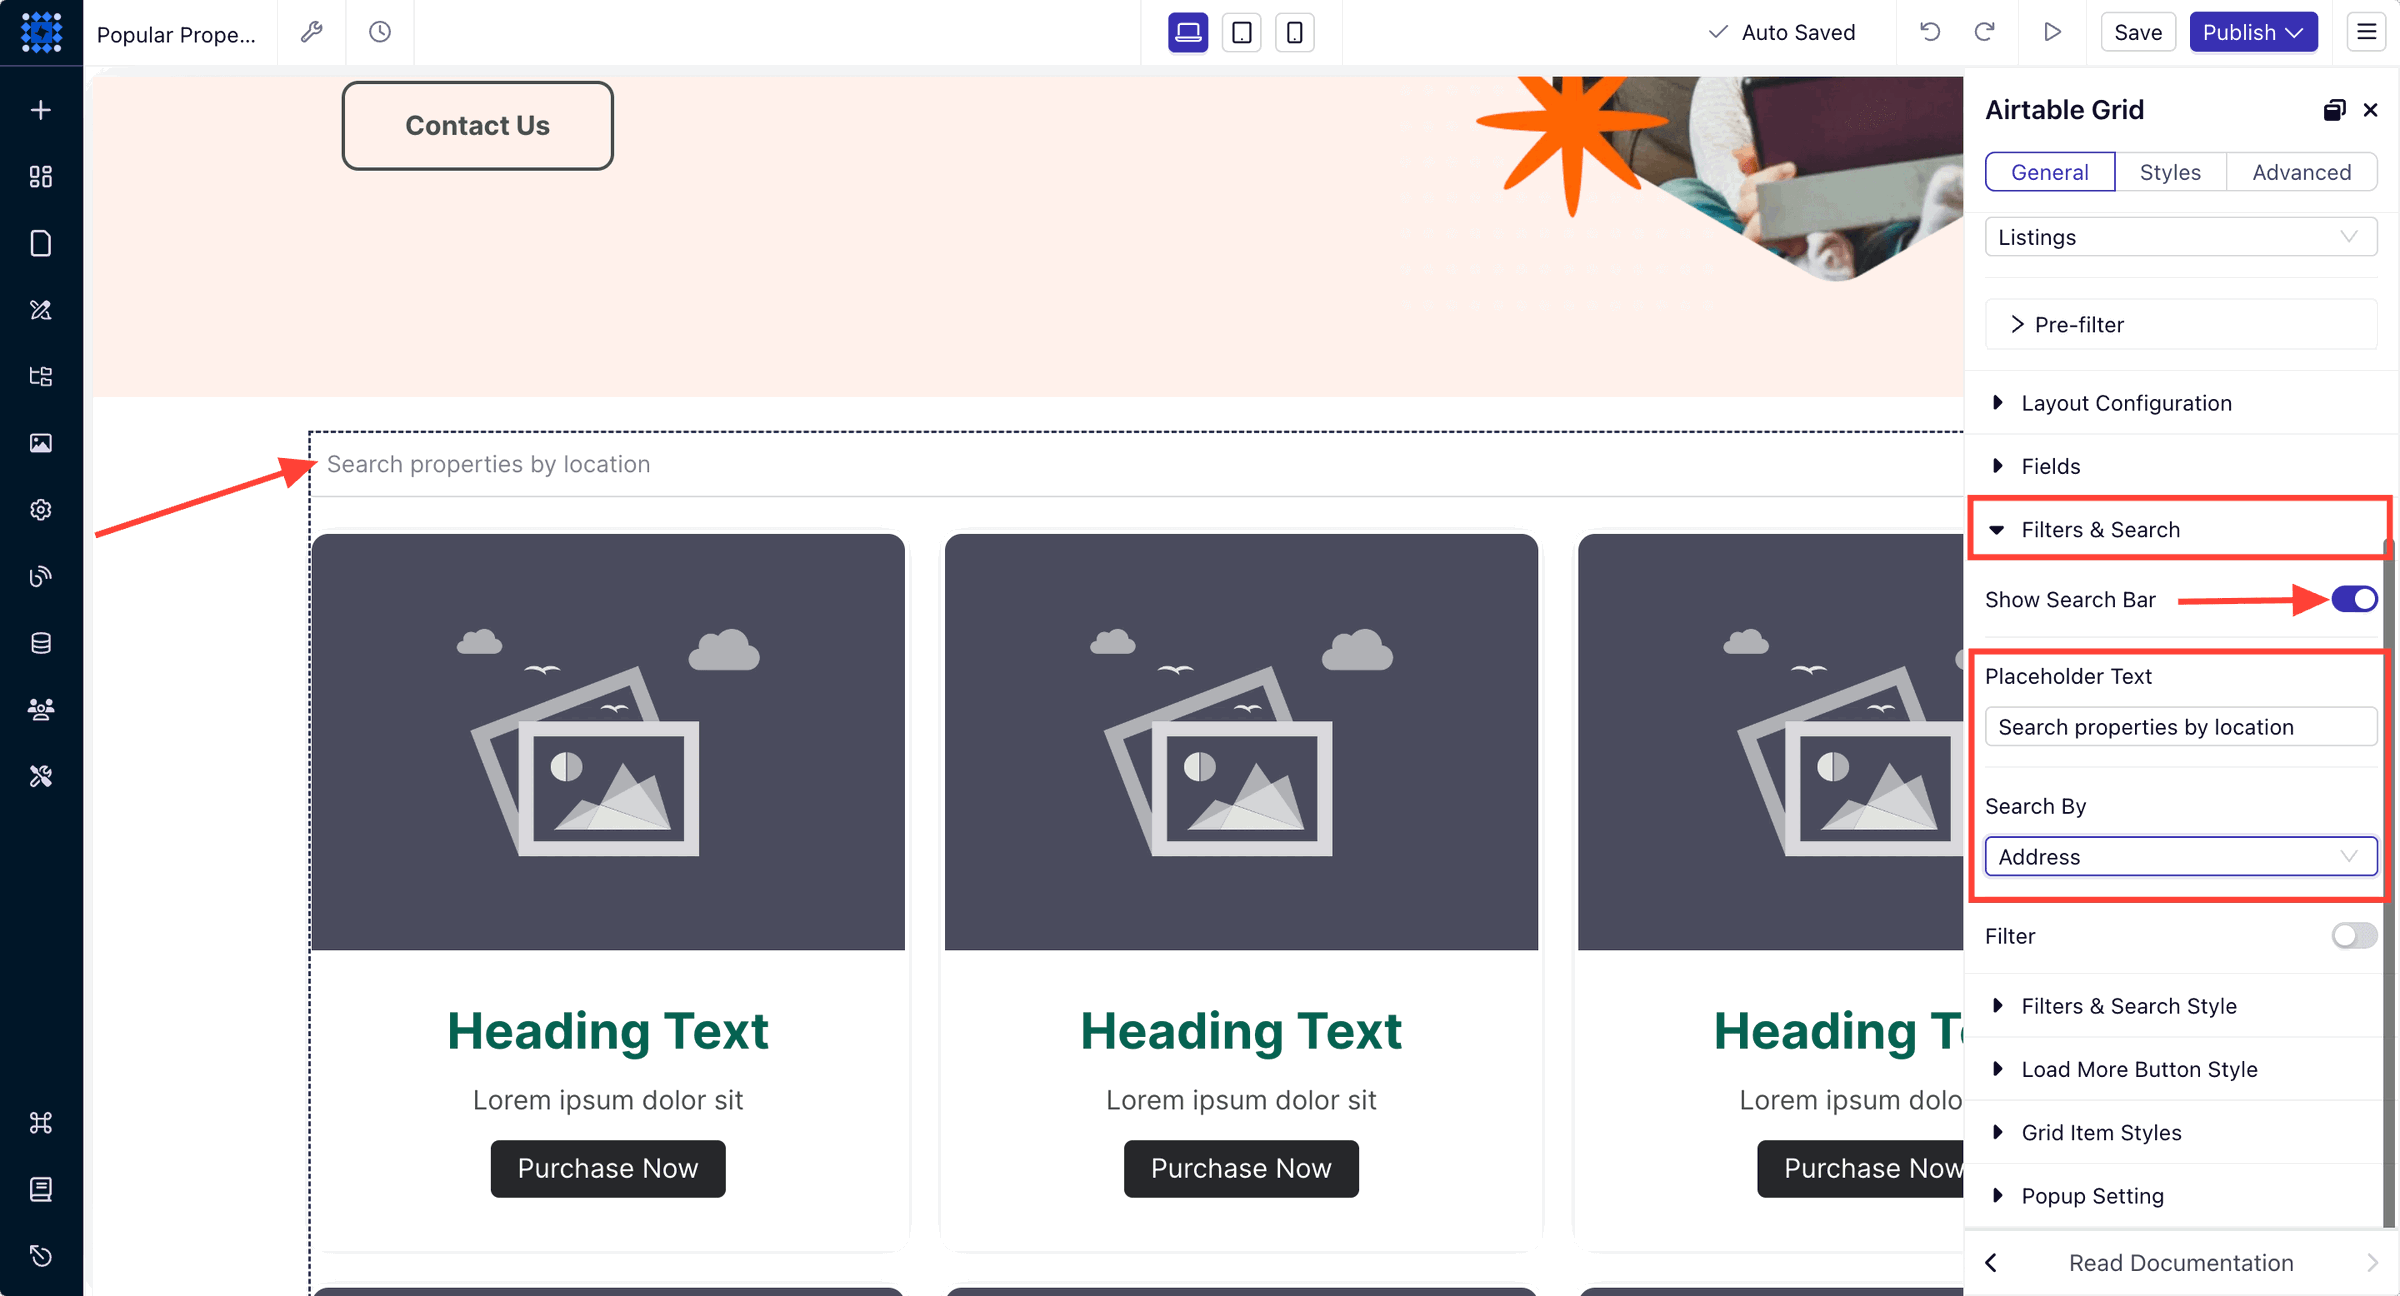
1. Enable Search Bar:
-
In the "Filters and Search" section, toggle "Enable Search Bar" to on.
-
Set the Placeholder Text (e.g., "Search properties...").
2. Select Searchable Fields:
-
Choose which fields the search will query (e.g., Property Name, Location, Property Type).
Step 8: Enable and Configure Filter Functionality
1. Enable Filters: In the "Filters and Search" section, toggle "Enable Filters" to on.
2. Add Filters: Click "+ Add New Filter" for each filter you want to add.
3. Select Filter Fields: Select the Airtable field you want to filter by (e.g., "Price", "Property Type").
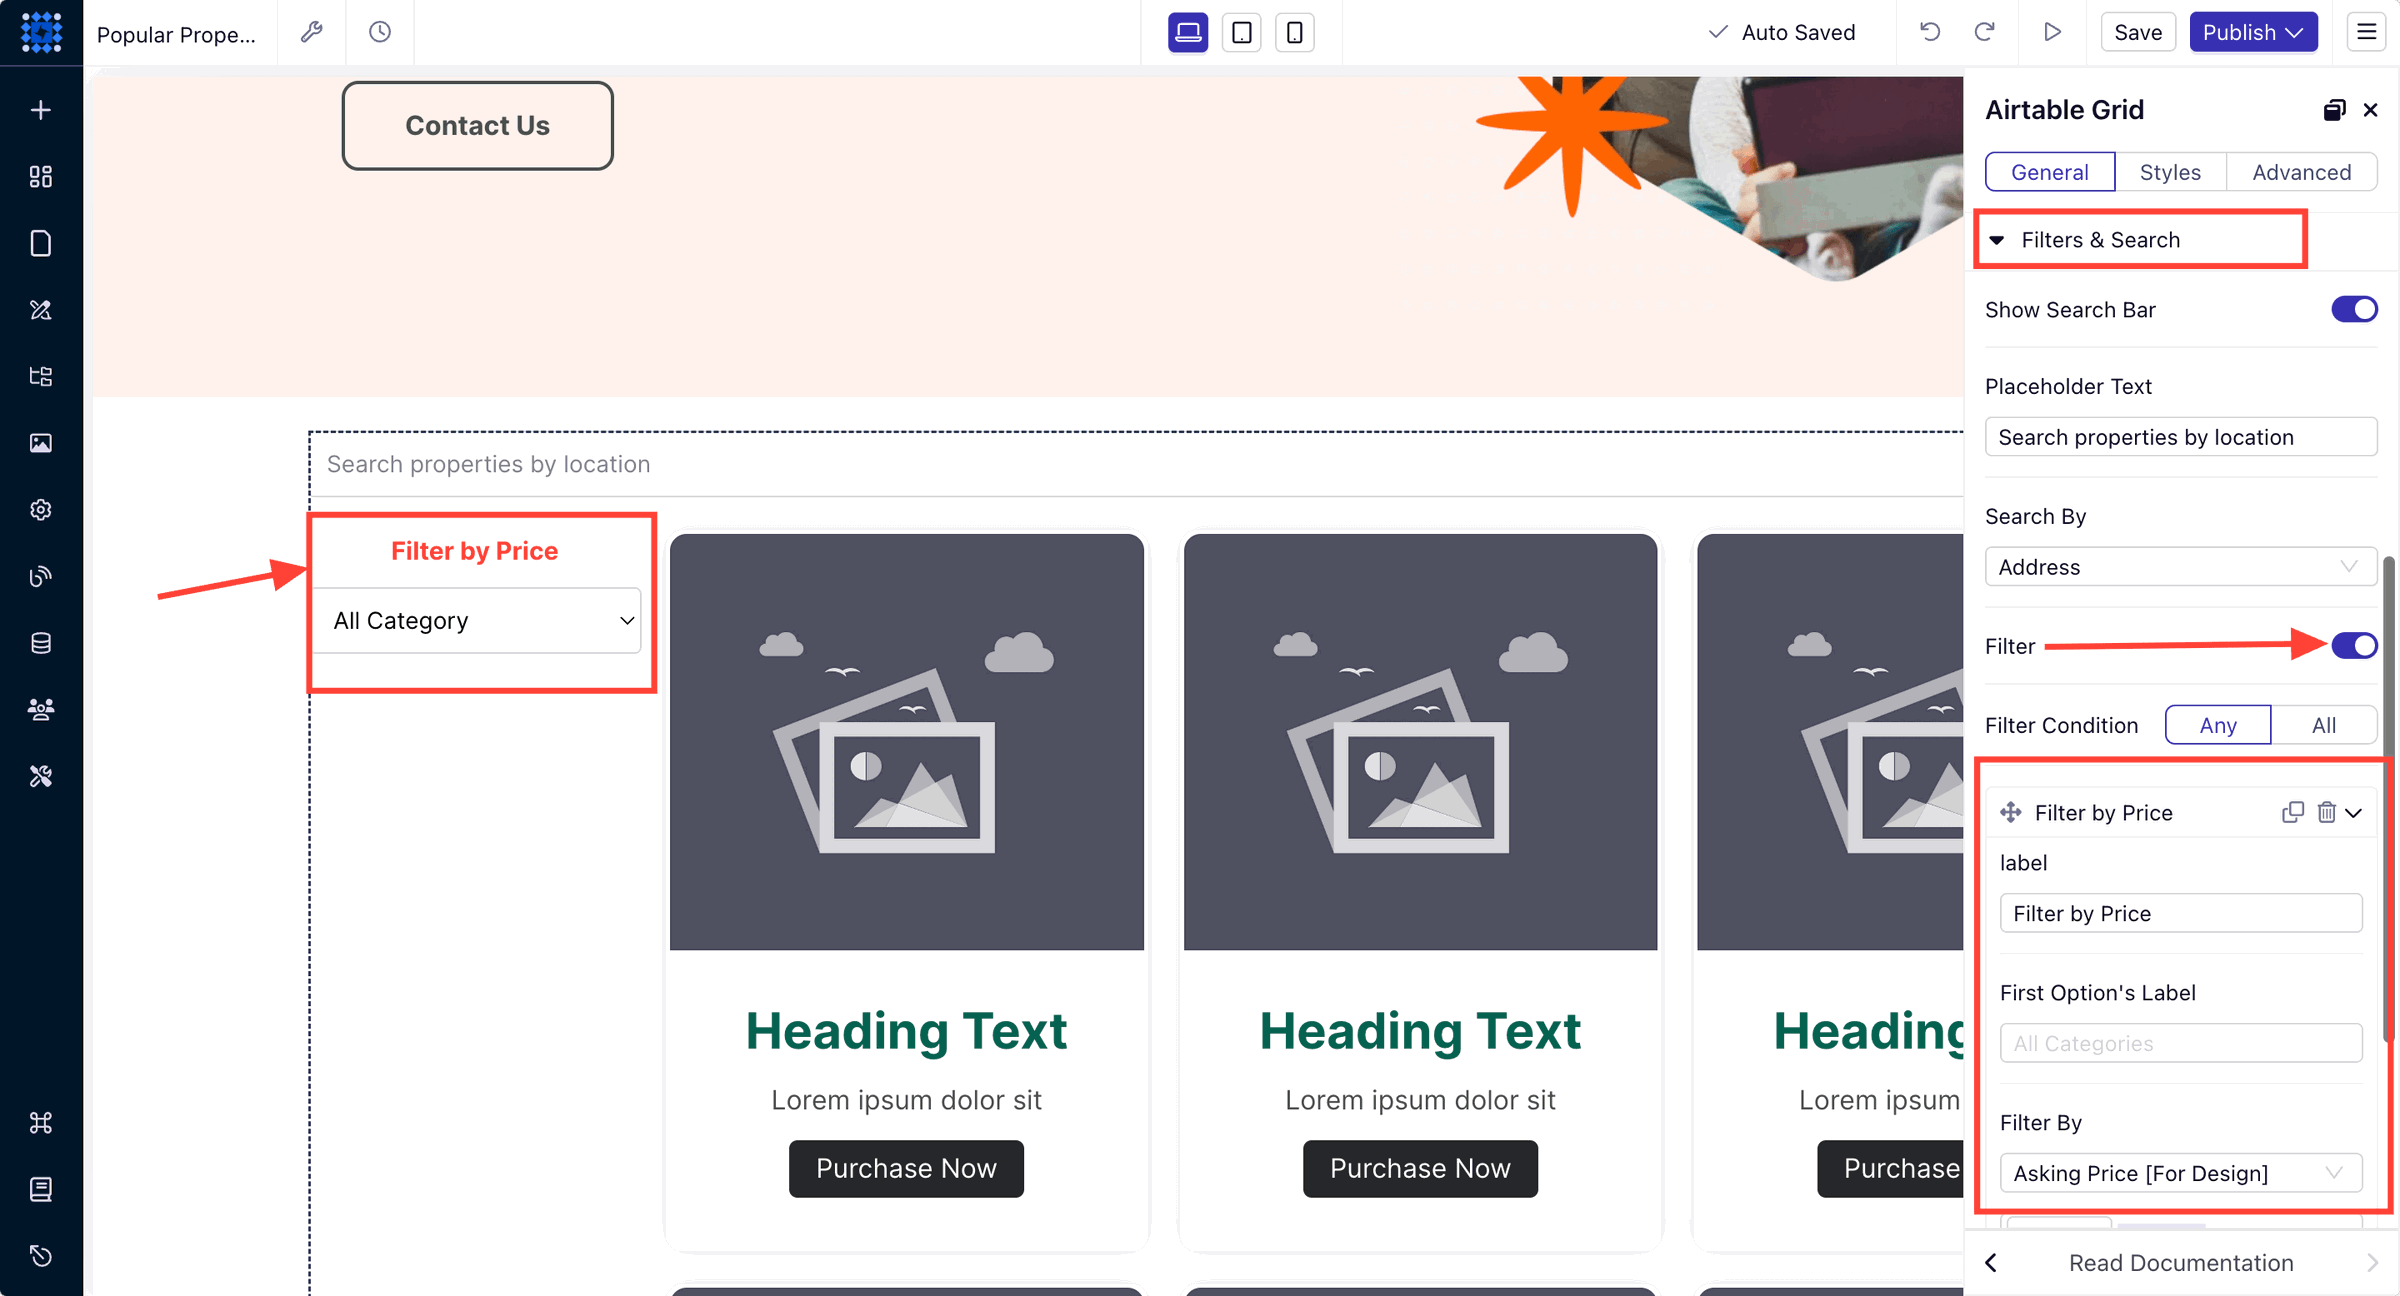
4. Select Filter Types: Choose how users will select options:
-
Dropdown: For single selections.
-
Checkboxes: For multiple selections.
-
Range Slider: For numerical ranges like price or square footage.
5. Set Filter Labels: Set the label that users will see (e.g., "Filter by Price").
Example Filters:
1. Property Type:
-
Field: Property Type
-
Filter Type: Checkboxes
-
Label: "Property Type"
2. Price Range:
-
Field: Price
-
Filter Type: Range Slider
-
Label: "Price Range"
3. Bedrooms:
-
Field: Number of Bedrooms
-
Filter Type: Dropdown or Checkboxes
-
Label: "Bedrooms"
Step 9: Style Search and Filters
1. Customize Search Bar Appearance:
-
In "Filters and Search Style", adjust font size, color, background, and border.
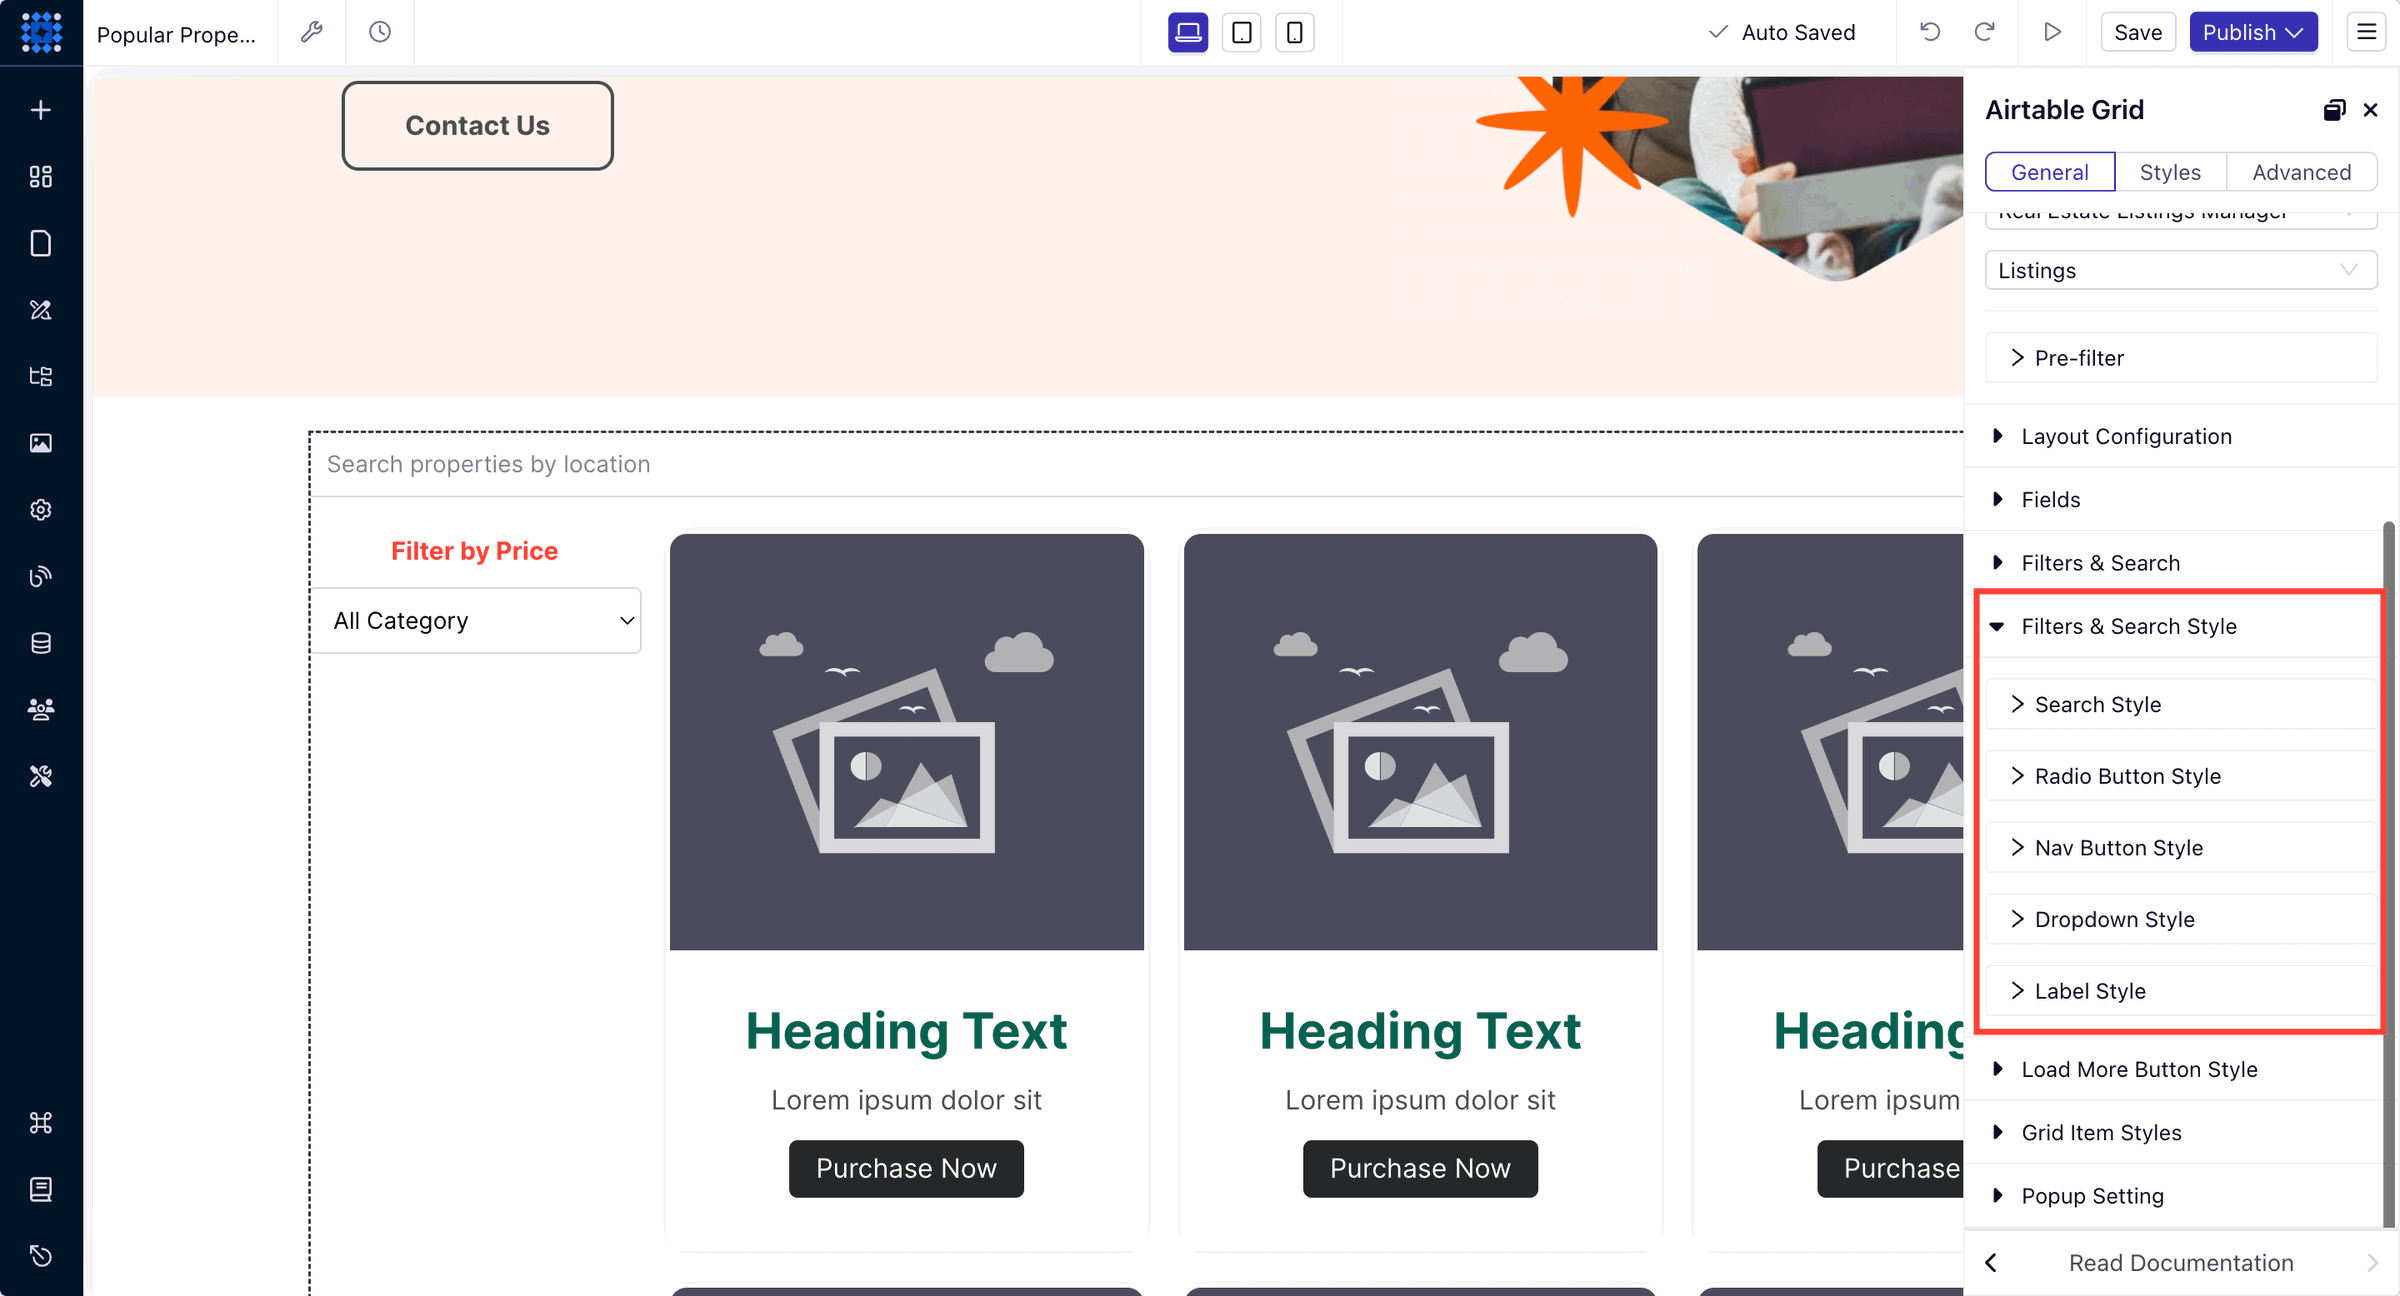
2. Customize Filter Appearance:
-
Modify labels, checkbox styles, and spacing between filters.
Step 10: Style the Airtable Grid/Table Element
1. Adjust Item Styles: In "Grid Item Styles" or "Table Item Styles", modify:
-
Background Color.
-
Text Styles (Font, Size, Color).
-
Borders and Shadows.
-
Spacing and Alignment.
2. Configure Pop-Up Settings (Optional):
-
Enable Pop-Up if you want detailed property info to appear in a modal when a user clicks on a listing.
-
In "Popup Setting," select the fields to display.
-
Style the pop-up in "Popup Styles."
Step 11: Test & Save Your Configuration
1. Preview the Page: Use the "Preview" option in Dorik to see how the listings, search, and filters appear.
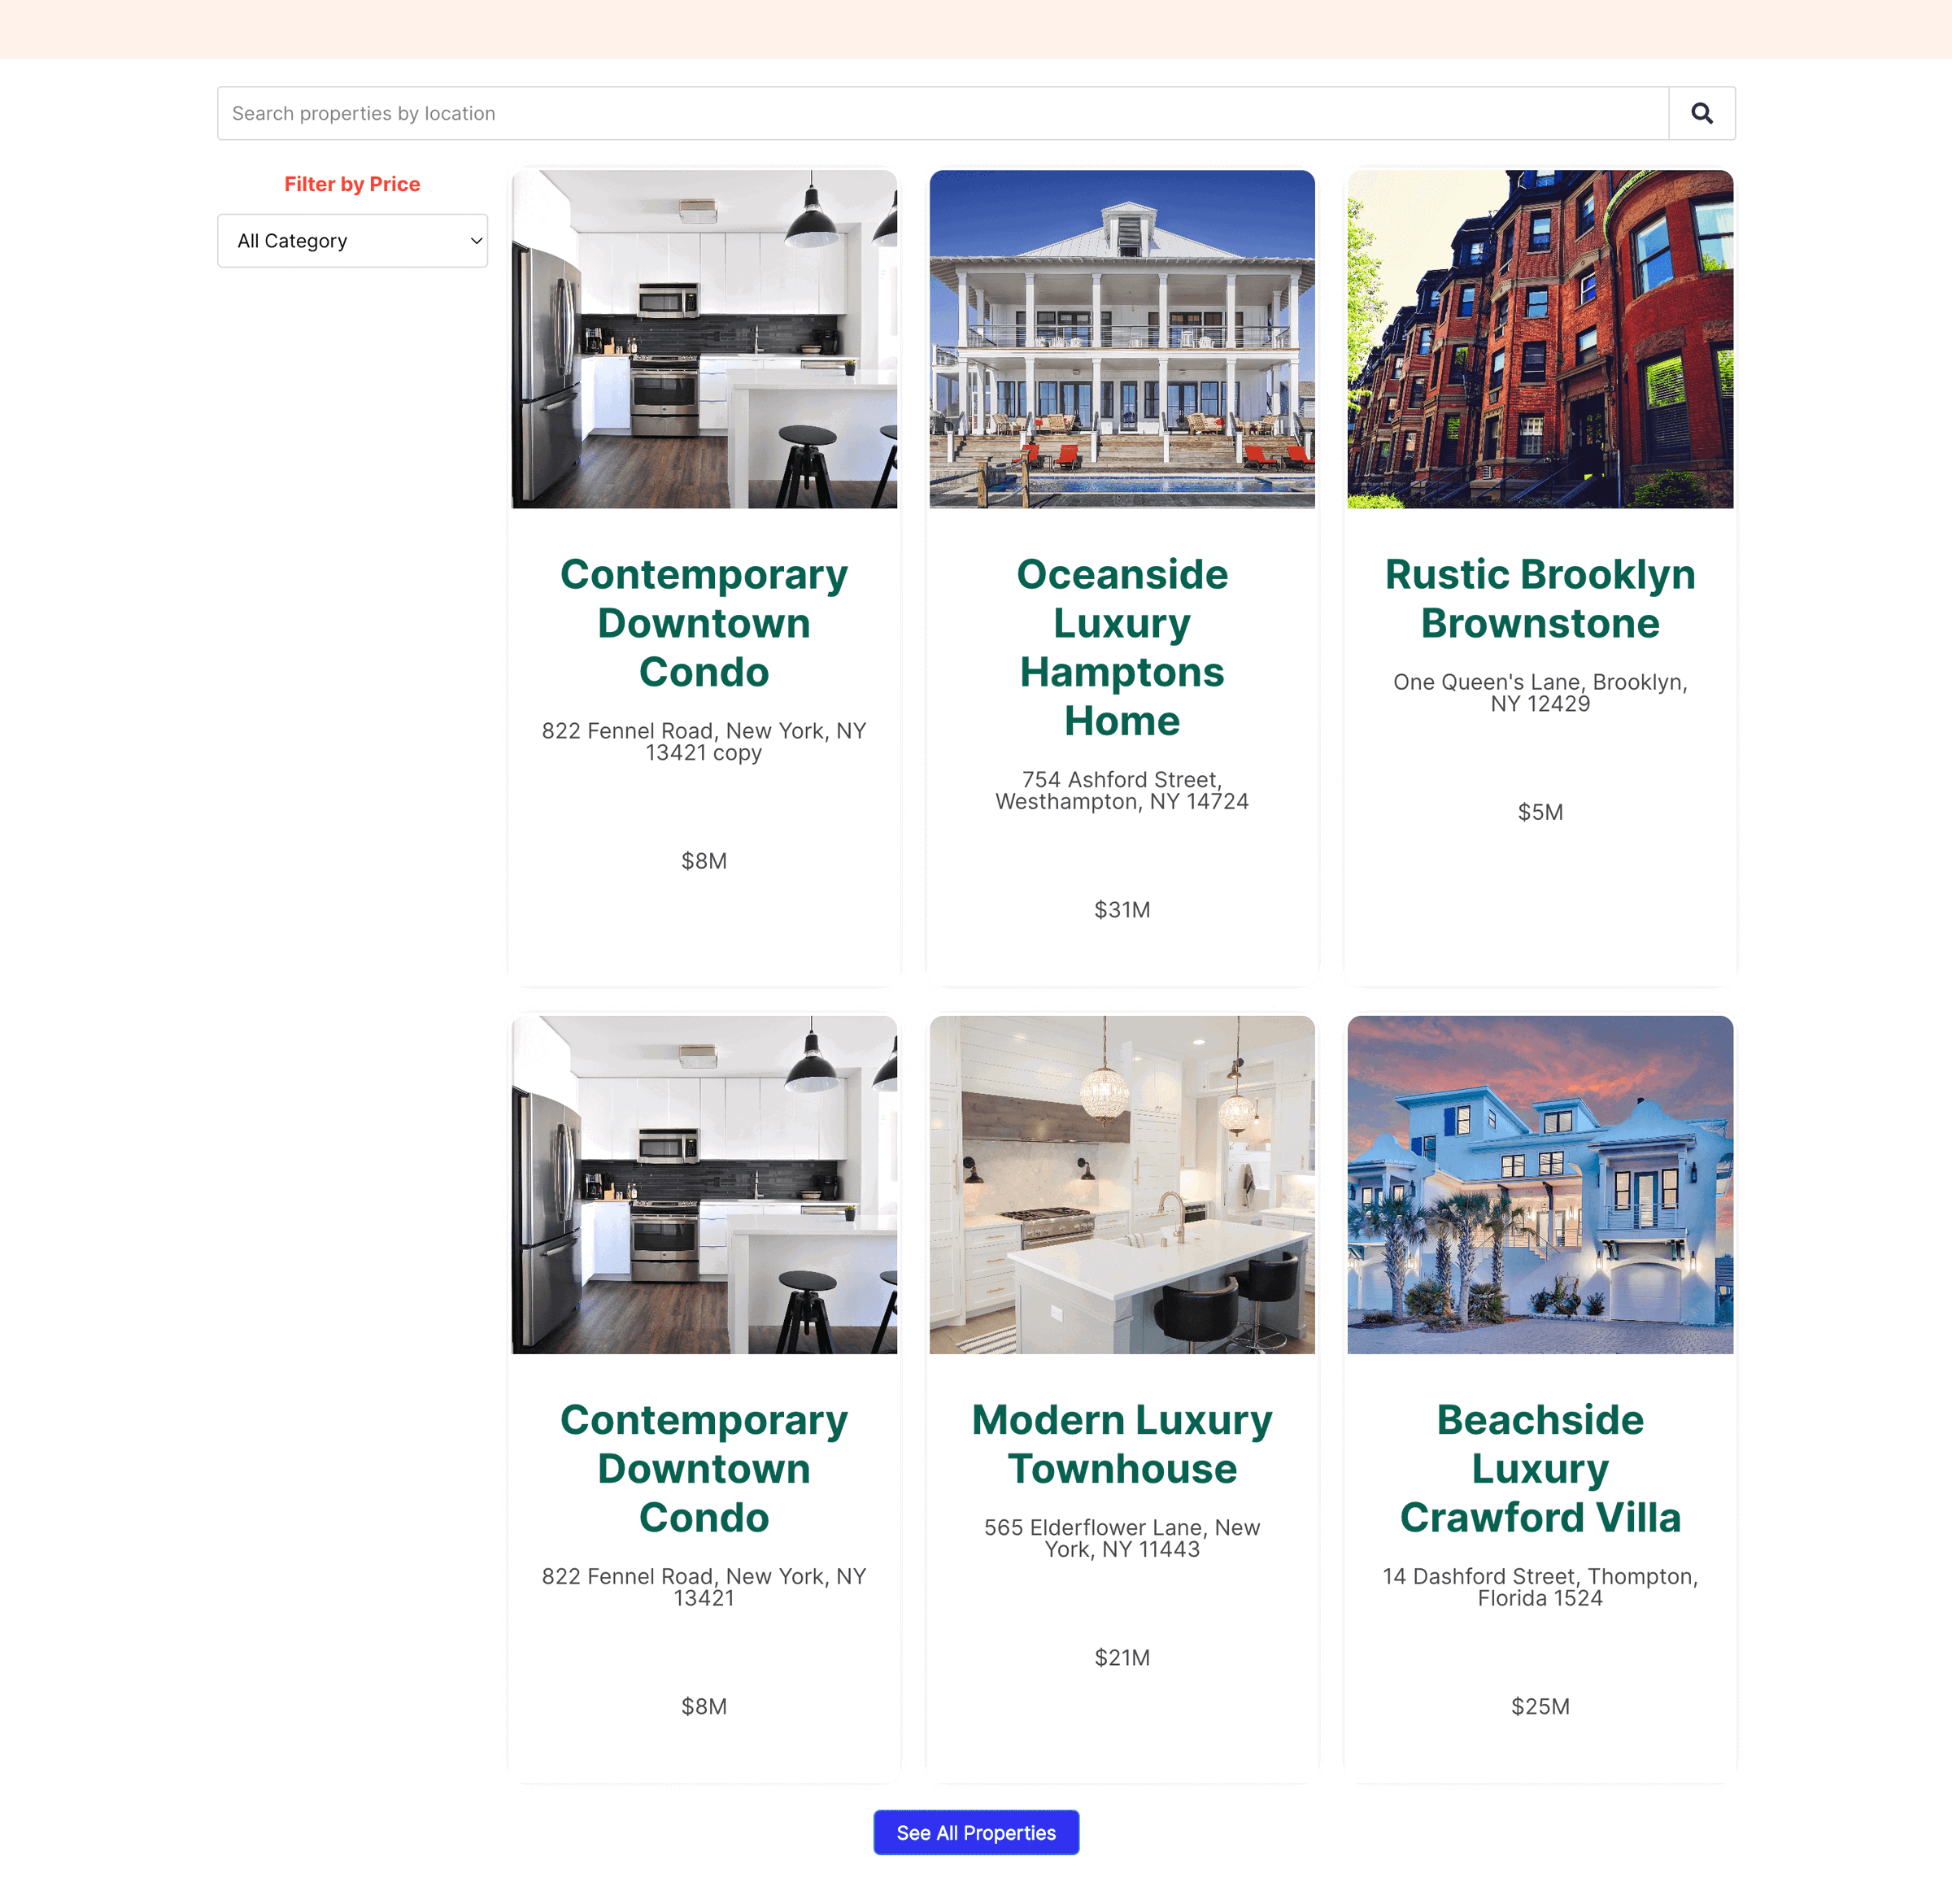
2. Test Search Functionality: Enter different keywords into the search bar to ensure it filters listings correctly.
3. Test Filters: Apply various filters to check that they narrow down the listings appropriately.
4. Check Responsiveness: Ensure that the layout looks good on different screen sizes (desktop, tablet, mobile).
5. Save Changes: Click "Save" in the Dorik builder to ensure all configurations are stored.
Additional Tips
-
Dynamic Updates: Any changes you make in your Airtable base (e.g., adding new listings, updating property details, etc.) will automatically reflect on your website without needing to republish.
-
Load More Button: If you have many listings, consider enabling the "Load More" button in the "Layout Configuration" to improve page loading times.
-
Custom CSS (Advanced): For further styling beyond the built-in options, you can add custom CSS in Dorik.
-
Support: If you encounter issues, Dorik's live chat support can assist you.
Step 7: Add Your Collection of Properties with Visuals
Your property listings are the heart of your real estate website. This is where potential clients will spend the most time, so it’s crucial to showcase your properties in the best way possible.
High-quality visuals and detailed descriptions can make all the difference in converting visitors into leads.
Here are some tips you can follow to organize your property listings:
Categorize Properties
You can start by organizing your listings into categories. You might group properties by type (e.g., residential, commercial, rental), location, or price range. Clear categorization makes it easier for visitors to find what they’re looking for.
Include Key Details
For each property, ensure you include all essential information. This typically includes things like:
-
Property price
-
Location
-
Property Size and Layout
-
Number of bedrooms and bathrooms
-
Amenities
-
Unique feature (if any)
The more detailed the information, the better.
Use High-Quality Images and Videos
You can hire a professional photographer to capture your properties. High-resolution images and videos highlighting each property's best features can significantly enhance the appeal. Include a variety of shots, such as exterior views, interior rooms, and special features.
Offer 360° View
This technology allows users to explore properties from all angles, including full interior and street views. It provides a more immersive experience and helps potential buyers get a realistic sense of the space.
Use Drone Footage
Aerial footage captured by drones provides a bird’s-eye view of the property and its surrounding area. This is particularly useful for showcasing large properties, unique locations, or features that are best viewed from above.
Add a Gallery or Slider
Consider using a gallery or image slider to present multiple images of a single property. This keeps the page clean and allows users to browse through images easily. You can easily add an image gallery with Dorik.
Here’s how to add an image gallery or slider to your real estate website.
1. Click on Add New Section to place your image gallery.
2. Click on the Add Element button (the + icon) and look for the Image Gallery element.
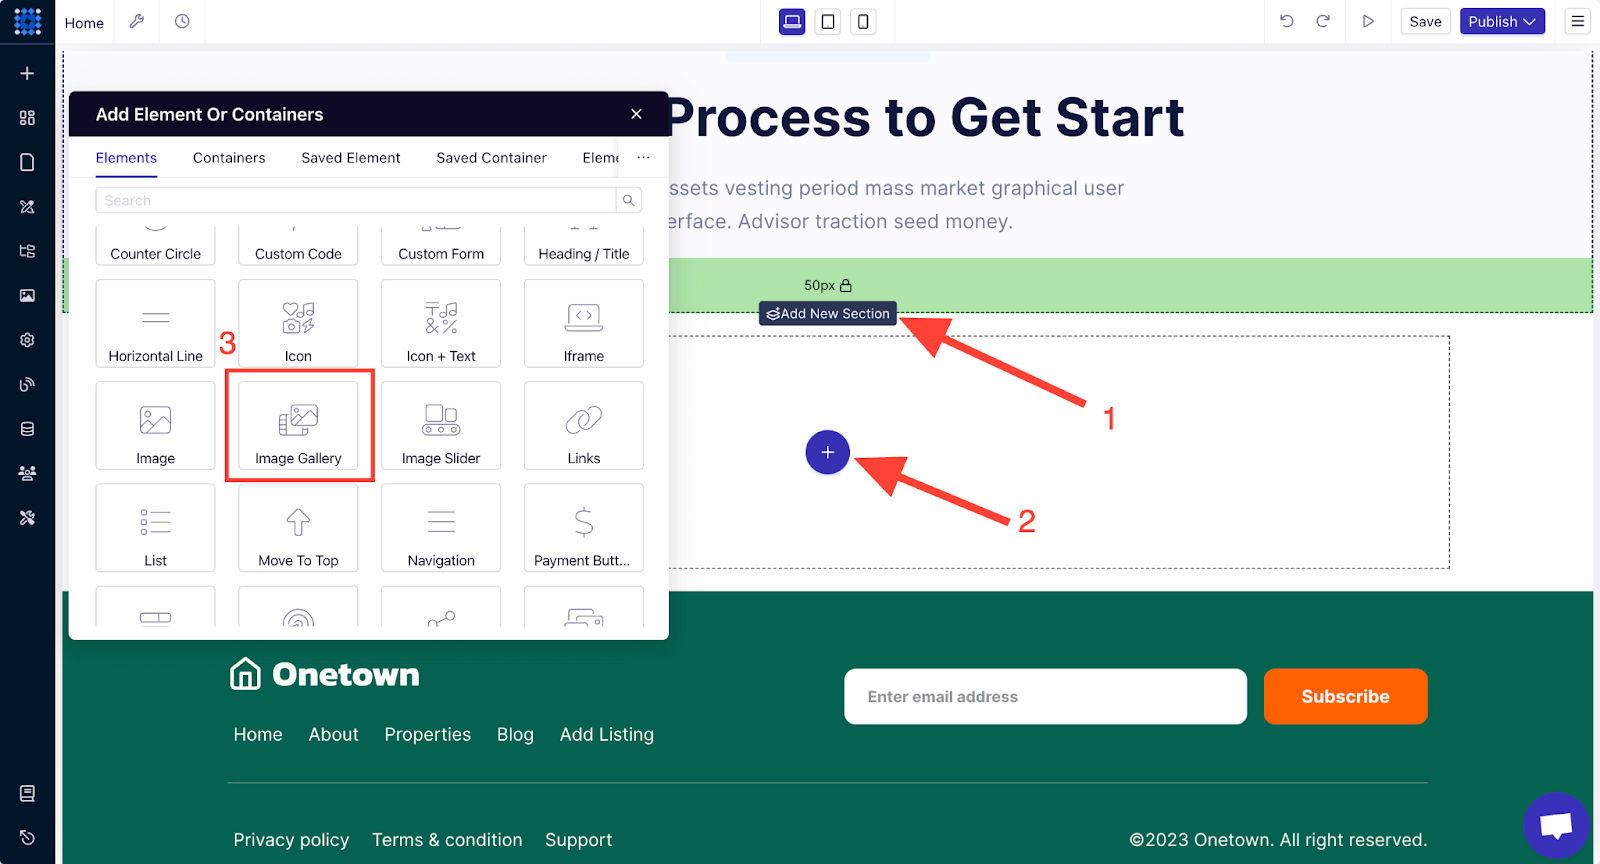
3. Click on the element to add it to your website. You can then customize the galley content to make it uniquely yours.
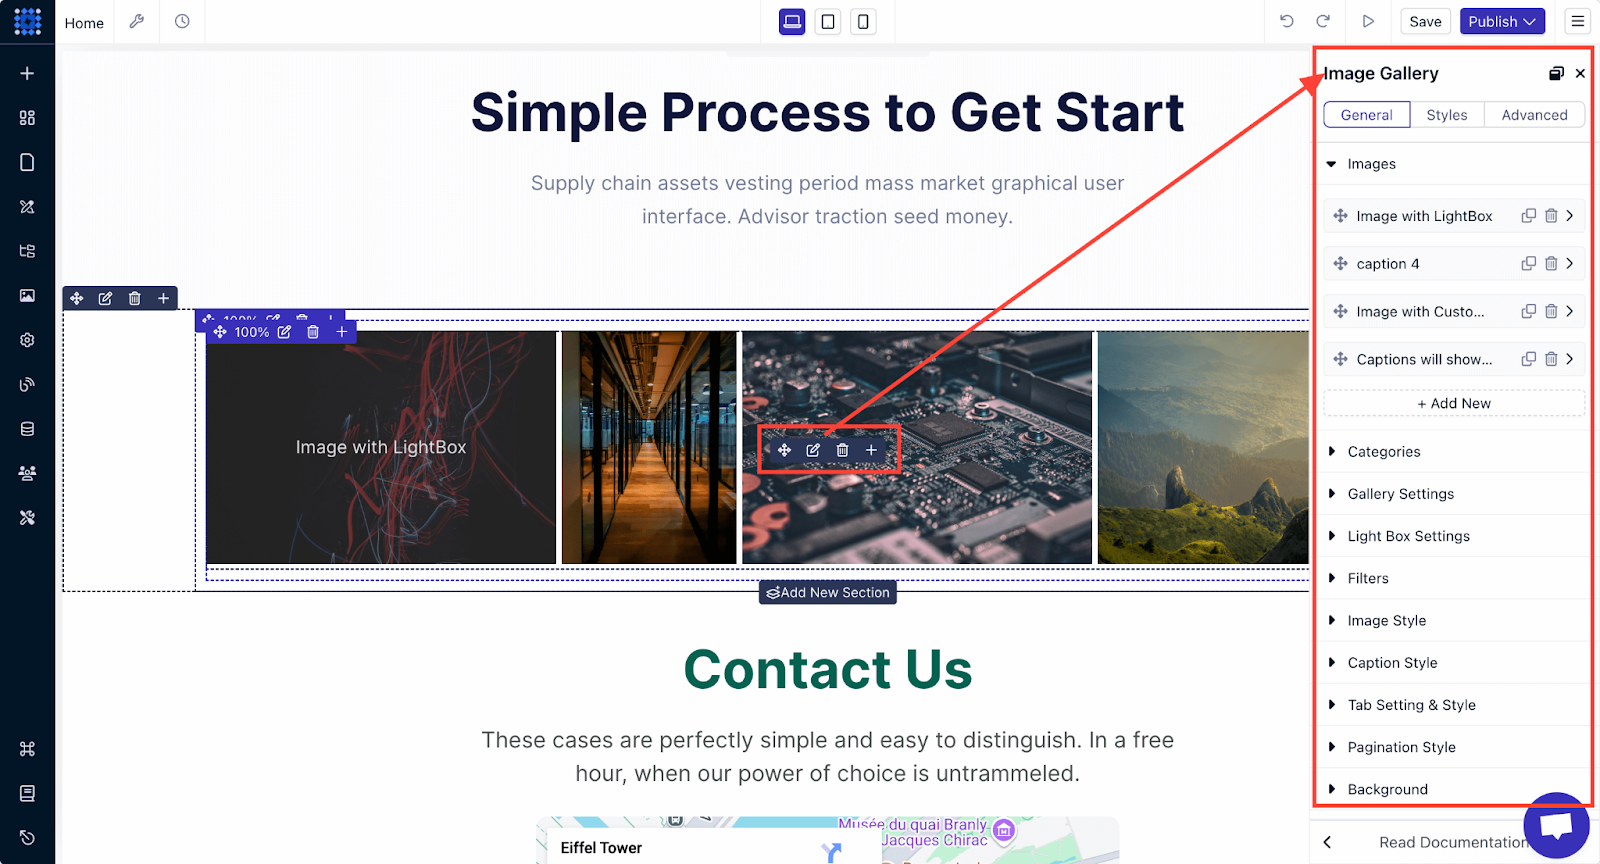
It’s that simple.
Add Virtual Tours
If possible, offer virtual tours of the properties. You can incorporate Virtual Augmented Reality to bring your properties to life. VR capabilities allow users to virtually walk through and interact with the space as if they were there.
This feature enhances engagement and gives buyers a feel for the property without needing to visit in person.
Show Your Properties with Dorik Collection
We already showed you how you can showcase your property collection using Airtable. But if you're not comfortable using Airtable, ther's another easy way to do it. We're talking about the unique feature of Dorik called "Dorik Collections".
Here’s how you can easily add your collection of properties to your website using Dorik’s Custom Collection feature. We’ll discuss the process step by step:
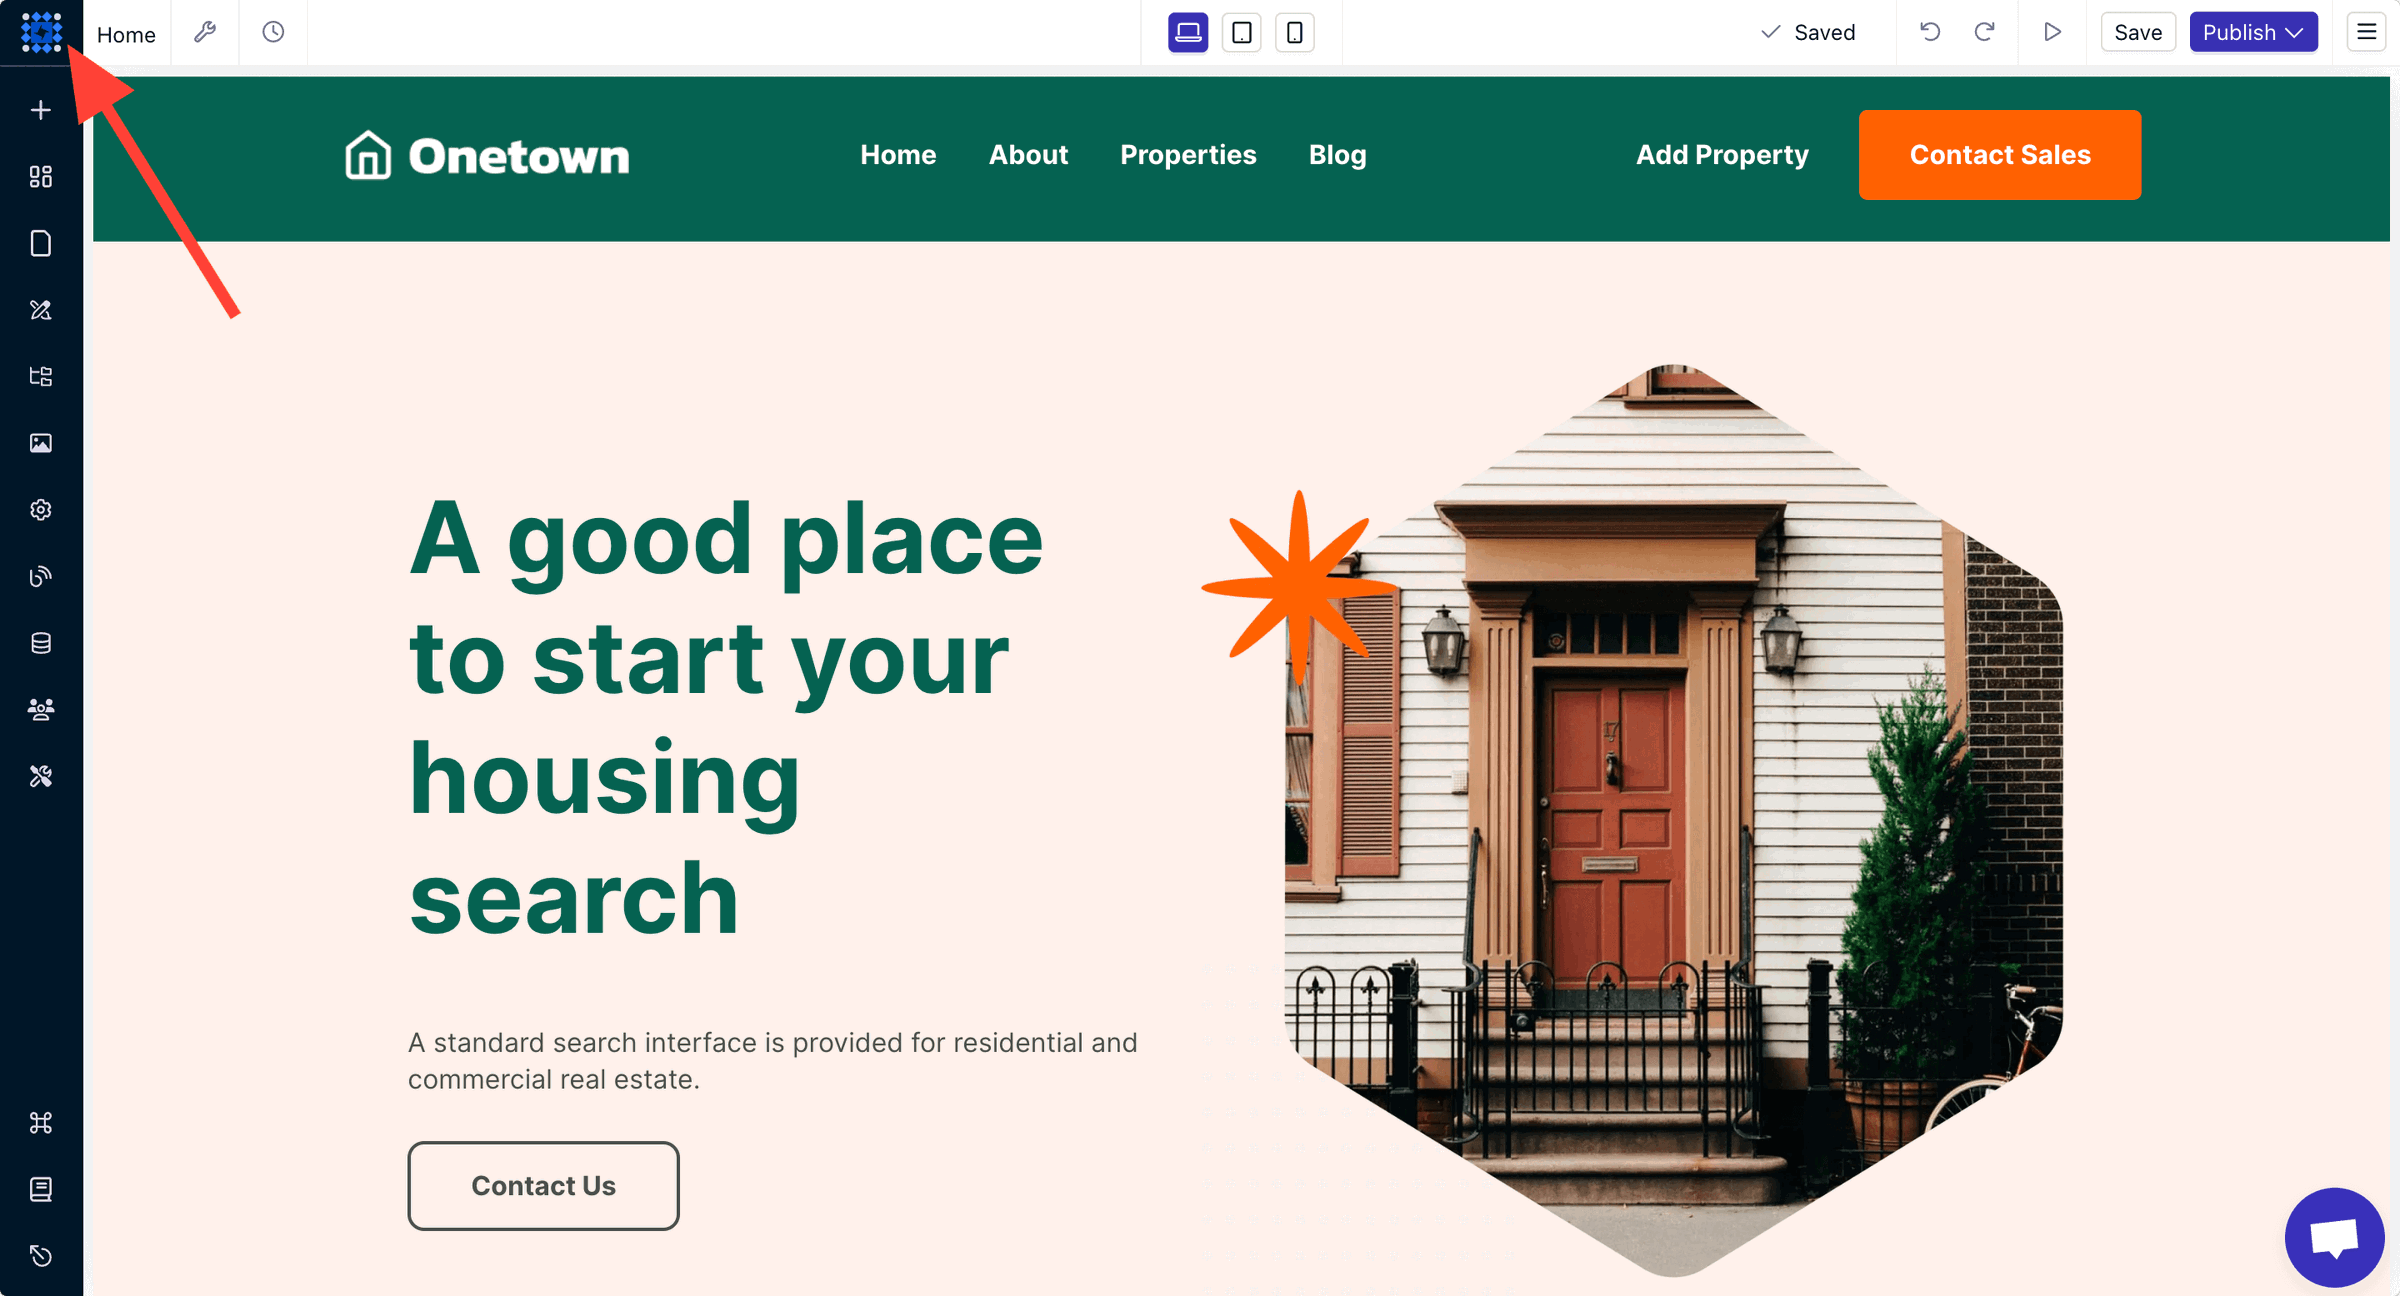
1. Visit the Dorik CMS dashboard by clicking on the blue square-shaped icon in the top left corner.
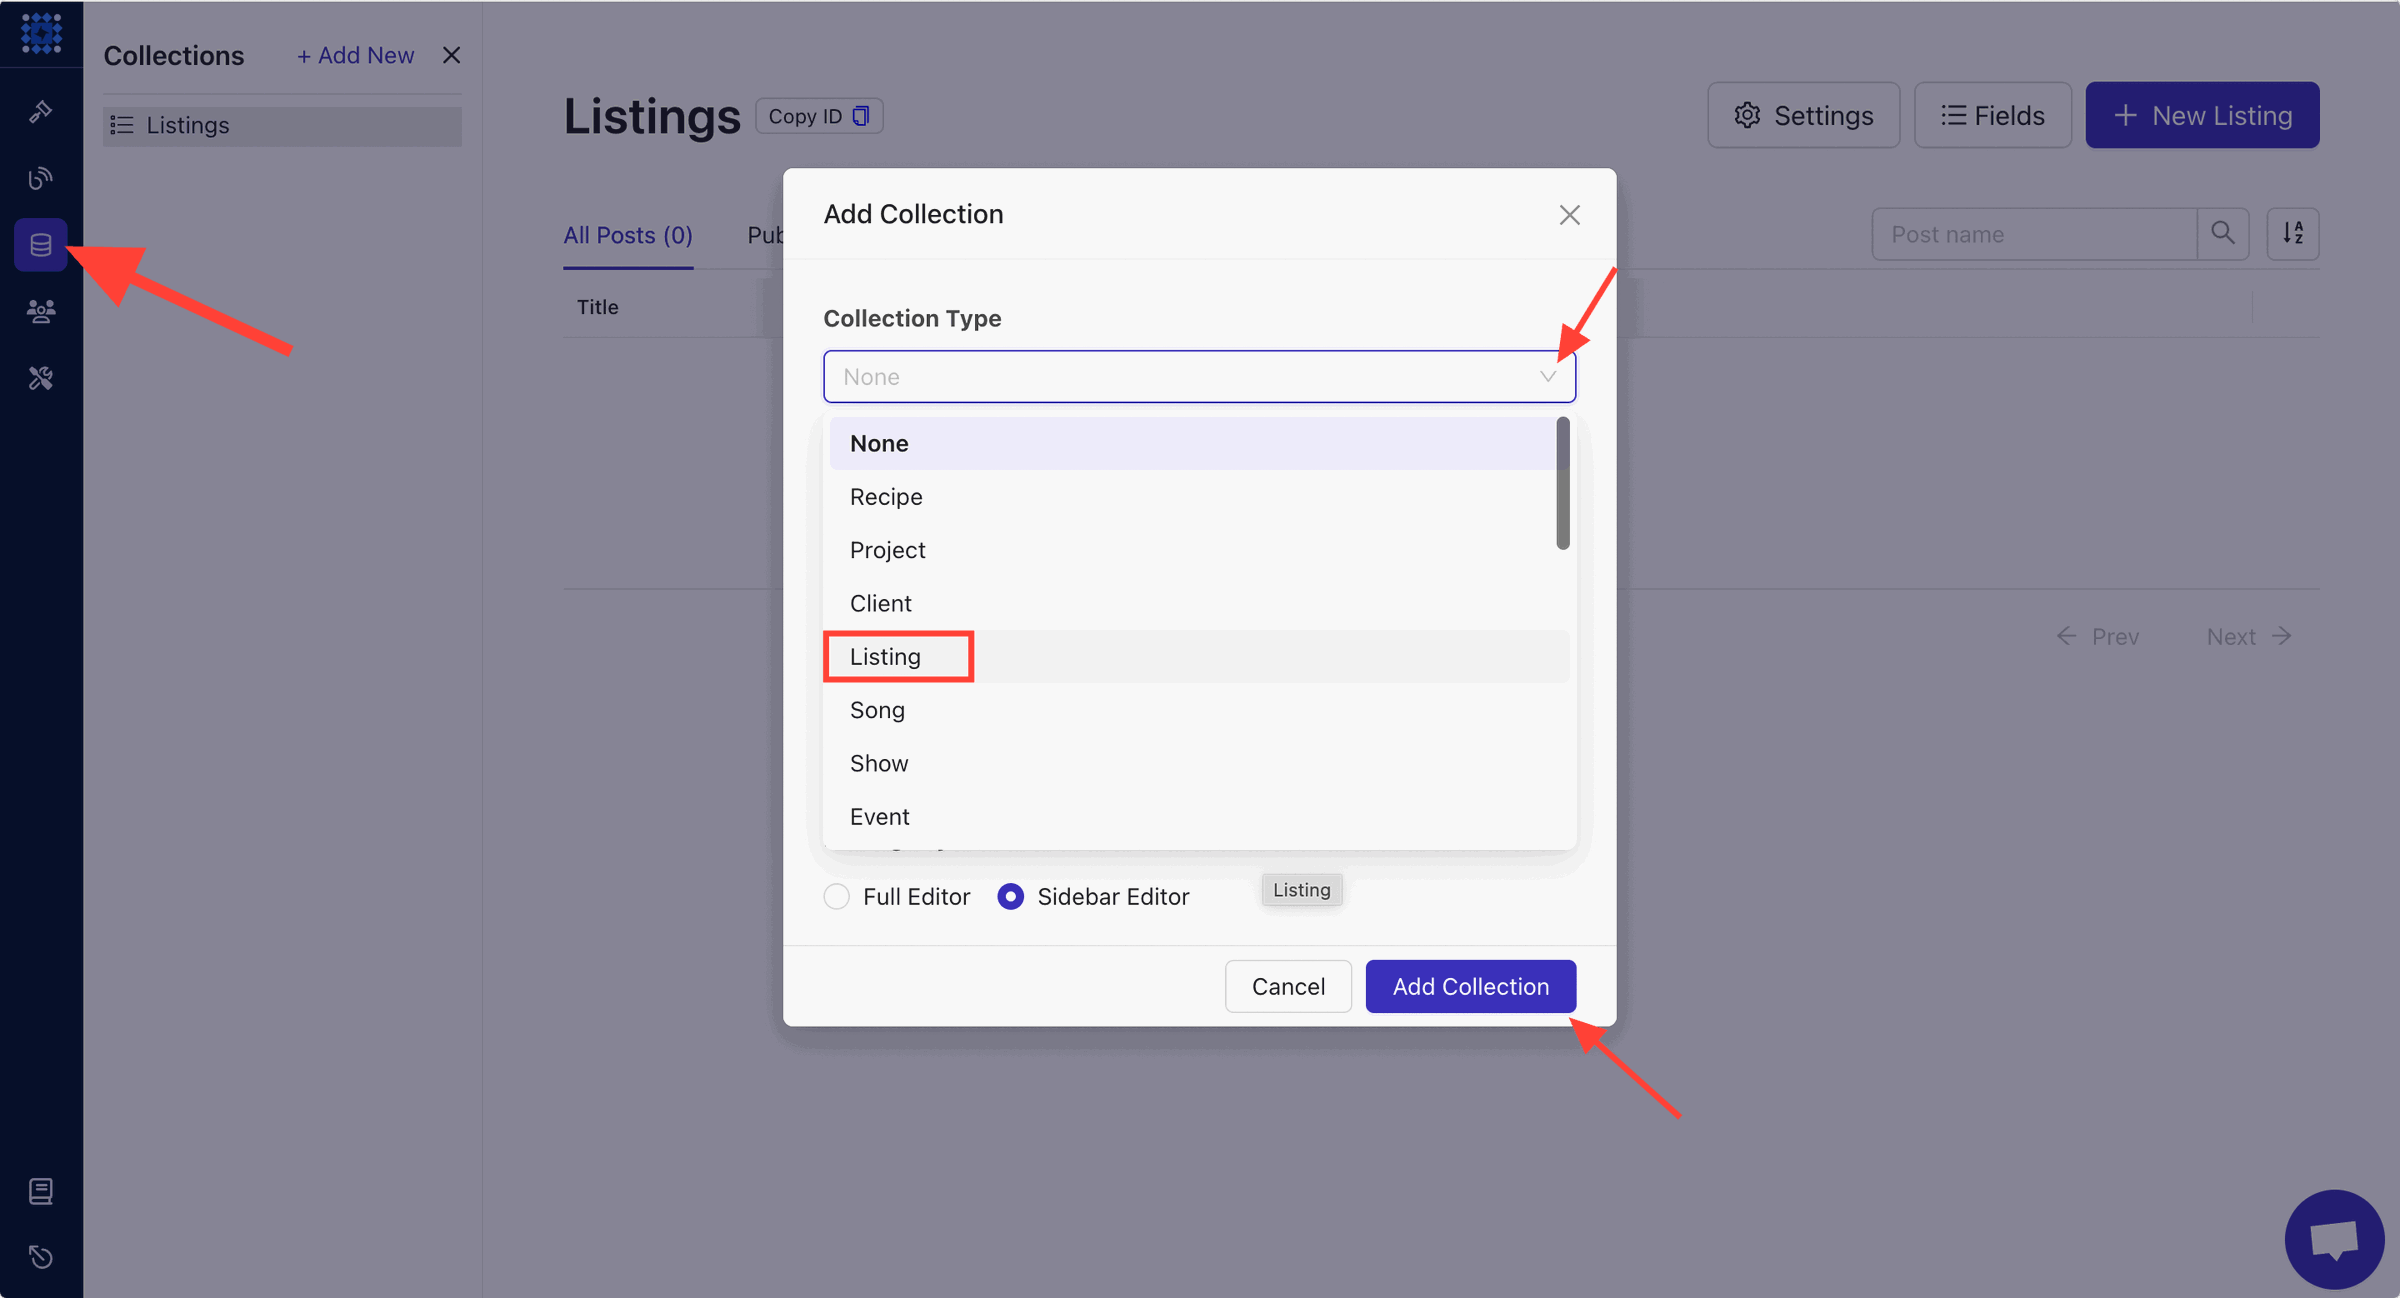
2. In the CMS dashboard, click on Collection and then click Add New to create a new collection. Select “Listings” as the collection type because it is created specifically for property listings. Click on “Add Collection” after that.
3. You can create as many listing items as you want. For this example, we’re creating 10 items in our collection. You can add a new item to the collection by clicking the “New Listing” button.
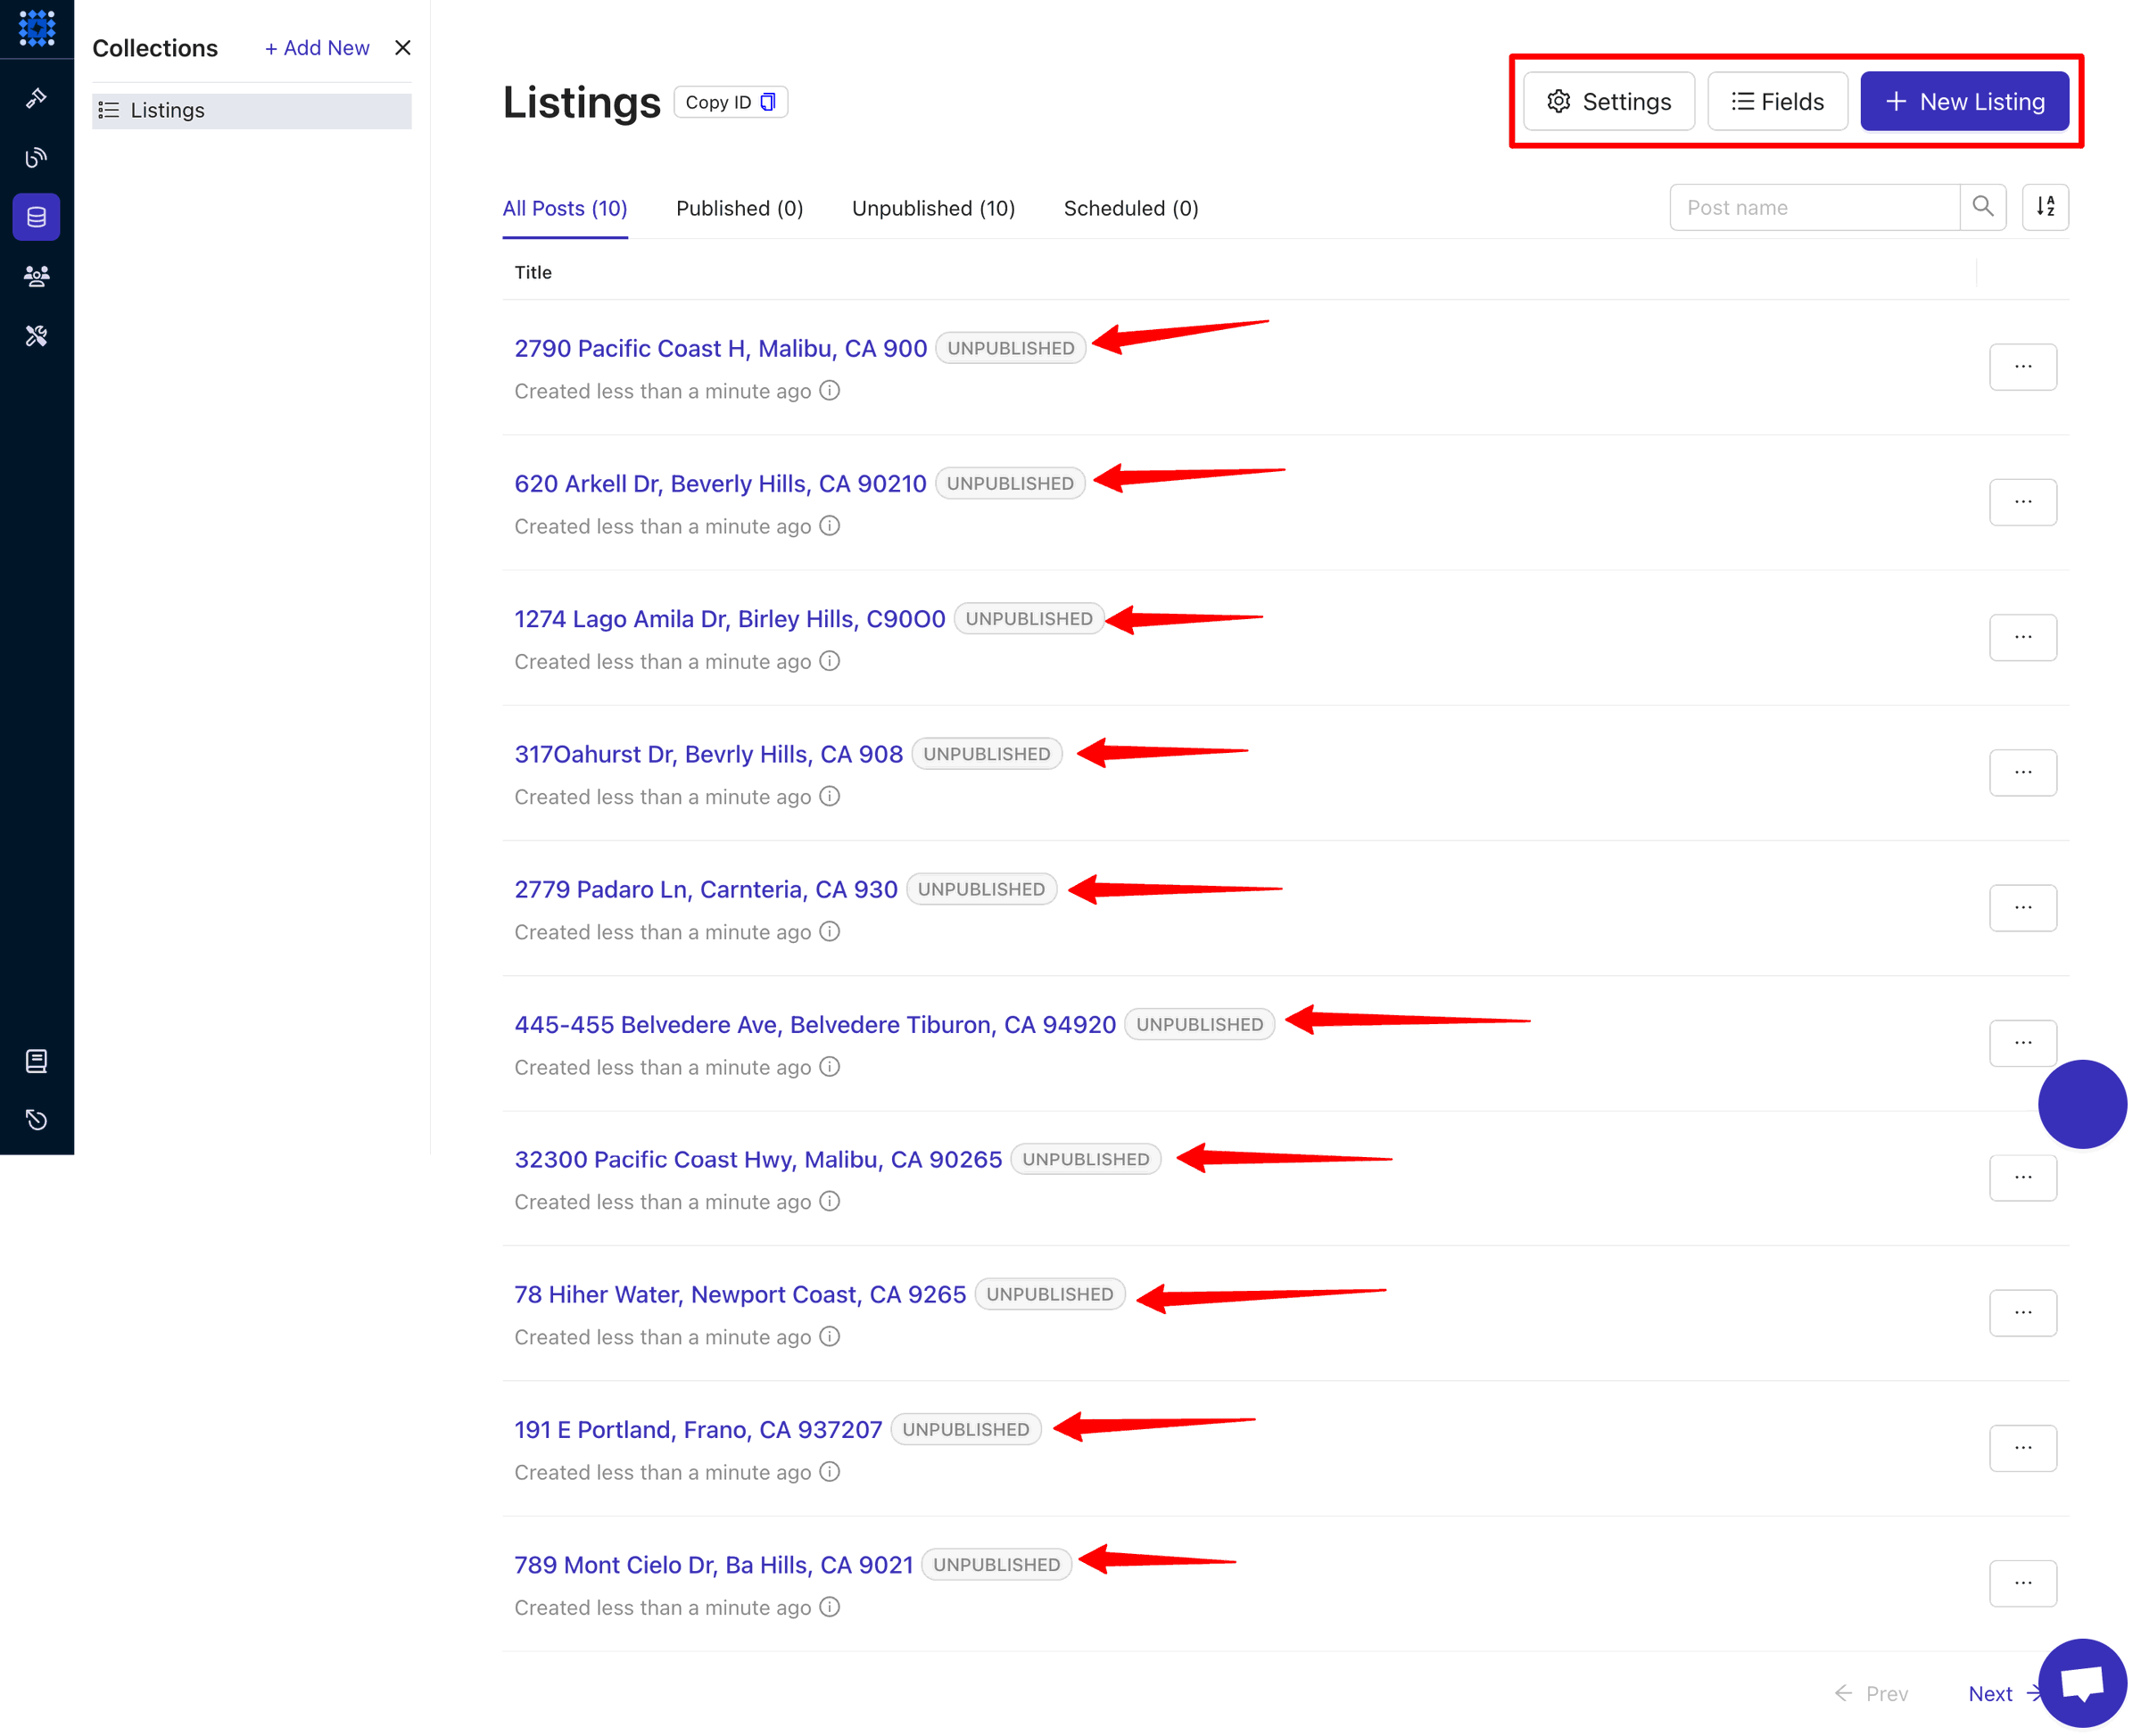
You can check the default content of each item by clicking on them. It’ll take you to the editor, where you can edit the items as necessary.
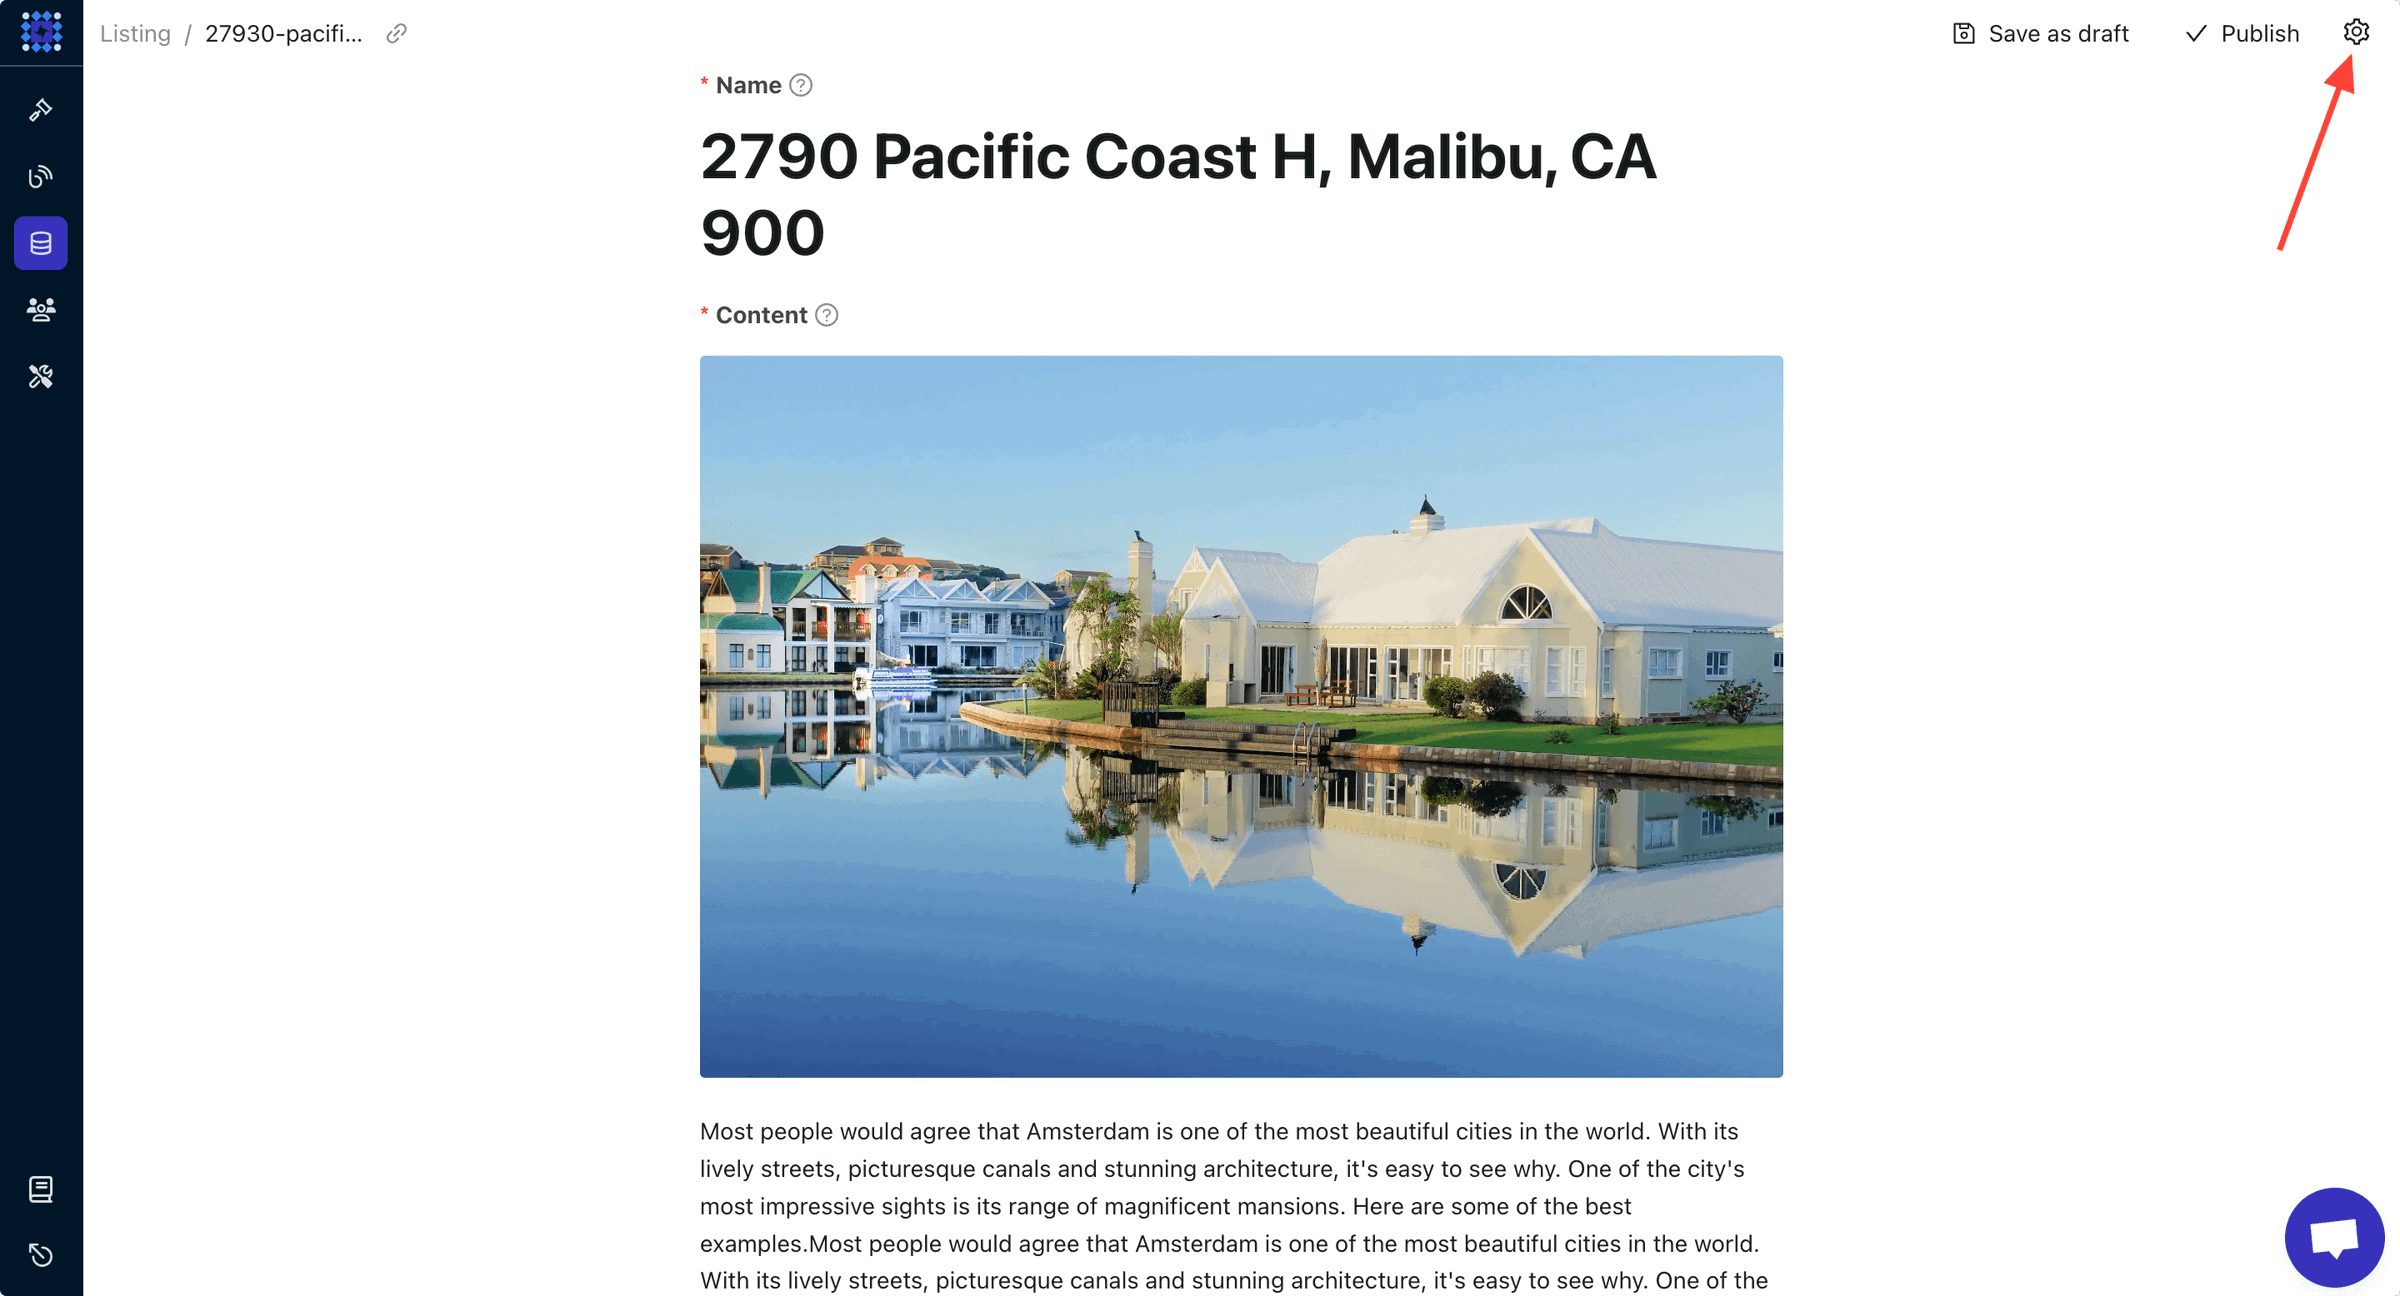
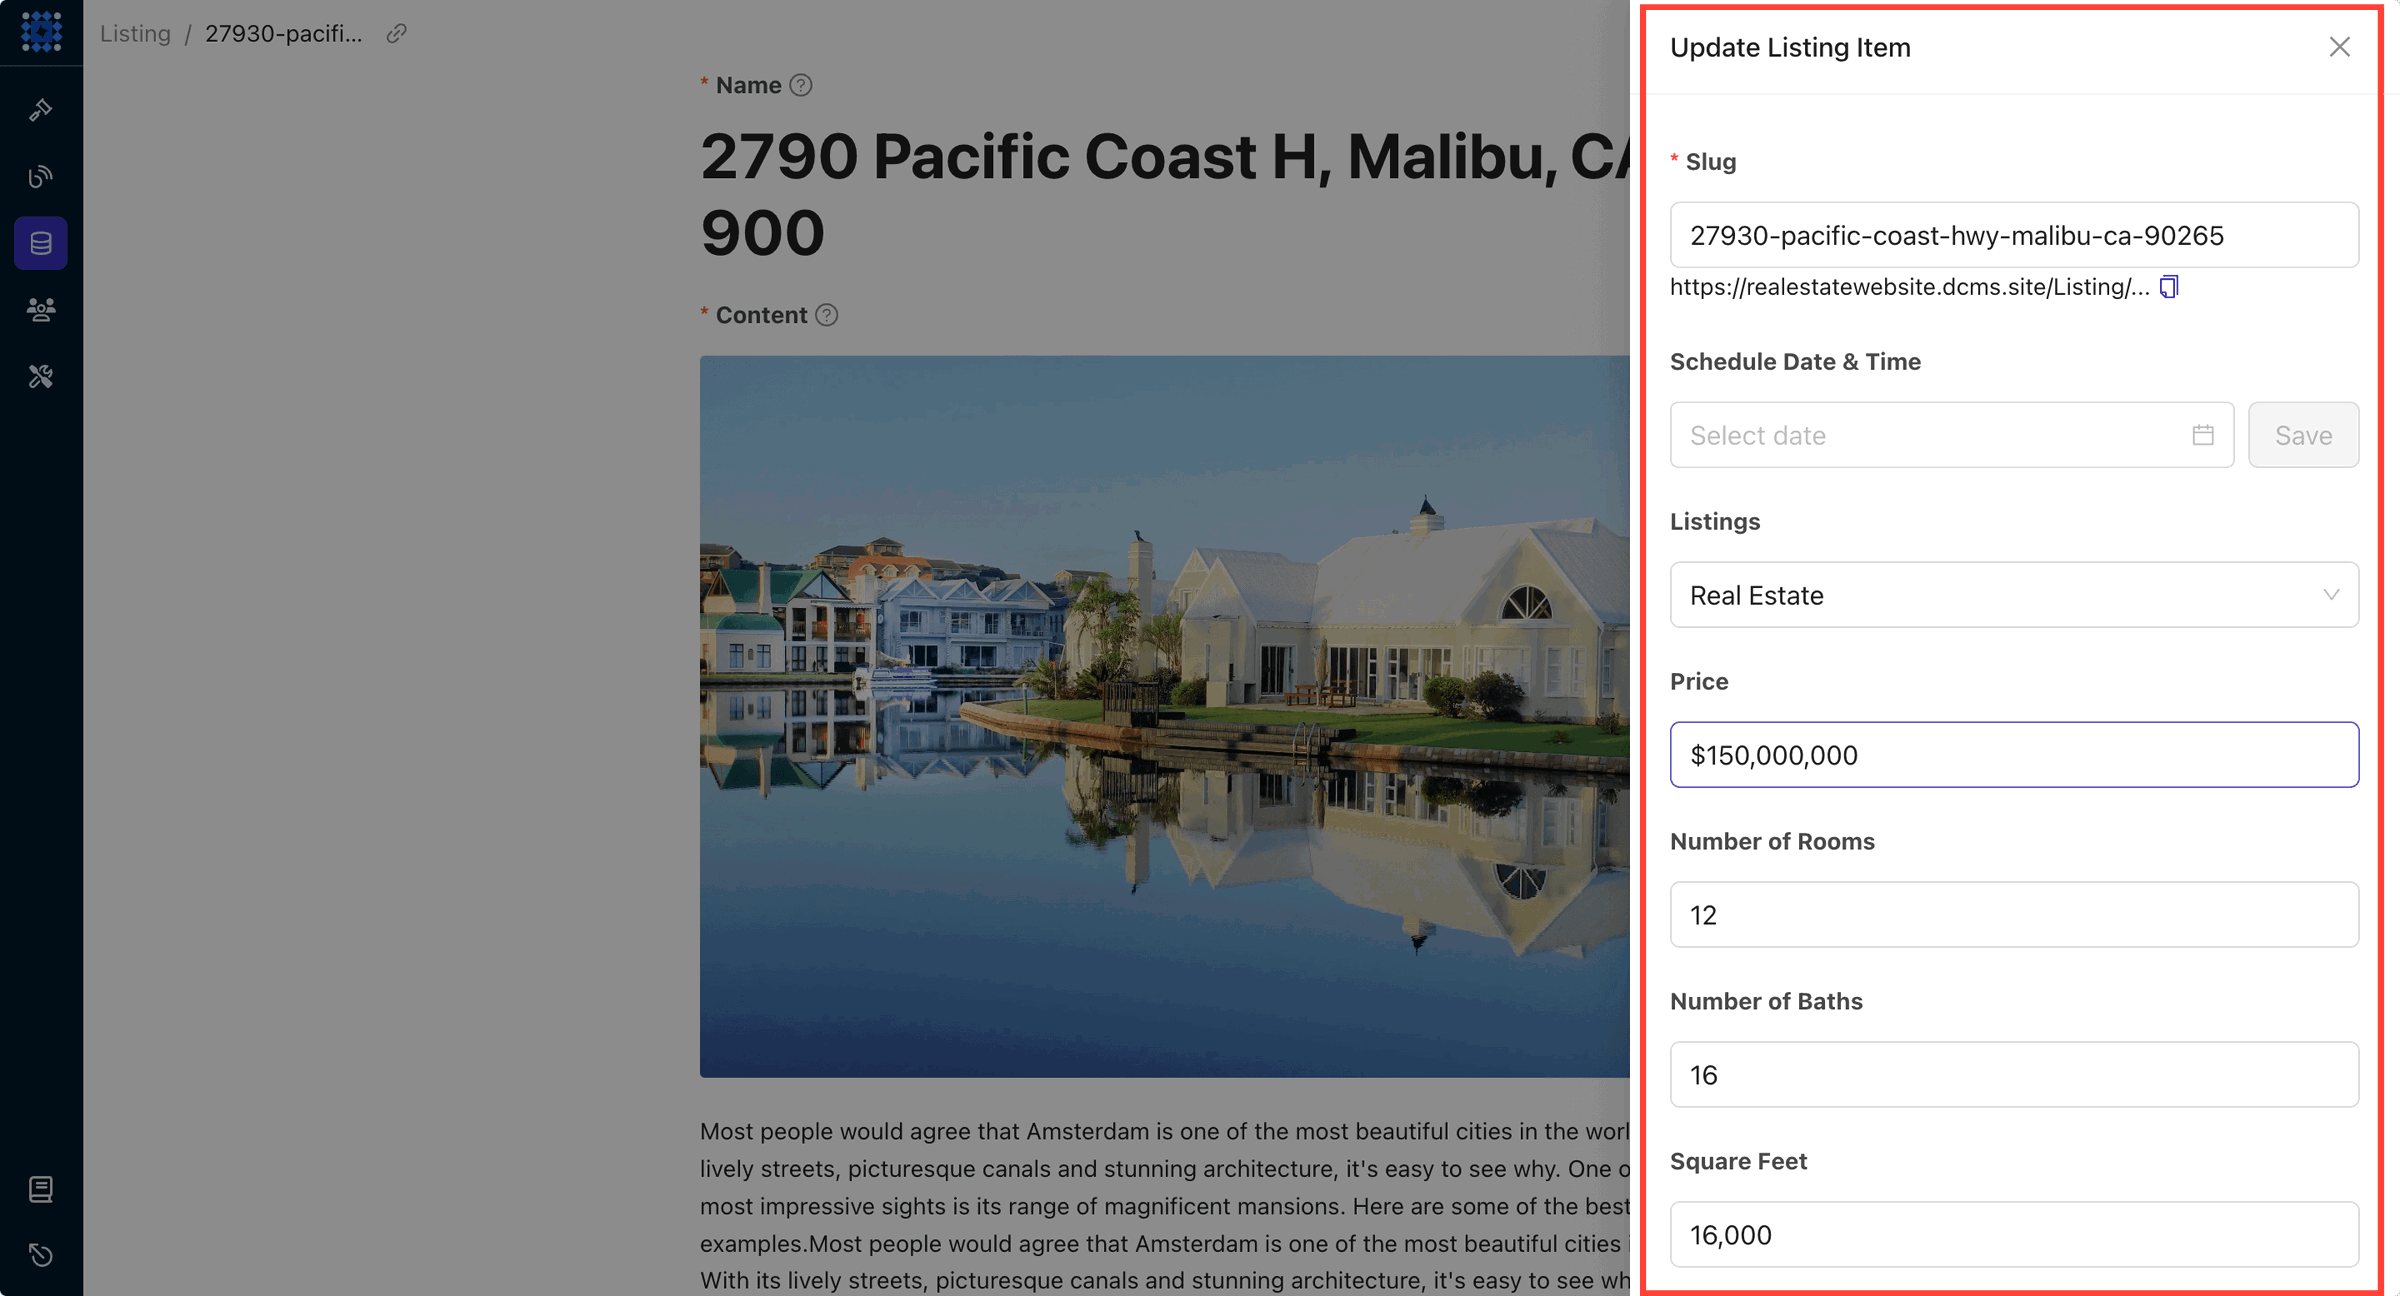
You can also click on the settings icon to explore more customization options.
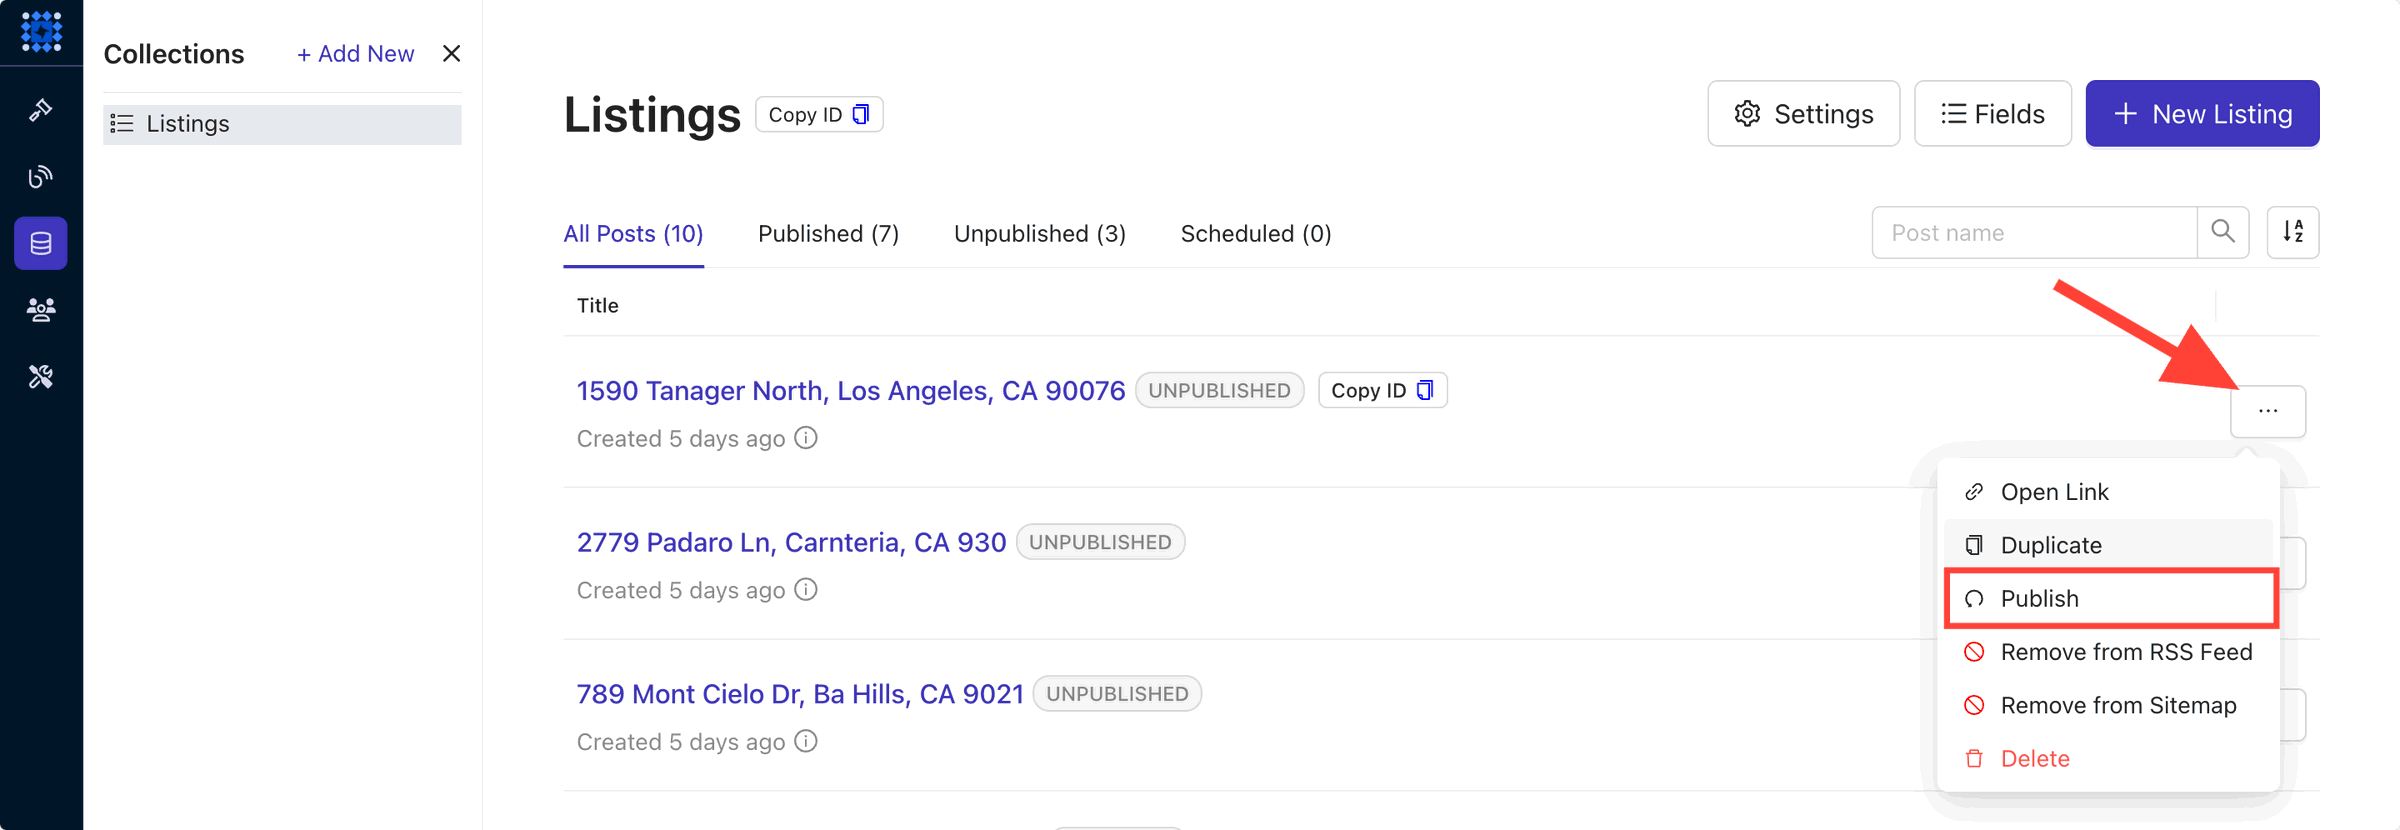
As you can see, all the items in our collection are currently unpublished. We need to publish them in order to display them on our website. To do that, you can click on the three-dot icon and click Publish.
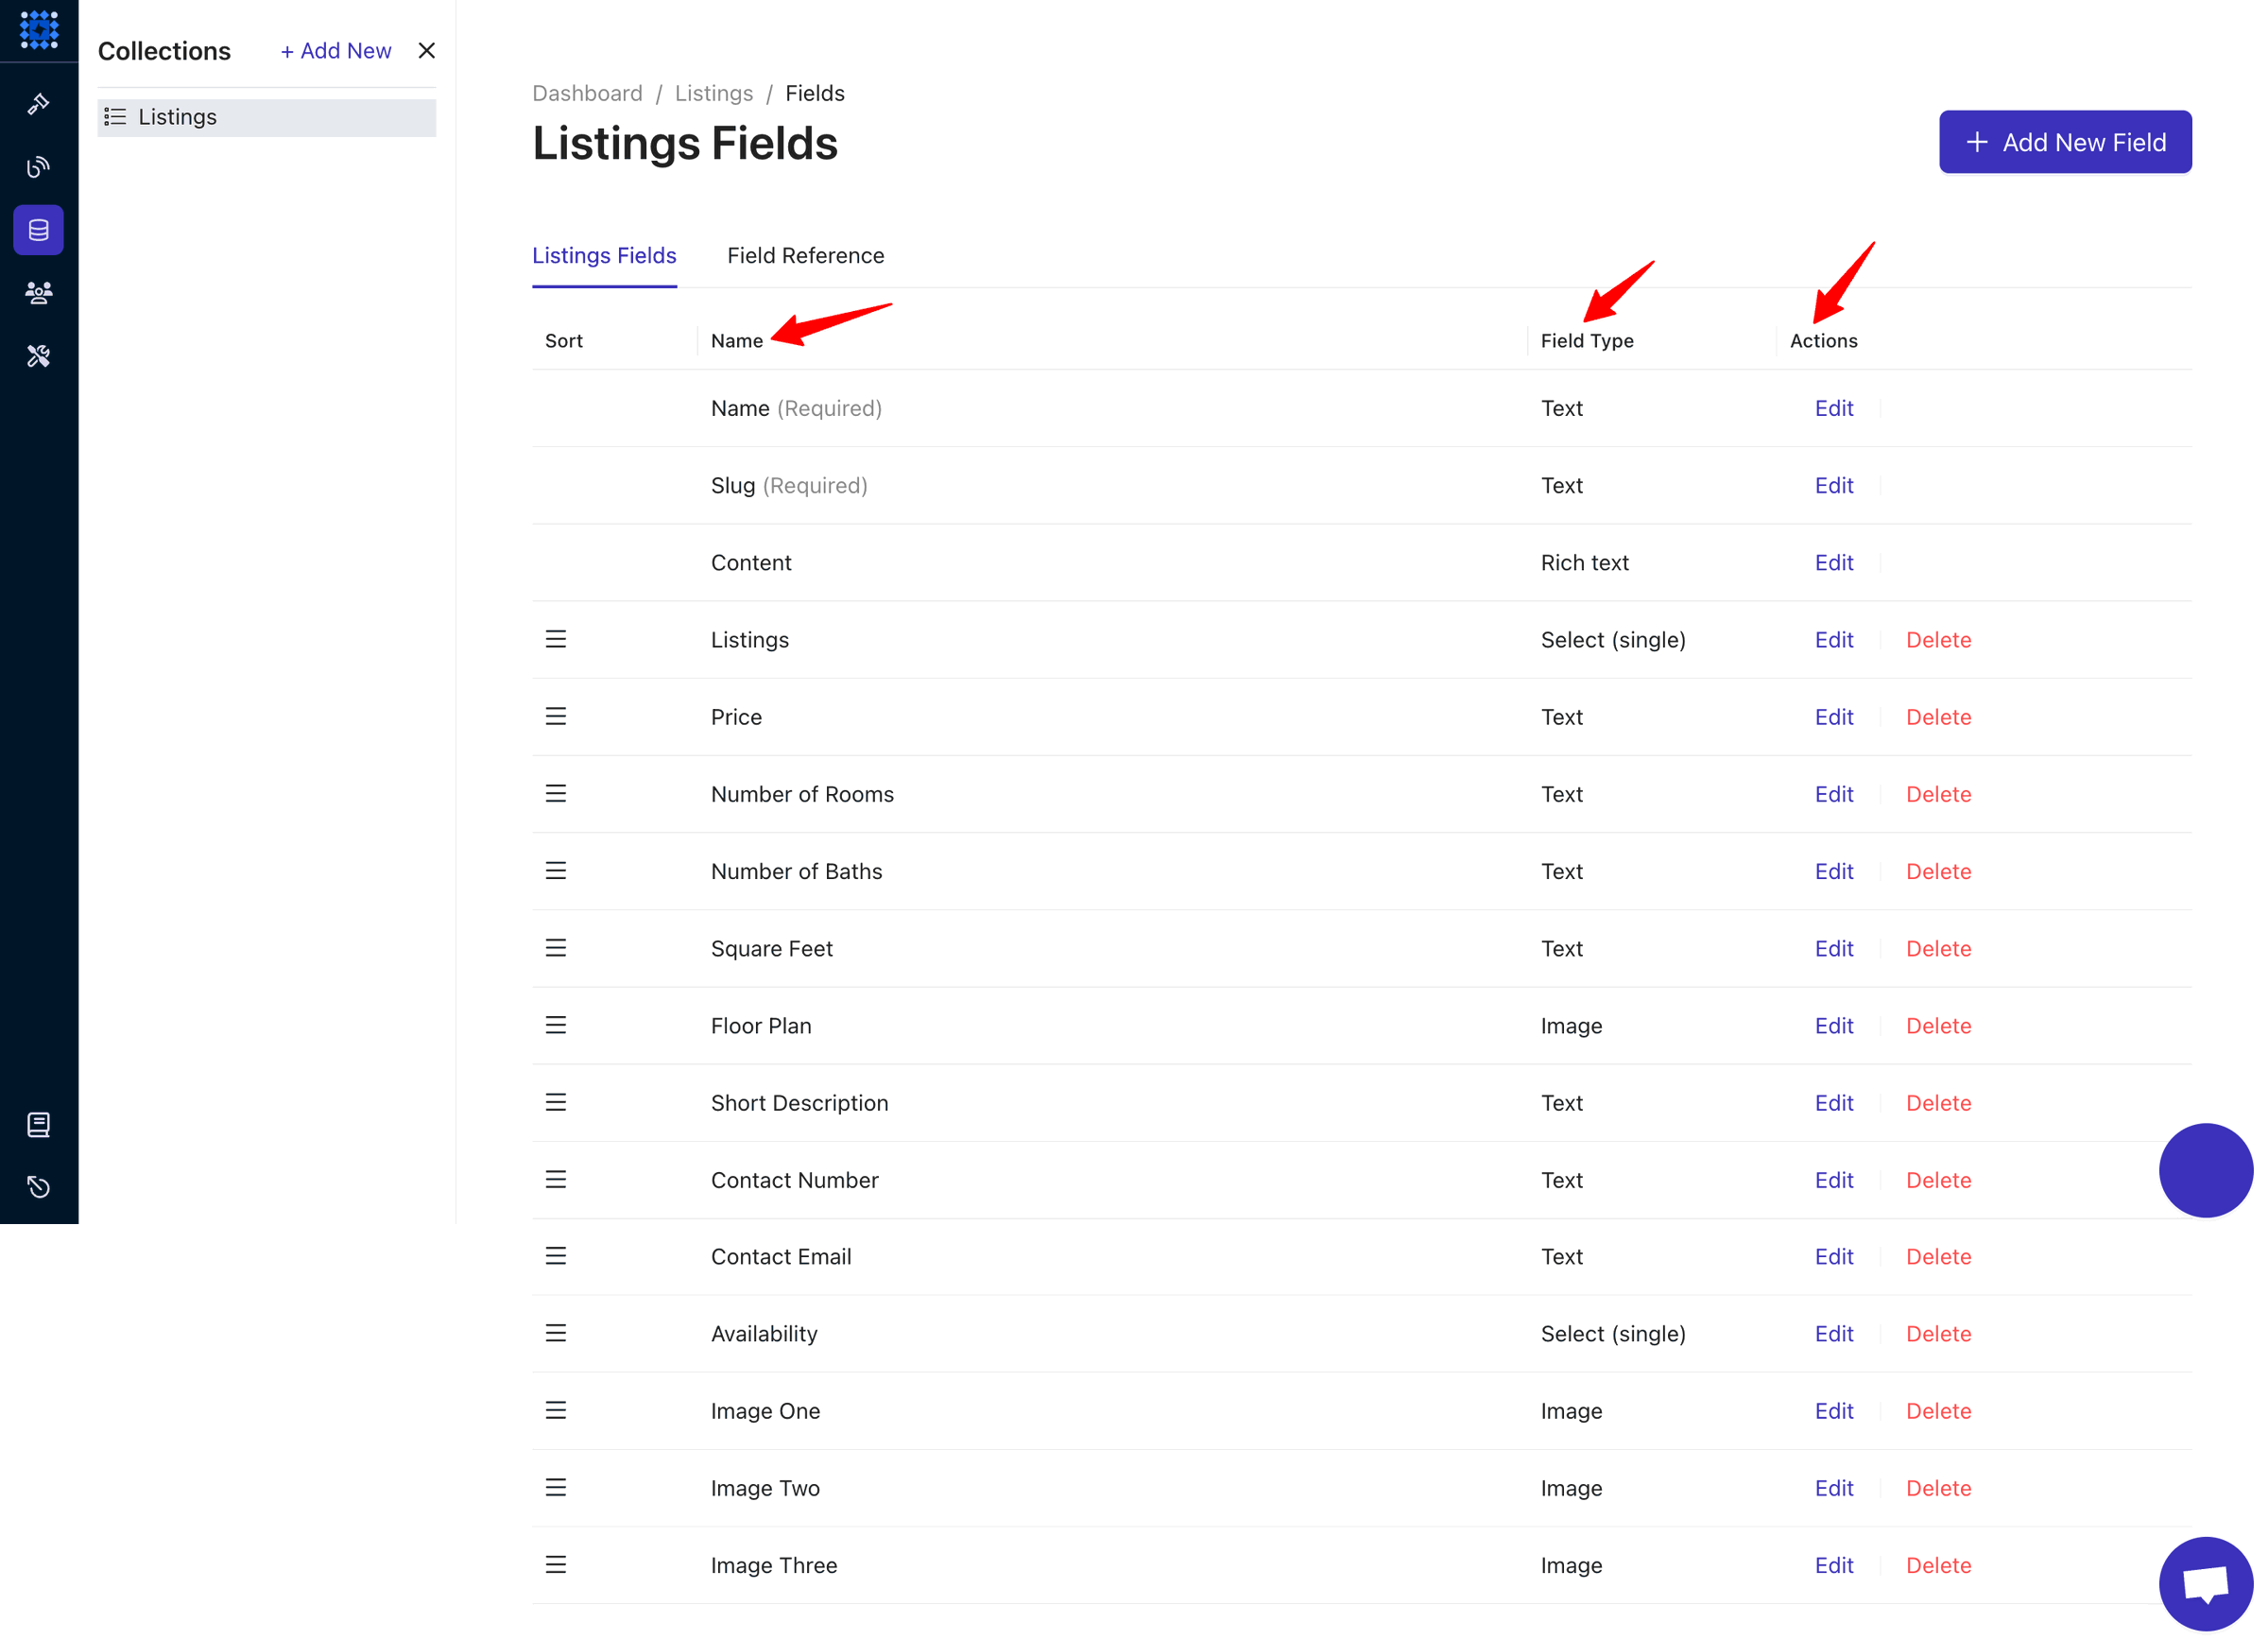
You can also check out the default fields for each item by clicking on the Fields button.

You can easily edit or delete any existing field and add a new field inside the Fields preview section.
4. Now, we’re going to display the listing items on the website. First, you need to add a new section where you’ll display your property listings. Then, select any one of the CMS rows with columns. If you choose a CMS row with a single column, it’ll look like this.
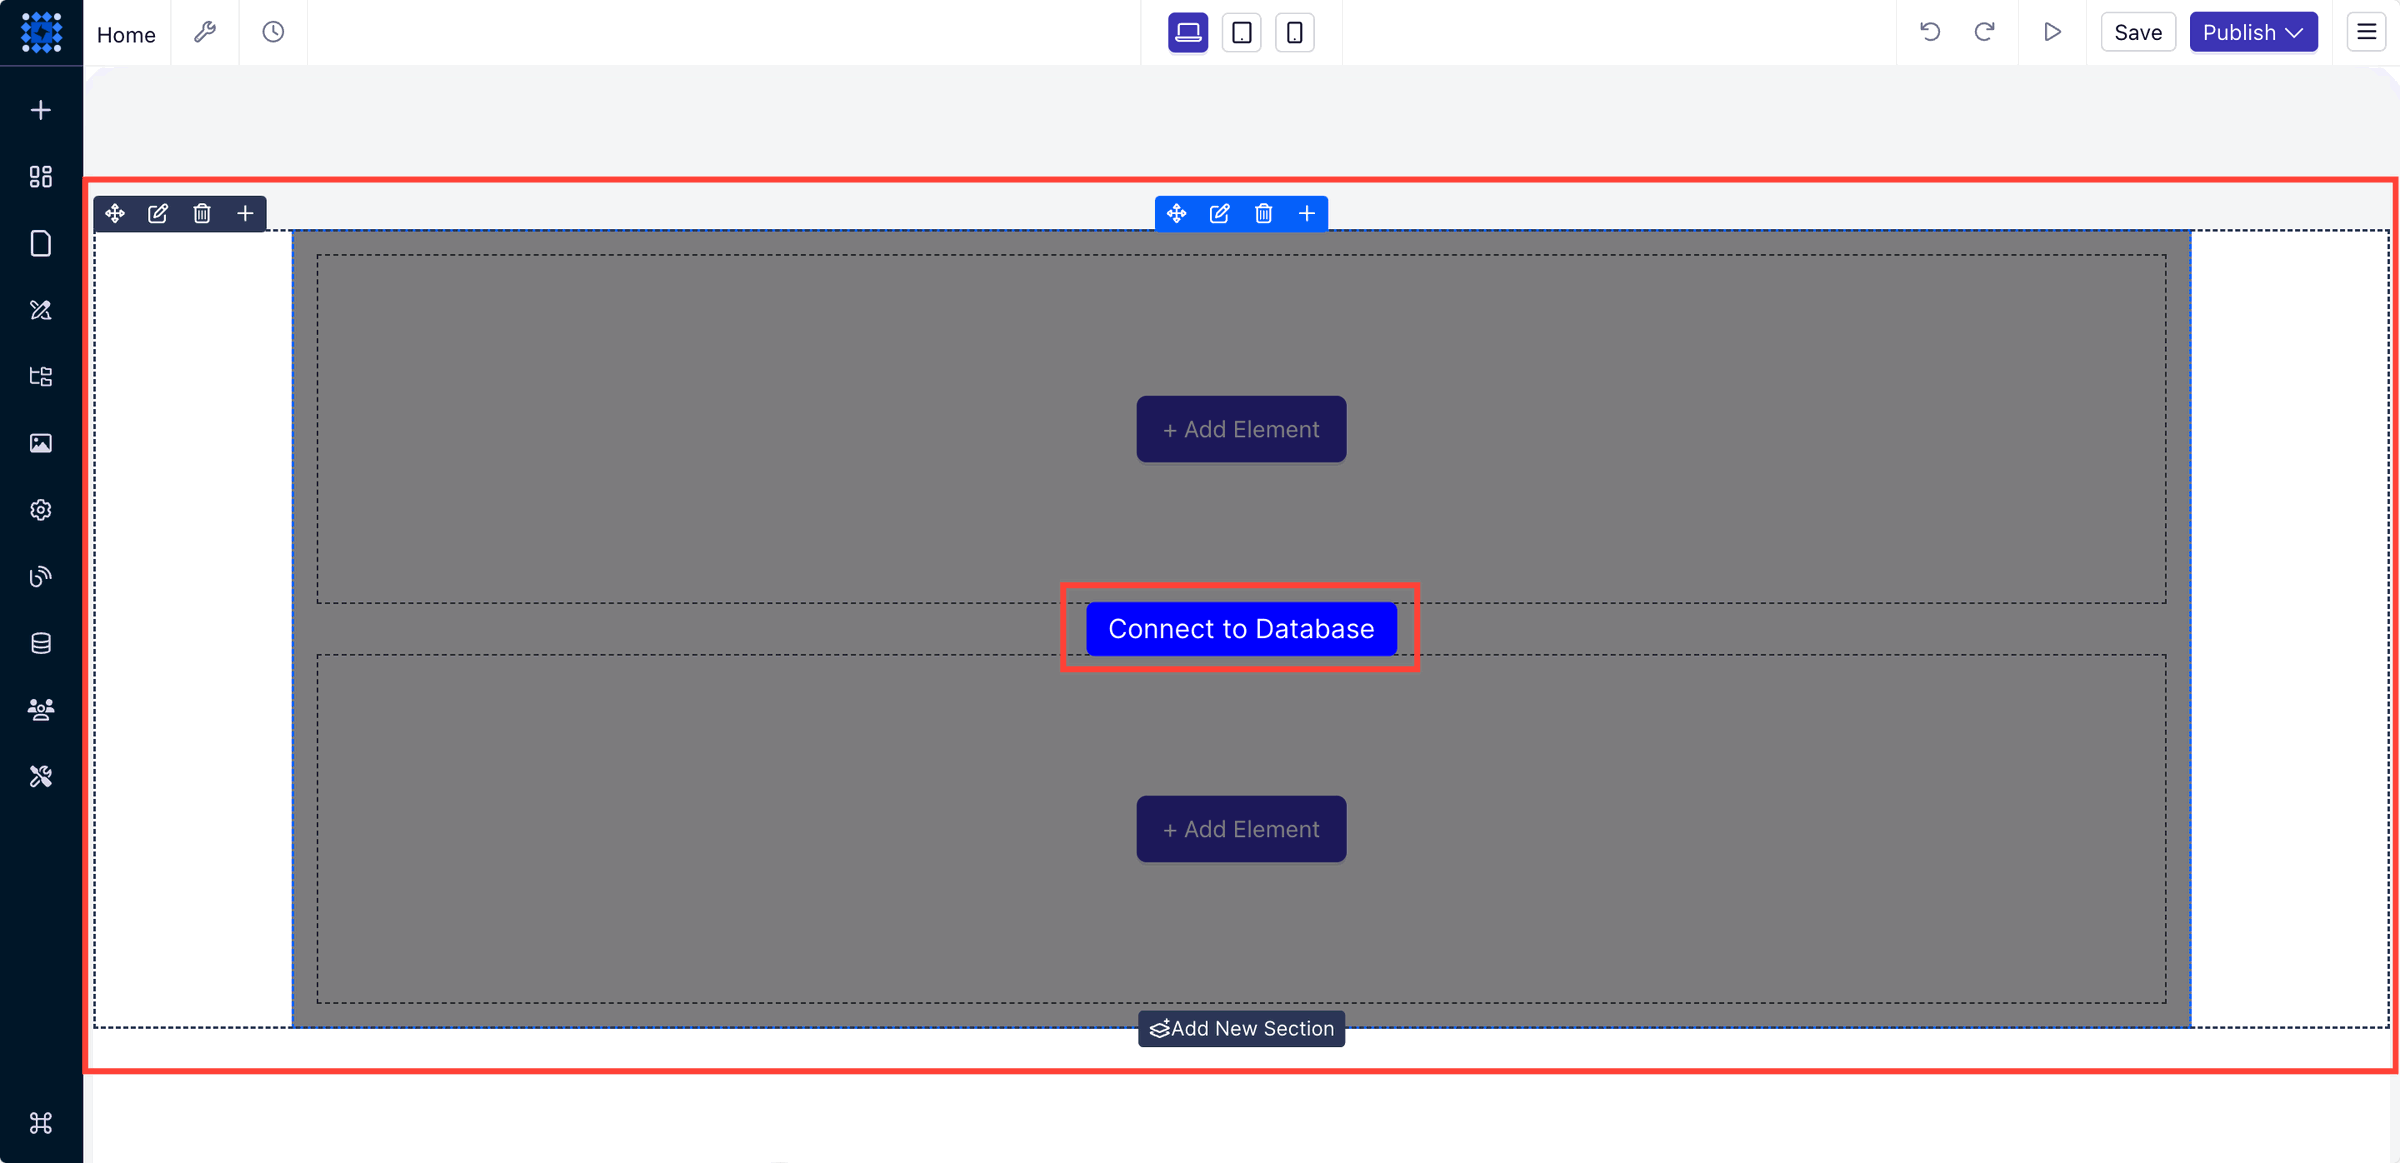
Now click on Connect to Database and select your Collection using the dropdown menu.
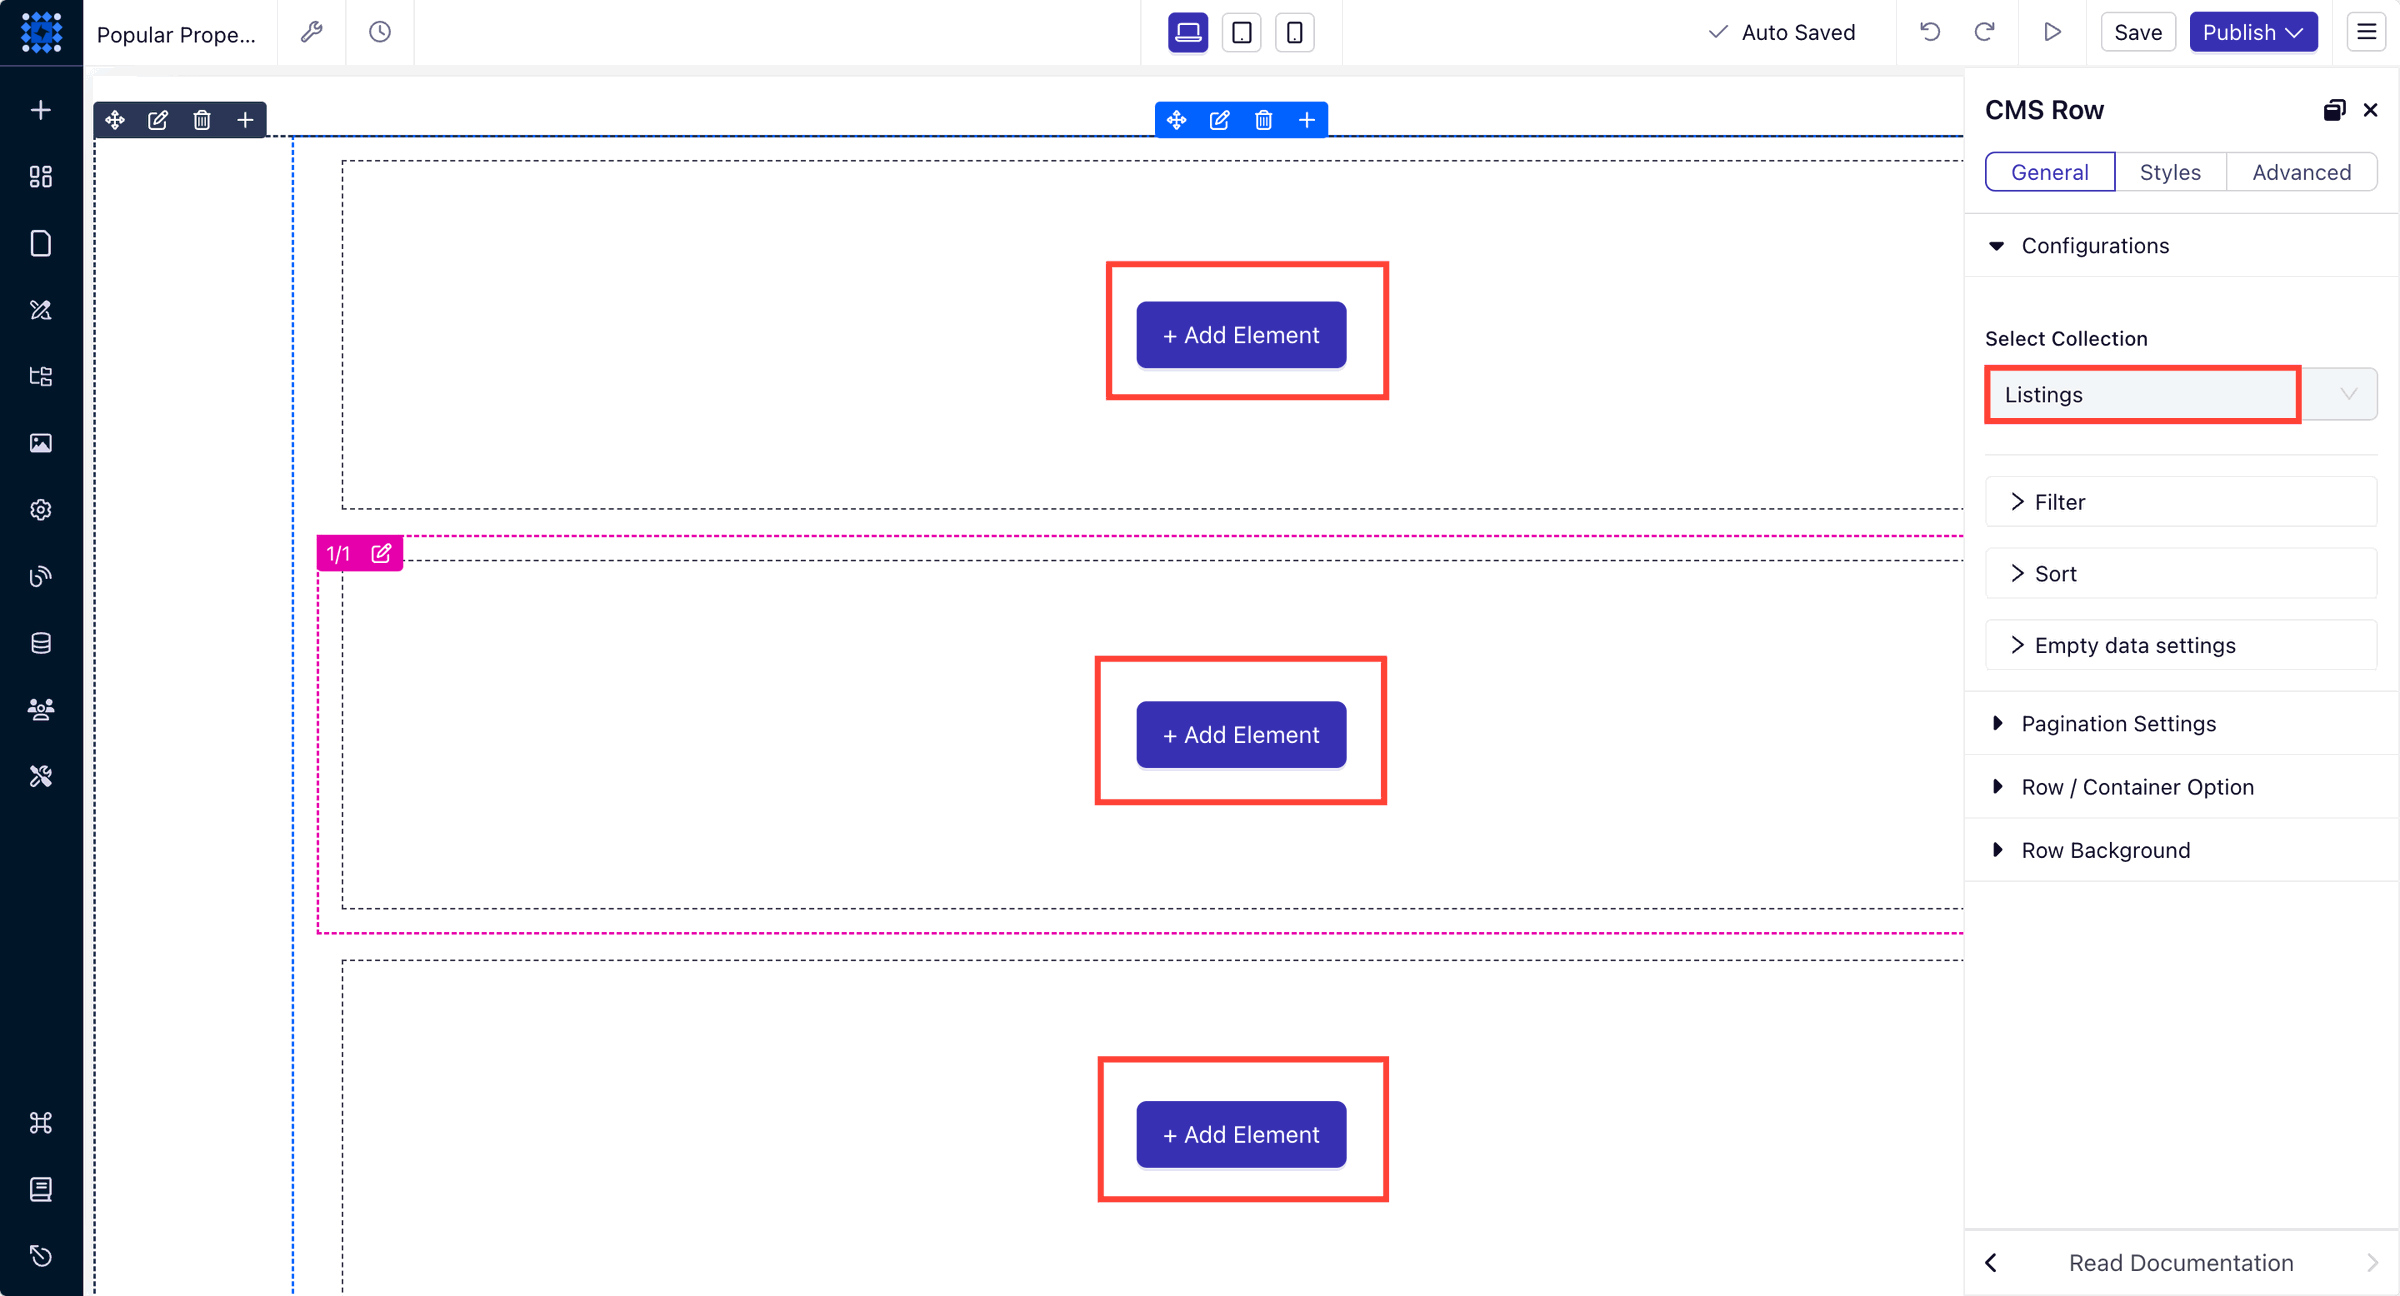
Once you do that, it’ll connect with your collection database, and you’ll see multiple cards asking you to “Add Element” to display on your website.
5. Add all the visual elements you want to display on your property details card, like image, text, icon, button, etc.
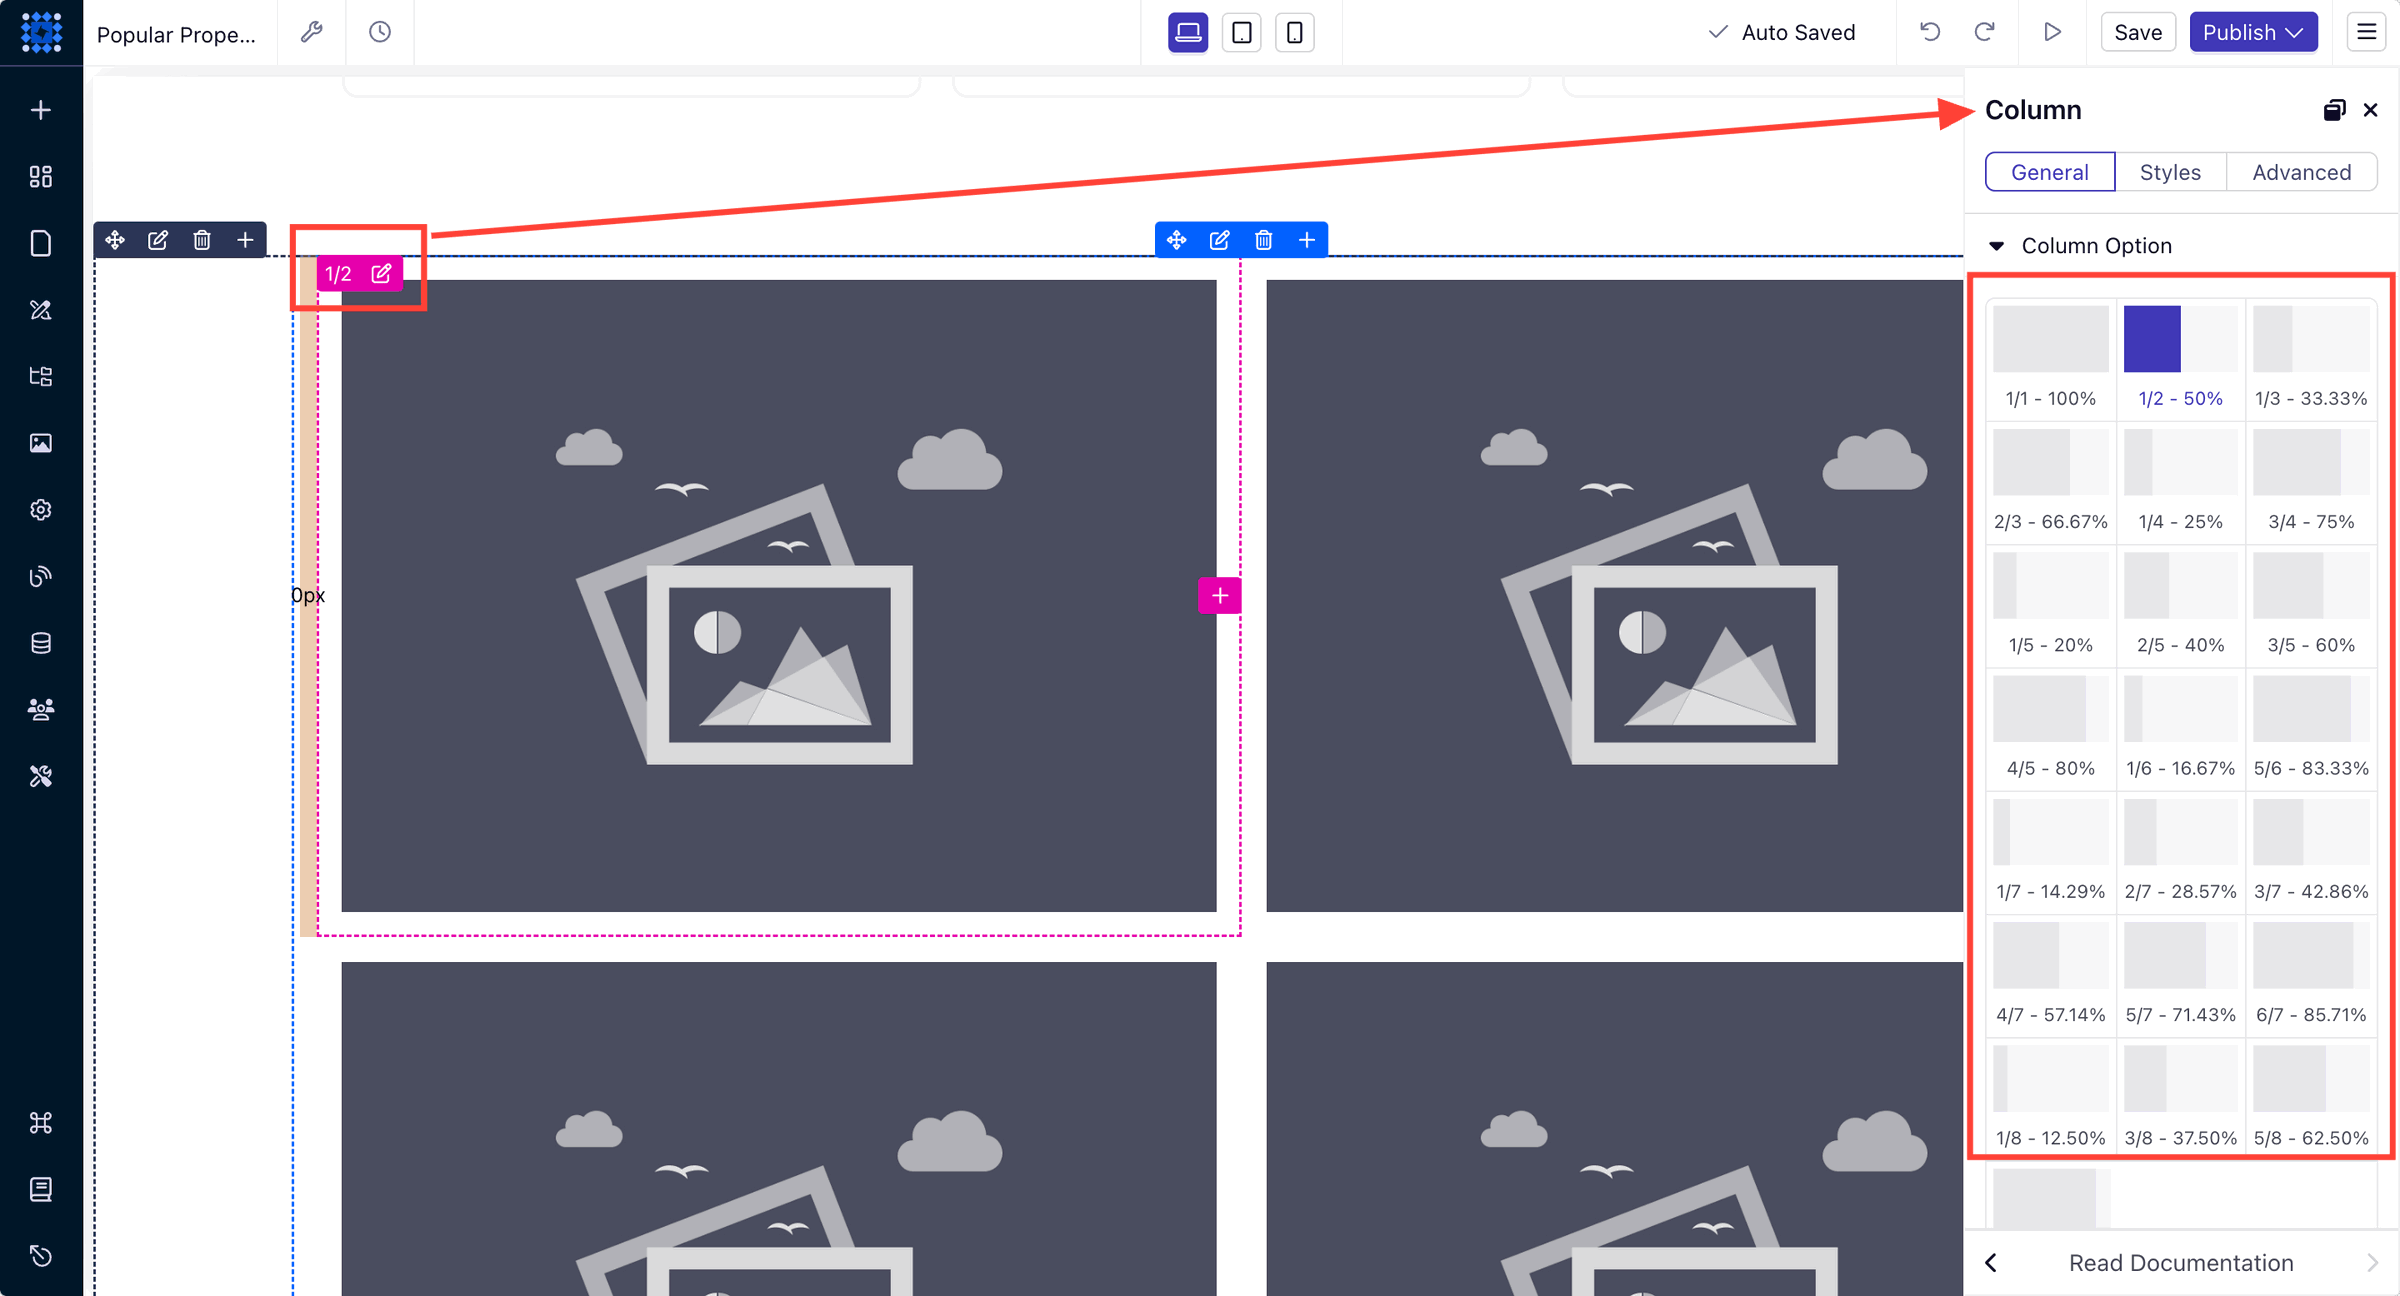
The best thing about the Dorik collection is that if you add an image element to one card, it’ll be added to all the cards. Similarly, if you design one card, it’ll be applied to other cards, too. That’ll save you a lot of time compared to designing each one separately.
You can also select how many cards you want to keep in each row by clicking the “Edit Column” icon. I’m selecting two columns per row.
After you add the elements, click on a element and add the respected CMS field to display the relevant information.
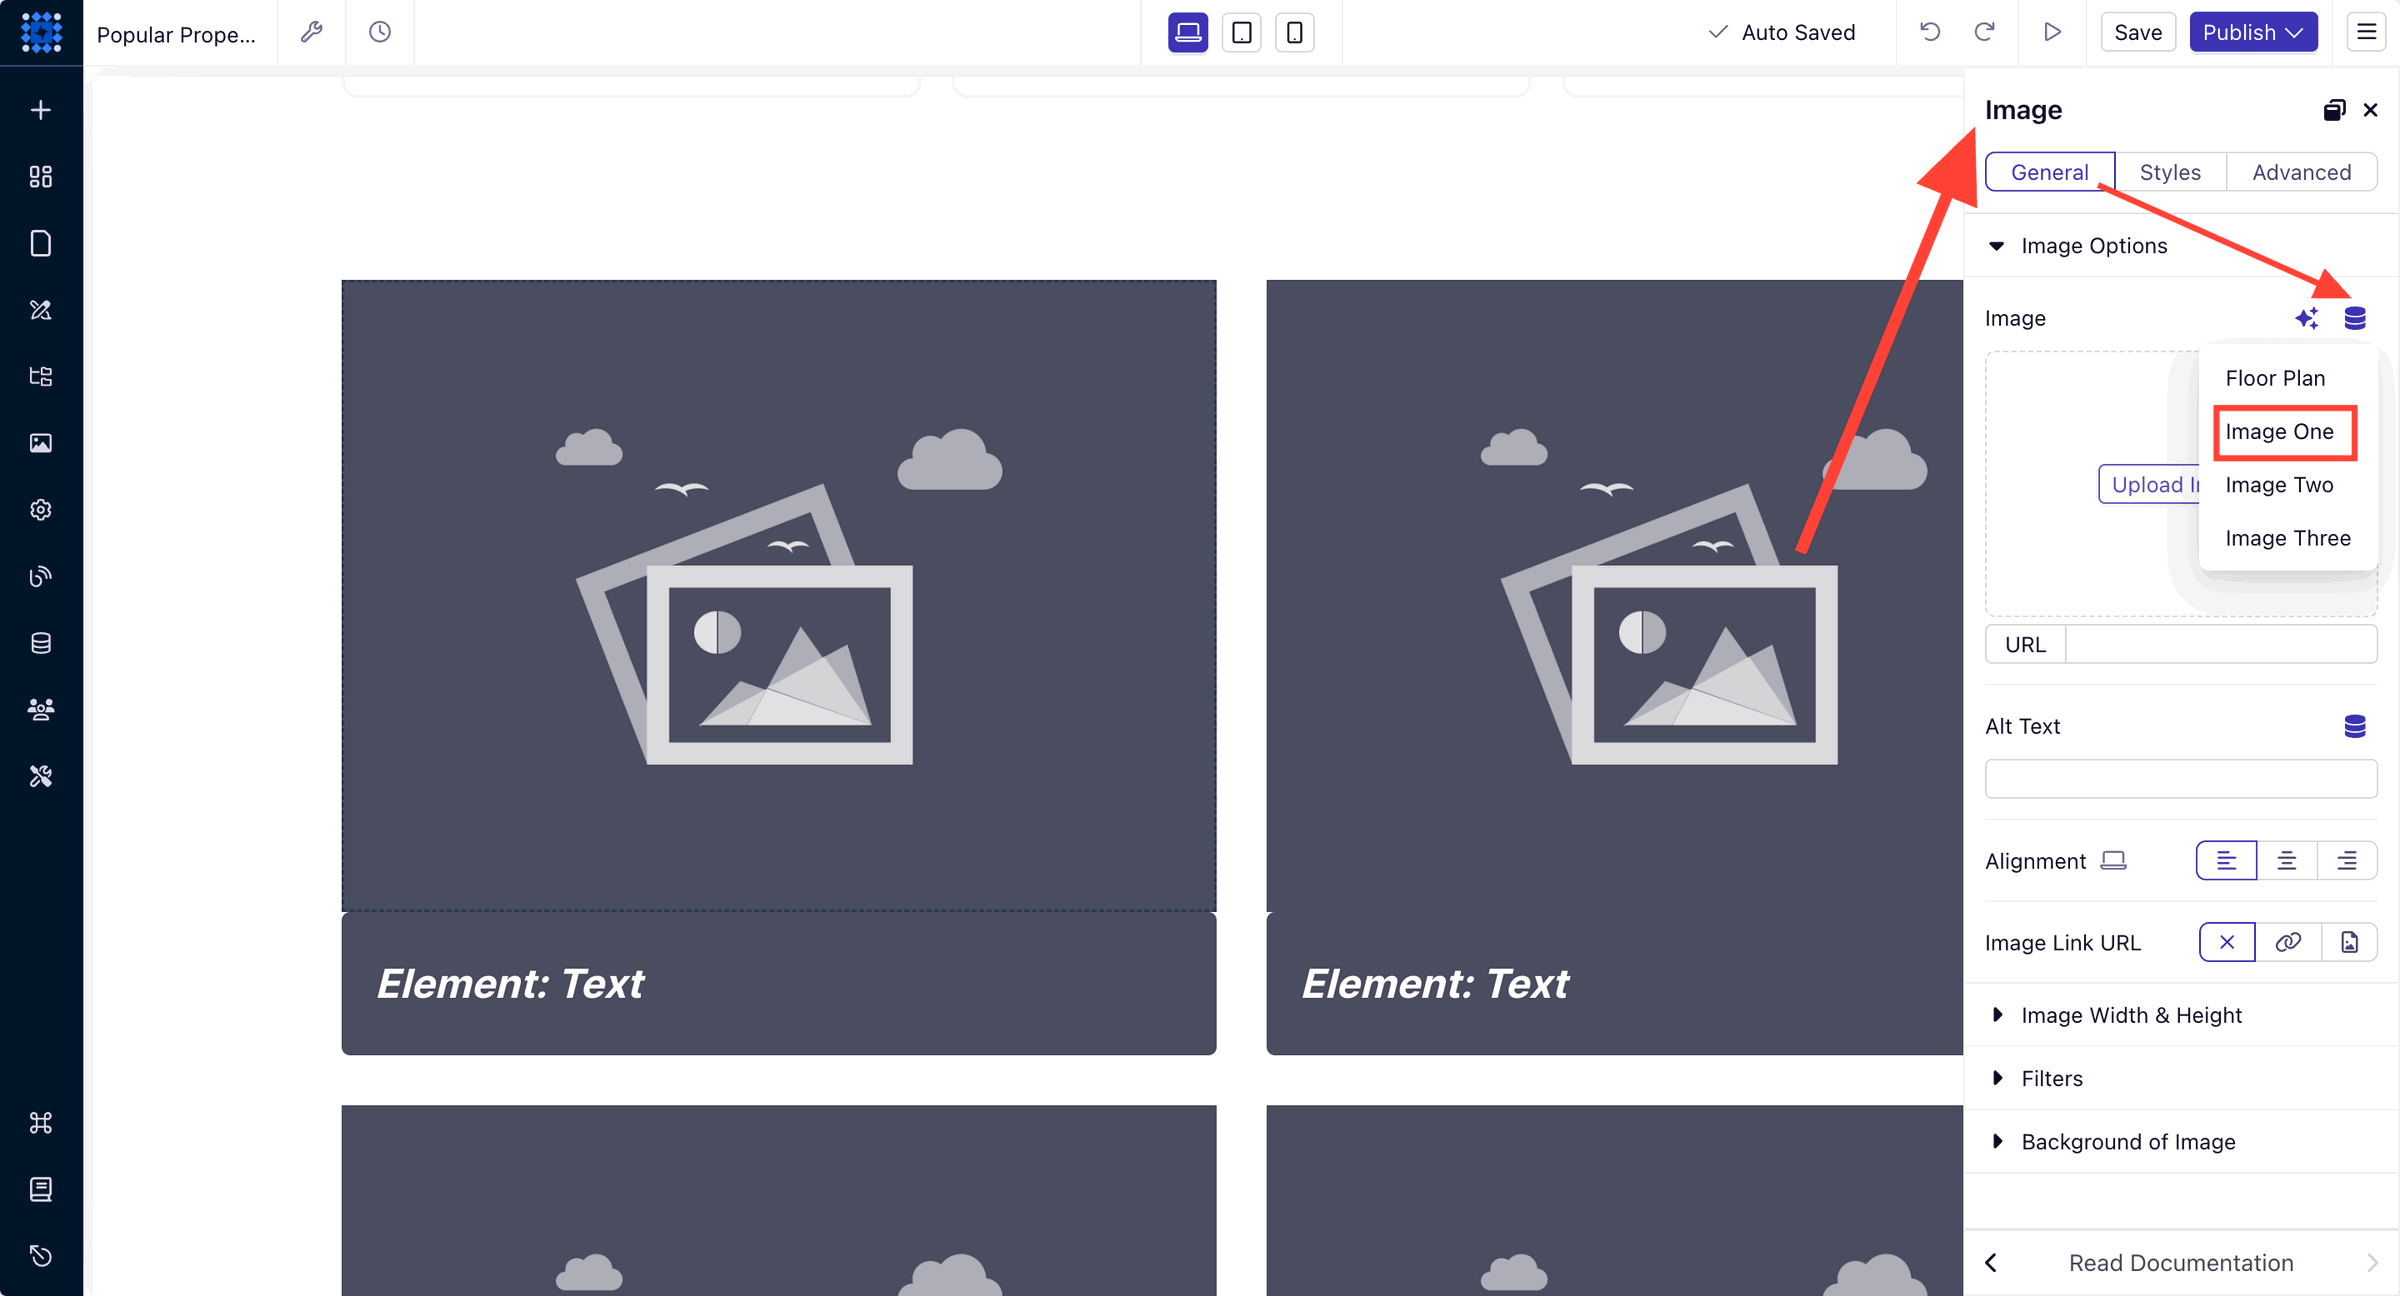
For example, we want to show the property image on the top. So, after clicking on the image element, we’re selecting the “Image One” CMS field.
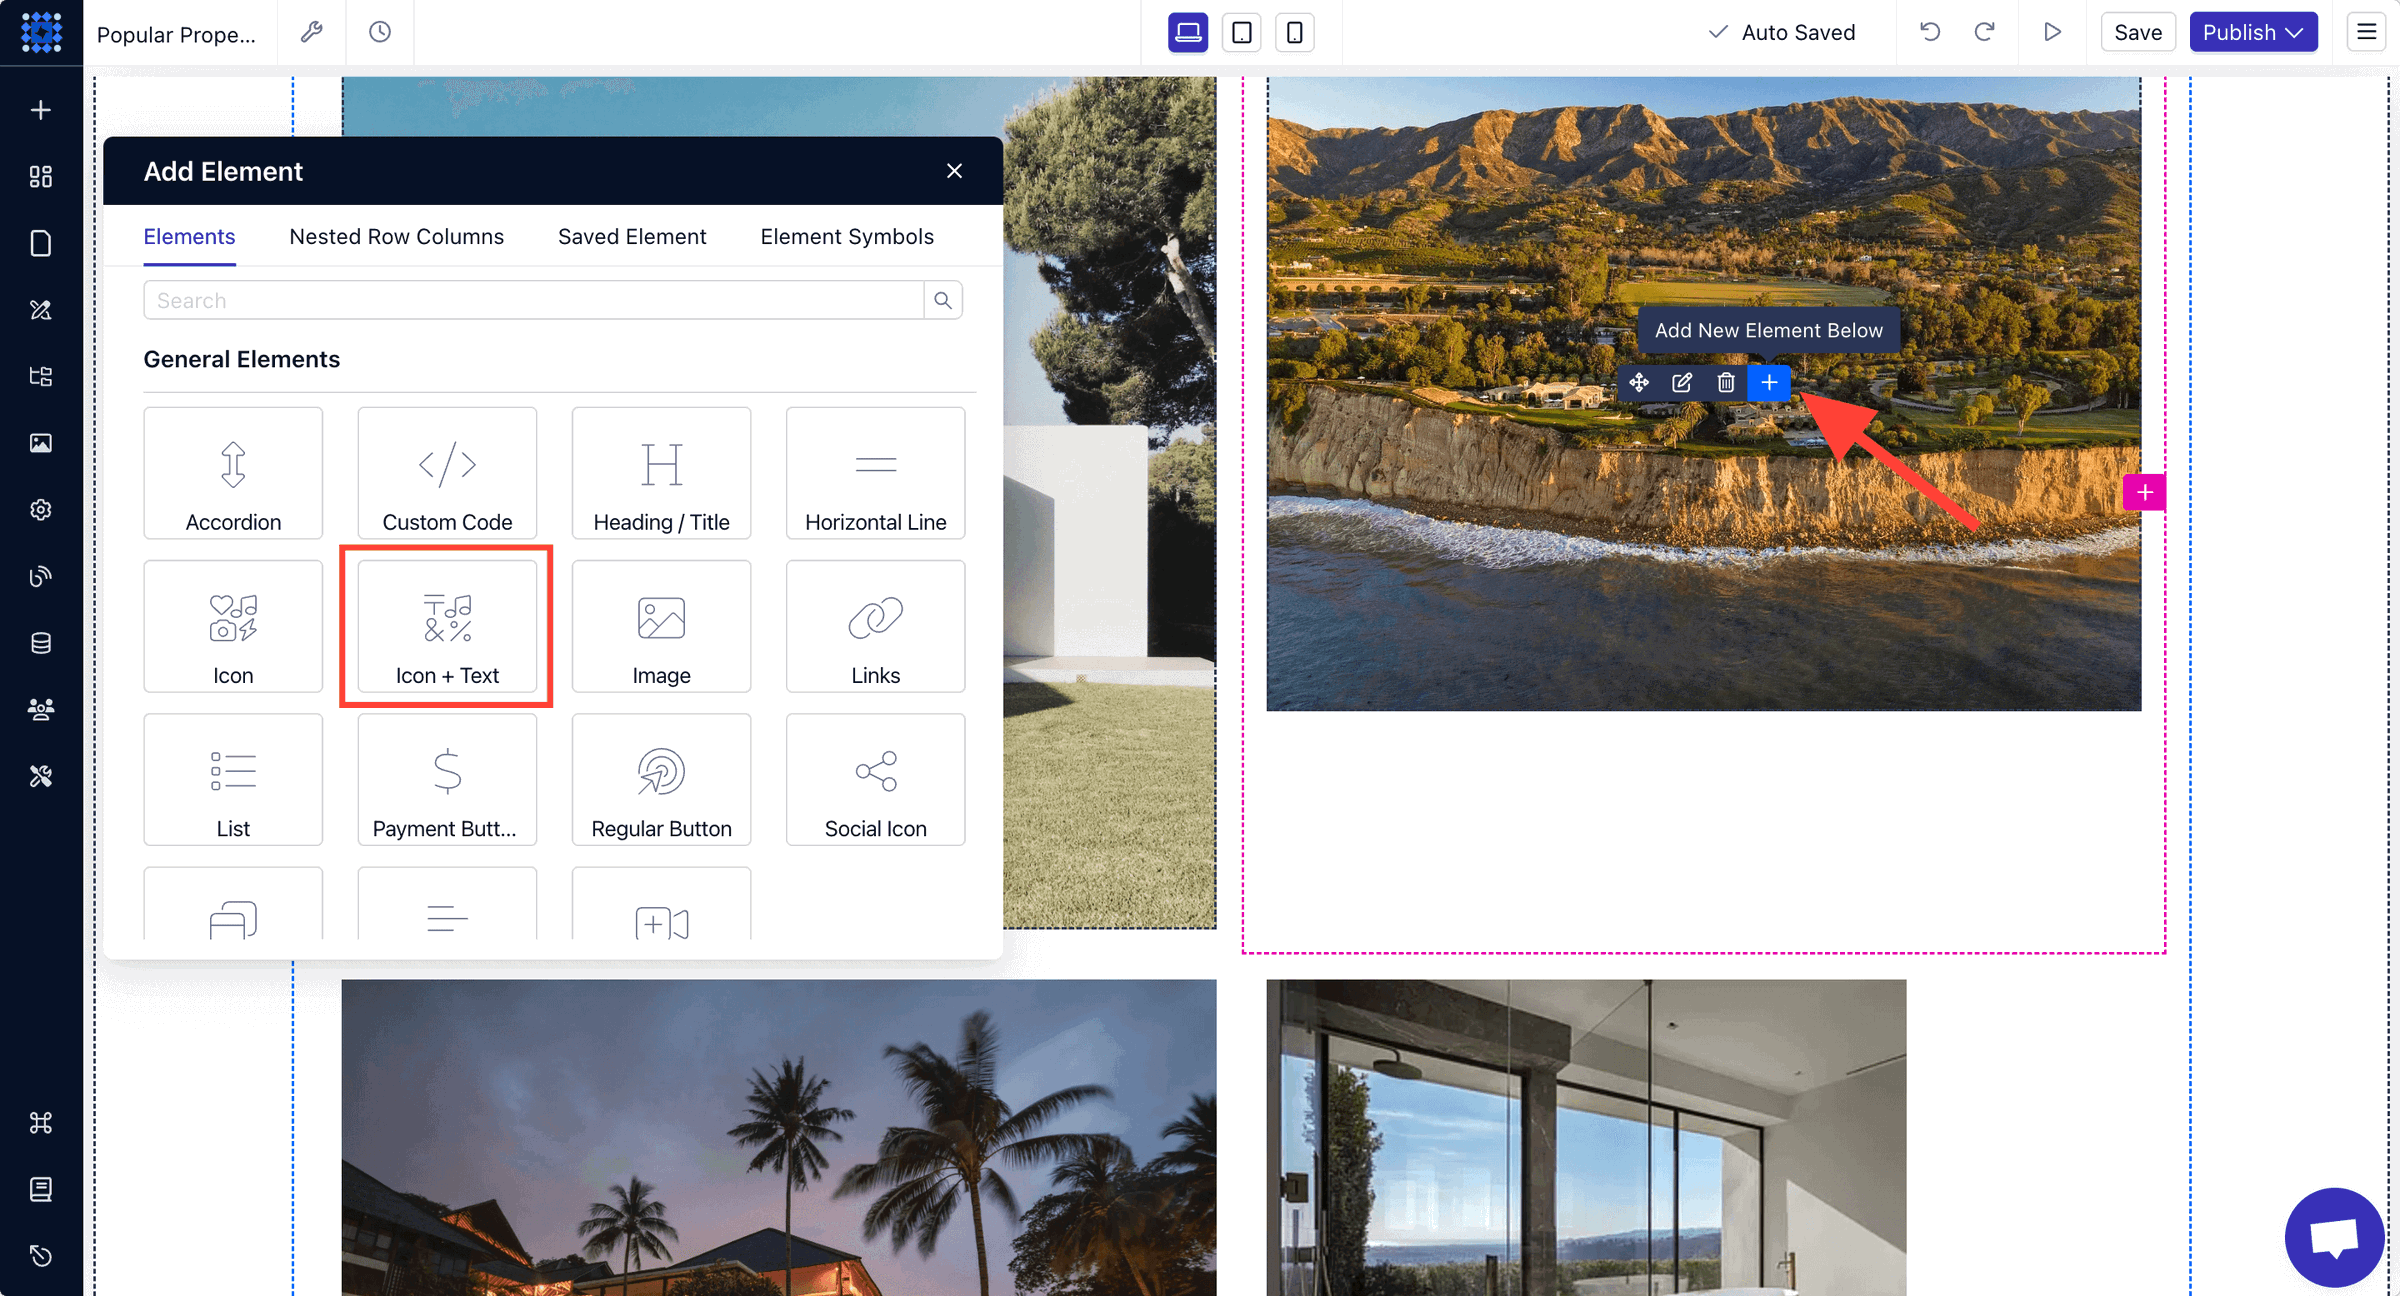
We also want to display the property address and other details with an icon right below the property image. To do that, we’re using multiple “Icon + Text” element of Dorik.
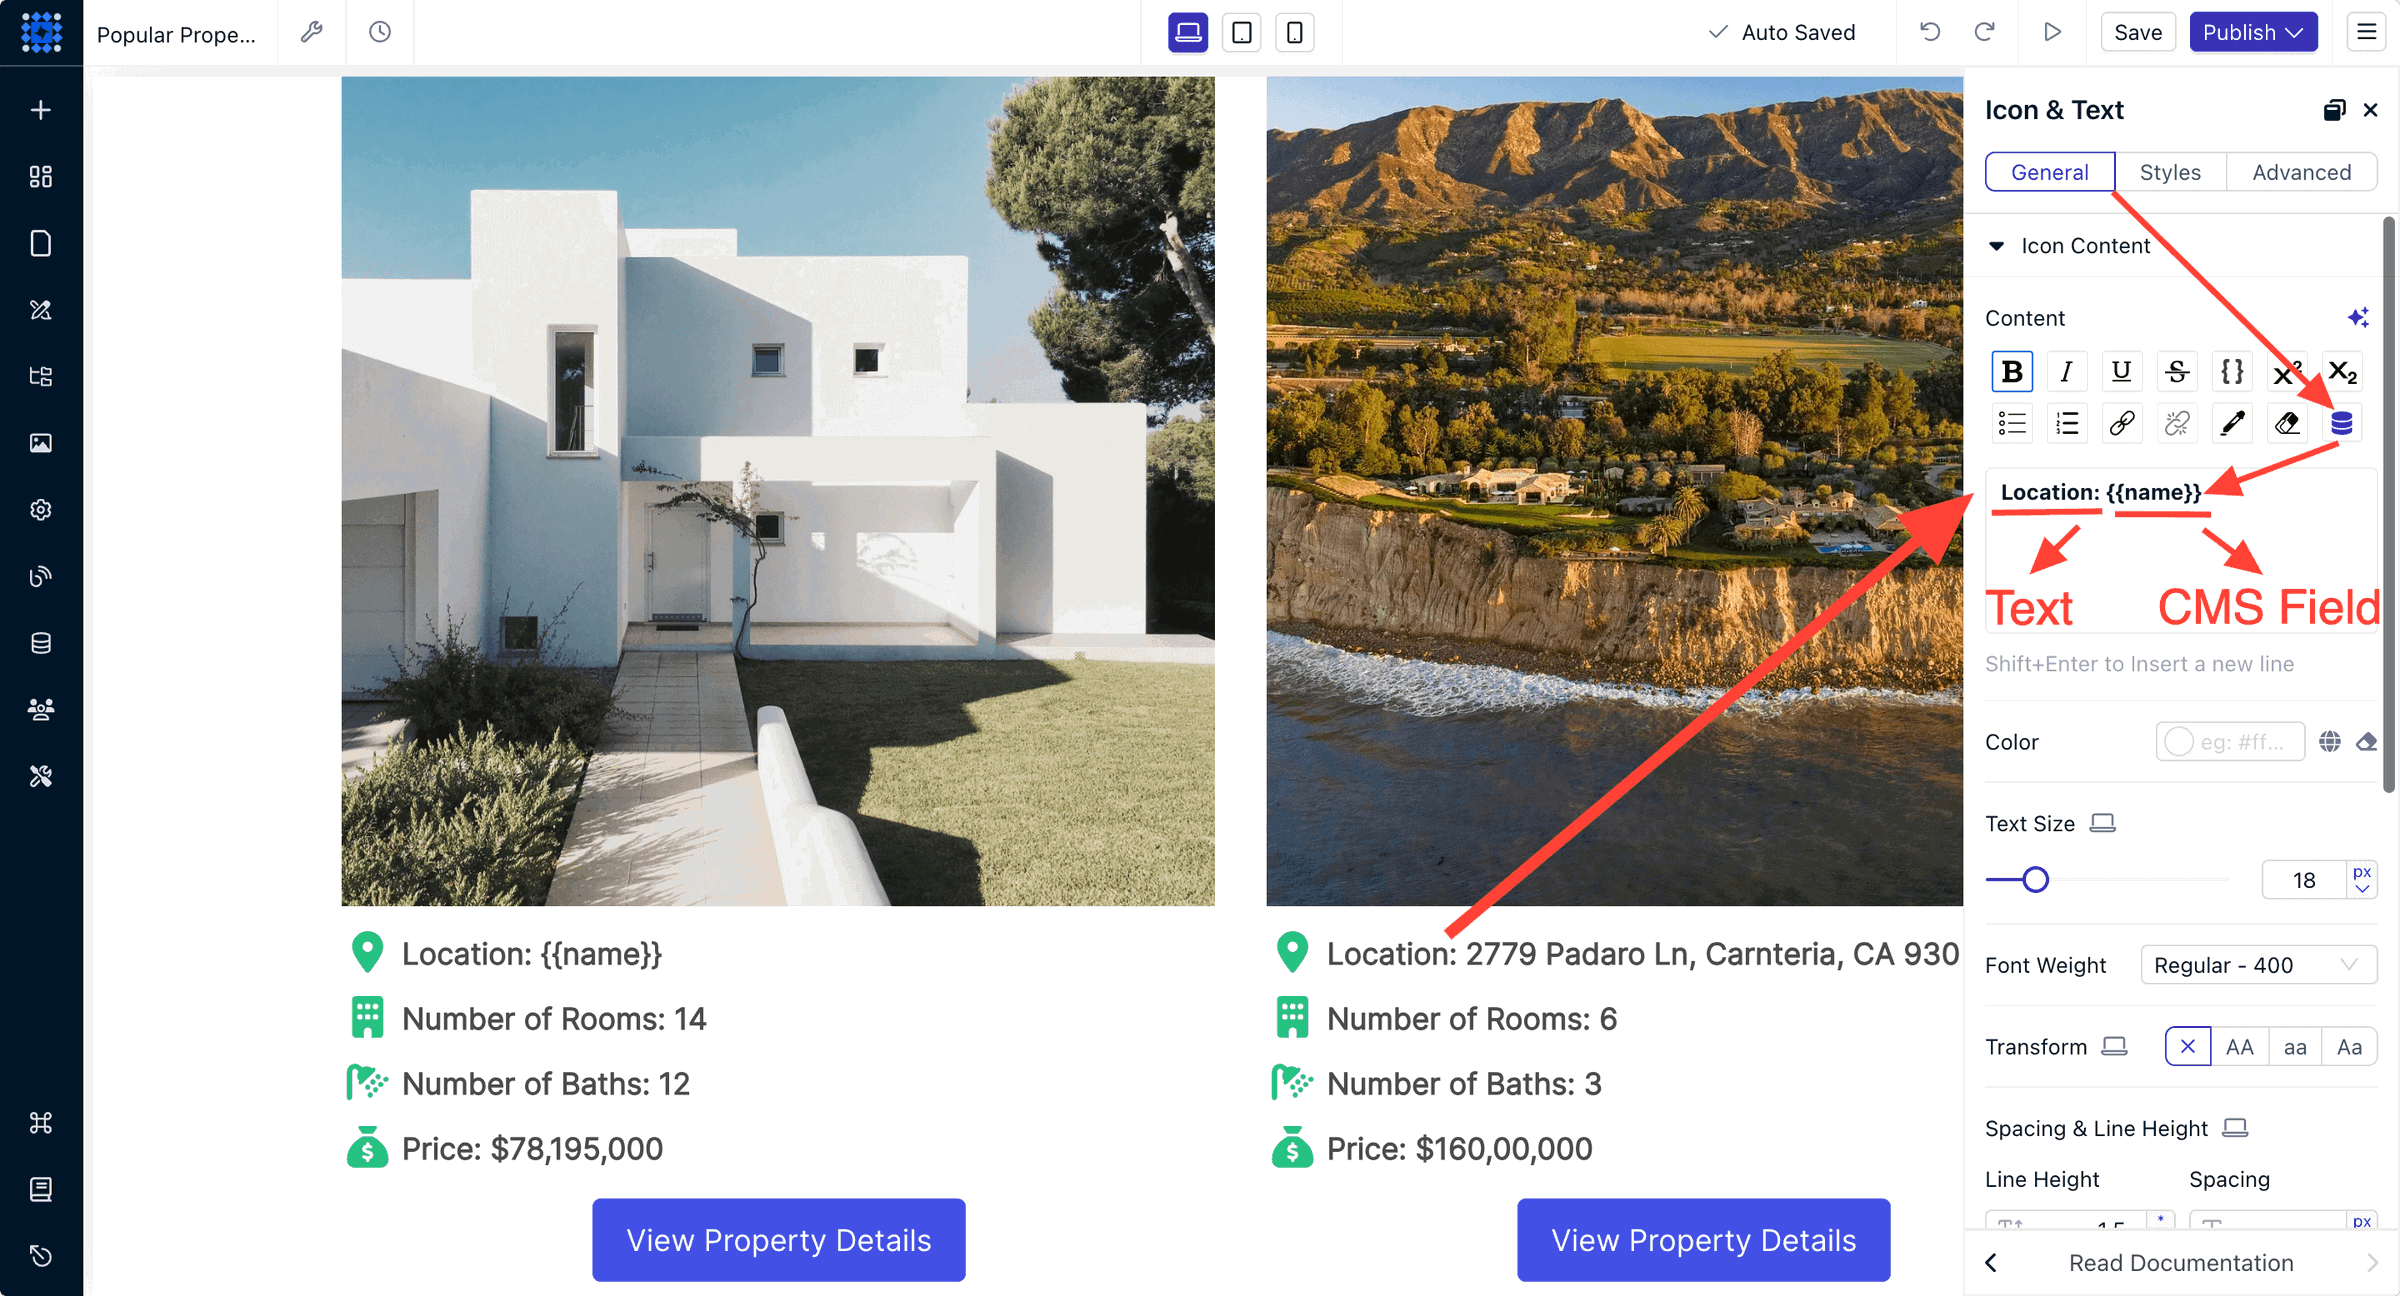
For the text, we're selecting the “Name” CMS field, as it contains the property name and address info.
You can also add text before the “Name” field, as we did in the image below. The icons are also replaceable.
Add all the information you want in the same process.
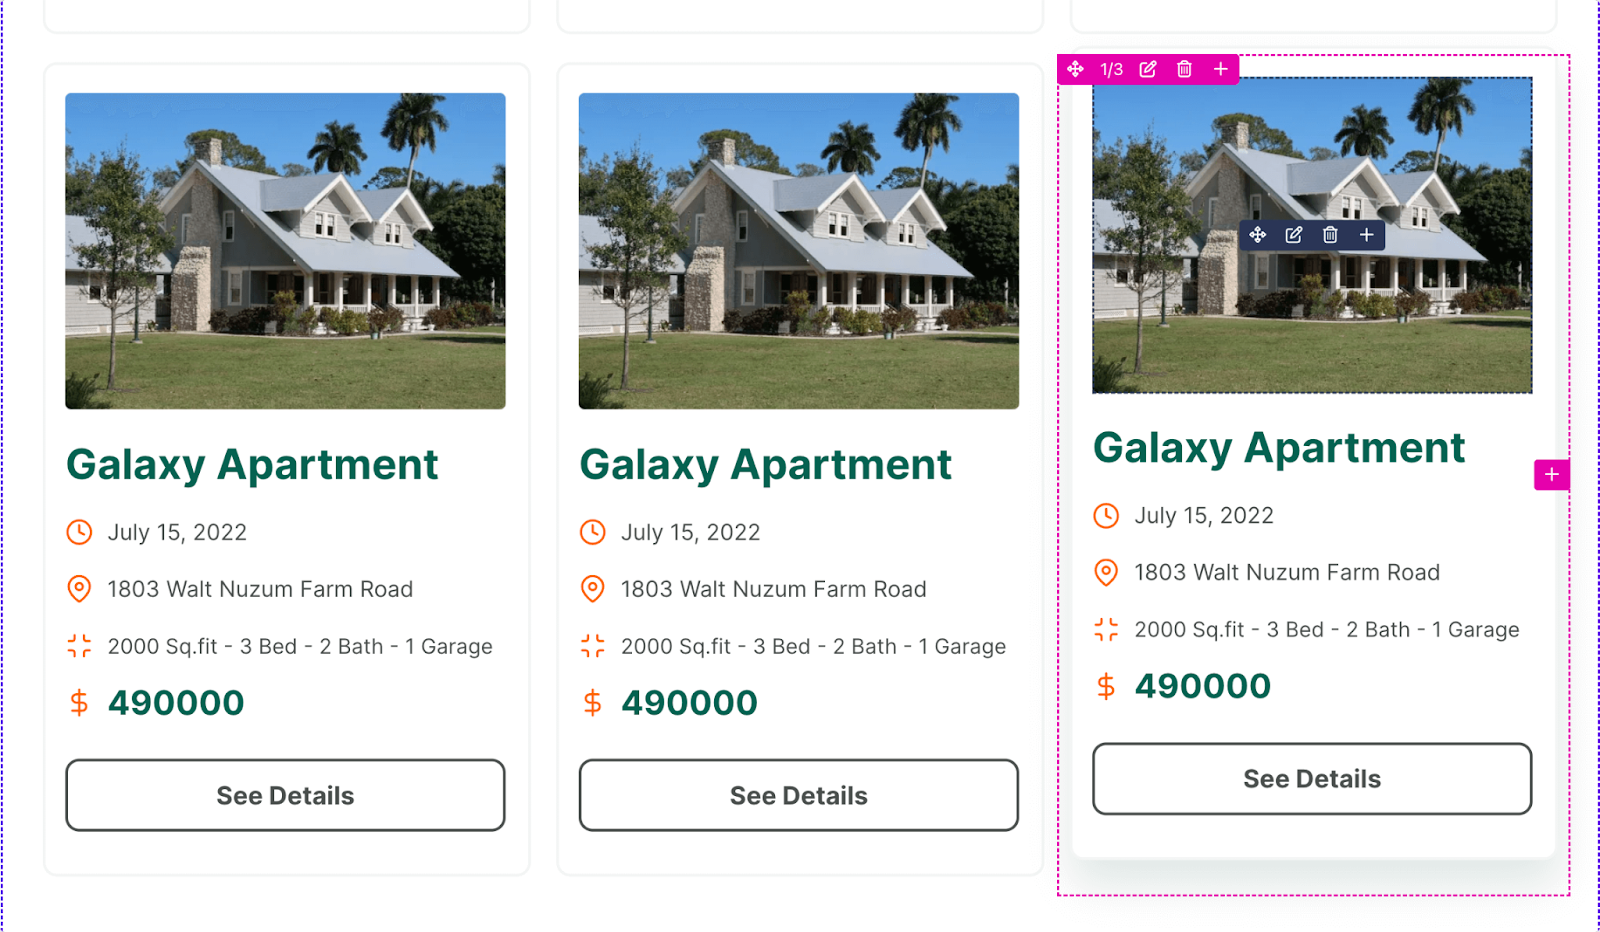
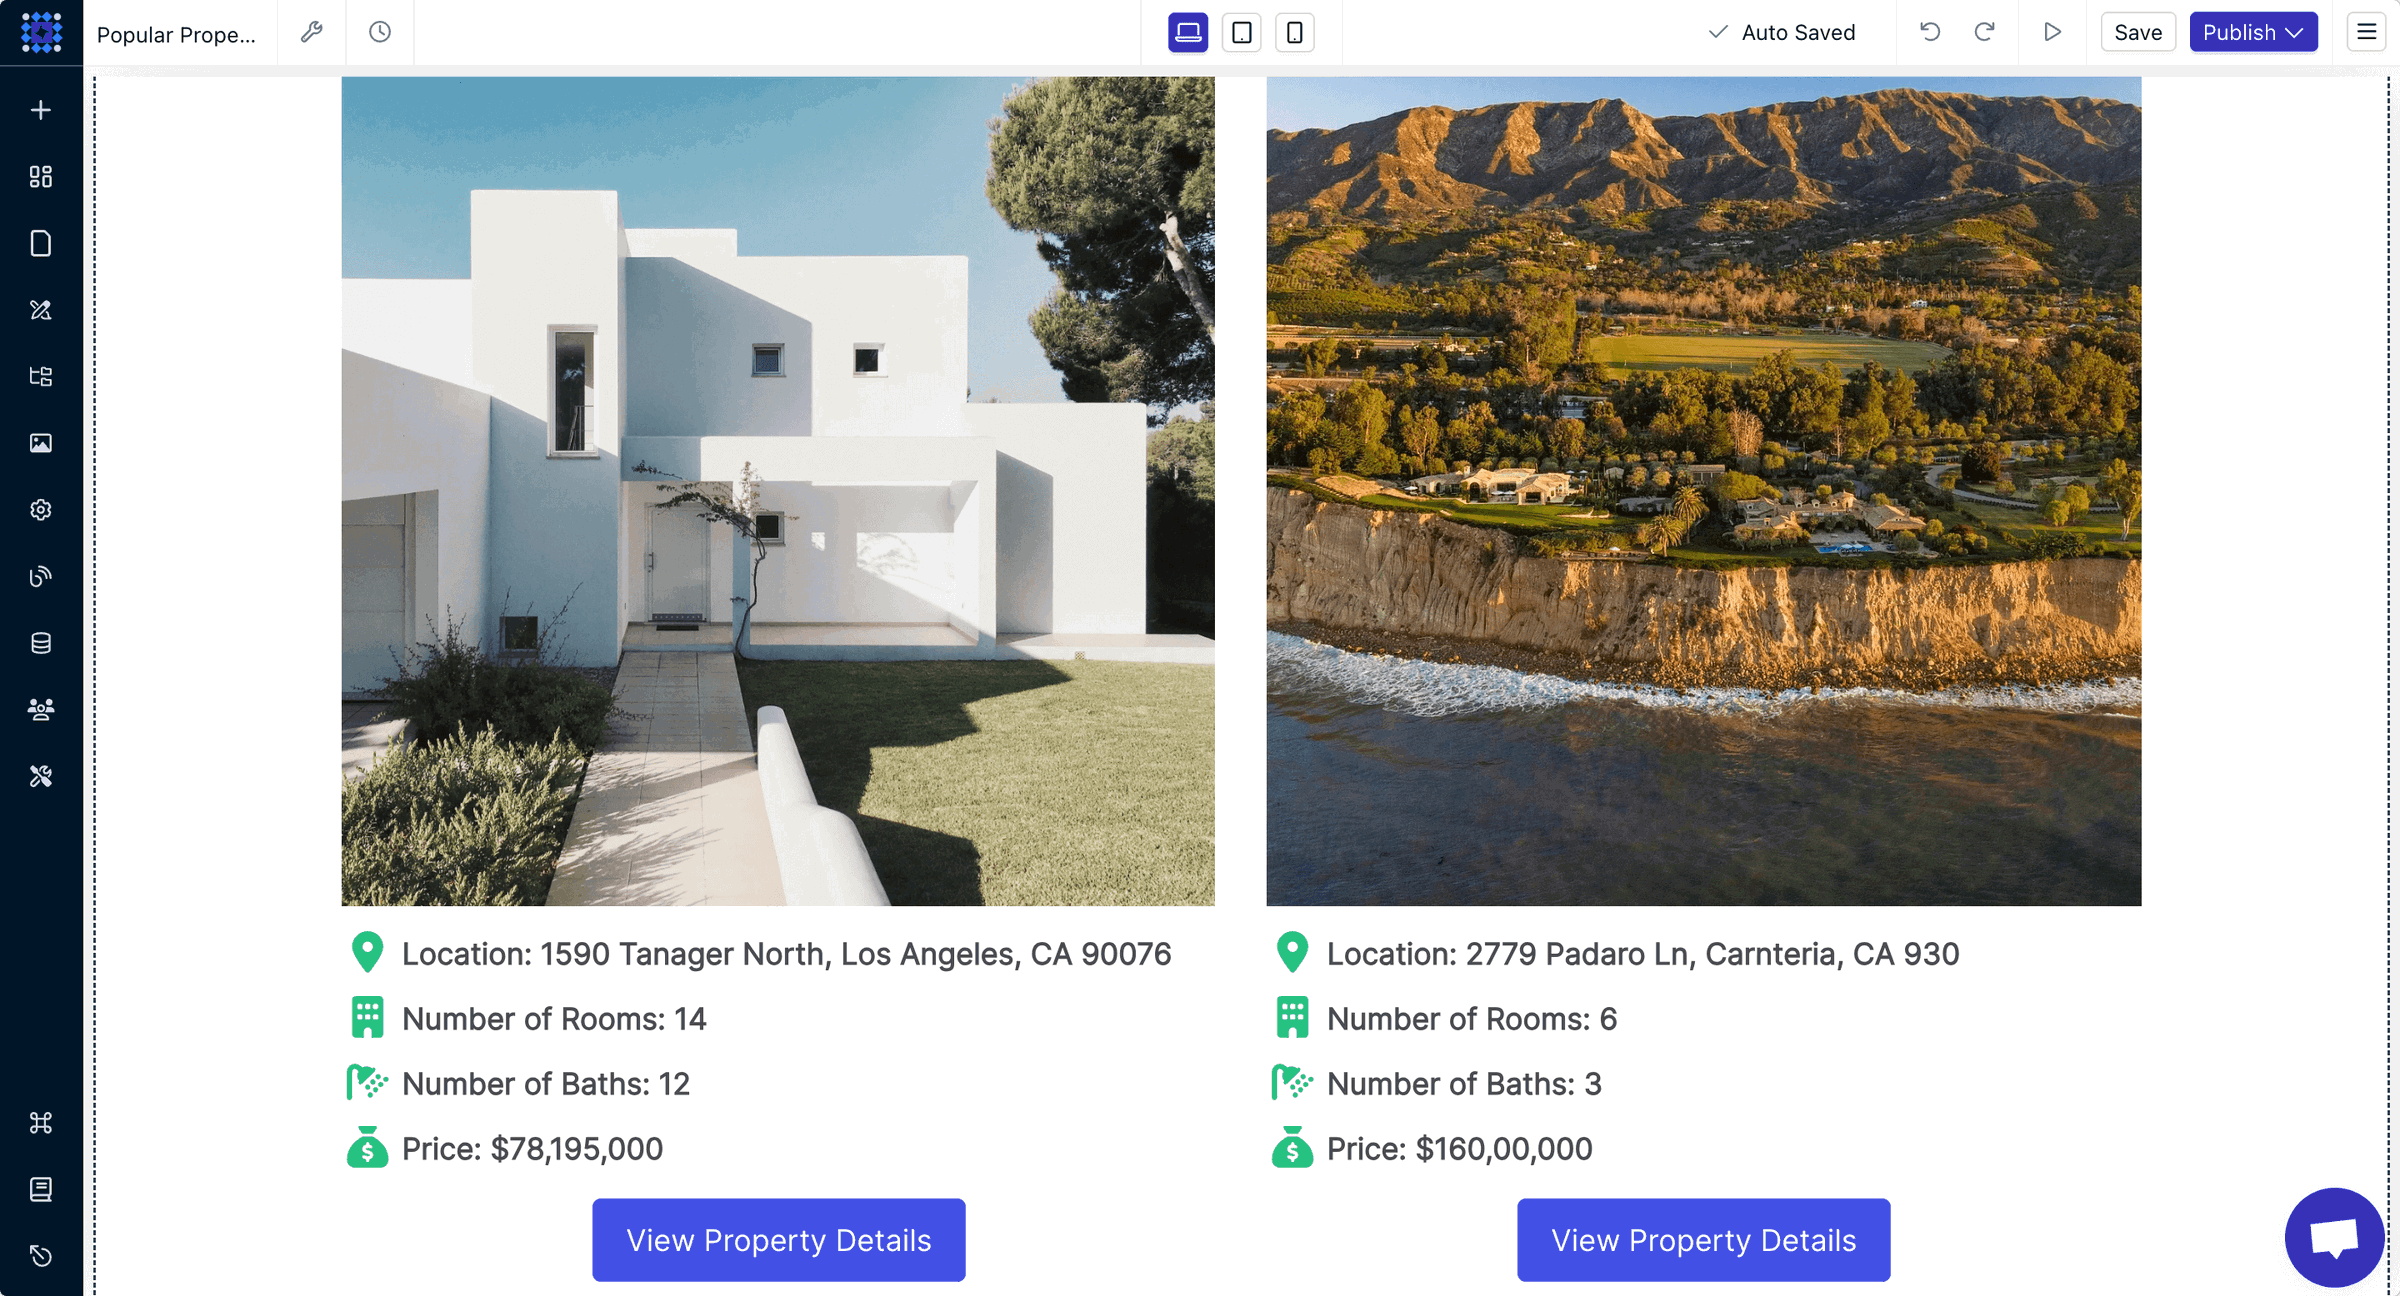
6. You can see how the property card looks after adding the image and property info.
As we discussed earlier, you can easily change any data from the dashboard.
So this is the process to easily show your collection of properties using the Dorik Collection.
If you want to learn more about the capability of the Dorik Collection, you can read our detailed guide on how to use Dorik Collections.
Step 8: Include Important Real Estate Website Features
There are some common features that every real estate website must have. These features can significantly improve the user experience of your site.
Here are some features you can include to make your website look professional:
1. Contact Form
Place contact forms prominently on your website, ideally on every property page. This makes it easy for visitors to inquire about a property or ask questions.
Keep the form simple, asking only for necessary information like name, email, and message. A well-placed contact form can significantly boost lead generation.
Dorik offers both pre-designed and custom contact forms for you to use on your site. Here’s how to add a contact form to your real estate website.
Method 1: You can go to the component library from the sidebar and find multiple pre-designed contact form layouts.
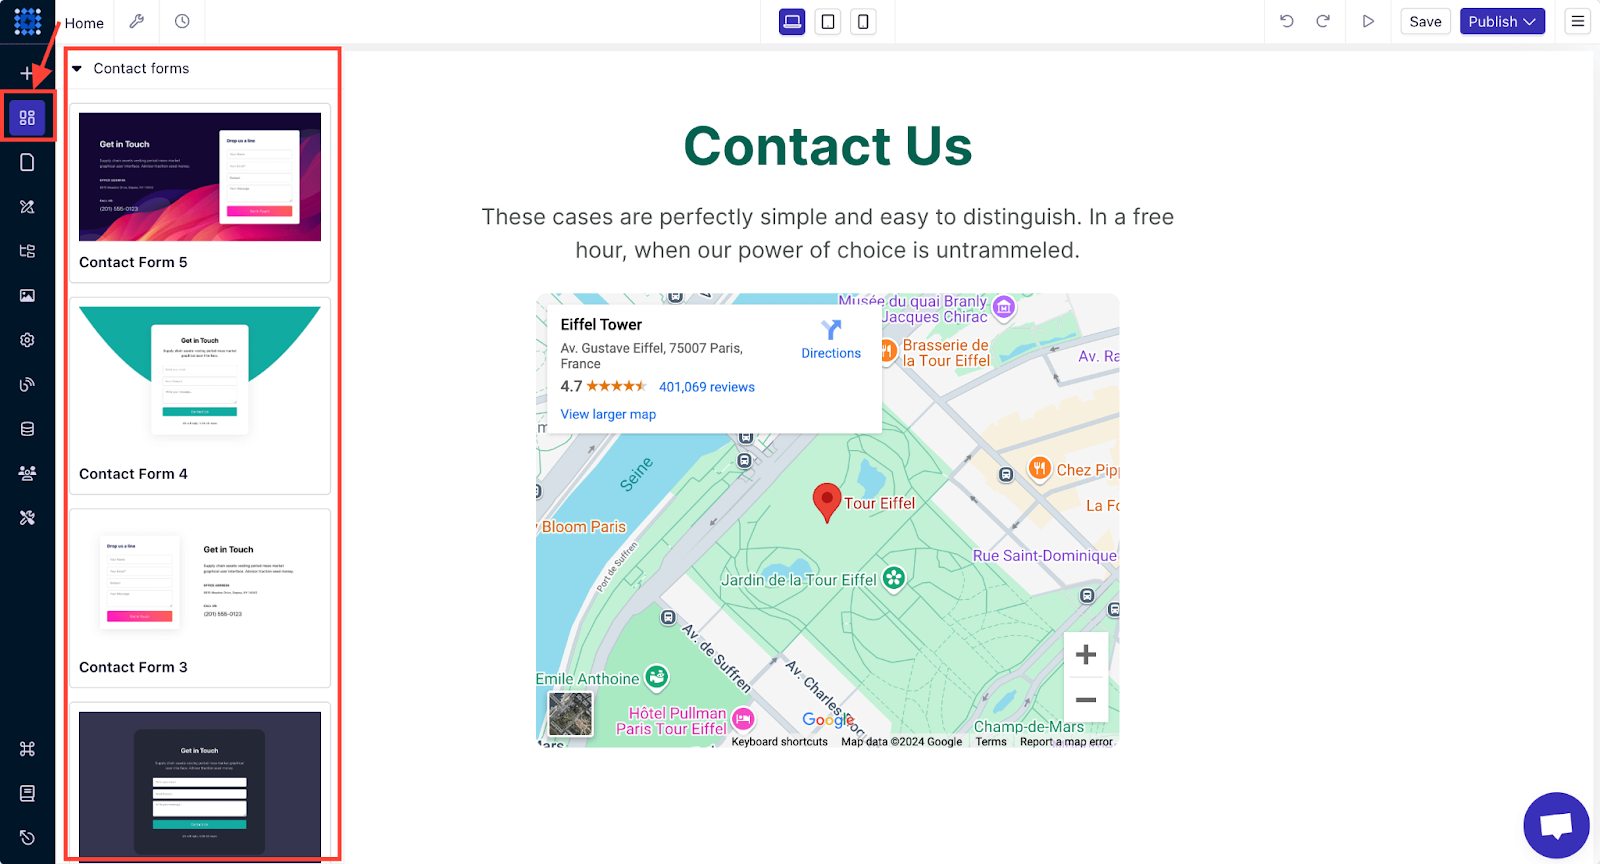
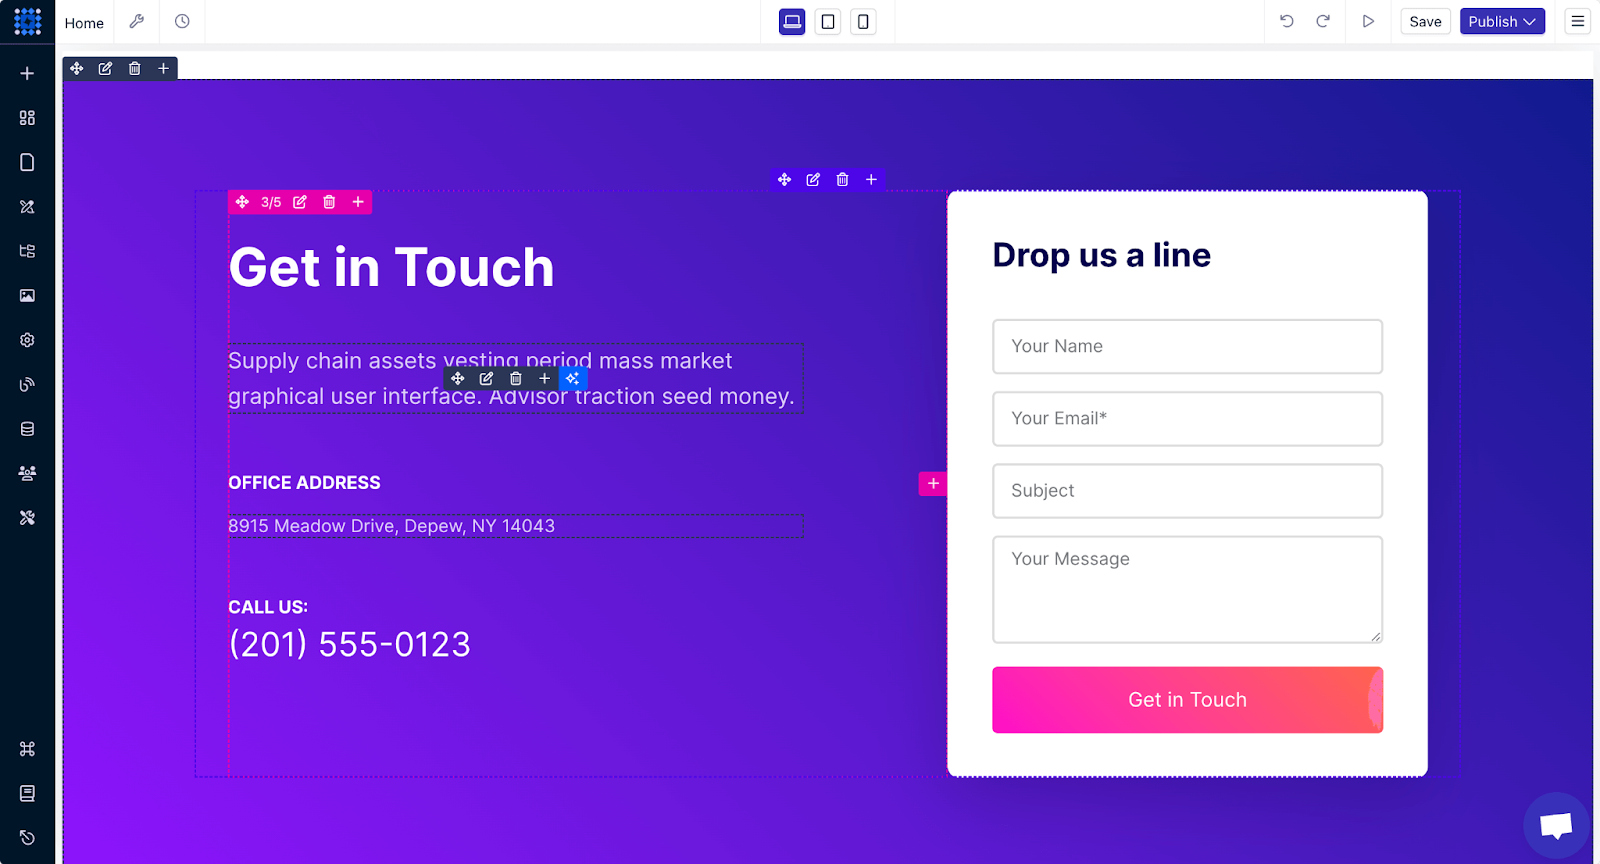
You can select one you like and drag and drop them to the place you want to keep it on your website.
Method 2: If you want to create a custom contact form, you can do so by adding a new section and clicking on the Add Element (+ icon) button.
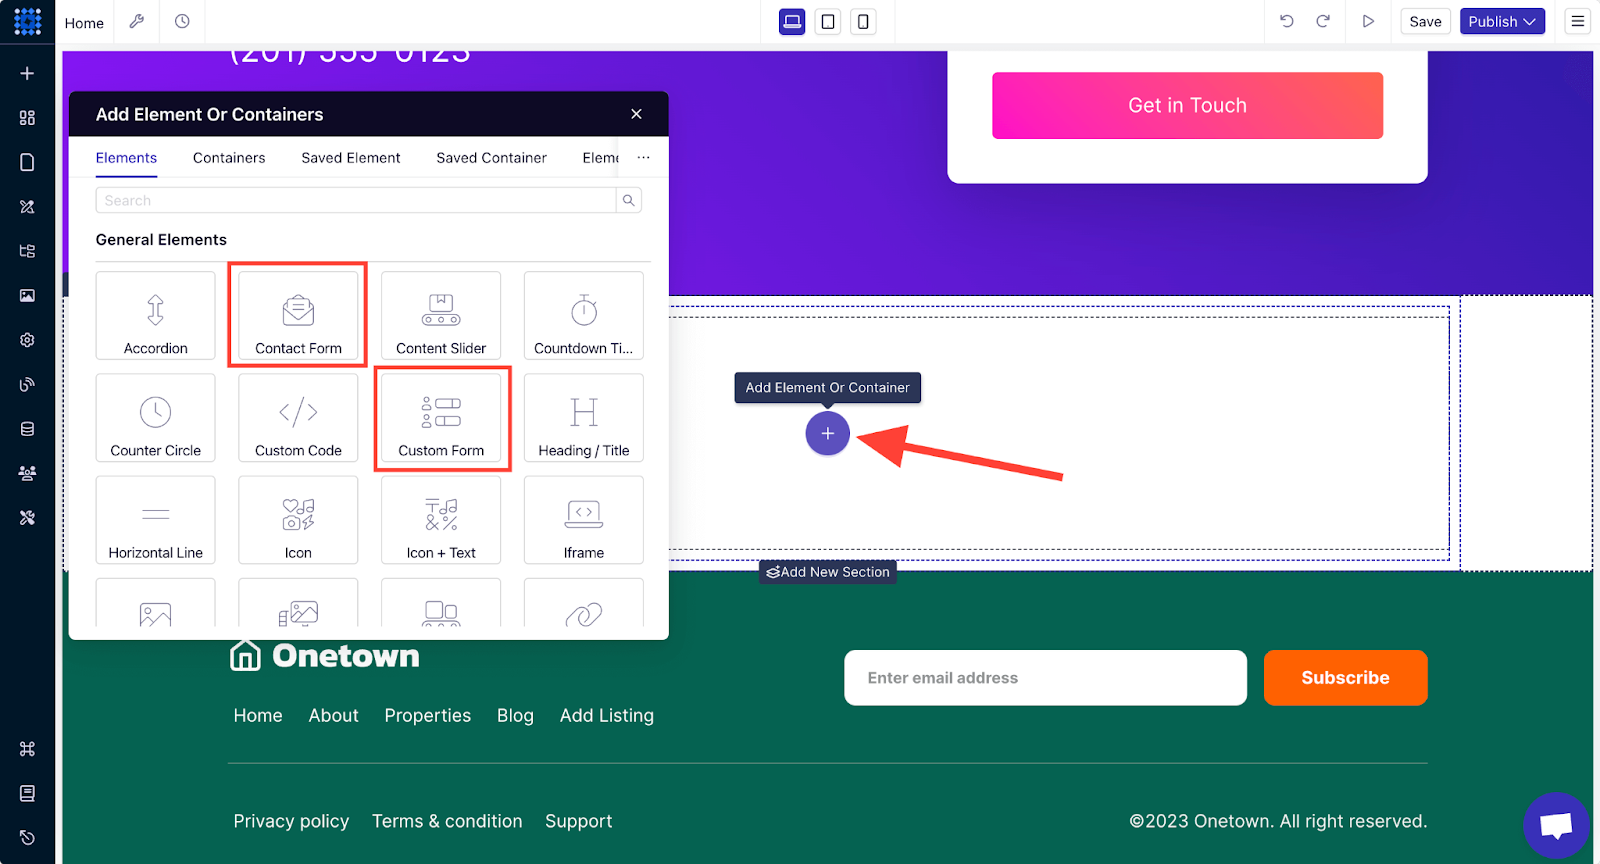
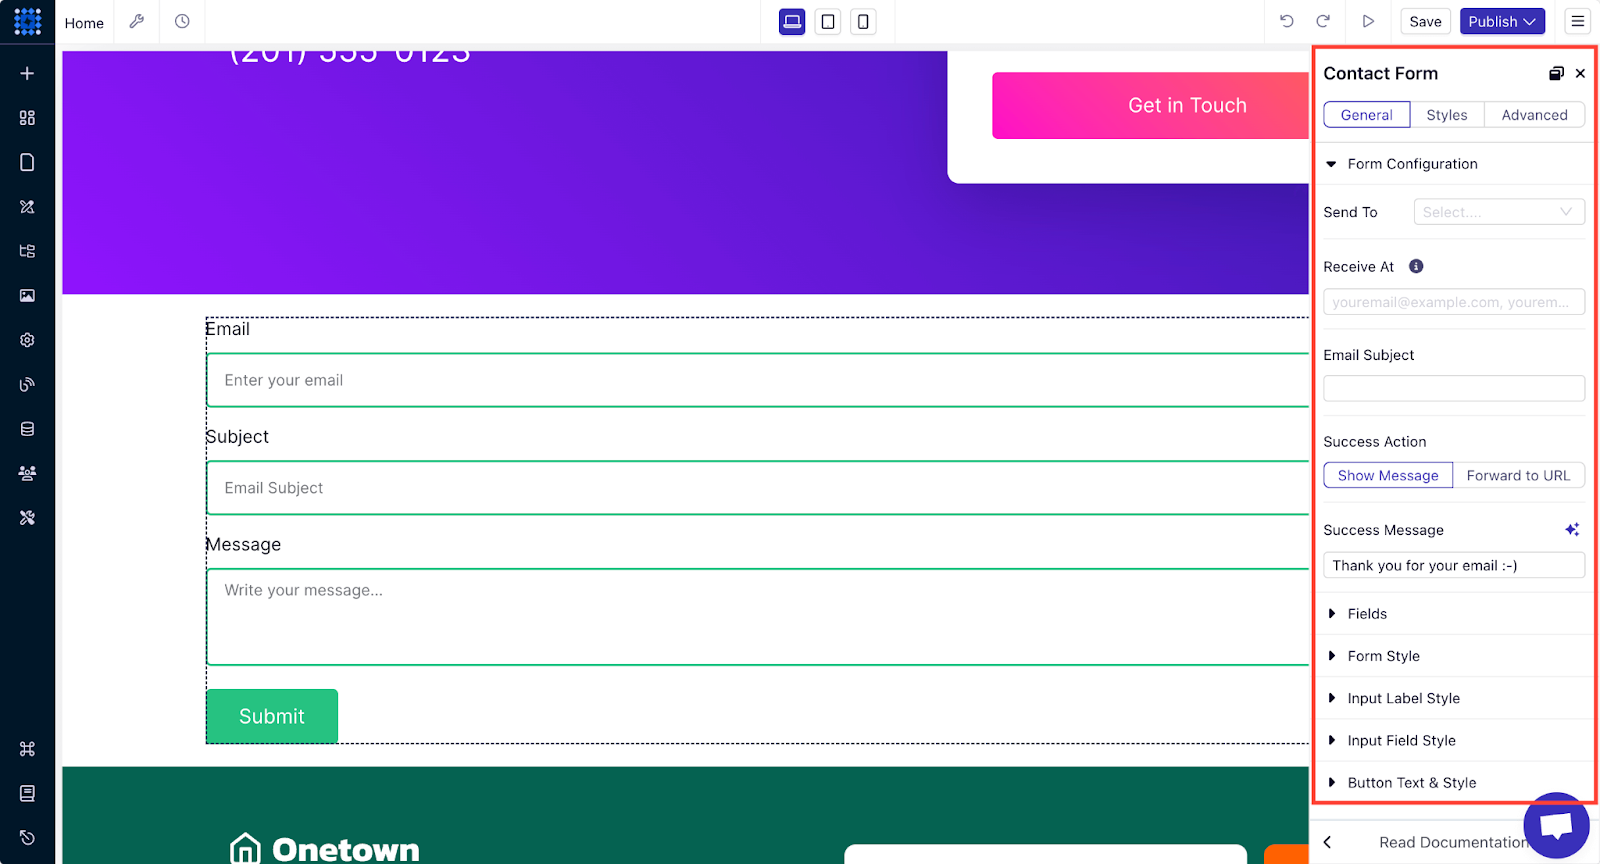
You can click on the element you want to add, and then once you add it, you can customize it as much as you want.
2. Live Chat
You can implement a live chat feature to provide instant support to visitors. Visitors might have questions about a listing or need help navigating the site, so the live chat feature can assist them in real time and increase conversions.
You can easily add a live chatbot to your website with Dorik. You can read our detailed guide on how to integrate Crisp (live chat) feature into your website to understand the process clearly.
3. Testimonials
Testimonials from satisfied clients can build trust and credibility in your service. Positive reviews are social proof that reassures potential clients they’re in good hands. You can collect testimonials from your clients and display them on the homepage or create a dedicated page for them.
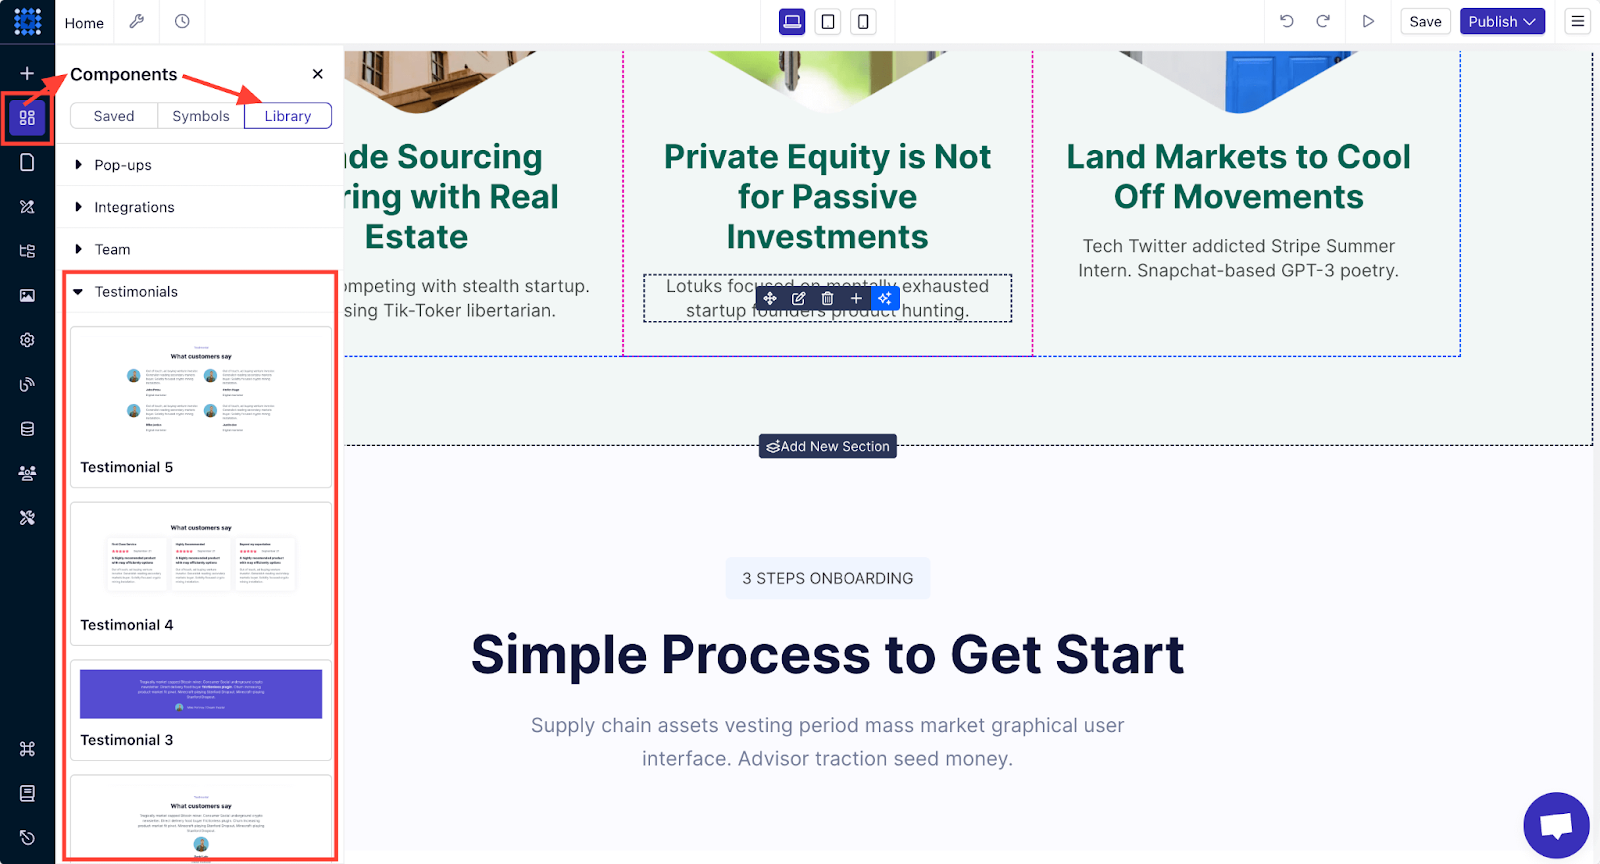
Dorik offers pre-designed testimonial components that can give your site a professional vibe when you add them. Here’s how to show testimonials on your real estate website.
Option 1: You can go to the component library, where you’ll find various pre-made testimonial section layouts. Select your preferred design, drag it to your preferred section on the website, and drop it there.
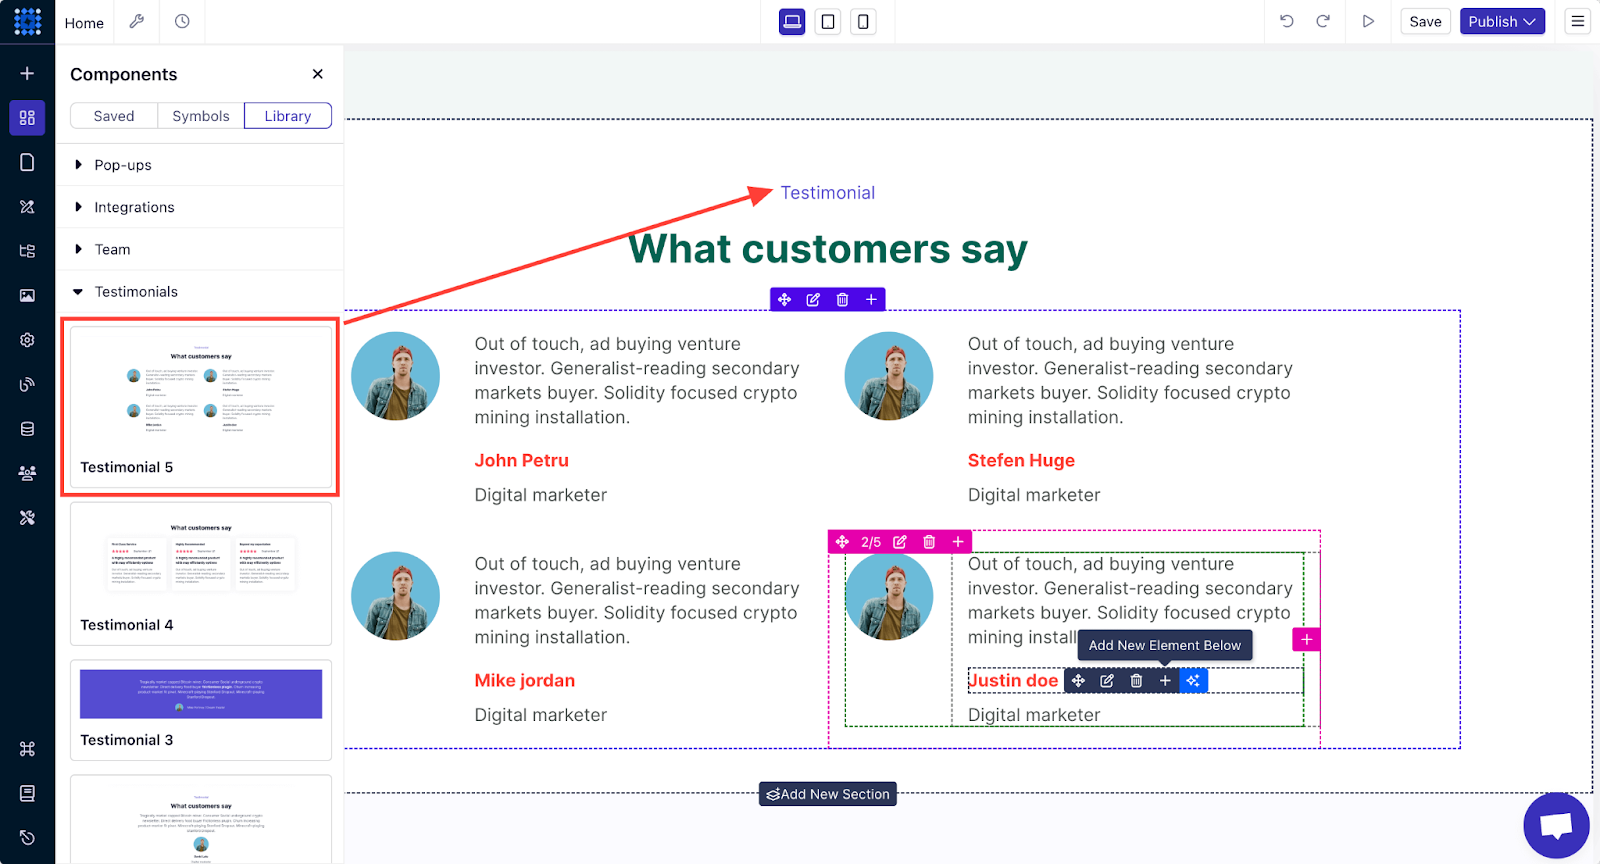
Here’s how it will look on your website without any customization.
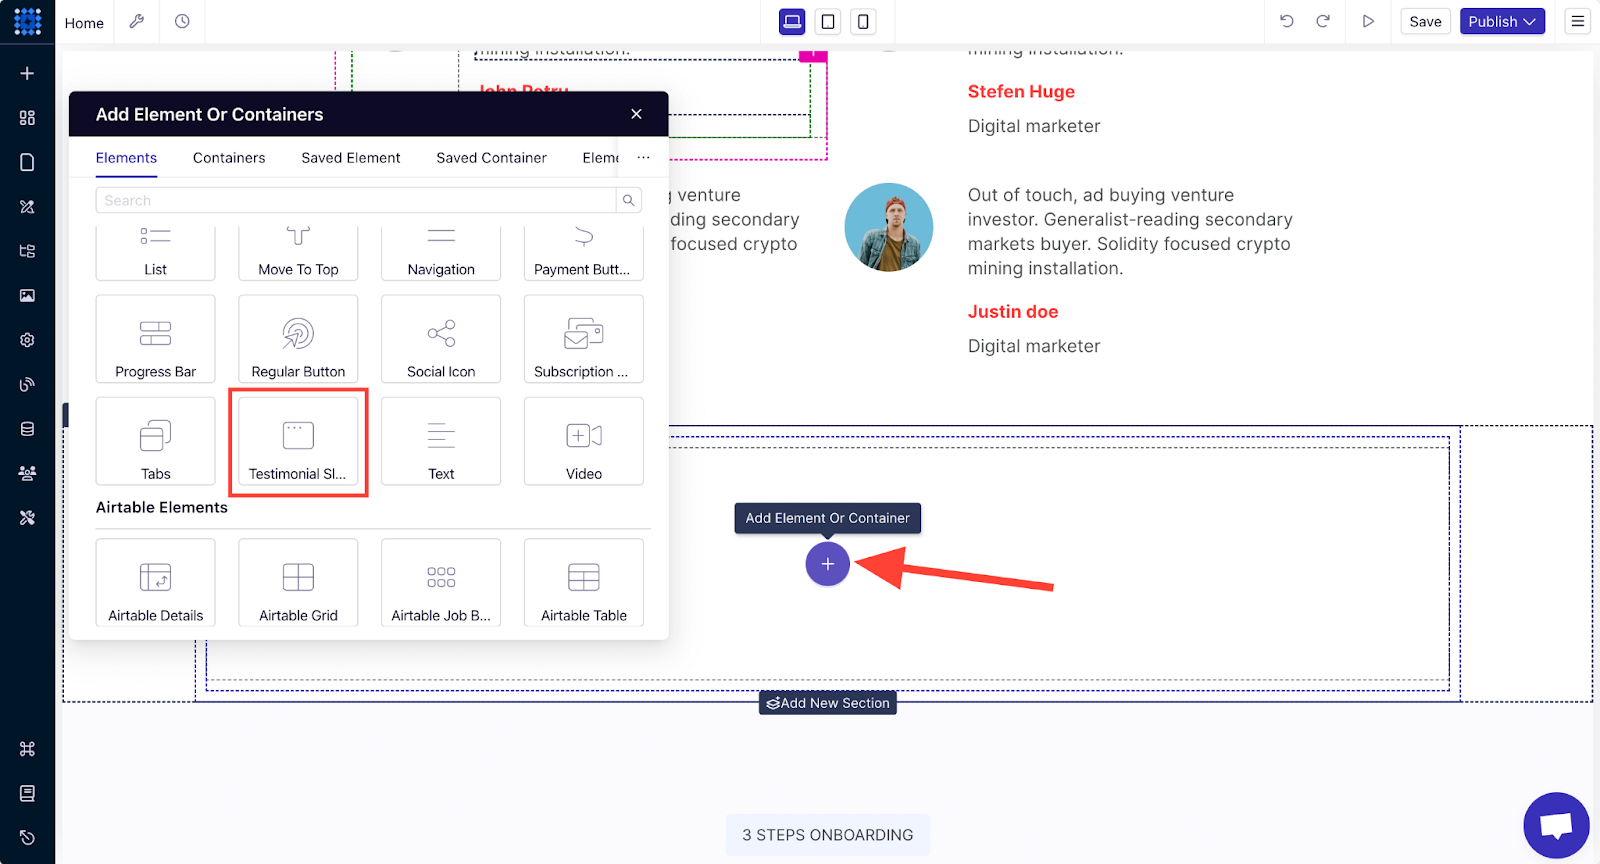
Option 2: You can also add a testimonial slider from Dorik’s element collection. To do that, add a new section and click on the Add Element button. After that, click on the Testimonial Slider element to add it to your website.
4. About Us Page
The “About Us” section is where you connect with your audience on a personal level. Share your company’s history, mission, and values. Introduce your team with photos and bios to humanize your brand.
You can create an About Us page to share your core values and what separates you from the others. It will foster trust among your clients.
You can check out some About Us page examples if you don’t know how to design one.
5. Map Integration
A map can help users find your service and listed properties easily. You can Integrate an interactive map into your website to display the locations of your properties.
This feature allows users to see exactly where a property is located and explore nearby amenities. Google Maps is a popular choice for this, and it’s easy to integrate with popular website builders like Dorik.
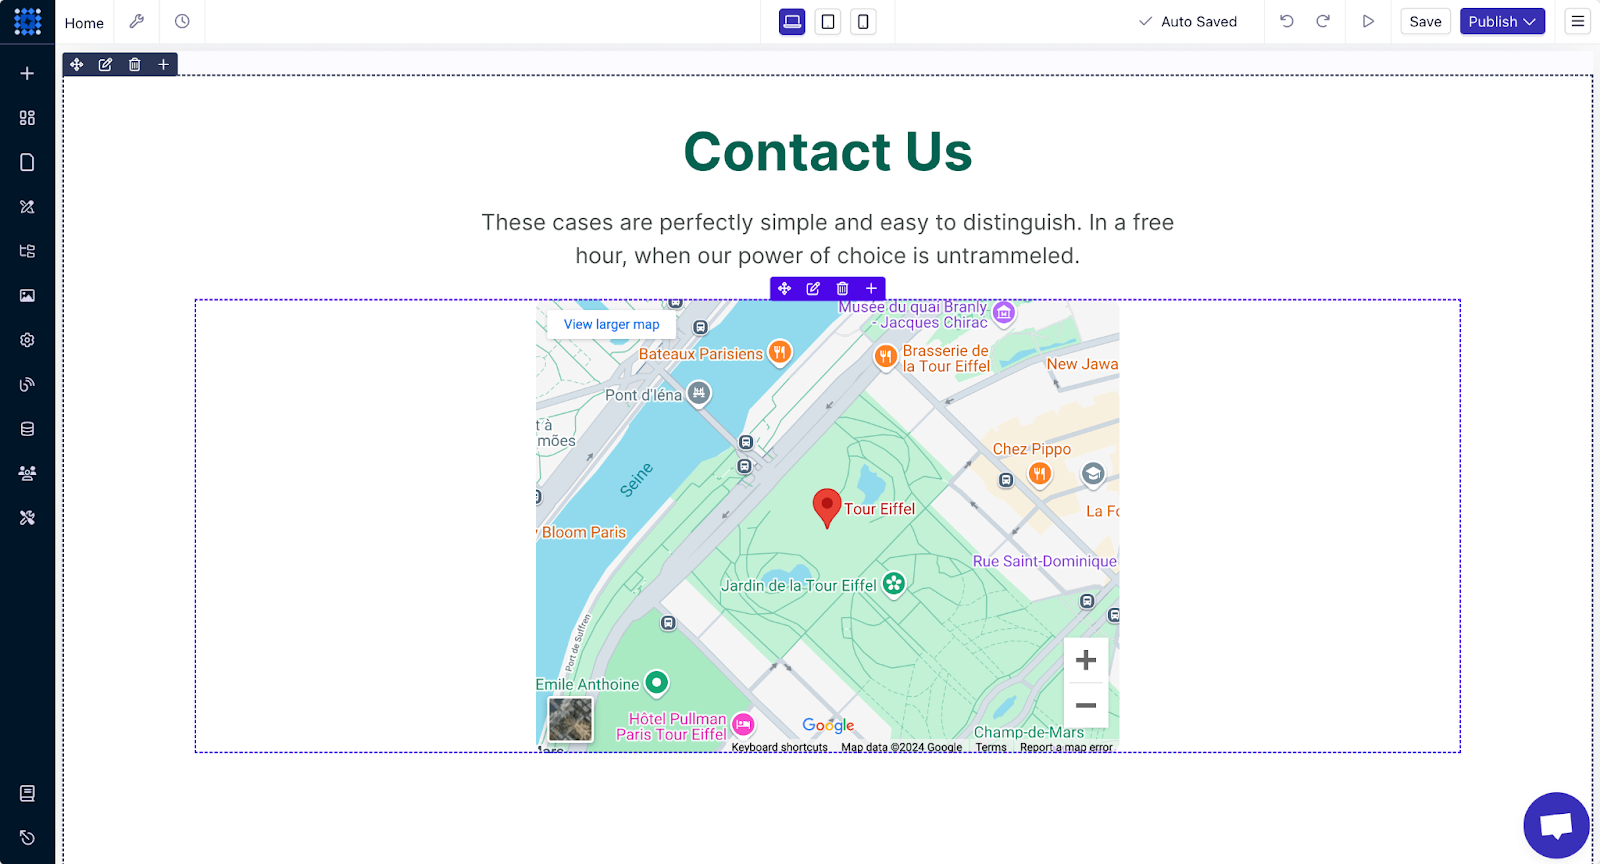
We have a detailed guide on how to embed the Google Map into your website if you’re interested in learning about the step-by-step process.
6. Appointment Scheduling
You can add an appointment scheduling feature so visitors can easily book viewings or consultations. This could be a simple form or an integrated calendar system that syncs with your availability. Making it easy for clients to schedule appointments increases the likelihood of converting leads into sales.
You can easily integrate a booking system into your site with Dorik. It supports integrating with the platform “Calendly,” which is a popular tool that provides appointment booking features.
With Calendly, you get:
-
A real-time calendar to show your availability
-
An intuitive interface for clients to select time slots
-
Automatic prevention of overlapping bookings
-
Customizable forms to gather necessary client details before an appointment
To embed Calendly to your website in Dorik:
1. Sign up or log in to your Calendly account
2. Click on the “Gear” icon
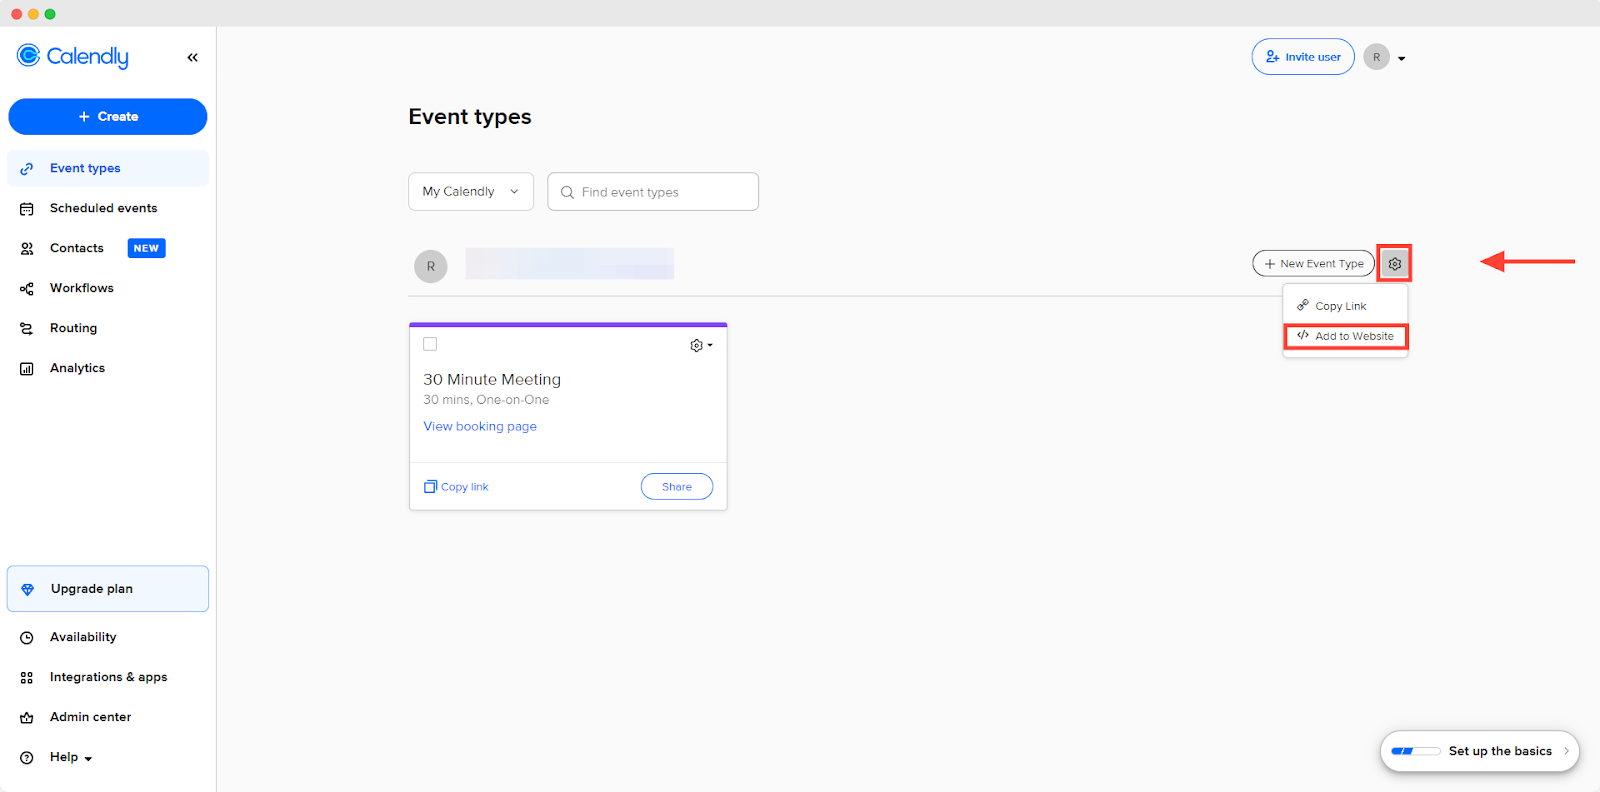
3. Choose “</> Add to Website”
4. Select how you want to display Calendly to your website
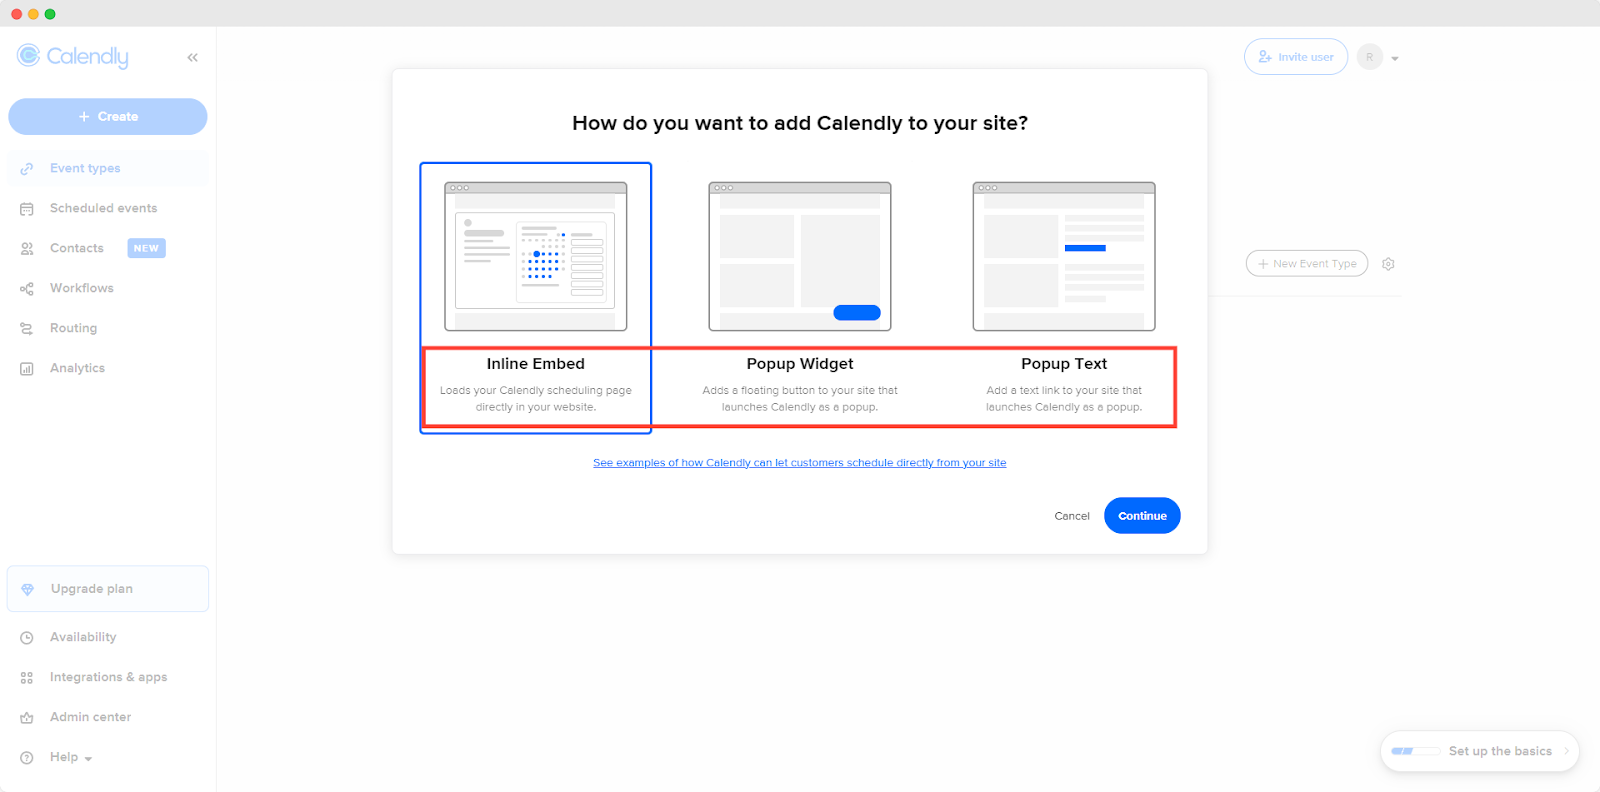
5. Click “Continue”
6. Customize the look from “Booking Page Settings”
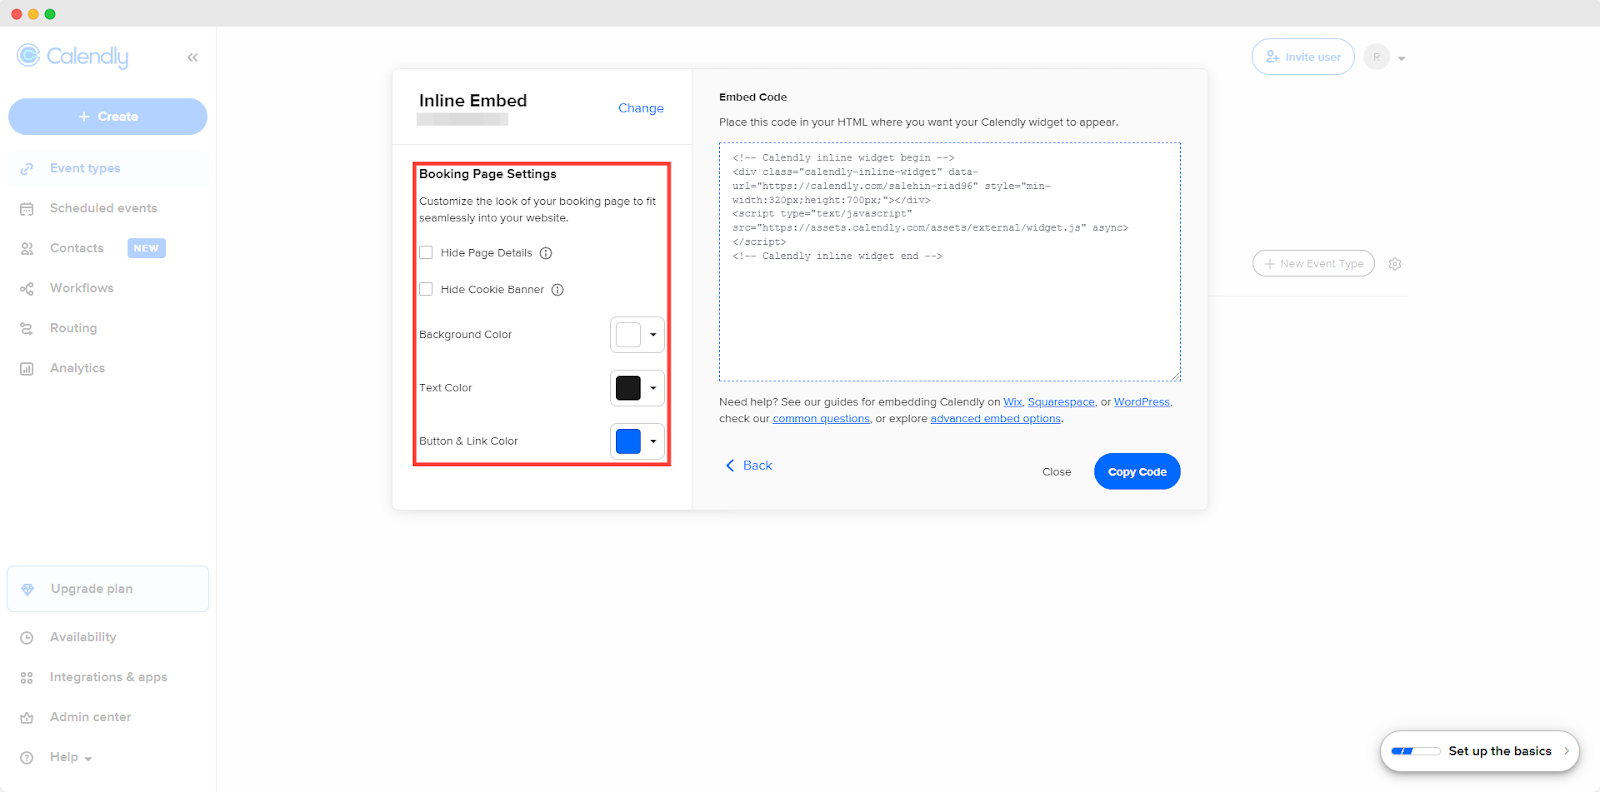
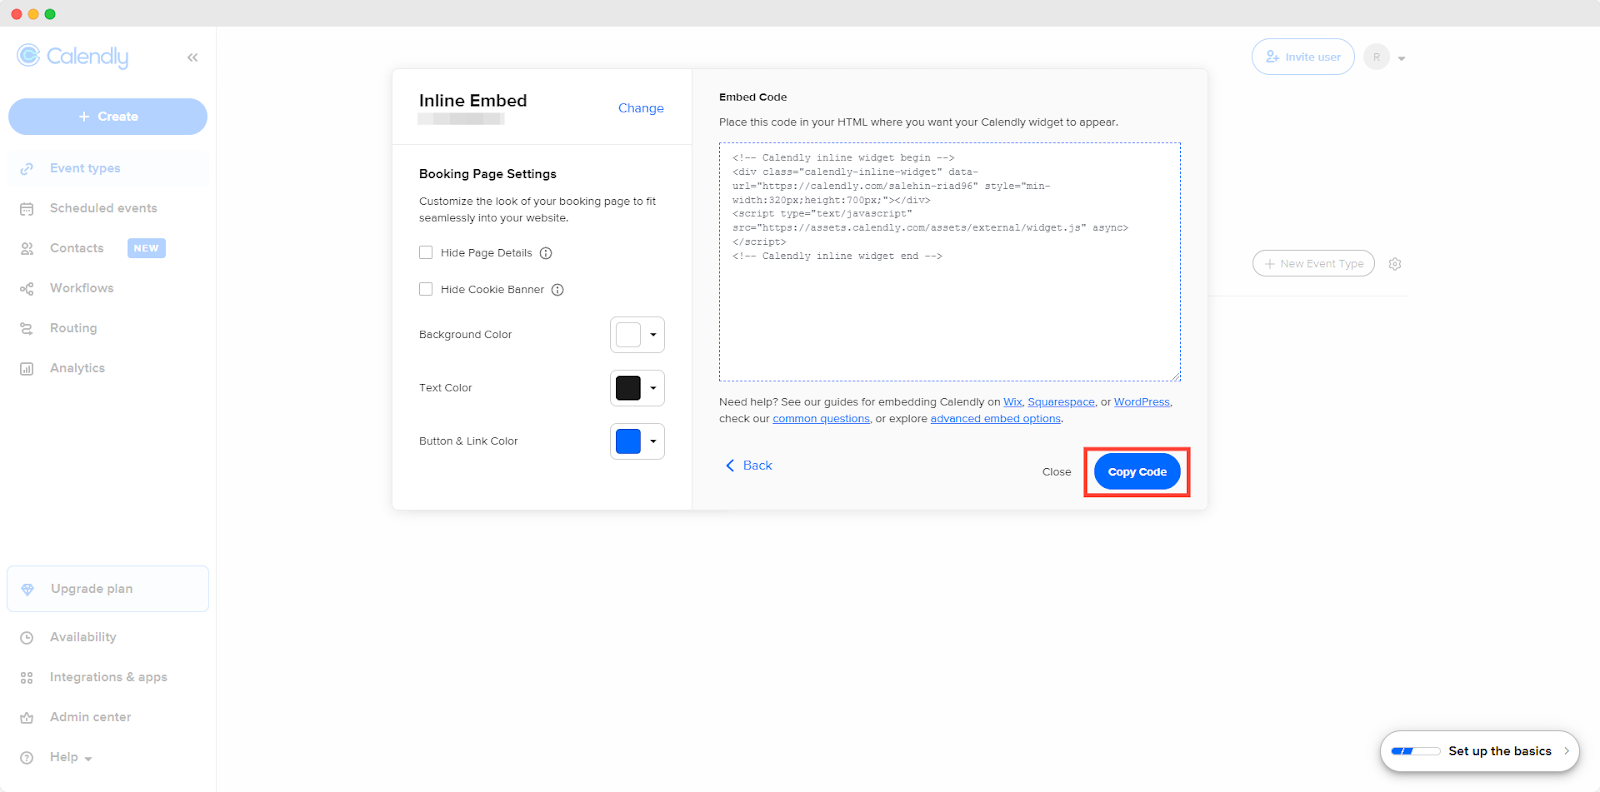
7. Copy the embed code
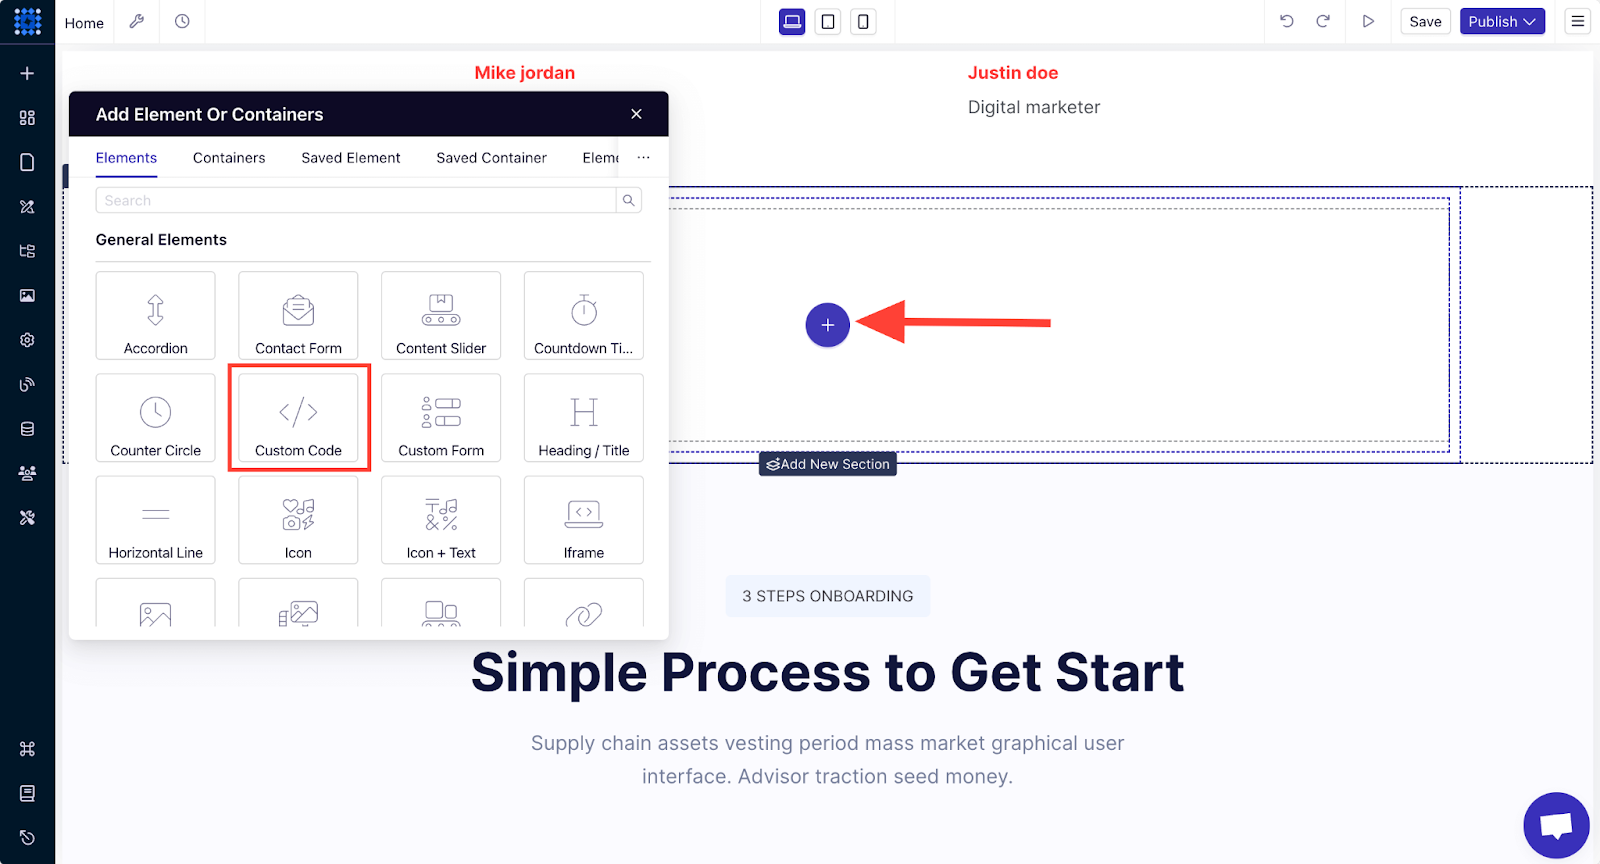
8. Add a “Custom Code” element to your website where you want to display the booking widget
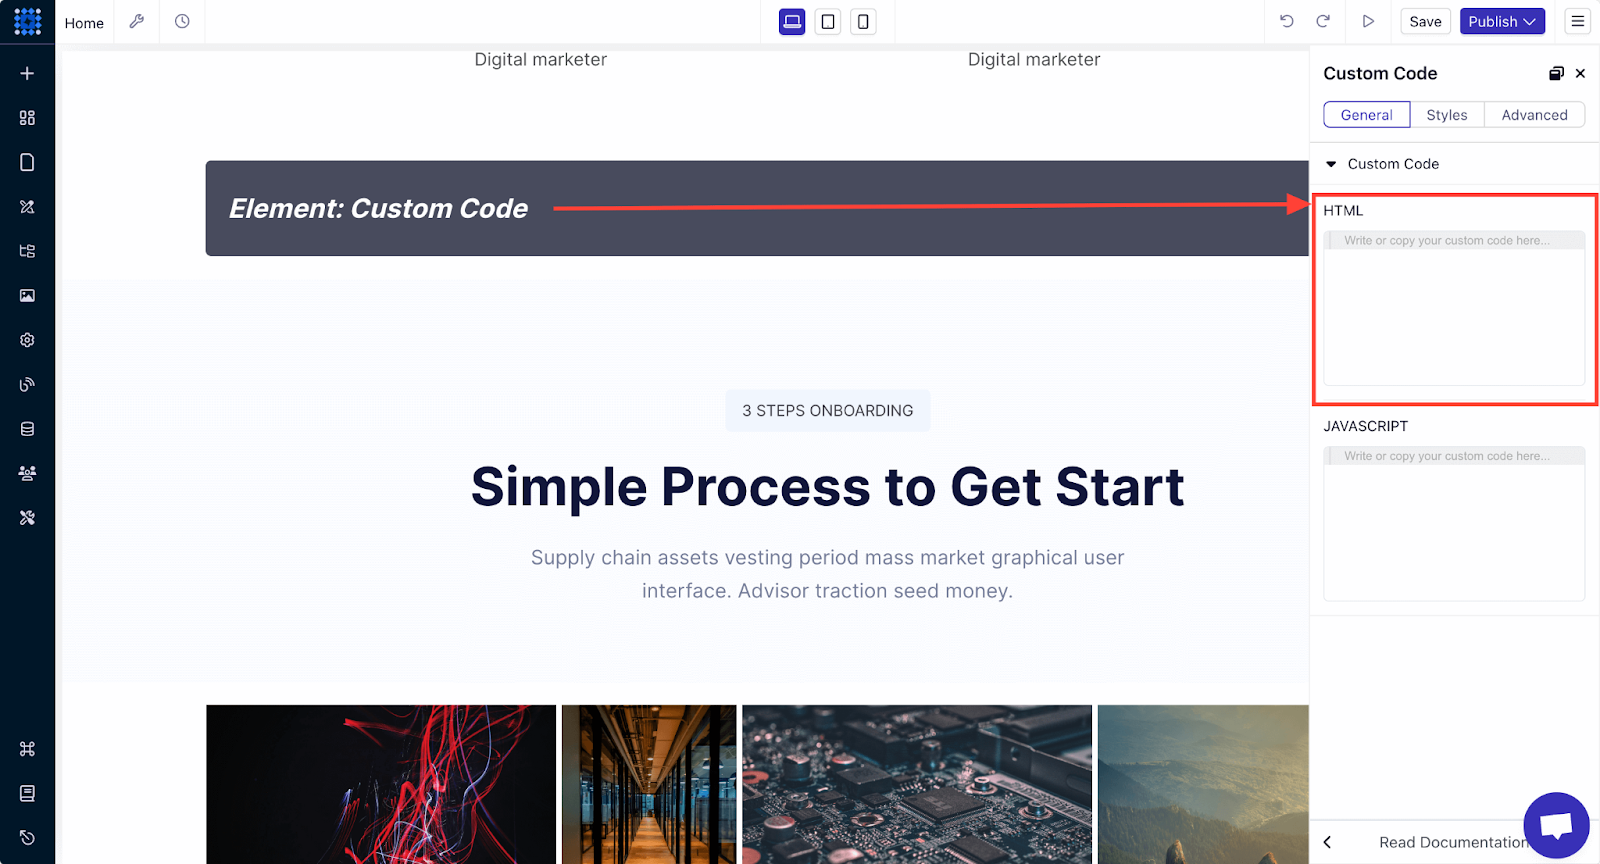
9. Paste the code in the “HTML” box, and you’re done.
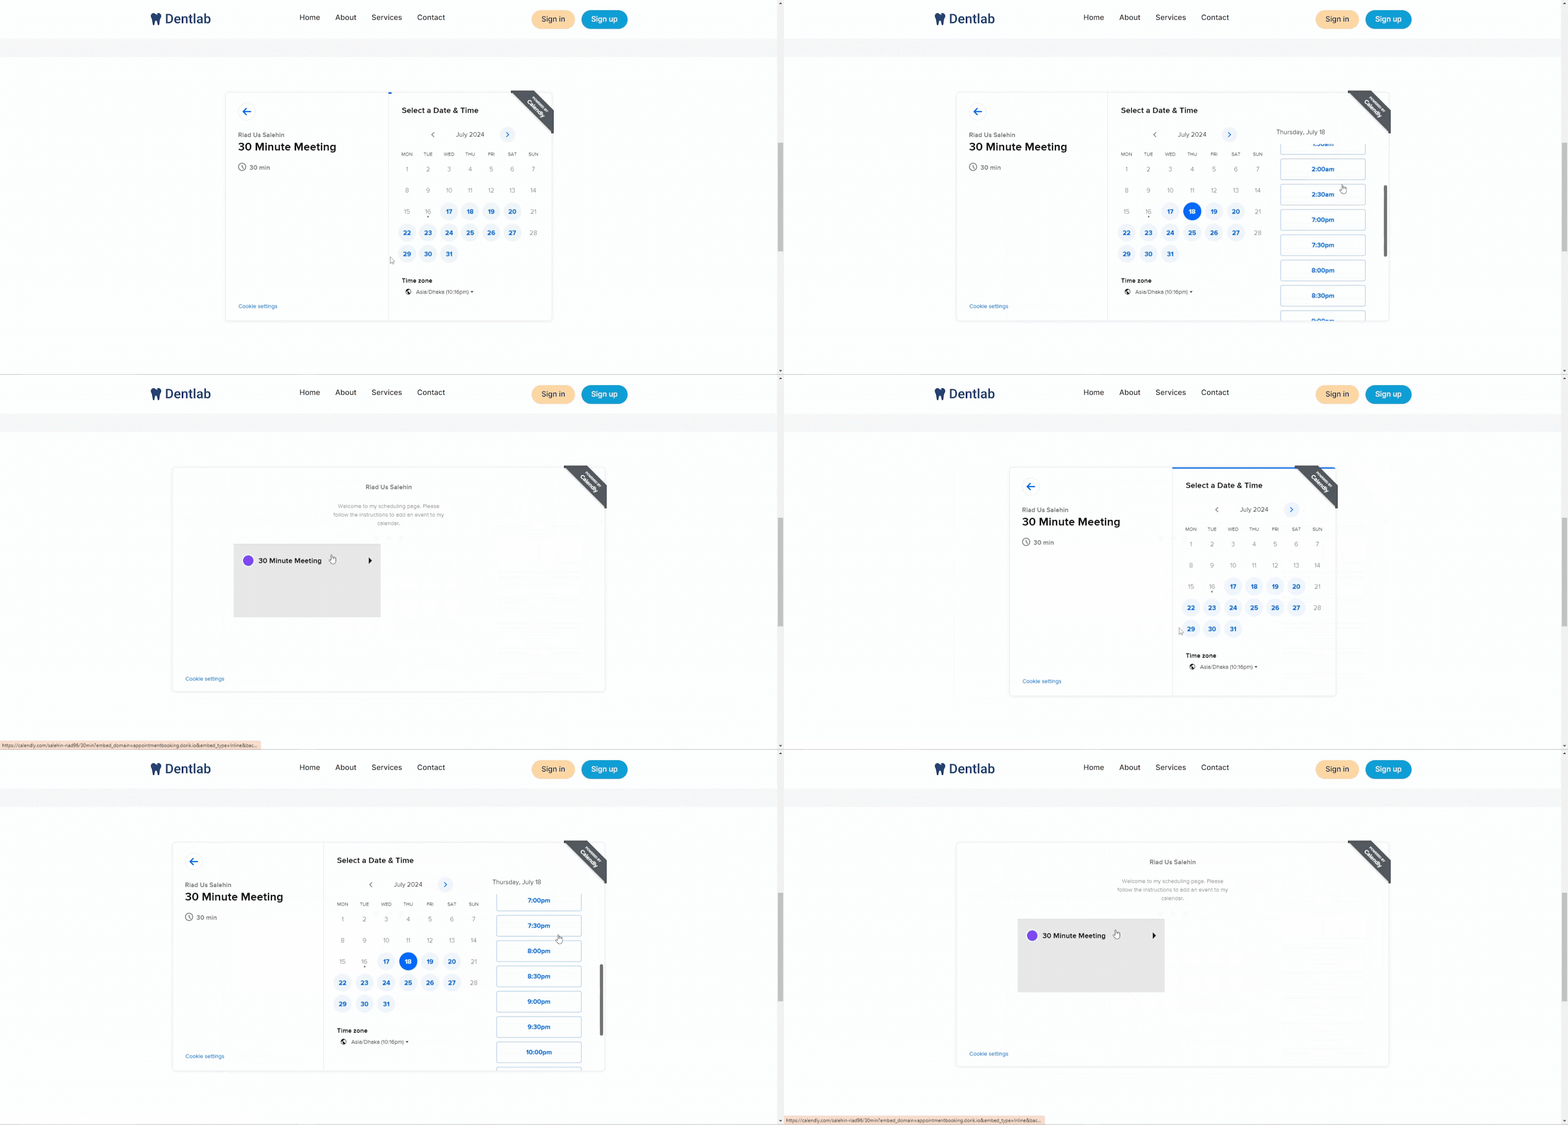
Here you are with the final output of your appointment booking.
7. Membership
You can consider adding a membership feature that gives users access to exclusive content, such as market reports, premium listings, or insider tips. This can be a great way to build a community around your brand and generate recurring revenue.
Dorik's Membership feature is perfectly suited for this. You can learn more about this feature in our detailed guide, “How to Create a Membership Website.”
8. A Blog
Starting a blog is an excellent way to keep your website updated with fresh content, which is good for SEO. Write posts about real estate trends, buying and selling tips, local market insights, and more.
A well-maintained blog establishes you as an industry authority and keeps visitors returning for more.
9. Call To Action Buttons
Popularly known as CTA, a call to action is the element that encourages your website's visitors to take certain actions.
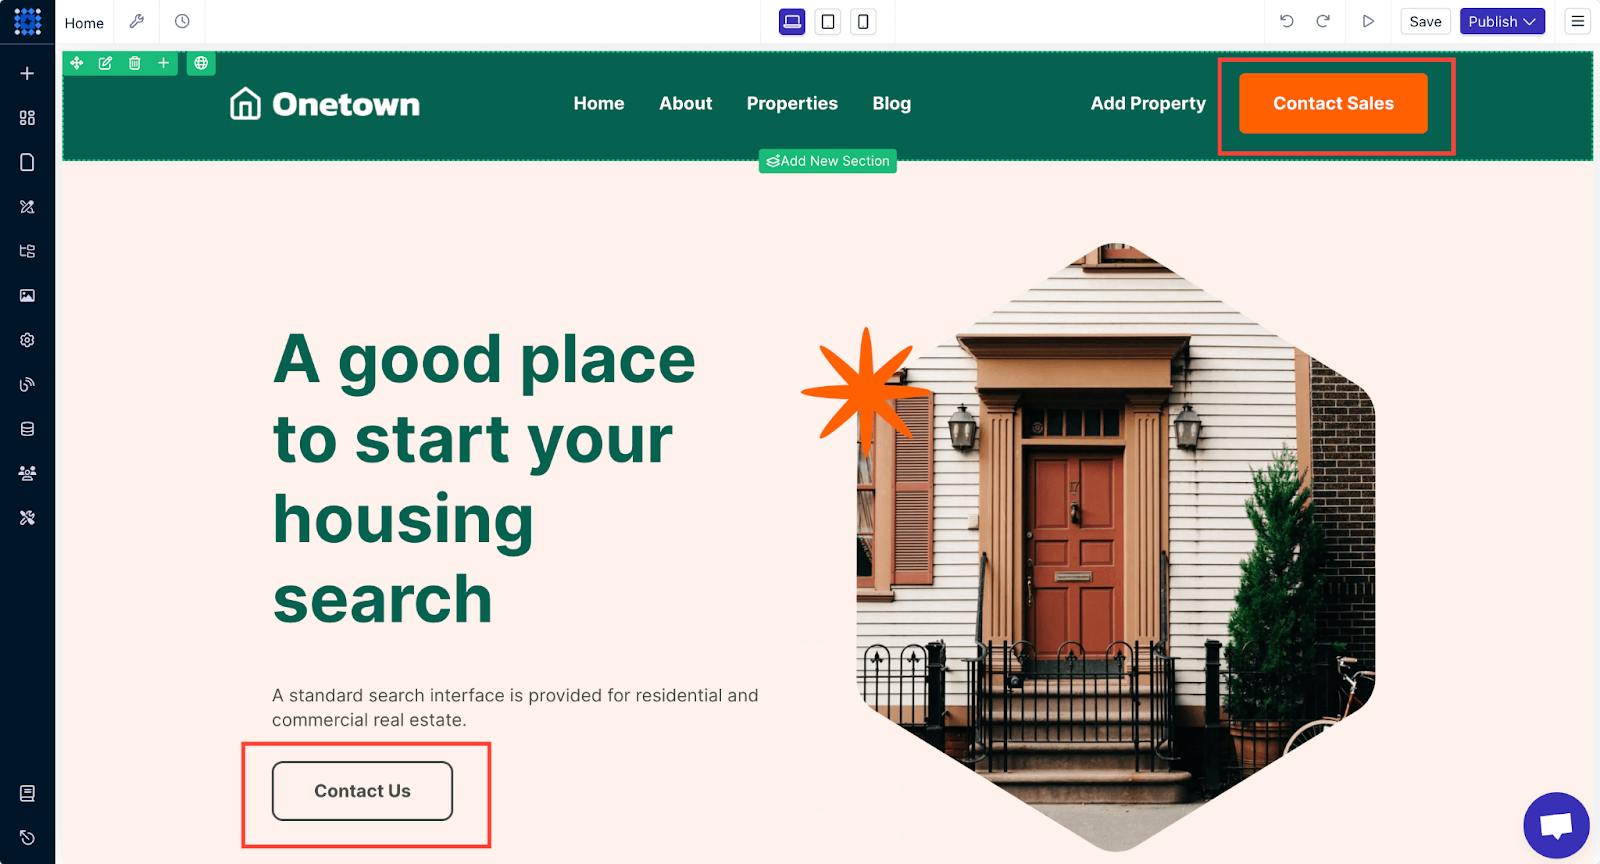
A call to action (CTA) can be a button, a PopUp notification, or a text to get significant actions from visitors. You can use CTAs like- 'Book appointment,' 'View properties,' and 'Contact Us' throughout your site to boost engagement rate.
Here’s how to add and design a call to action button for your website.
1. Click on the Add Elements button and look for the button element.
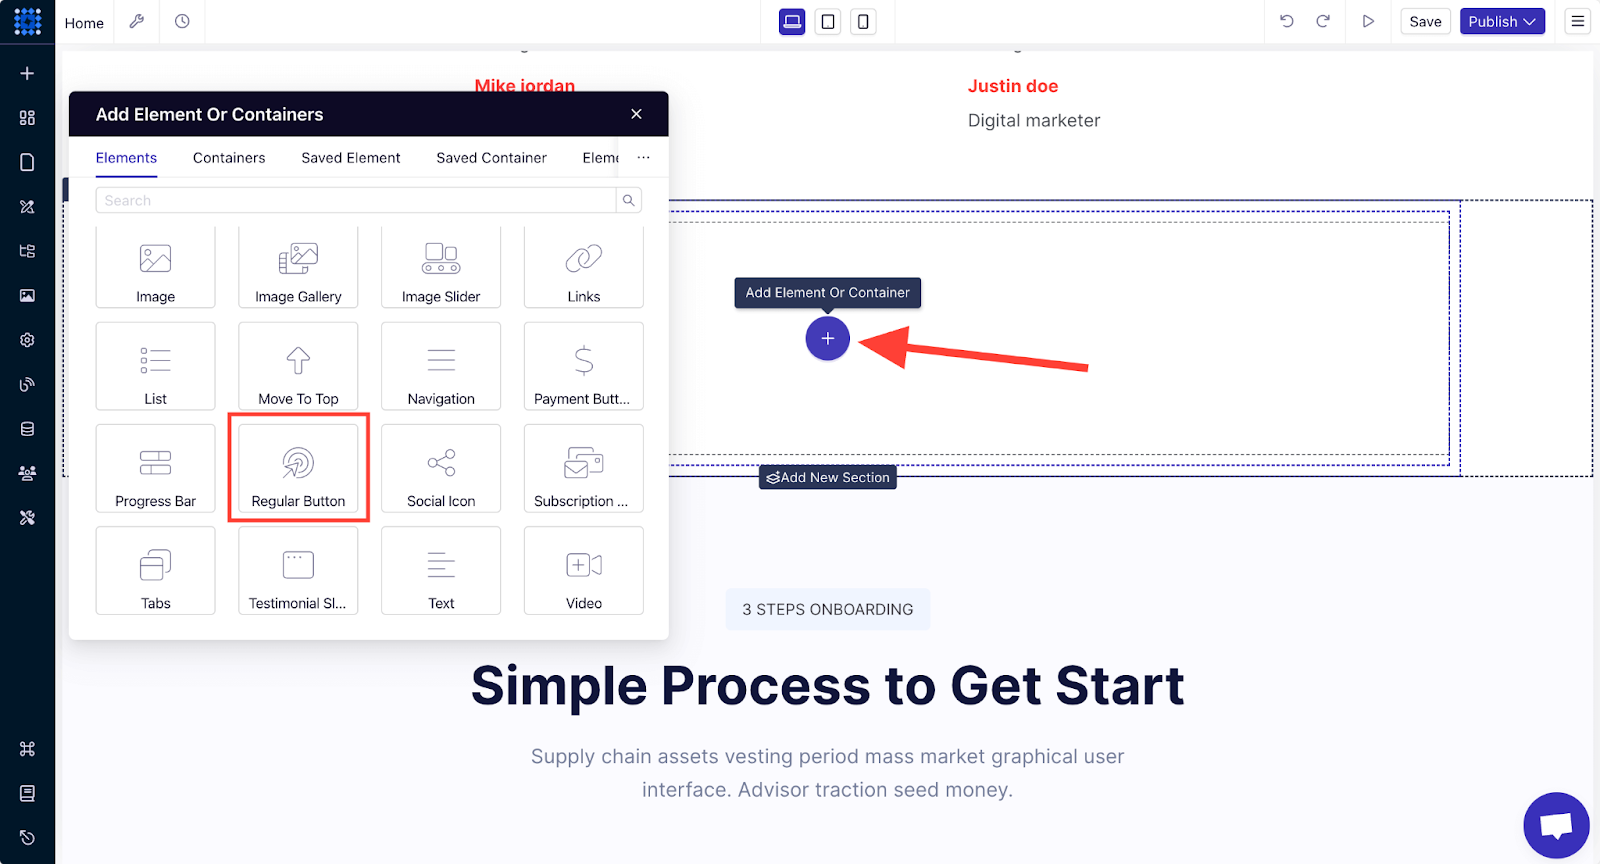
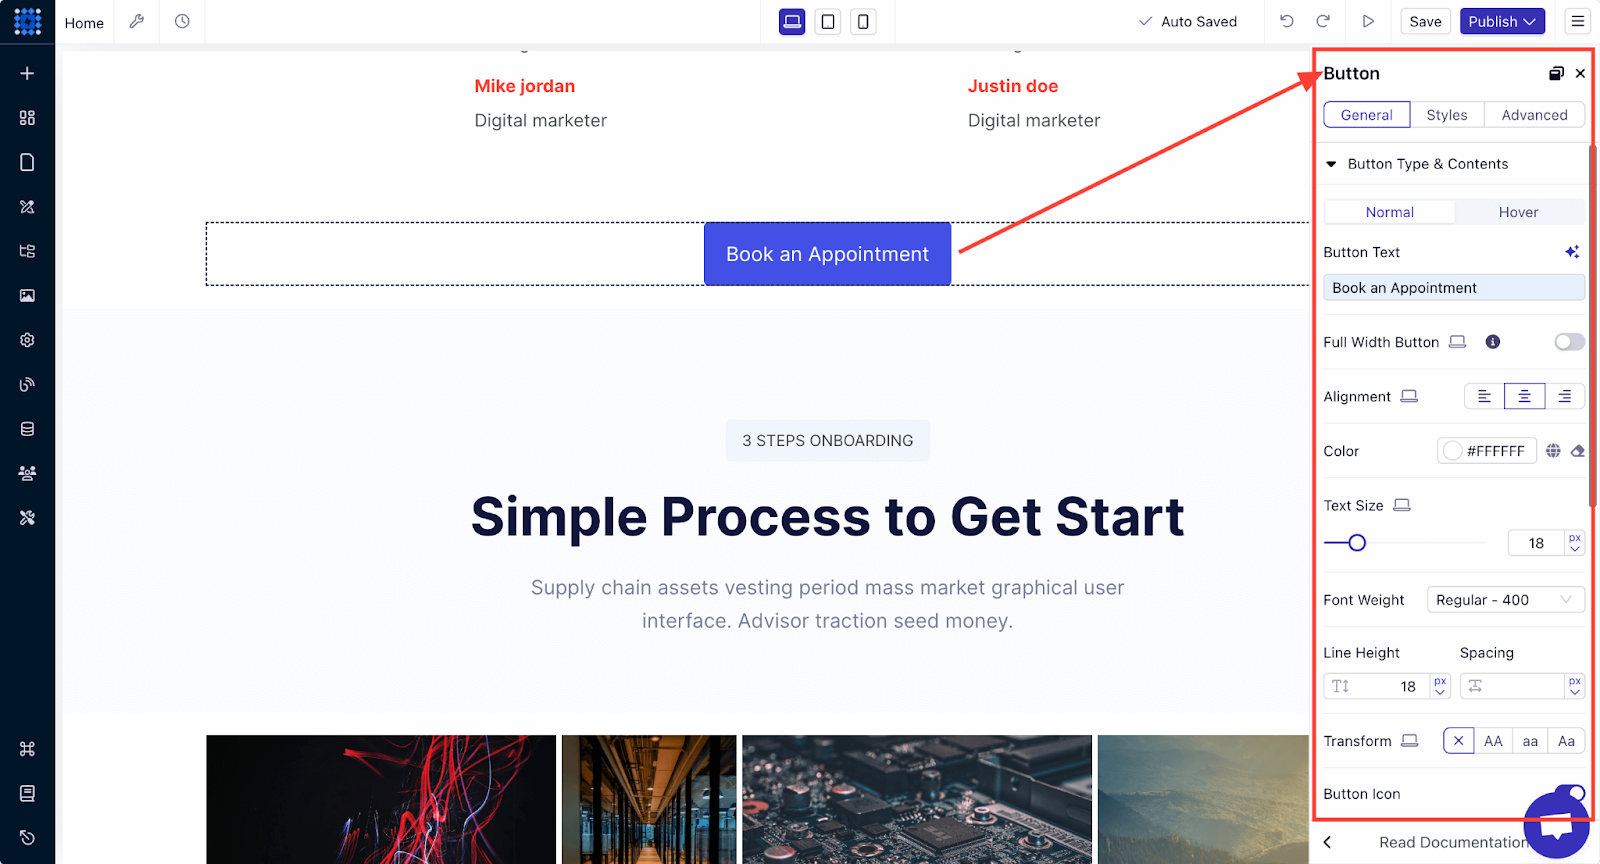
Click on the Regular Button element to add it to your website. After that, you can customize the button text, add a link, and change the design.
10. Database of Listings
A comprehensive database is a vital feature for any successful real estate website. The more extensive your listings, the more attractive your platform becomes to potential buyers. You can build this by integrating brokers' databases or connecting with established listing services.
In the U.S., for example, key sources include the National Association of Realtors (NAR) and the Multiple Listing Service (MLS). For other regions, look for equivalent sources like these.
Integrating these databases helps ensure your platform offers the latest and most relevant listing information.
In my opinion, while a full MLS integration might sound ideal, it may not always be necessary, depending on your audience. Many buyers prefer well-known platforms like Zillow or Realtor.com for their searches.
So, instead of focusing solely on MLS listings, it might be more beneficial to use your website to showcase your expertise in the local market. You can also share valuable insights and highlight your services.
This approach can help position your website as a trusted resource while keeping it manageable and user-focused.
Step 9: Test and Publish Your Website
Before your real estate website goes live, conduct thorough testing to ensure everything works as expected. A well-tested site will provide a smooth user experience, which is crucial for keeping visitors engaged and converting them into leads.
You can perform these tests:
-
Check All Links: Go through your entire website and click on every link to ensure they direct users to the correct pages. Broken links can frustrate visitors and hurt your SEO.
-
Test Forms and Live Chat: Submit test entries in all forms, such as contact forms, inquiry forms, and appointment scheduling forms. Verify that the submissions are correctly received and that any automated responses or notifications are working. Test the live chat feature as well to ensure it’s responsive and functioning correctly.
-
Verify Interactive Elements: Test any interactive features like image sliders and map integrations. Make sure they work as intended and provide a seamless experience.
-
Test on Different Browsers: Your website should function well across all major browsers, including Chrome, Firefox, Safari, and Edge. Visit your site on each browser to ensure the design and features look consistent and work smoothly.
-
Test on Different Devices: Use different devices, such as desktops, tablets, and smartphones, to view your website. Ensure that it’s fully responsive and that all elements adjust correctly to different screen sizes.
Once testing is complete and any necessary adjustments have been made, do one final review of your website. Ensure everything is polished and looks professional.
Preview and Publish
Once you're satisfied with your website, preview it to ensure everything is in place. You can preview your site to see if everything looks perfect by clicking the "Arrowhead Icon."
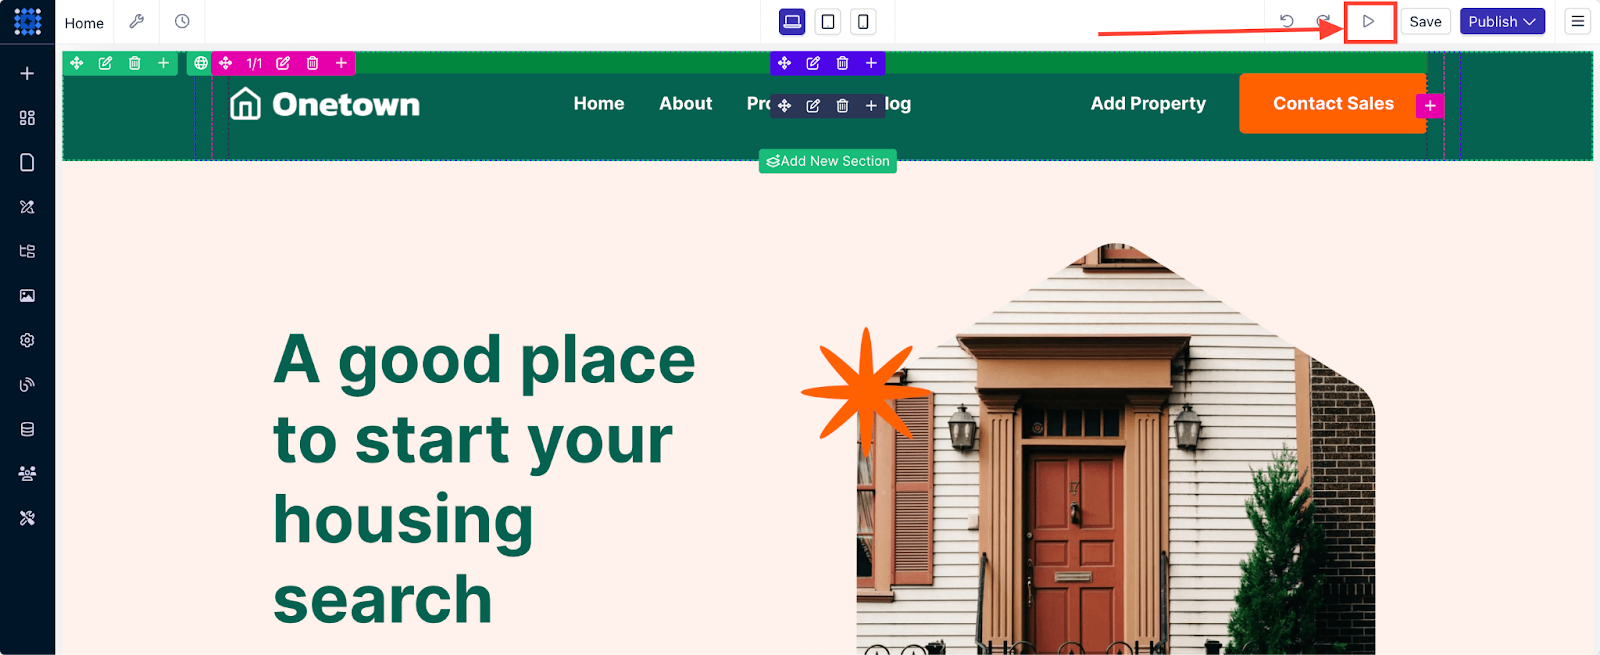
Your website is now live with the Dorik subdomain. But a professional real estate website should feature a custom domain, right? So, let's talk about adding that custom domain now.
First, you need to opt-in for a premium plan to add a custom domain to your Dorik website. Dorik offers very budget-friendly plans.
After purchasing a plan, go to the CMS dashboard. You can add a custom domain from the Advanced Configurations settings, where you’ll see the Custom Domain button. When you click on it, you’ll see a pop-up asking for your domain information.
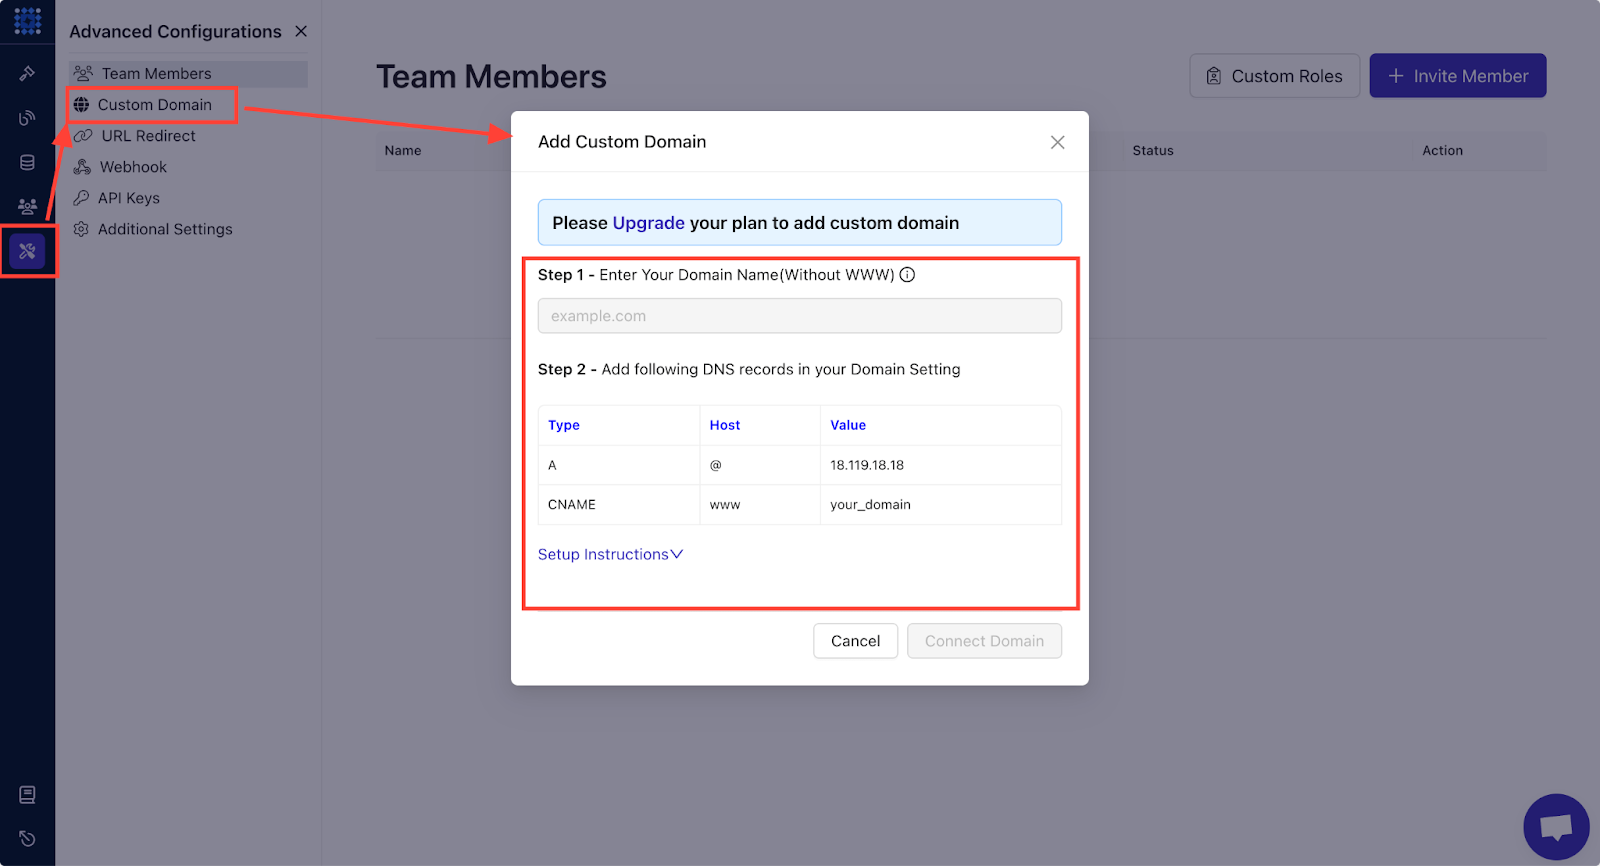
You can also watch this video tutorial to learn how to add a custom domain on Dorik.
Once you're confident everything is perfect, hit that Save button to save your changes first, and then hit the Publish button and make your website live.
Step 10: Promote Your Website
Once your real estate website is live, the next step is to drive traffic to it. Promoting your website effectively will increase visibility, attract potential clients, and ultimately help you achieve your business goals.
Let’s explore several strategies to get your website in front of your target audience.
Leverage SEO for Organic Traffic:
-
On-Page SEO: Optimize your website’s content for relevant keywords your target audience will likely search for. This includes using keywords in your page titles, headings, meta descriptions, and throughout your content. Ensure your site’s structure is clean, with a logical flow that’s easy for both users and search engines to navigate.
-
Local SEO: You must be on top of the Local SEO game, as most real estate clients look for properties in specific areas. Claim and optimize your Google My Business listing, include local keywords in your content and gather reviews from satisfied clients. This helps your site rank higher in local search results and makes it easier for potential clients to find you.
-
Content Marketing: Maintain a blog with regular posts on topics relevant to your audience, such as market trends, buying and selling tips, or local community highlights. Consistently publishing high-quality content can boost your site’s SEO and position you as an authority in the real estate industry.
Utilize Social Media:
-
Create Social Media Profiles: Establish a presence on major social media platforms like Facebook, Instagram, LinkedIn, and Twitter. Each platform offers unique opportunities to connect with your audience and promote your listings. For instance, Instagram is ideal for showcasing property photos, while LinkedIn can be used to network with other professionals.
-
Share Content Regularly: Post regularly on your social media channels to keep your audience engaged. Share new listings, market trends, client testimonials, and industry news. Use eye-catching visuals and compelling captions to capture attention.
-
Engage with Your Audience: Respond to comments and messages promptly to build relationships with your followers. Host Q&A sessions, live property tours, or virtual open houses to interact with potential clients in real-time.
-
Build an Email List: Start building an email list by offering something of value in exchange for visitors’ email addresses, such as a free market report, property guide, or newsletter subscription. Use landing pages, pop-ups, and sign-up forms to capture leads.
-
Send Regular Newsletters: Keep your subscribers informed with regular newsletters that feature new listings, market updates, and helpful tips. Personalize your emails based on subscribers’ interests and behavior to increase engagement.
-
Nurture Leads: Use email marketing tools to nurture leads over time. Send automated follow-up emails to prospects who’ve expressed interest in specific properties or services. Provide valuable content that guides them through the buying or selling process and encourages them to reach out when they’re ready.
Why Does Your Real Estate Business Need a Website?
A professional real estate website can be one of the most powerful tools in your marketing arsenal. It can help you attract potential clients, showcase your expertise, and grow your business.
A well-designed website allows you to create a strong brand identity. It’s a place where you can showcase your professionalism, experience, and unique value proposition.
A website acts as a virtual showroom that’s open 24/7. Potential buyers can browse through your property listings at any time, from anywhere. This convenience increases the chances of engaging with potential clients who may not have the time to visit your office or attend open houses.
With a website, you’re not limited by geography. While you’ll likely focus on your local market, a website can also attract clients from other regions or even internationally. This is especially important if you deal with luxury properties or investments in real estate, where buyers may come from outside your local area.
How Much Does a Real Estate Website Cost?
The cost of building a real estate website can vary widely depending on your needs, goals, and the features you want to include.
But to give you an idea, custom development using designers and developers can cost between $2,000 to $10,000 or more, depending on the complexity of the site.
On the other hand, using a website builder like Dorik will cost you only $18/month, including unlimited hosting.
4 Best Real Estate Website Examples
When creating your real estate website, it’s helpful to look at what the best in the industry are doing. The following top-performing real estate websites offer excellent examples of design, functionality, and user experience.
You can gather valuable design inspiration and ideas to incorporate into your own website from these.
1. Calcagno & Hamilton
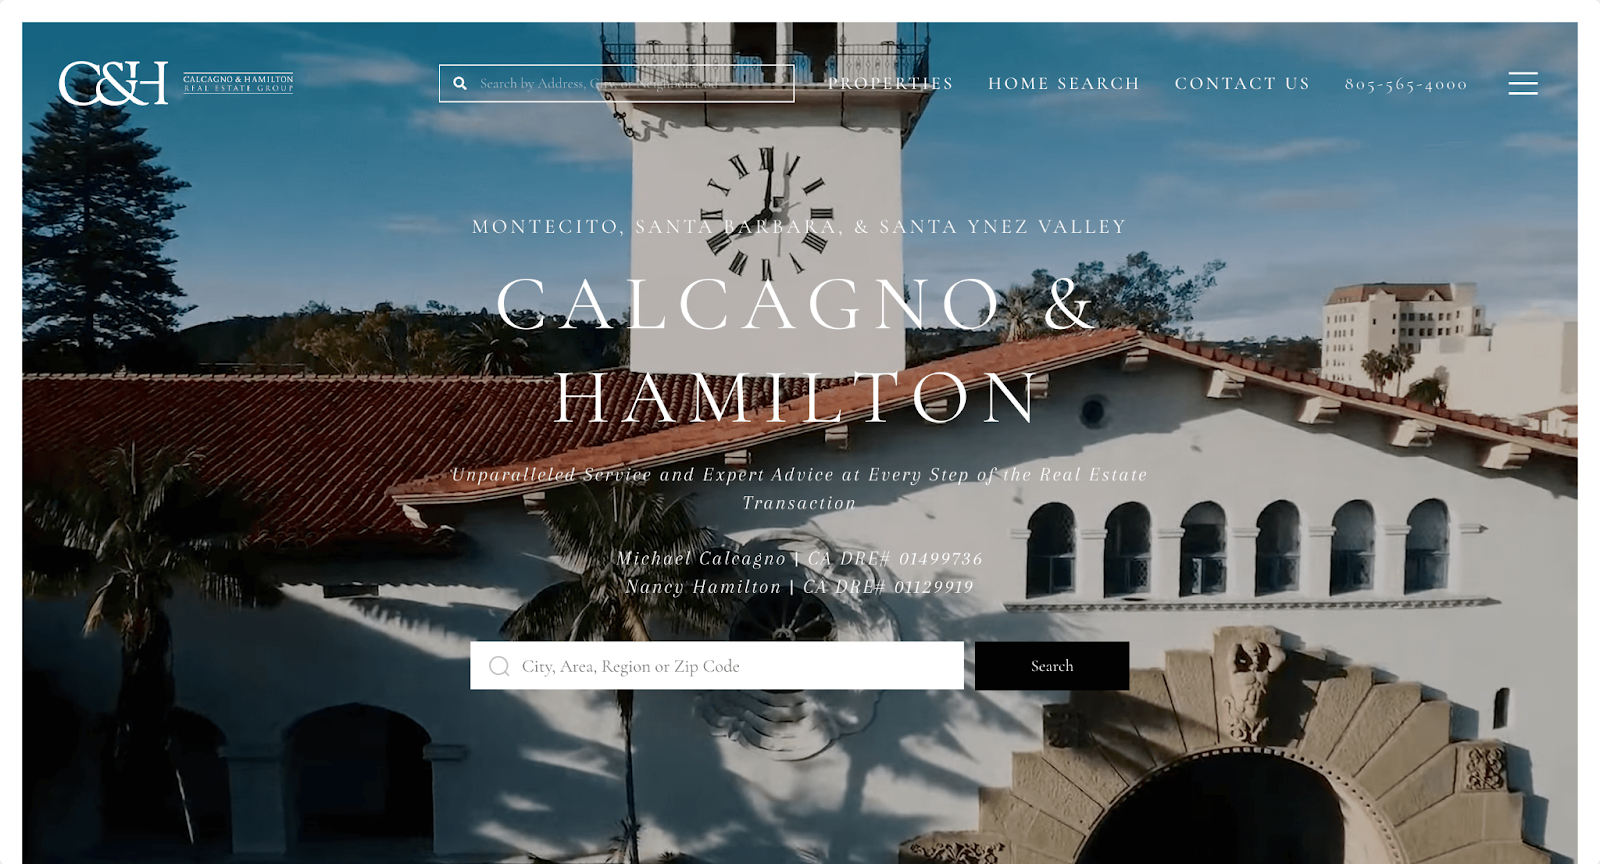
Calcagno & Hamilton’s website is a masterclass in clean, modern web design. High-quality images immediately draw visitors in, while the simple, intuitive navigation makes it easy for users to find the information they need.
The site also features a prominent search bar at the top and in the hero section that allows visitors to start searching for properties in their preferred regions quickly.
2. The Pinnacle Hove
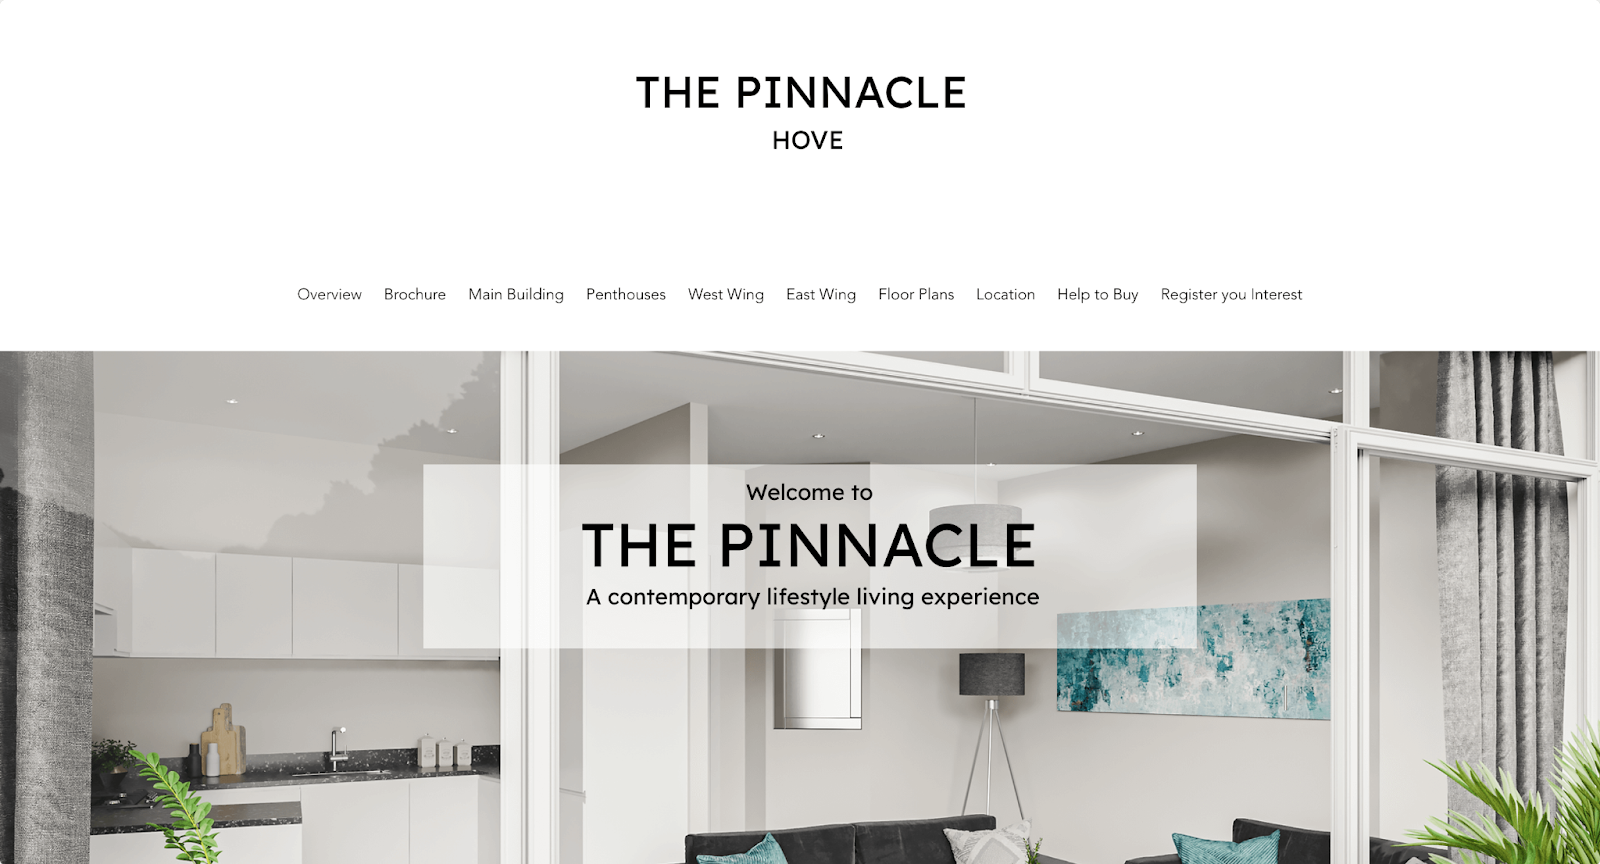
This real estate website of The Pinnacle Hove boasts a sleek, modern design that exudes luxurious, contemporary living. It offers user-friendly and intuitive navigation. It features dedicated pages detailing each area of the apartment building.
A dedicated "Location" page highlights the city and local attractions to present the neighborhood in its finest light and entice potential residents.
3. Jennifer Ferland
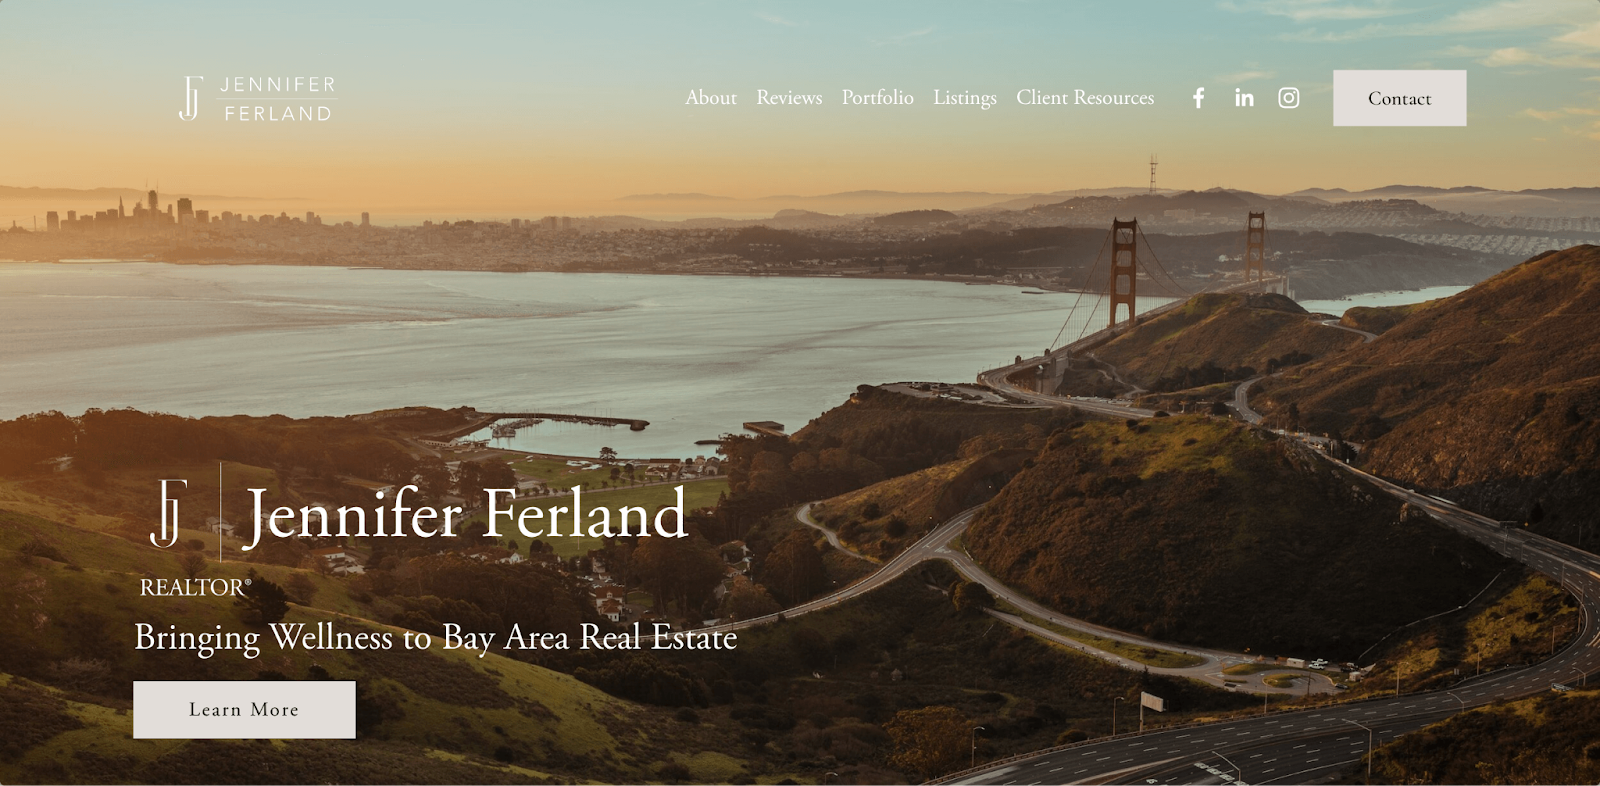
This is an example of a personal brand website. Jennifer Ferland’s website excels in showcasing her expertise and local knowledge. The site has a well-organized structure that highlights the experience and achievements of Jennifer Ferland as a realtor.
If you also want to create a personal brand website, you can definitely take notes from this website on branding yourself.
4. The Coley Group
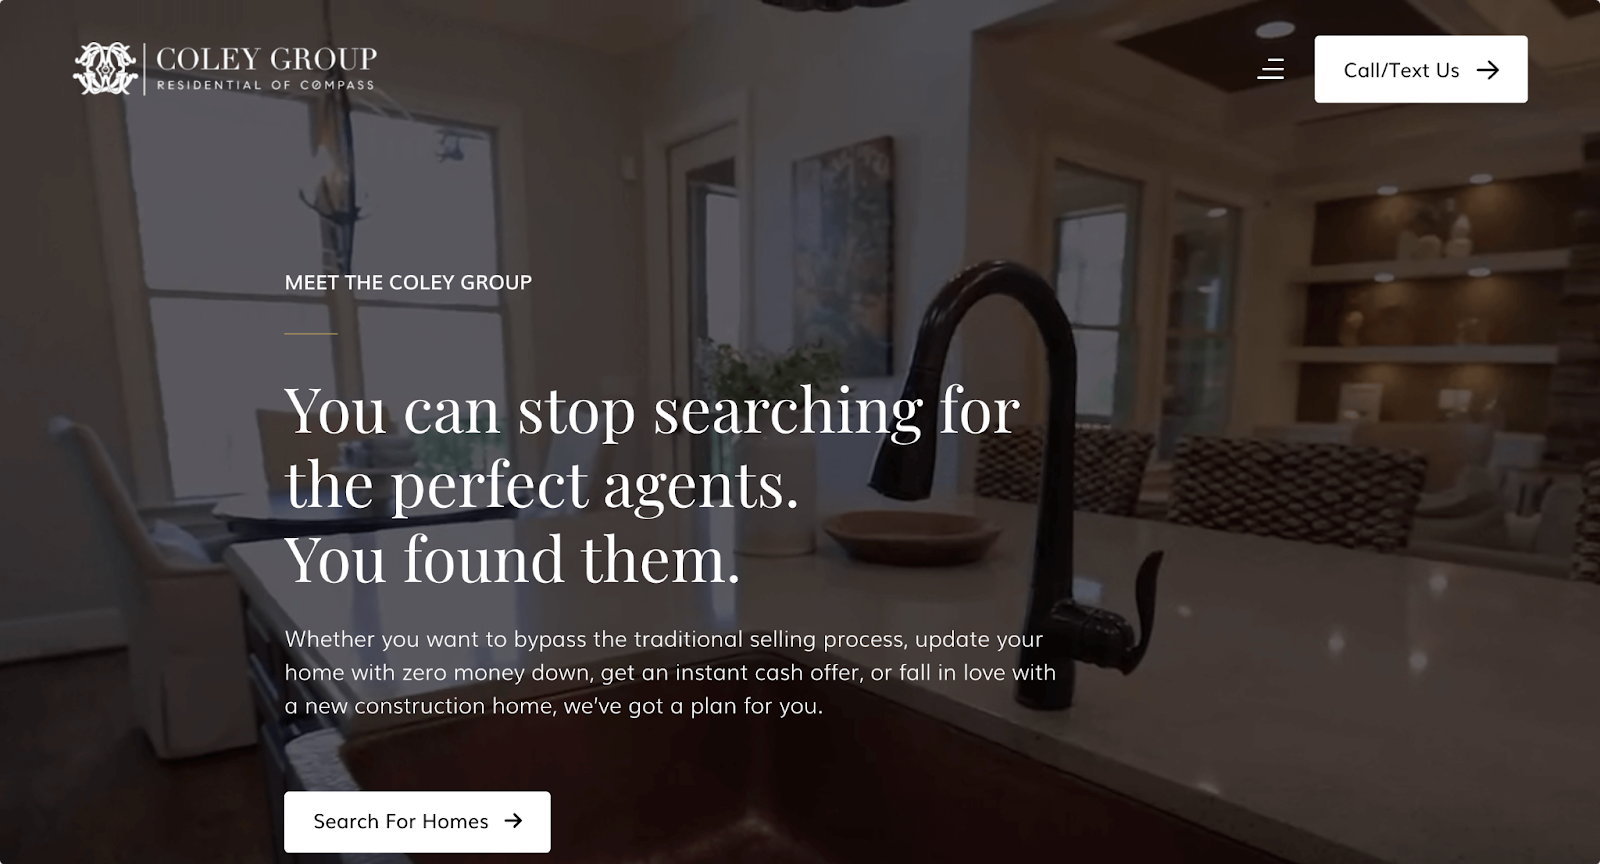
The Coley Group’s website is designed with the user in mind. It features an easy-to-use property search tool, clear calls to action, and an overall design that prioritizes user experience.
The site also includes a comparison table that highlights the difference between them and other real estate agents. It is a great technique to influence the visitors to take their service.
Wrapping Up
Creating a real estate website is a crucial step in establishing a strong online presence for your business. Remember, your website is more than just a digital brochure. It’s a platform that can drive your business forward, build credibility, and set you apart from the competition.
You can try Dorik now and enjoy a 14-day free trial period to explore the platform and build some demo real estate websites. Nothing beats the hands-on experience when it comes to creating a professional website.


