Flooded with endless wedding planning tasks? Creating a wedding website might seem like just another chore on your never-ending to-do list. But what if I told you it could actually save you time, reduce stress, and keep your guests better informed?
Whether you're tech-savvy or a complete novice, I'll walk you through the simple steps to making a wedding website that works for you, not against you.
Step-by-Step Guide to Creating a Wedding Website
Follow the below steps to create your wedding website:
-
Select a Website Builder
-
Start Building Your Website
-
Craft Your Wedding Story
-
Add Essential Wedding Details
-
Add an Online RSVP System
-
Add a Gift/Cash Registry
-
Add an FAQ Section
-
Password-Protect Your Website
-
Optimize for Mobile
-
Test Your Website Functionality
-
Publish and Share Your Wedding Website
[Note: You can make any website with Dorik in just 4 steps. However, to perfectly optimize and personalize your wedding website, adhere to all the steps we discuss here.]
This was just a glimpse of the tasks you need to complete to create your wedding website flawlessly. Now, let’s explore each step in detail so that you can get your wedding website ready while reading this.
Step 1: Select a Website Builder
A website builder helps you to create a website by providing easy-to-use tools and templates. It lets you design and build your website without any coding skills. With drag-and-drop features and pre-designed layouts, you can quickly create a beautiful, personalized wedding website to share information, collect RSVPs, and showcase your love story to guests.
While choosing a website builder for your wedding website, look for the following features:
-
Ease of use: Ensures you can create and manage your site without technical expertise.
-
Drag-and-drop editor: Allows quick and intuitive design adjustments without coding knowledge.
-
Mobile responsiveness: This guarantees that your site looks great on all devices, improving the guest experience.
-
Personalized schedules: Enables selective sharing of event details, maintaining privacy for different guest groups.
-
Helpful guest Q&A: Reduces repetitive questions, keeps guests informed, and saves you time.
-
Organized RSVPs: Simplifies guest list management and helps with event planning.
-
Countdown: Builds excitement and reminds guests of important dates.
-
Photo gallery: Shares your memories and helps guests connect with your story.
-
Gift registry integration: Centralizes gift preferences, making it convenient for guests to choose presents.
-
Customizable wedding templates: Allows you to match your website to your wedding theme effortlessly.
-
Guestbook: Provides a space for guests to leave messages, creating lasting memories.
-
Interactive maps: This helps guests easily locate your venue and plan their travel.
When it comes to creating your perfect wedding website, Dorik stands out as one of the best wedding website builders.
With its AI-powered website builder, you can bring your vision to life effortlessly.
No need to wrestle with complex coding or spend hours on design - Dorik's drag-and-drop editor lets you customize stunning templates or start from scratch, all while ensuring your site looks great on any device.
You'll find everything you need, from RSVP forms and countdown timers to photo galleries and guest message boards. Plus, with built-in SEO tools and easy integrations, you can keep your guests informed and excited about your big day.
Whether you're tech-savvy or don't know anything about website building, Dorik makes it simple to create a beautiful, functional wedding website that truly reflects your love story.
Step 2: Start Building Your Website
Once you’ve selected the website builder, it’s time to start creating your wedding website. With Dorik, you have three options to choose from to build the website:
-
Creating the website with AI
-
Creating the website using templates
-
Creating the website from scratch
1. AI-Powered Wedding Website Creation
This method is ideal for couples short on time or design skills who need a beautiful wedding website quickly.
Steps to create a wedding website with AI:
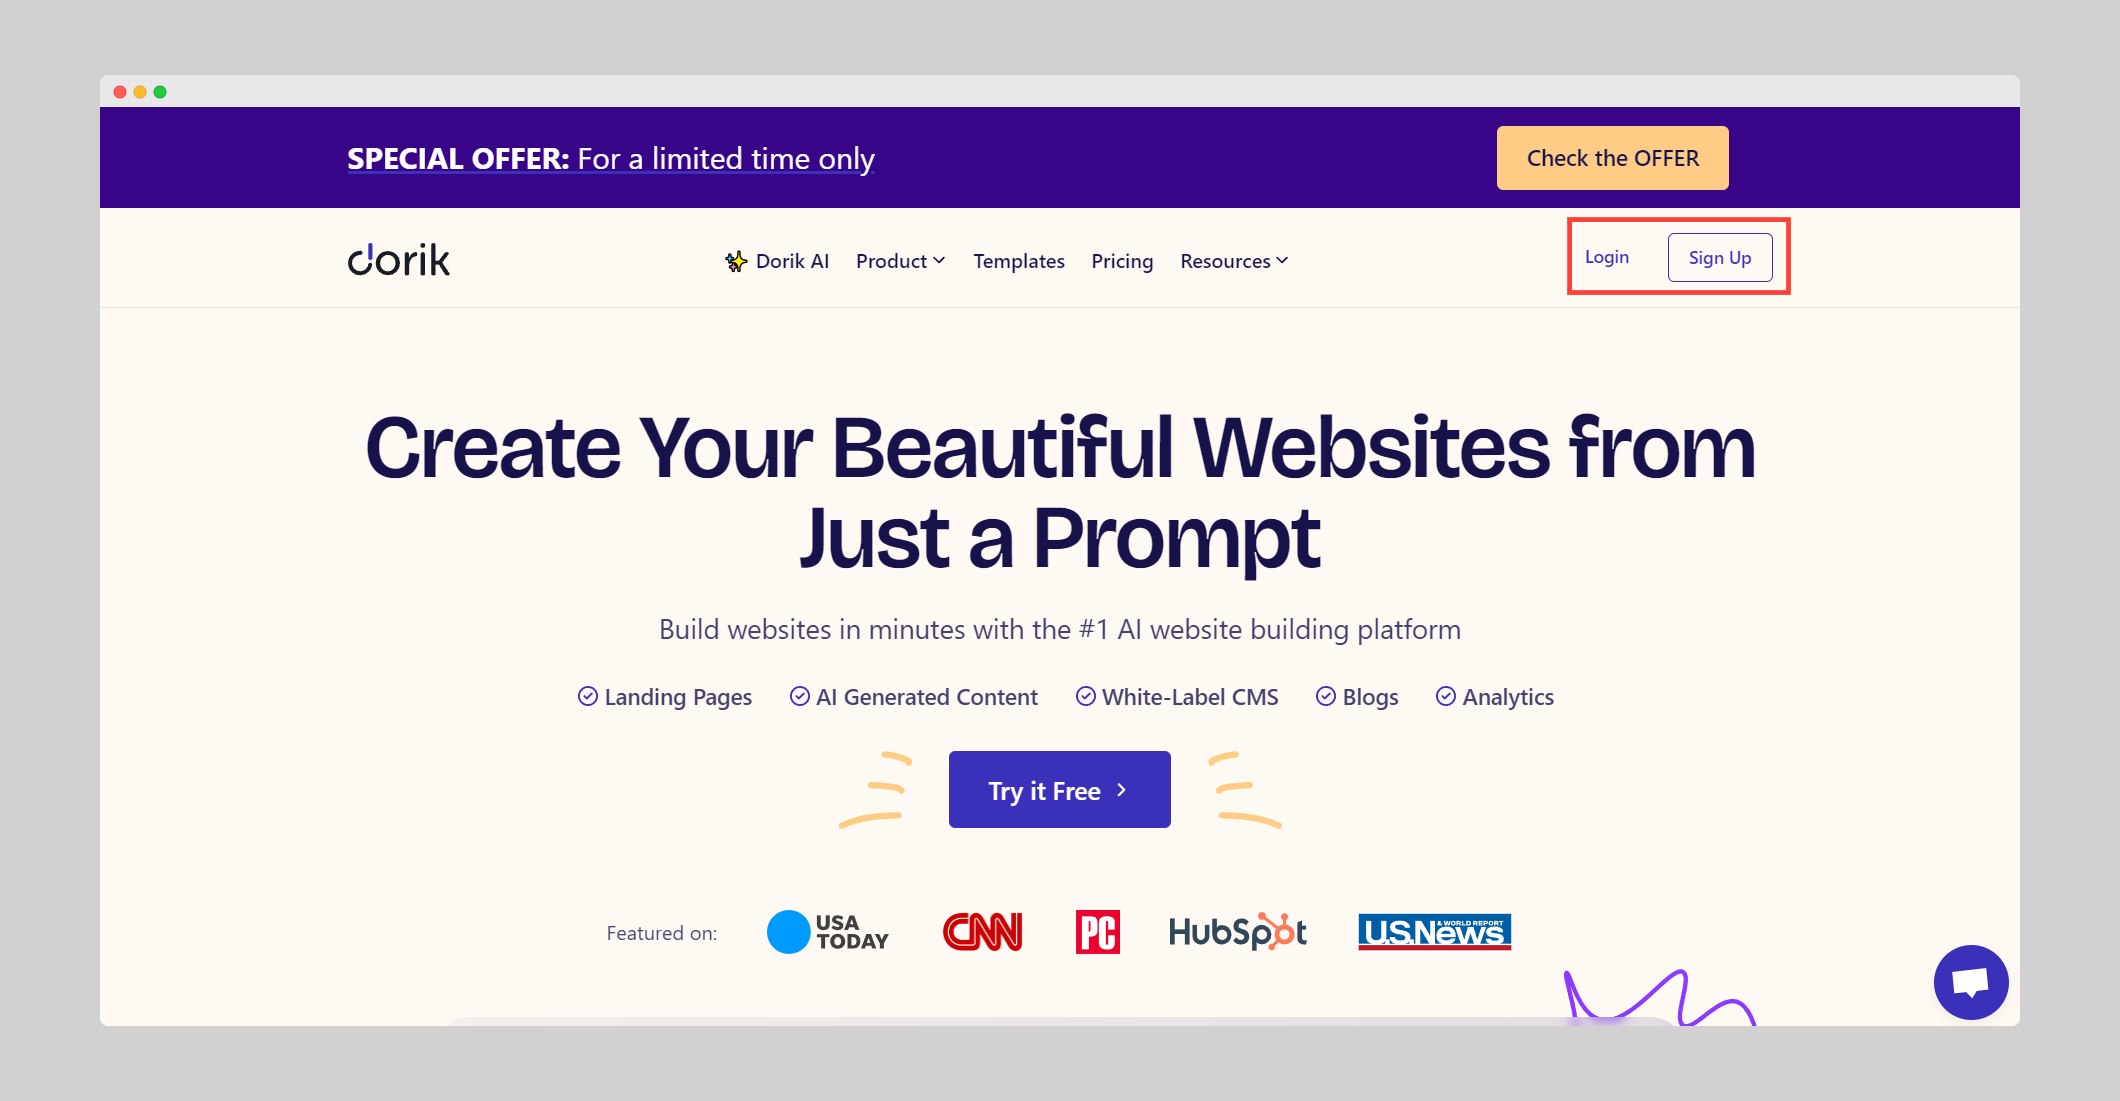
2. Navigate to 'AI Sites (beta)' on your dashboard.
-jLXAK.png)
3. Click "Create New Site with AI".
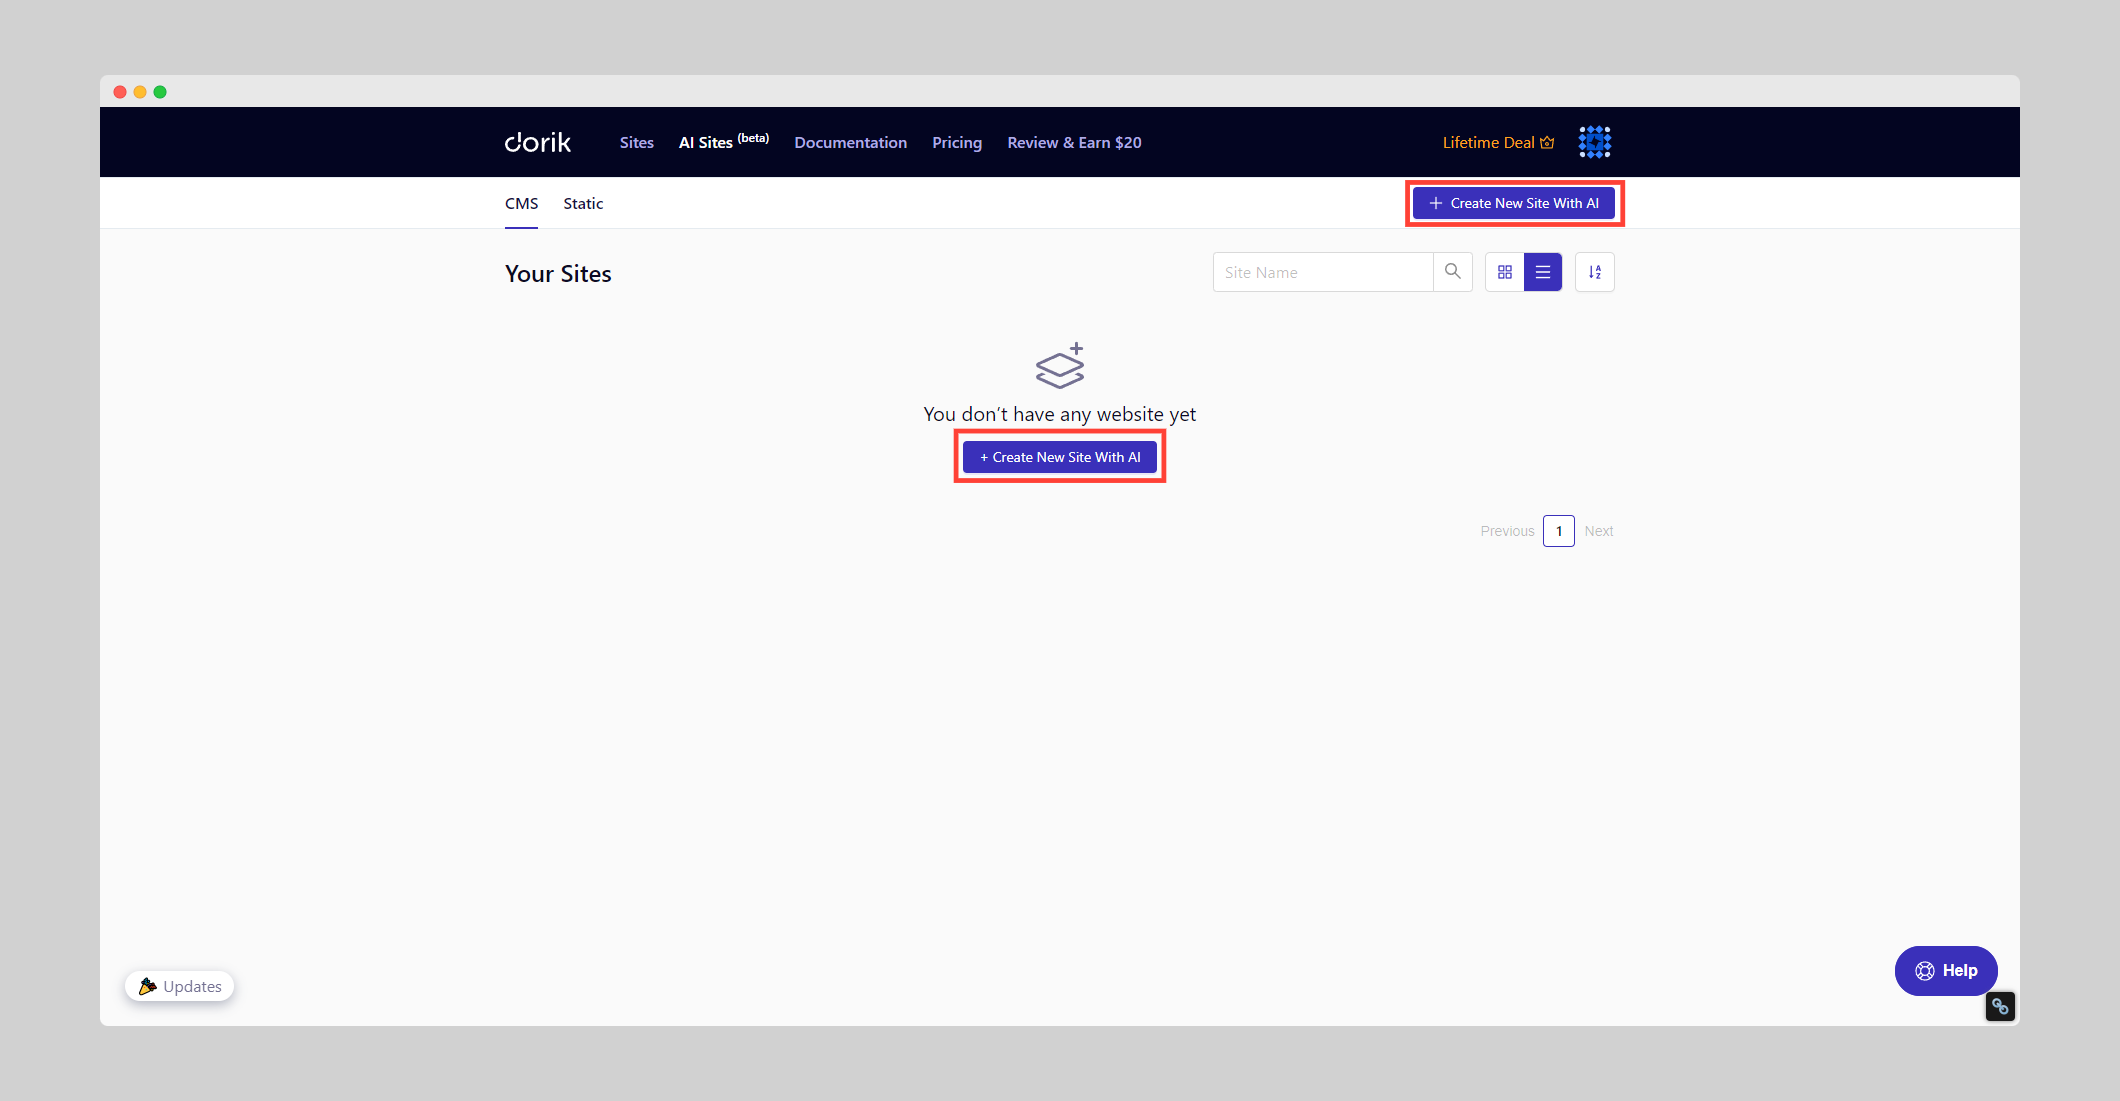
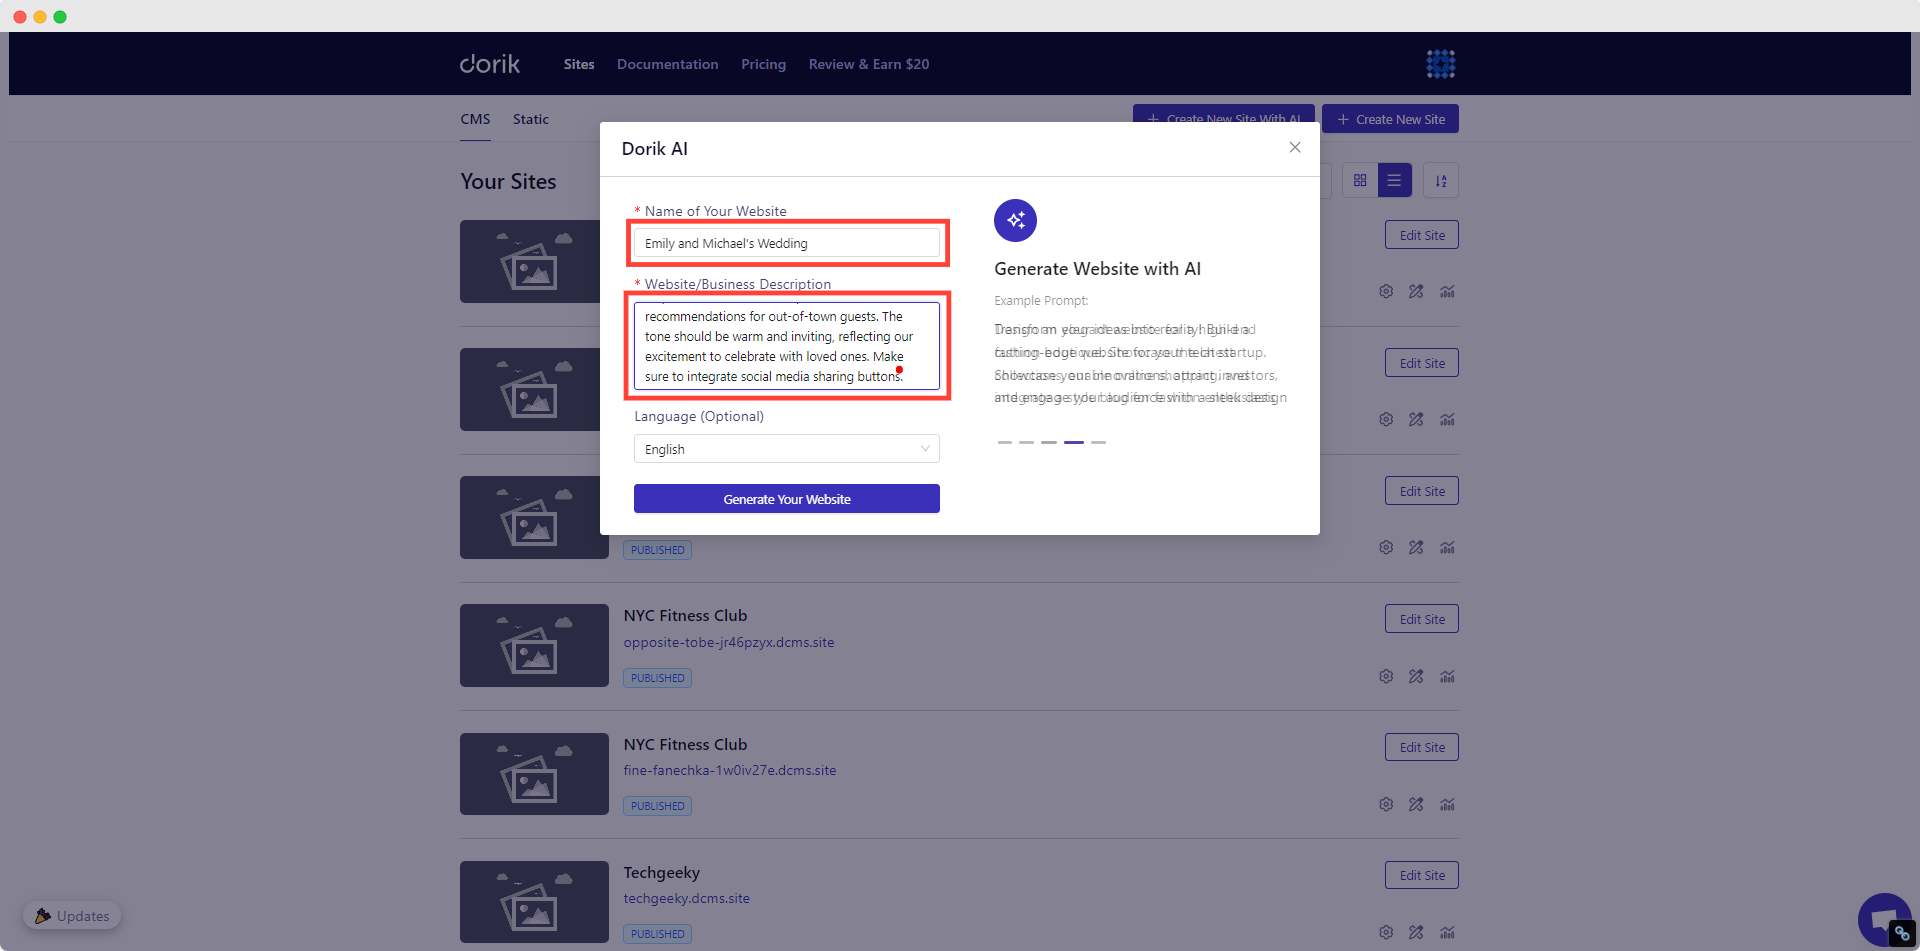
4. Name your wedding website and write a detailed prompt describing your ideal site.
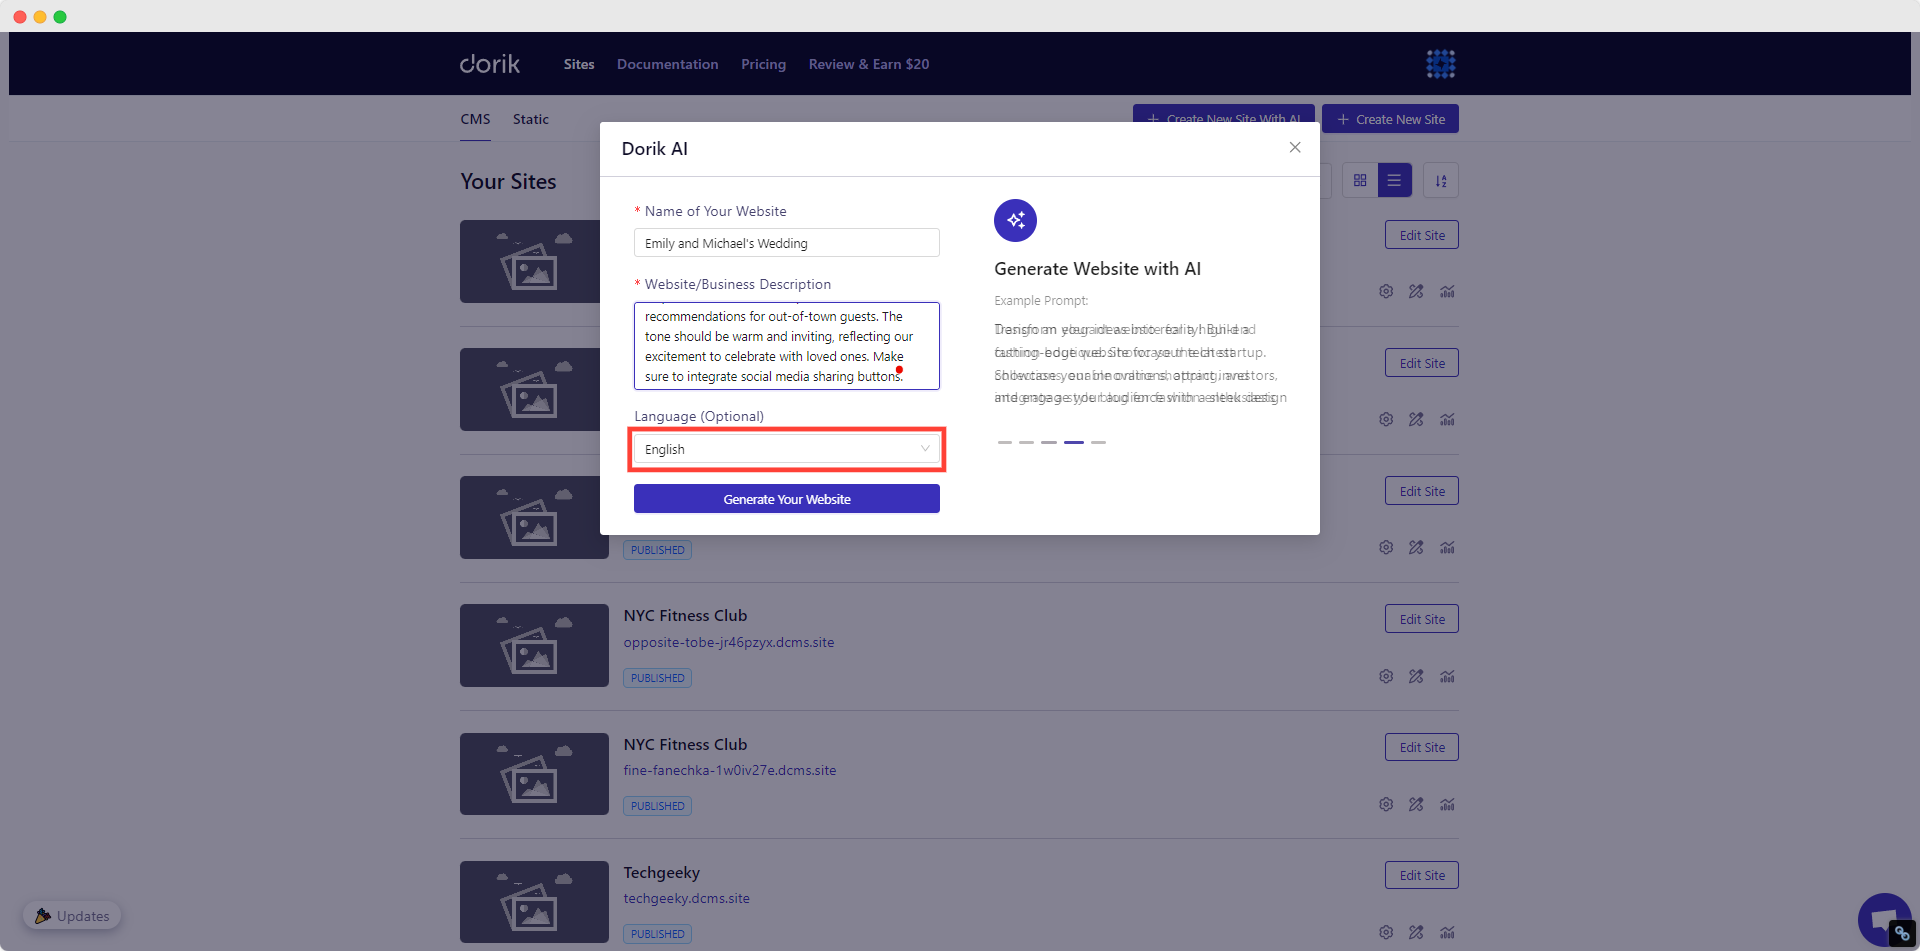
5. Select your preferred language.
6. Click "Generate Your Website".
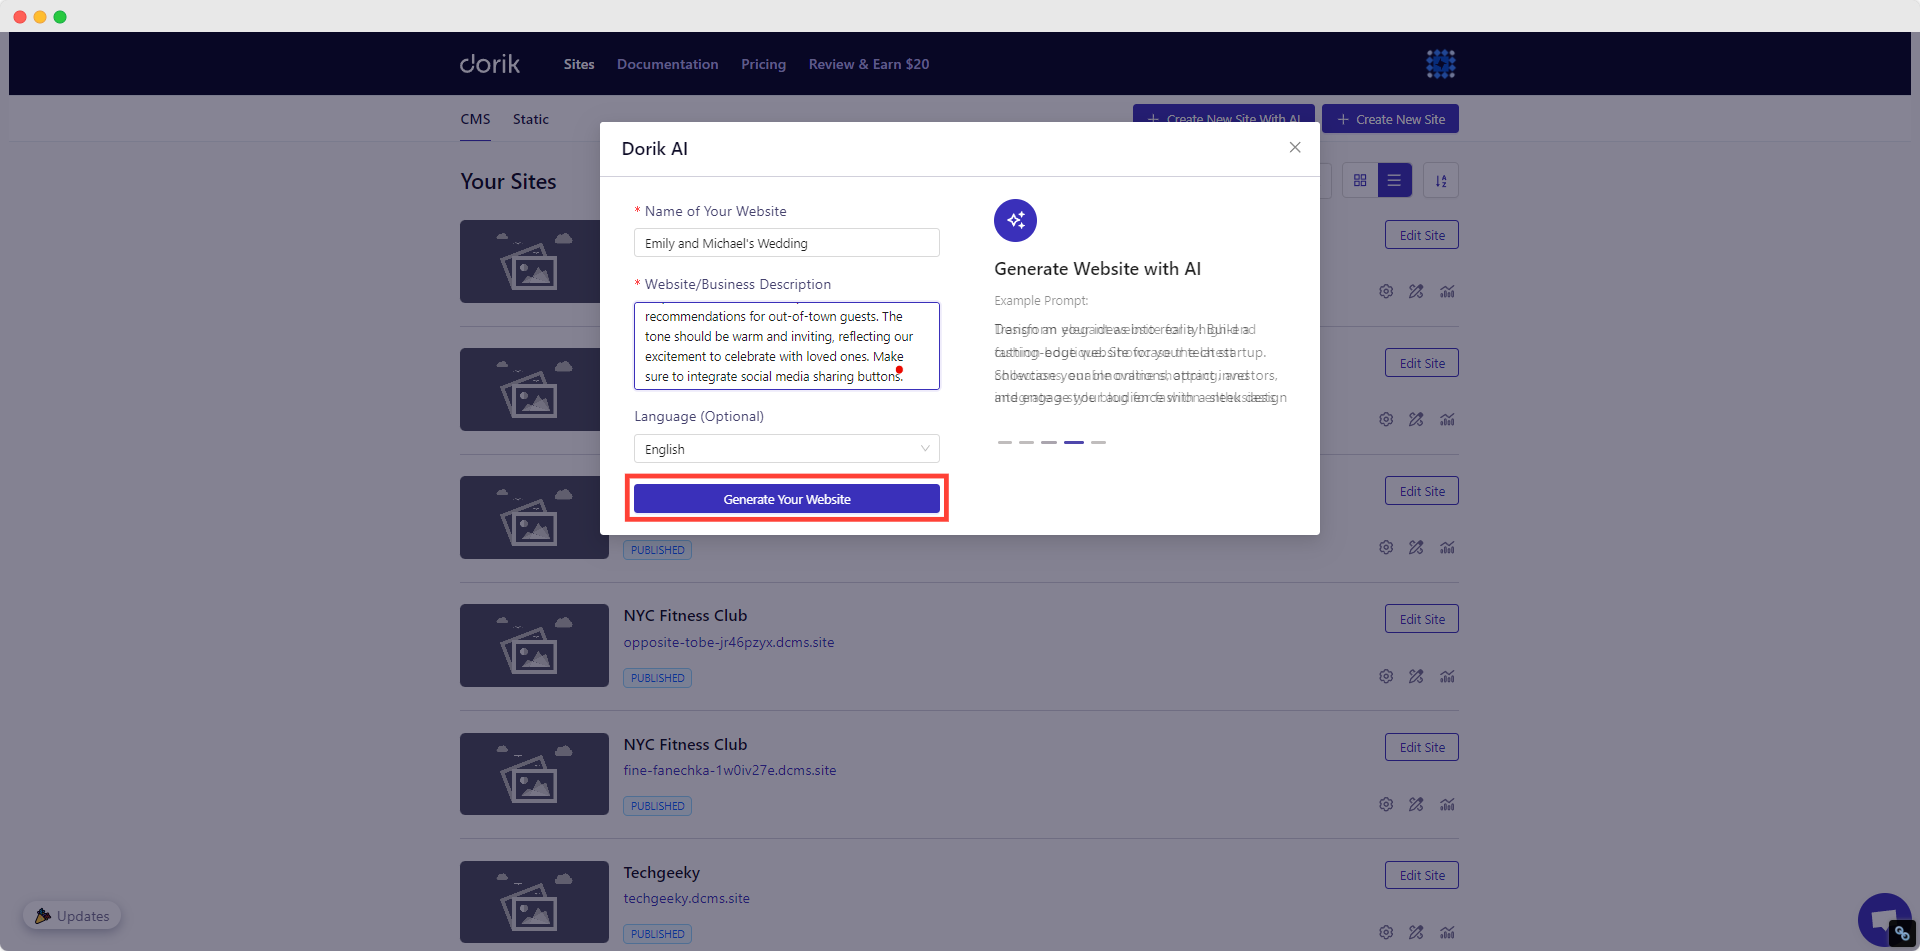
Dorik AI will create a fully functional wedding website in less than a minute.
Here’s a wedding website I created while writing this article:

Prompt Used: "Create a romantic wedding website for Emily and Michael's garden wedding in New York City. Use a soft, floral color palette with blush pink and sage green. Include sections for:
1. Our Story: How we met and got engaged
2. Event Details: Ceremony and reception information with an embedded Google Map
3. RSVP: Online form for guest responses and meal preferences
4. Registry: Links to gift registry and honeymoon fund
5. FAQ: Common questions about dress code, parking, and accommodations
6. Photo Gallery: Engagement photos and couple snapshots
Incorporate a countdown timer to the big day. Ensure the design is elegant and mobile-responsive. Include travel tips and local recommendations for out-of-town guests. The tone should be warm and inviting, reflecting our excitement to celebrate with loved ones. Make sure to integrate social media sharing buttons."
Check out our detailed tutorial for a comprehensive guide on creating your website with AI. It covers everything from writing customized prompts to adding personal touches and publishing your site.
Related Read: Best Wedding Website Examples
2. Template-Based Wedding Website Creation
Perfect for couples who want a pre-designed structure with wedding-specific features.
Steps to create a wedding website using a template:
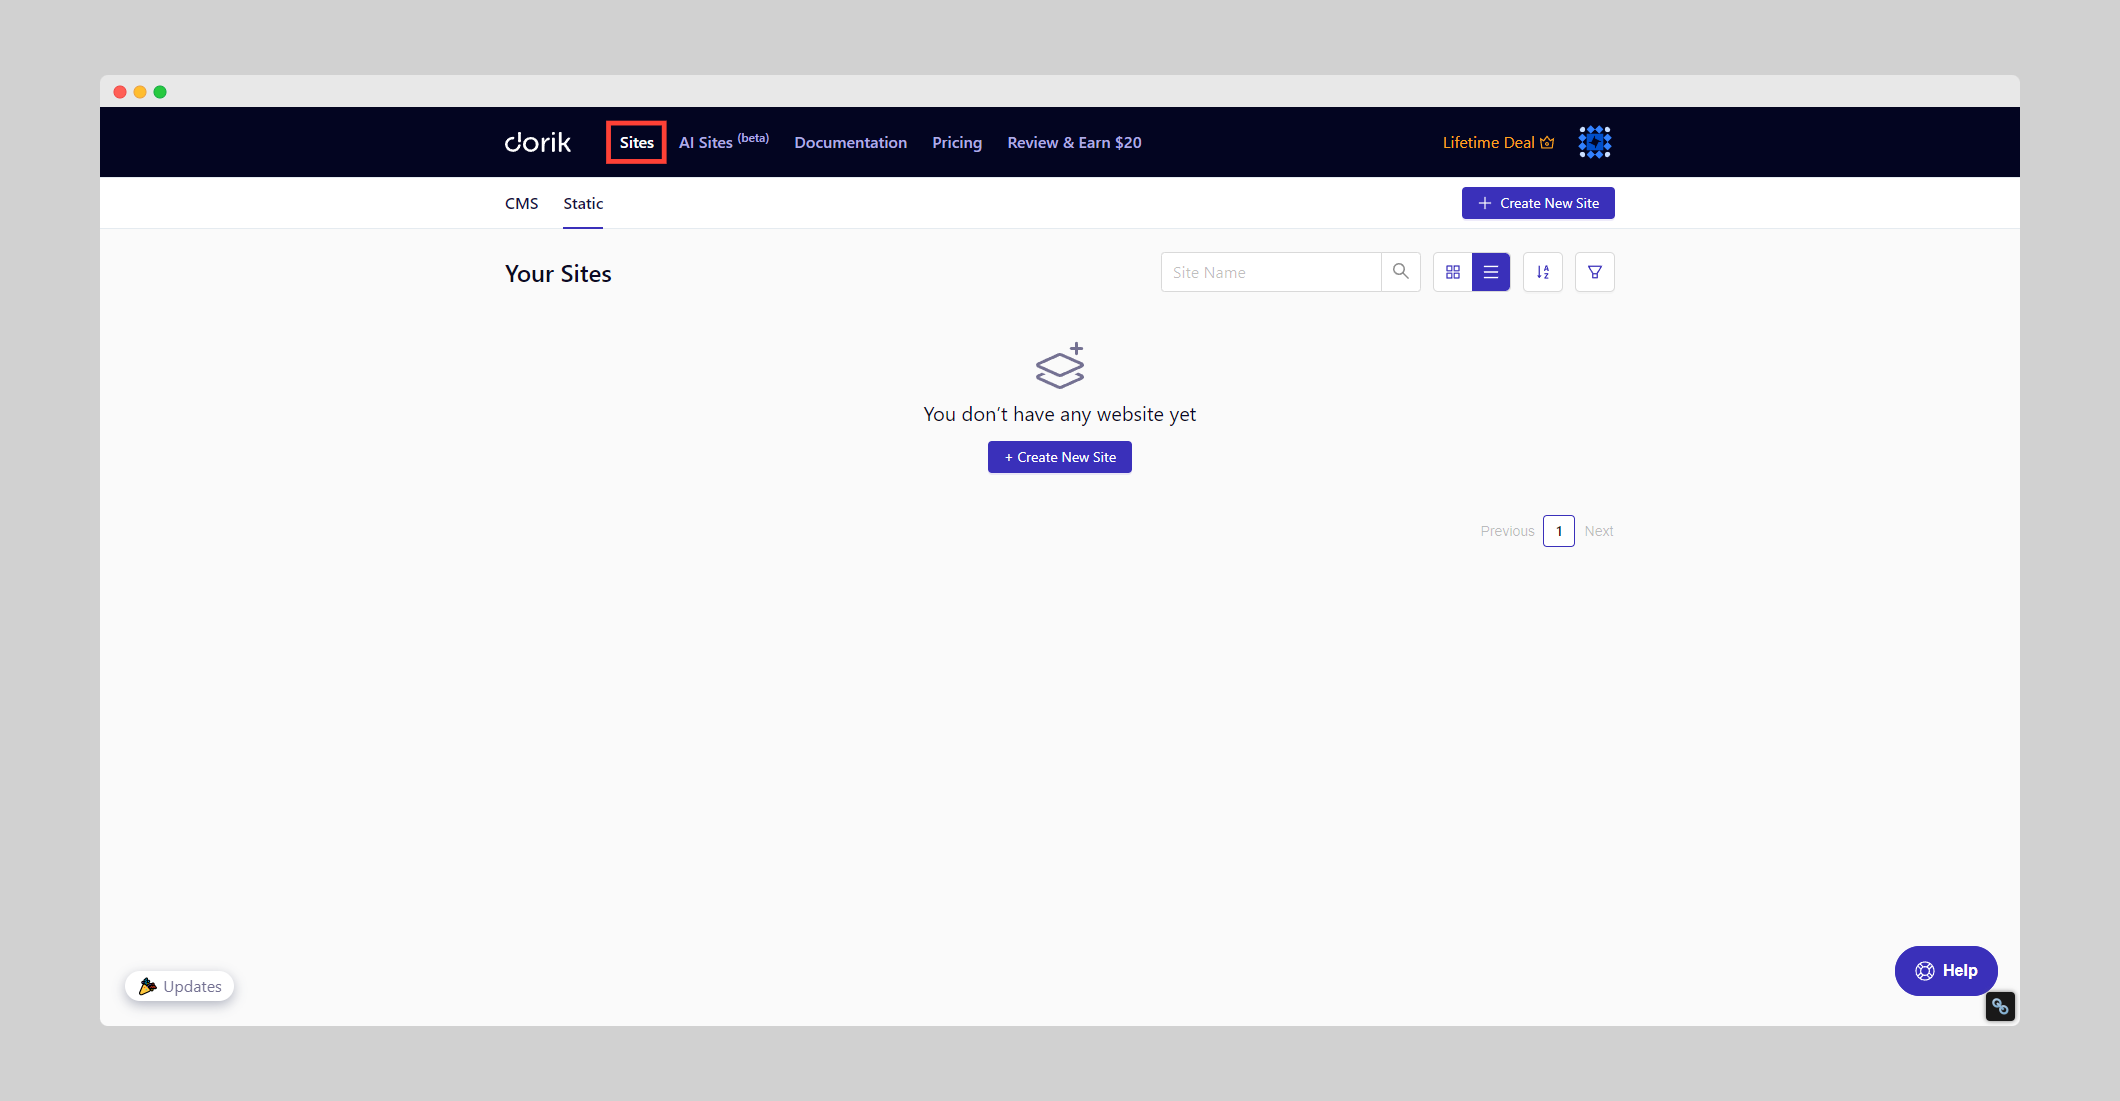
1. From your Dorik dashboard, go to 'Sites'.
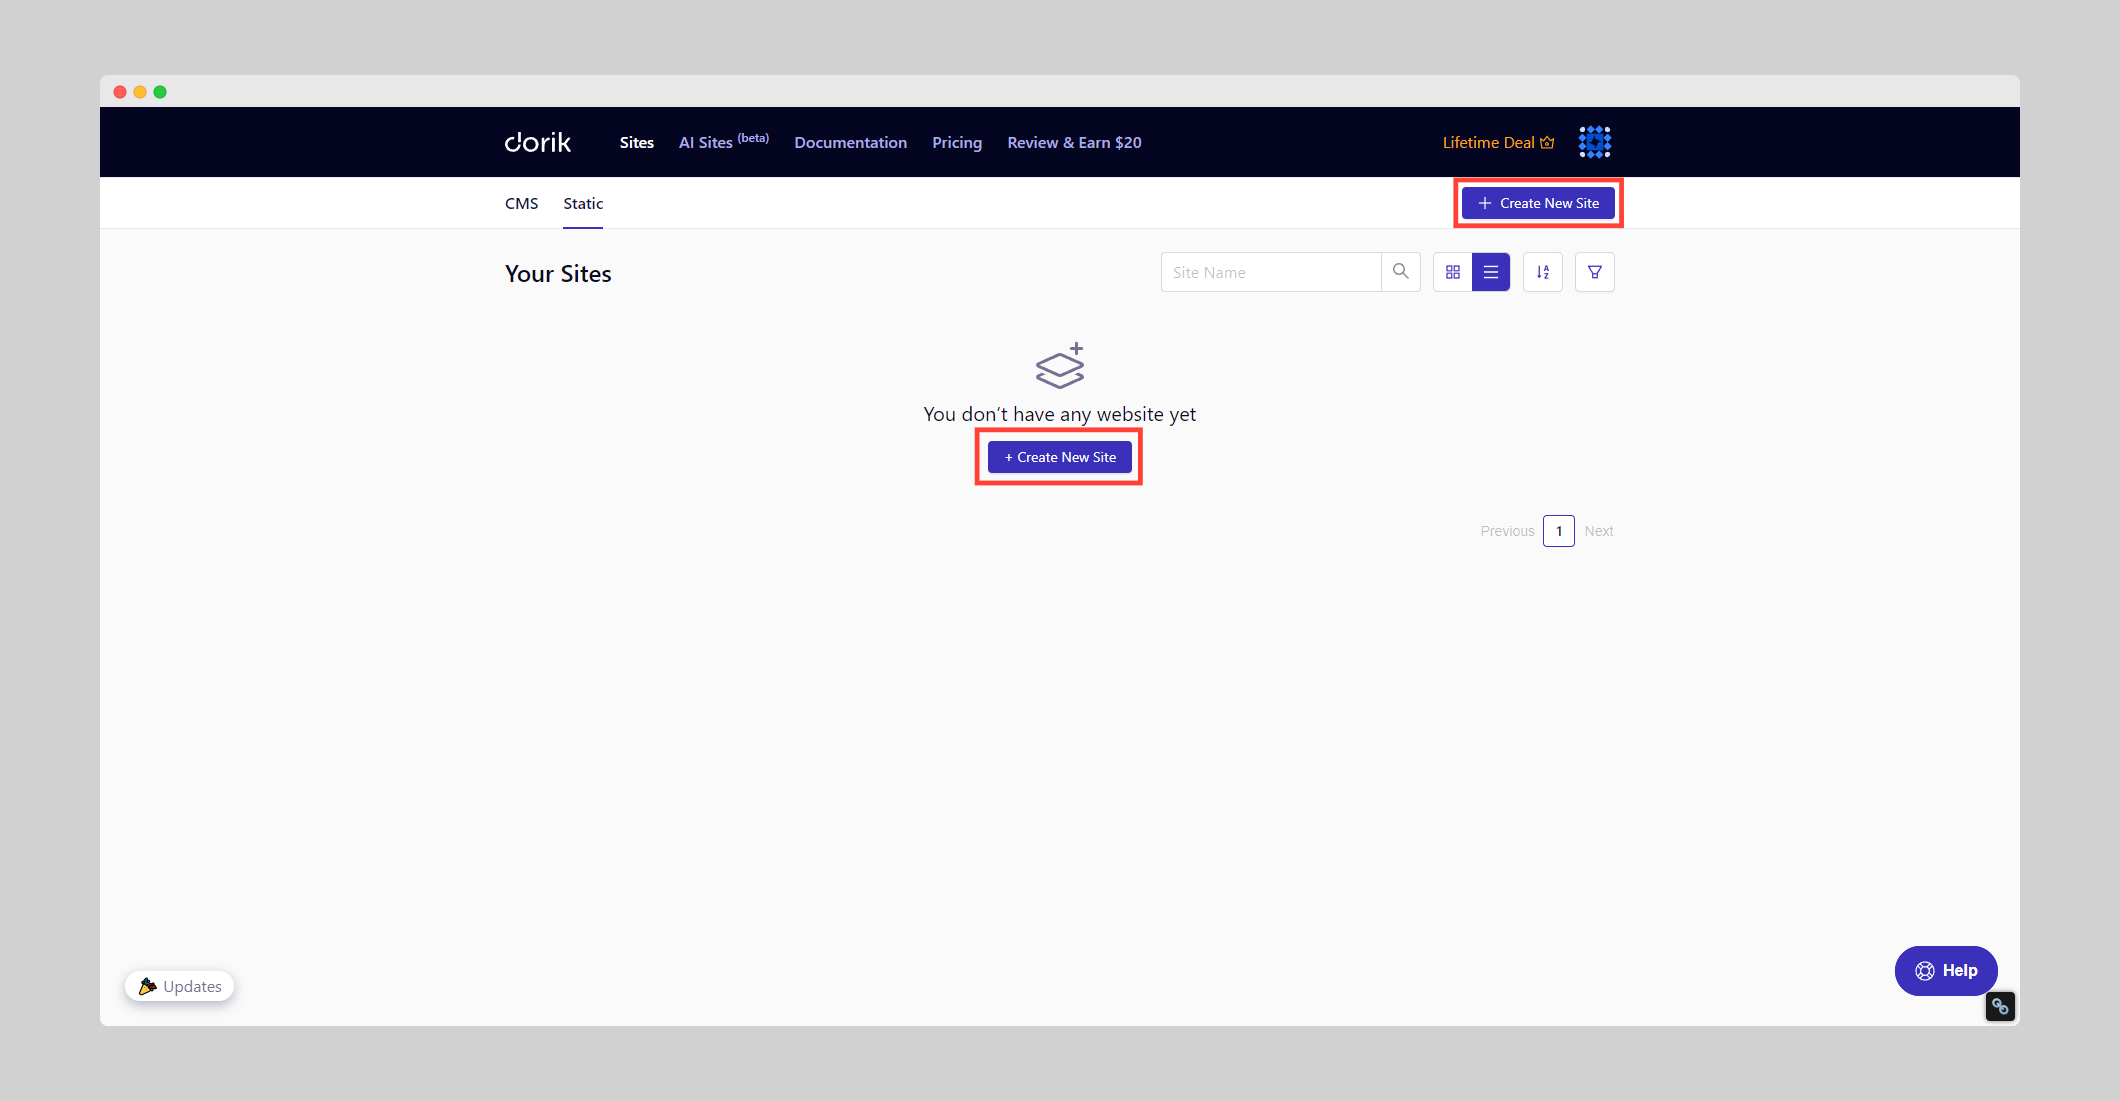
2. Click "Create New Site".
3. Search for “Wedding” on the template library.
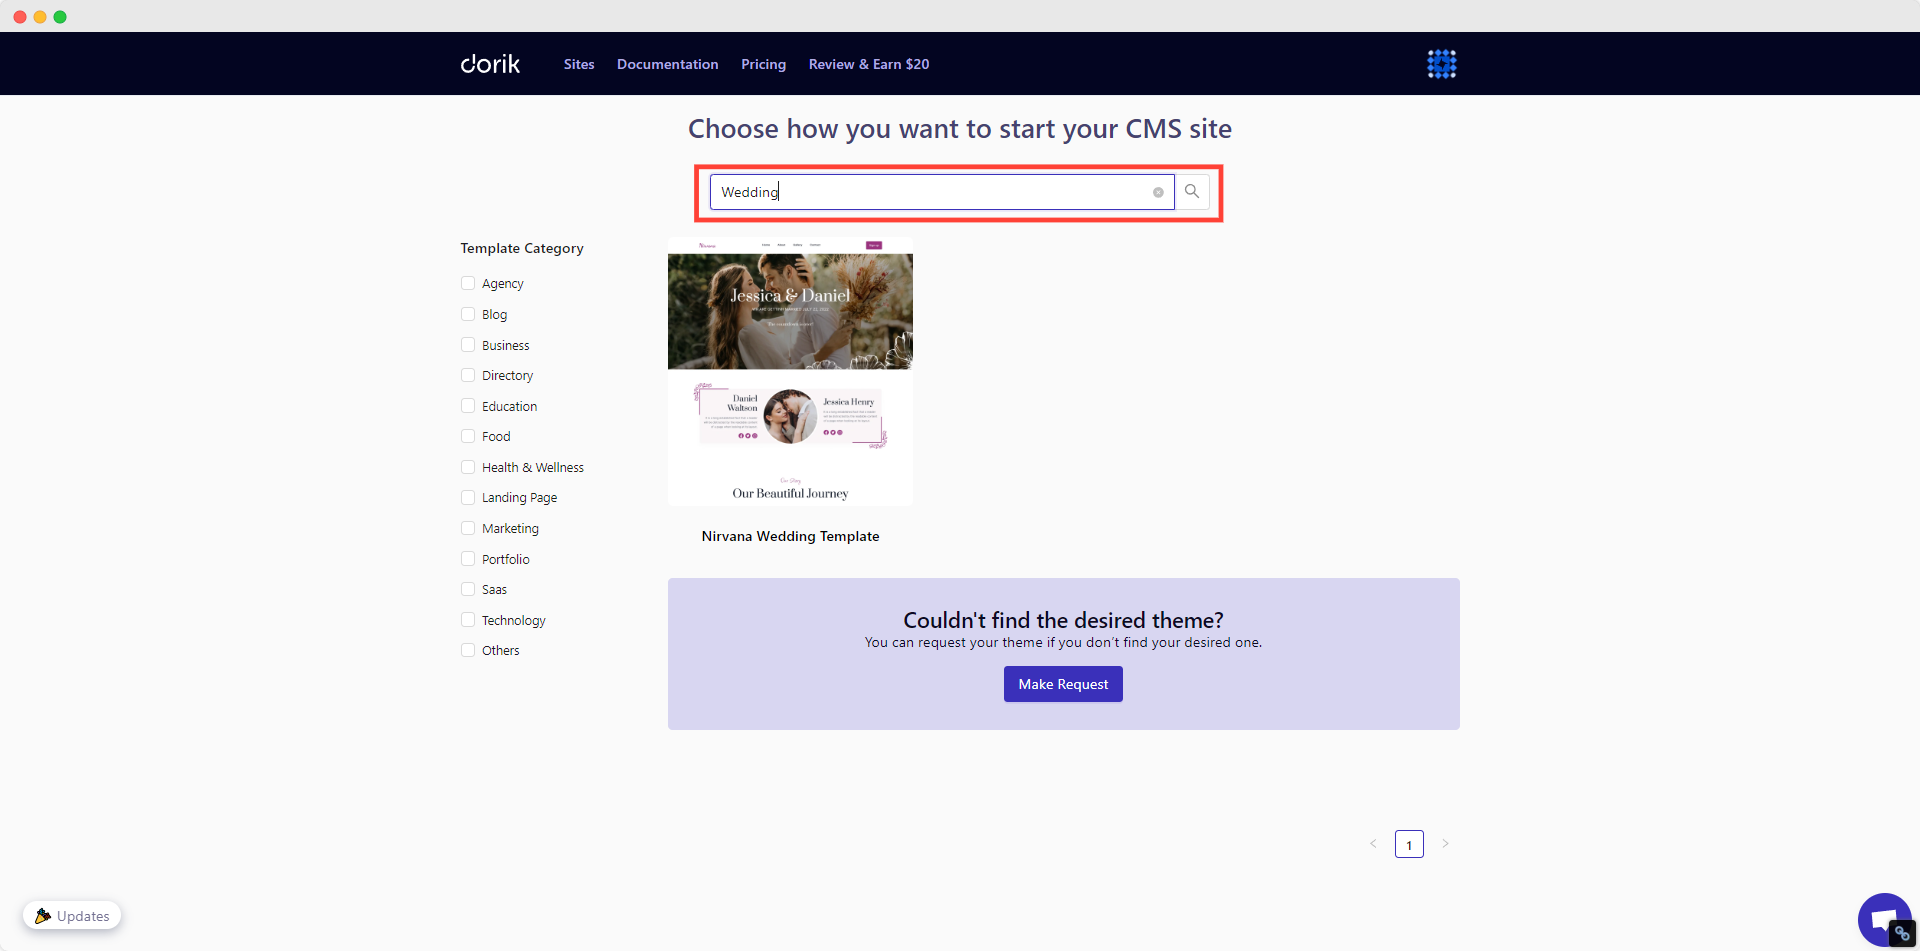
4. Preview and select the template to create your wedding website if you’re satisfied with the live preview.
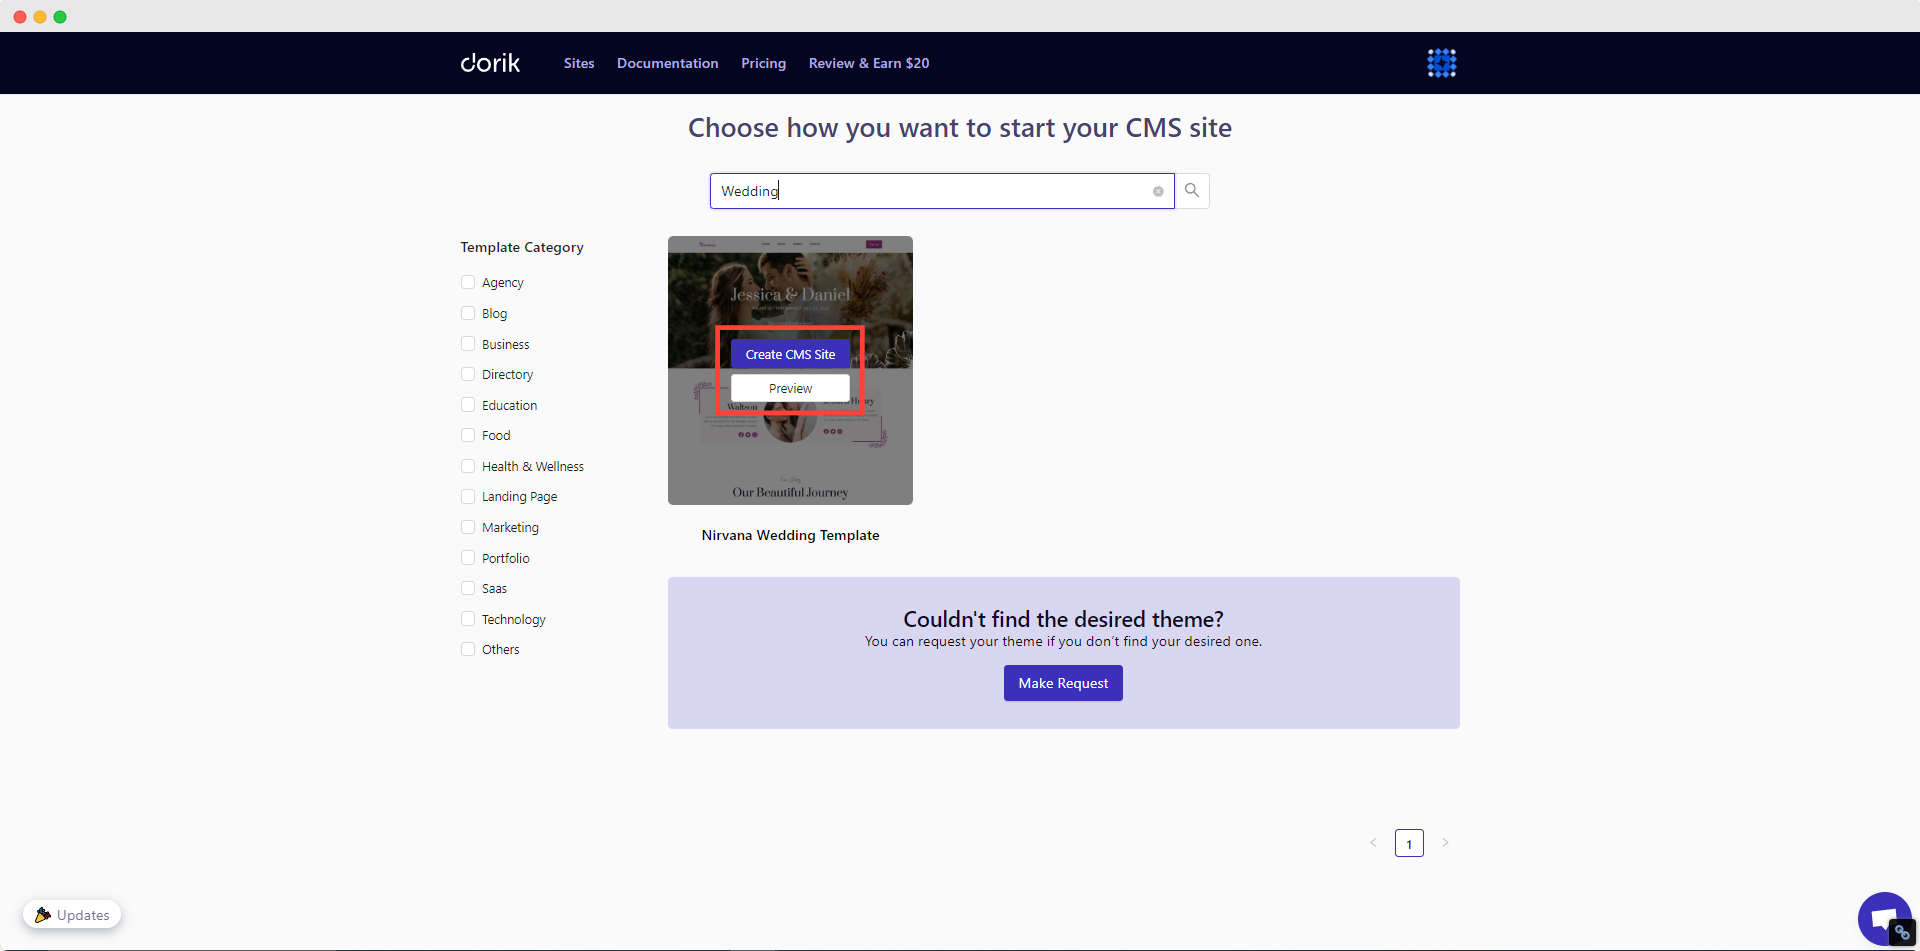
5. Customize the template to reflect your unique love story and wedding details.
3. Building Your Wedding Website from Scratch
This approach offers complete creative control, allowing you to create a truly one-of-a-kind wedding website that perfectly captures your love story and wedding vision.
Steps to create a wedding website from scratch:
1. In Dorik, go to 'Sites' and click "Create New Site."
2. Choose "Create From Scratch".
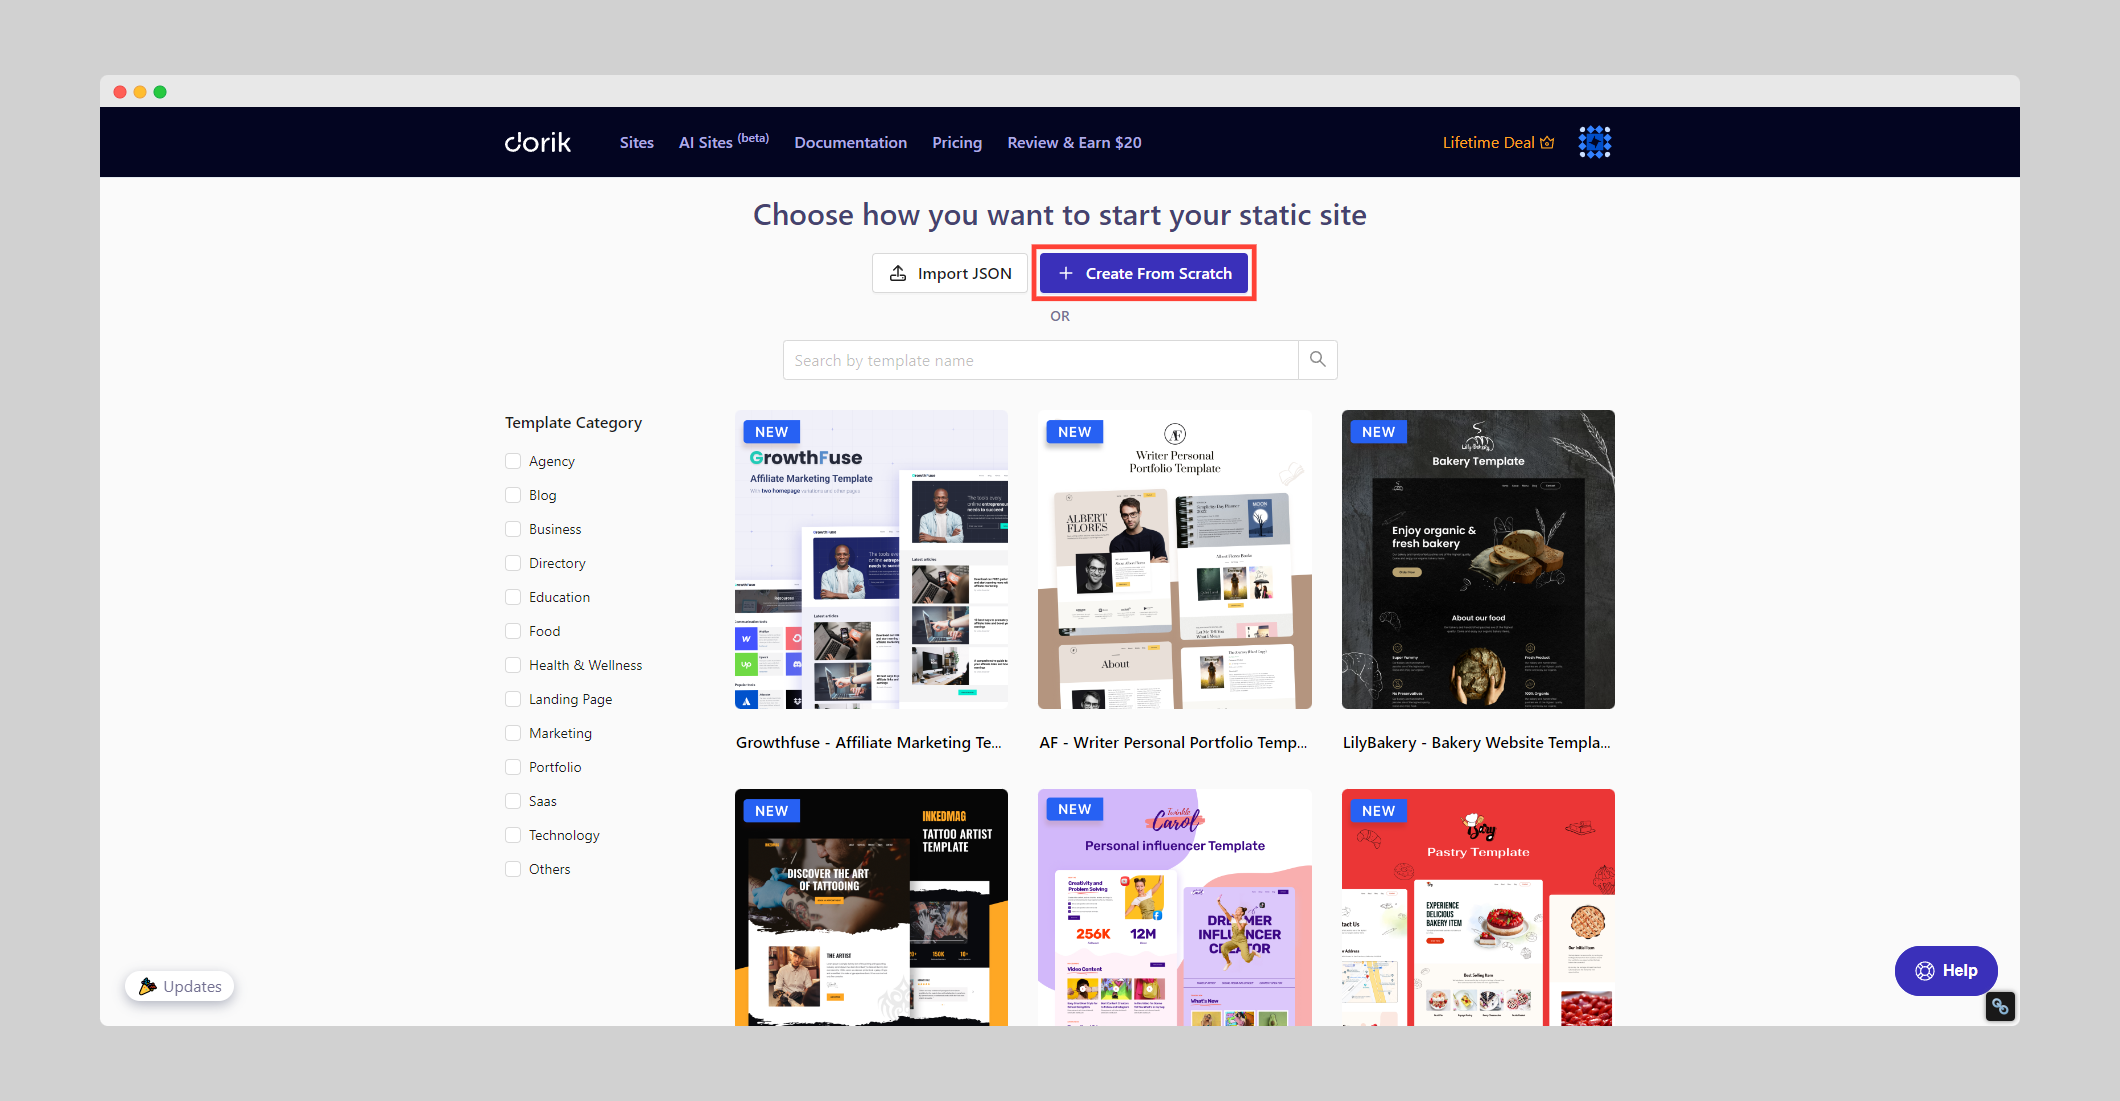
3. Use the drag-and-drop editor to build your layout.
4. Add sections for your love story, event details, RSVP, registry, and photo gallery.
5. Customize colors and fonts to match your wedding theme.
Regardless of the website building method you choose, I highly recommend you spare 5 minutes to understand the Builder Basics. This will save you hours down the road while customizing your wedding website.
Step 3: Craft Your Wedding Story
A wedding story on your website makes an excellent first impression by sharing your unique journey as a couple. It's like telling your friends and family how you met, fell in love, and decided to get married. This personal touch helps guests feel more connected to your celebration, creates excitement for the big day, and gives them a deeper understanding of your relationship.
Introduce Yourselves

Start by introducing yourselves with a brief, engaging overview. Share how you met, your first date, and the proposal story.
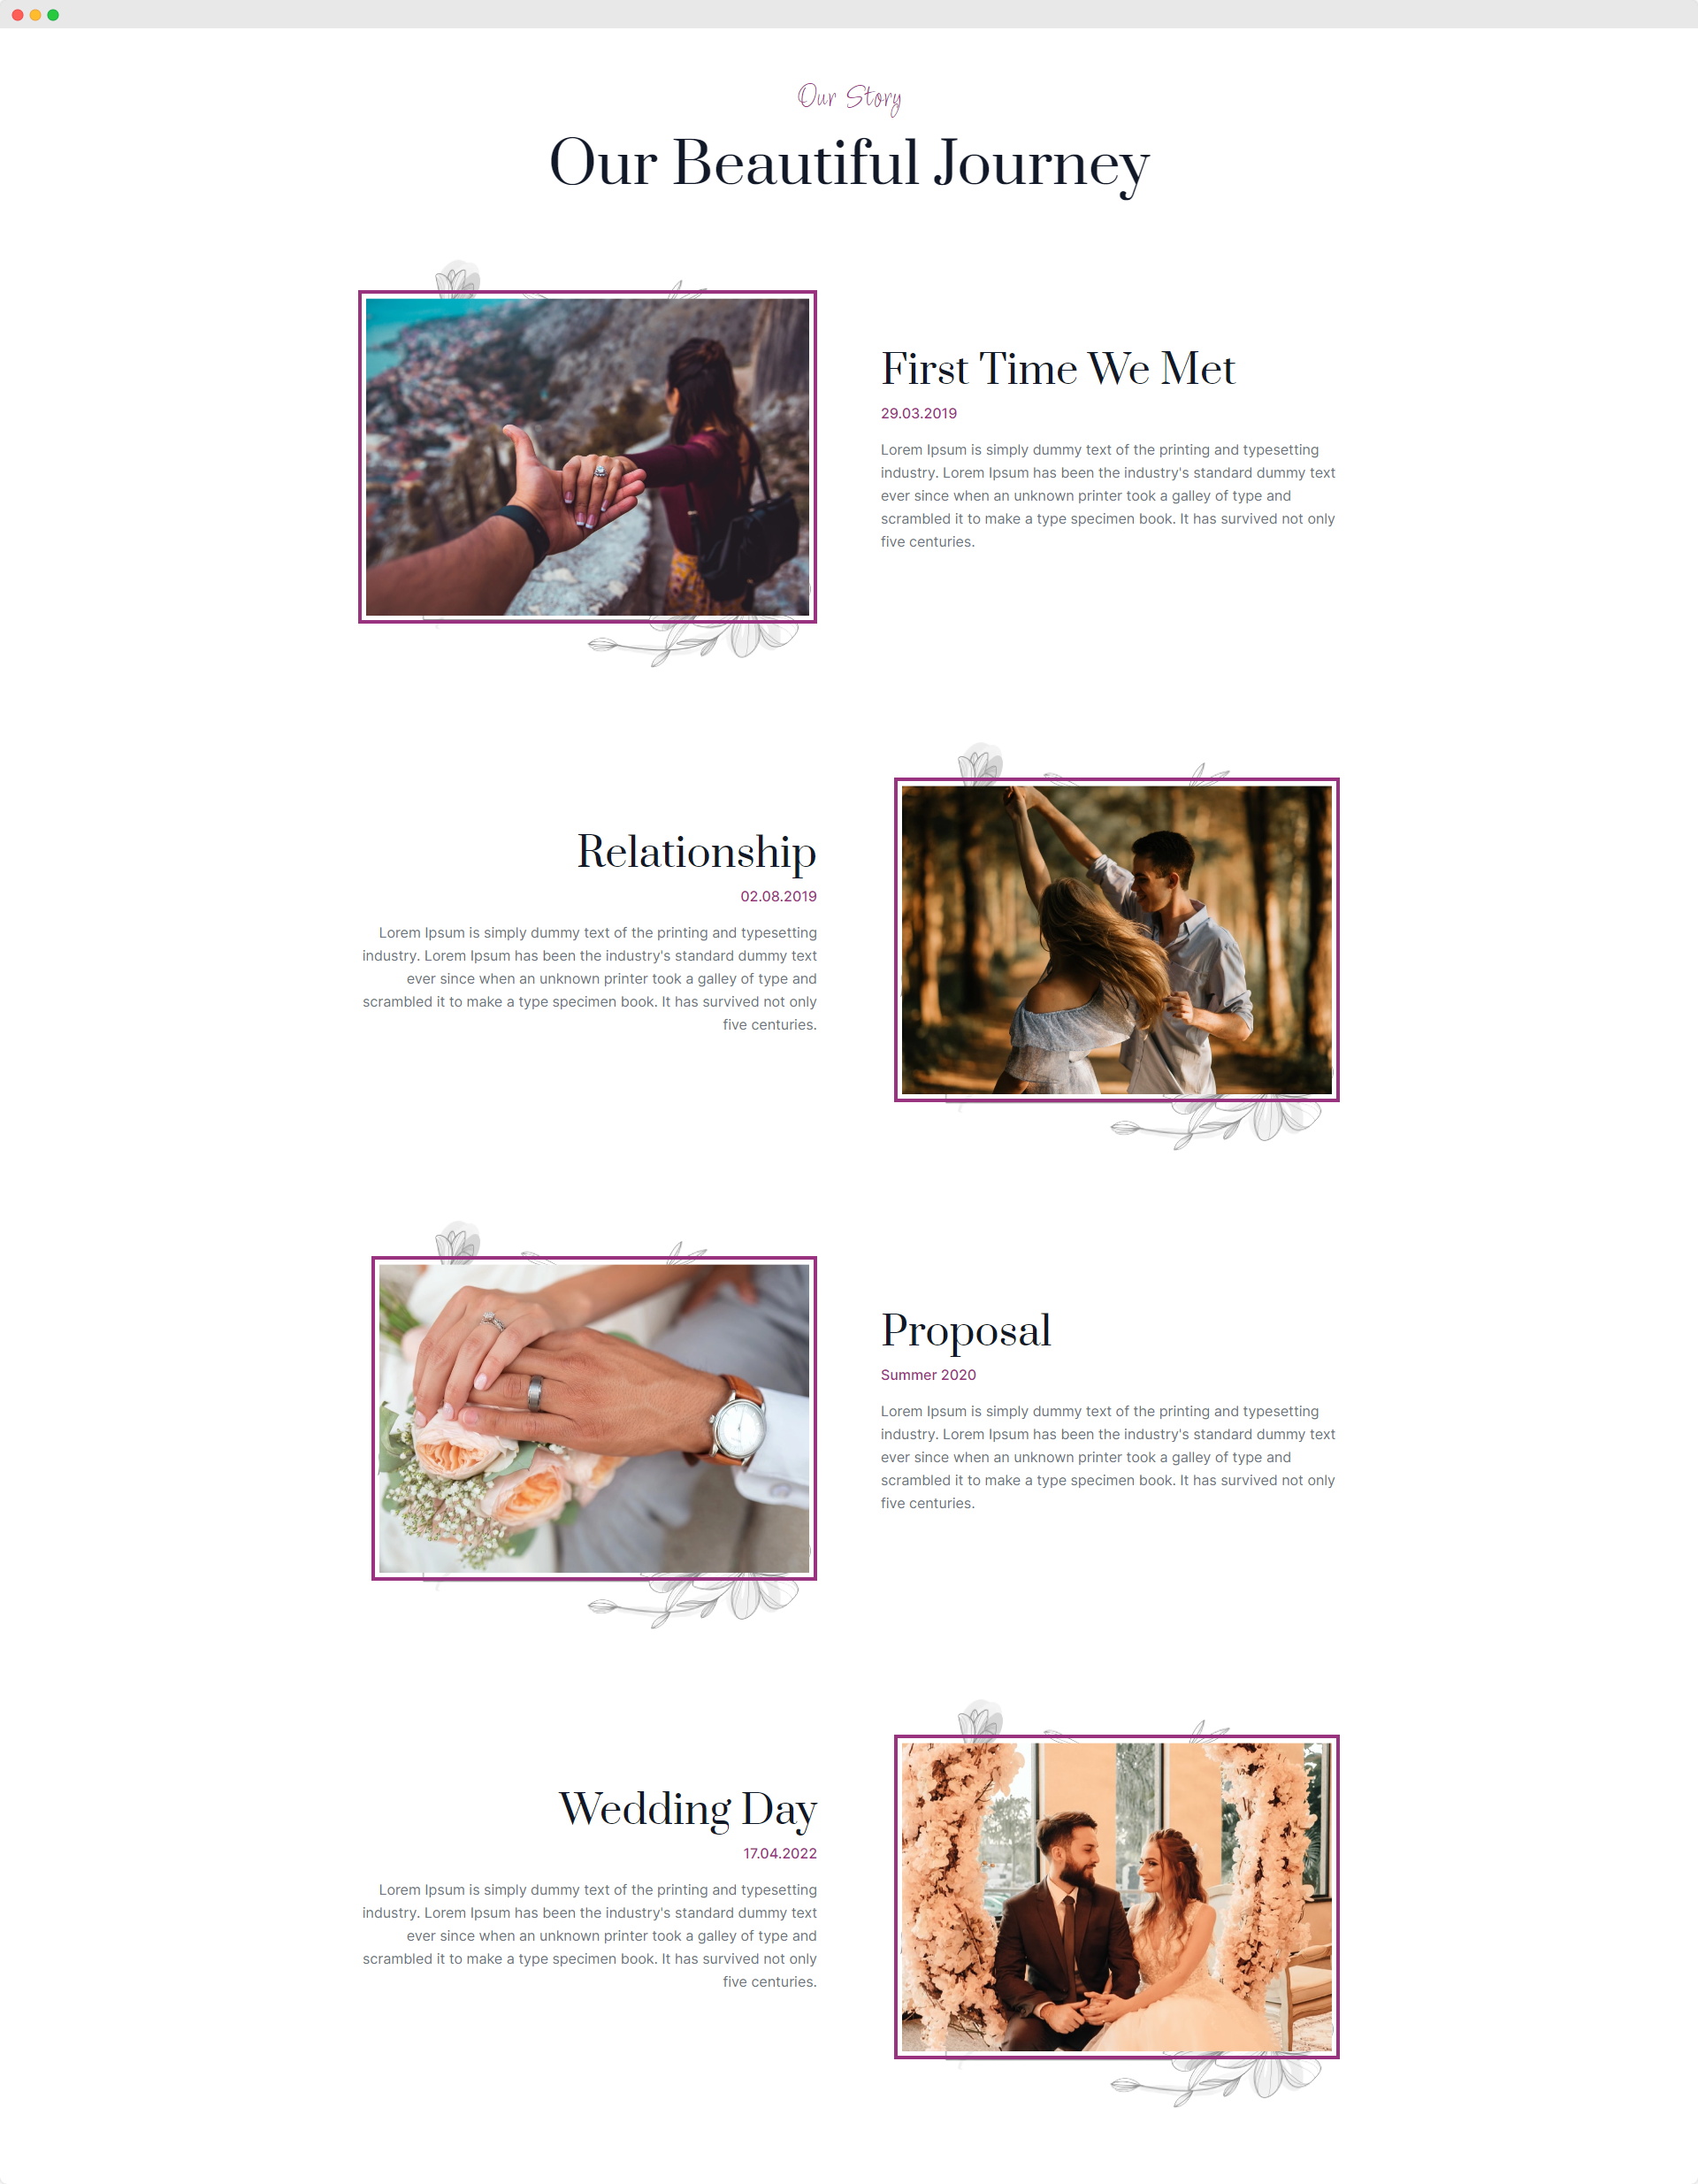
Keep it light-hearted and fun – a touch of humor can make your story more relatable. Remember, less is more; aim for a couple of concise paragraphs that capture the essence of your relationship.
Showcase Beautiful Moments
The most impressive part of having a wedding website is that it allows you to share precious moments with your loved ones in one place.
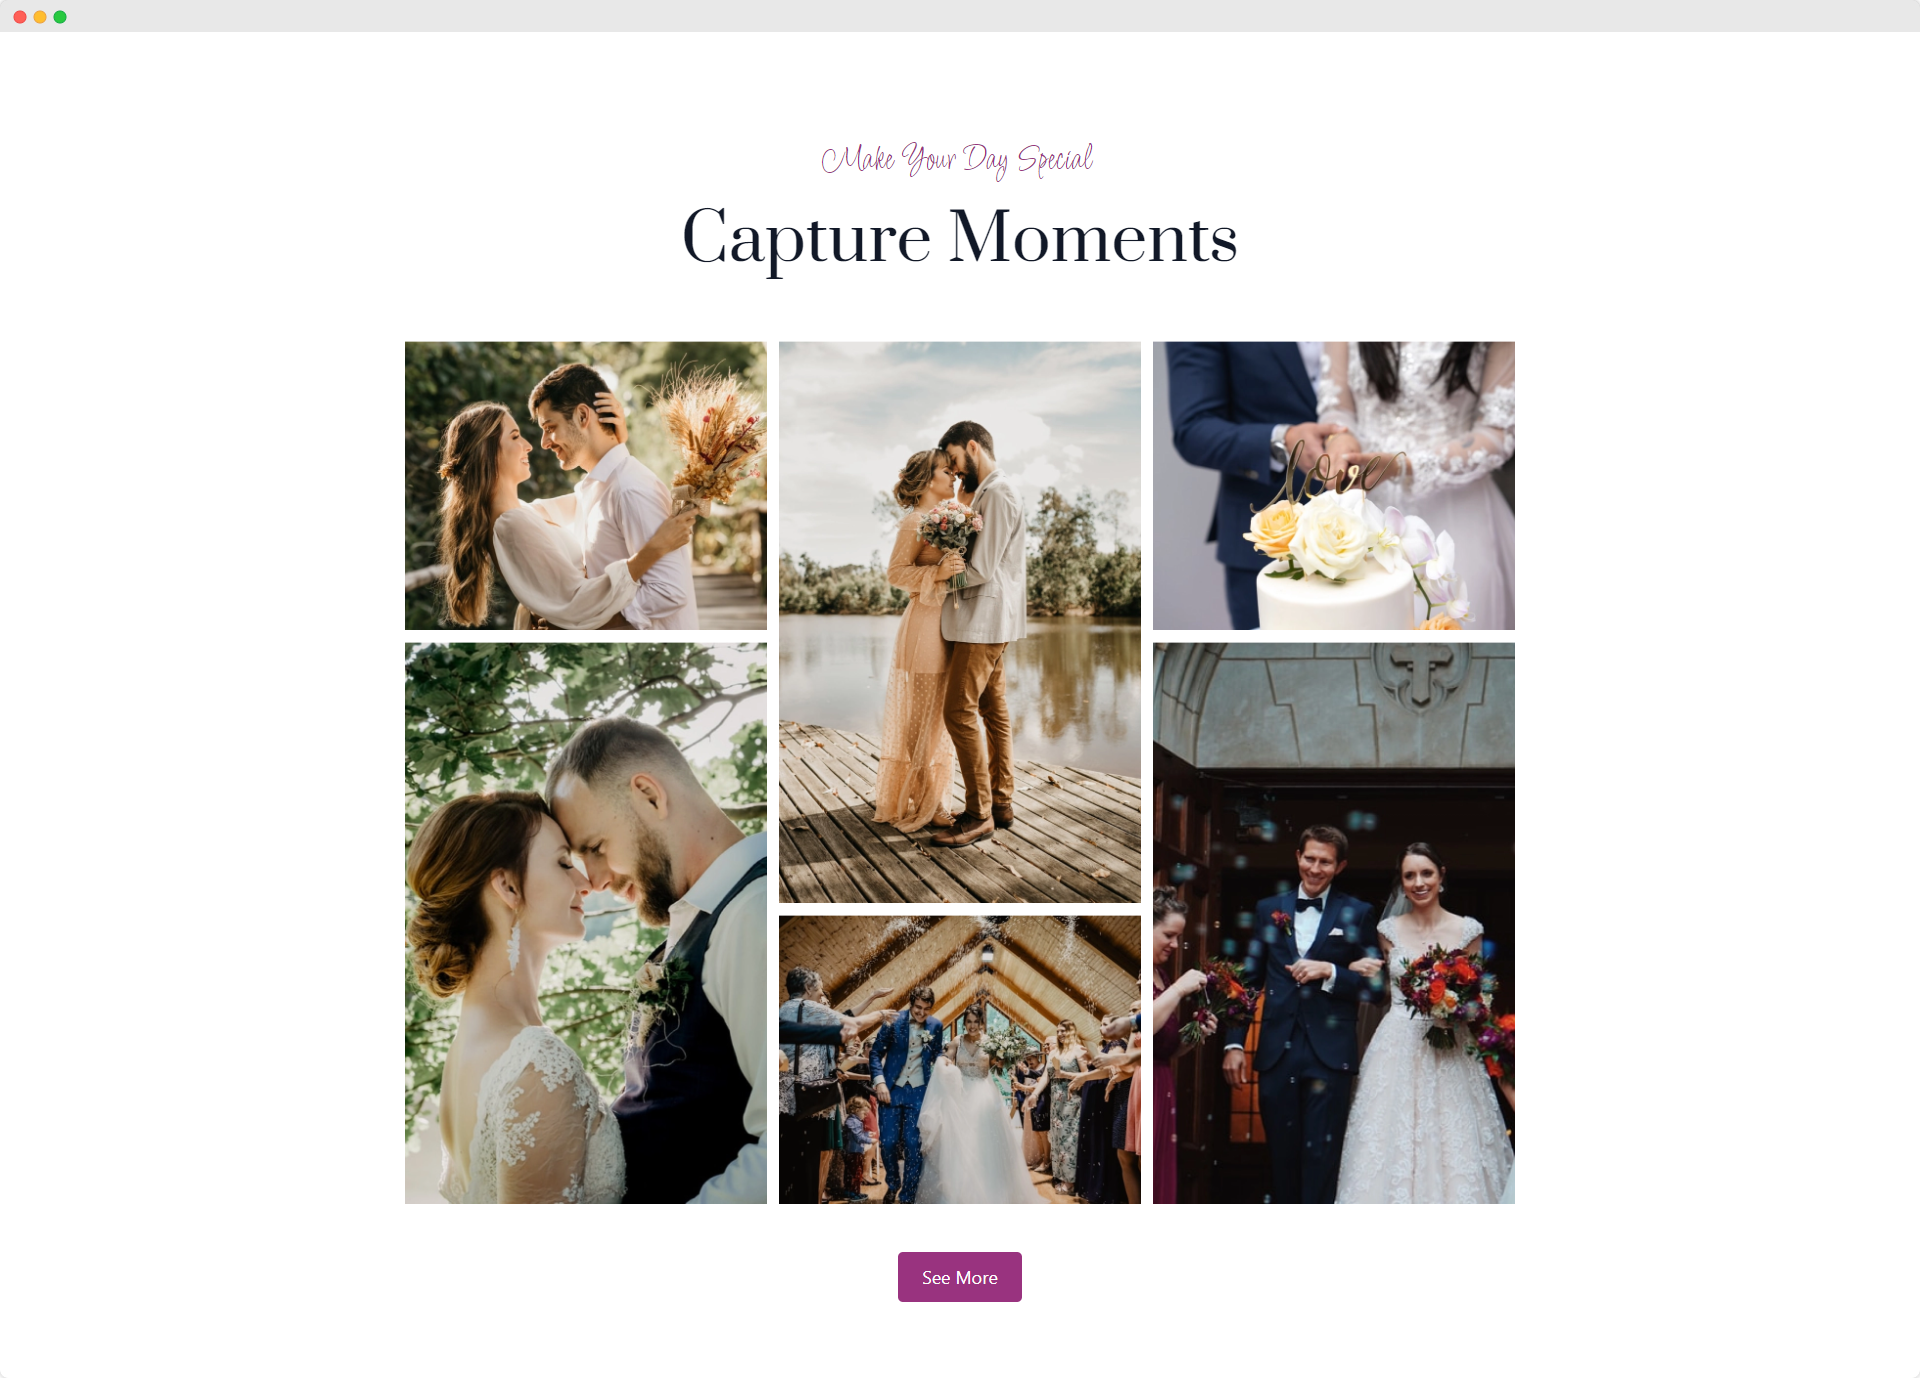
Showcase key moments with a curated photo gallery. Use Dorik's image tools to create a visually appealing timeline of your journey together. Include candid shots, vacation memories, and milestone moments to give guests a glimpse into your life as a couple.
It will help people who missed the event see your wedding photos. Additionally, guests who had to leave the party early can revisit the footage to see what they missed.
Introduce Special People
Don't forget to introduce your wedding party. Create brief, personality-filled bios for your bridesmaids, groomsmen, and other key players. This helps guests get to know the important people in your lives and can serve as great conversation starters at the wedding.
By crafting a compelling wedding story, you're not just sharing information – you're inviting your guests to be part of your love story, creating a more meaningful and memorable wedding experience for everyone involved.
Step 4: Add Essential Wedding Details
Adding essential wedding details helps guests prepare for your special day. It works like a guidebook for your wedding. By including information such as date, time, venue, dress code, and schedule, you ensure that guests arrive at the right place at the right time, wearing appropriate attire. This makes the event run smoothly and helps everyone enjoy the celebration.
Welcome Message and Countdown
Start your website with a warm welcome that sets the tone for your wedding. Include your names, wedding date, and a heartfelt message expressing your excitement. Add a countdown timer to build anticipation.
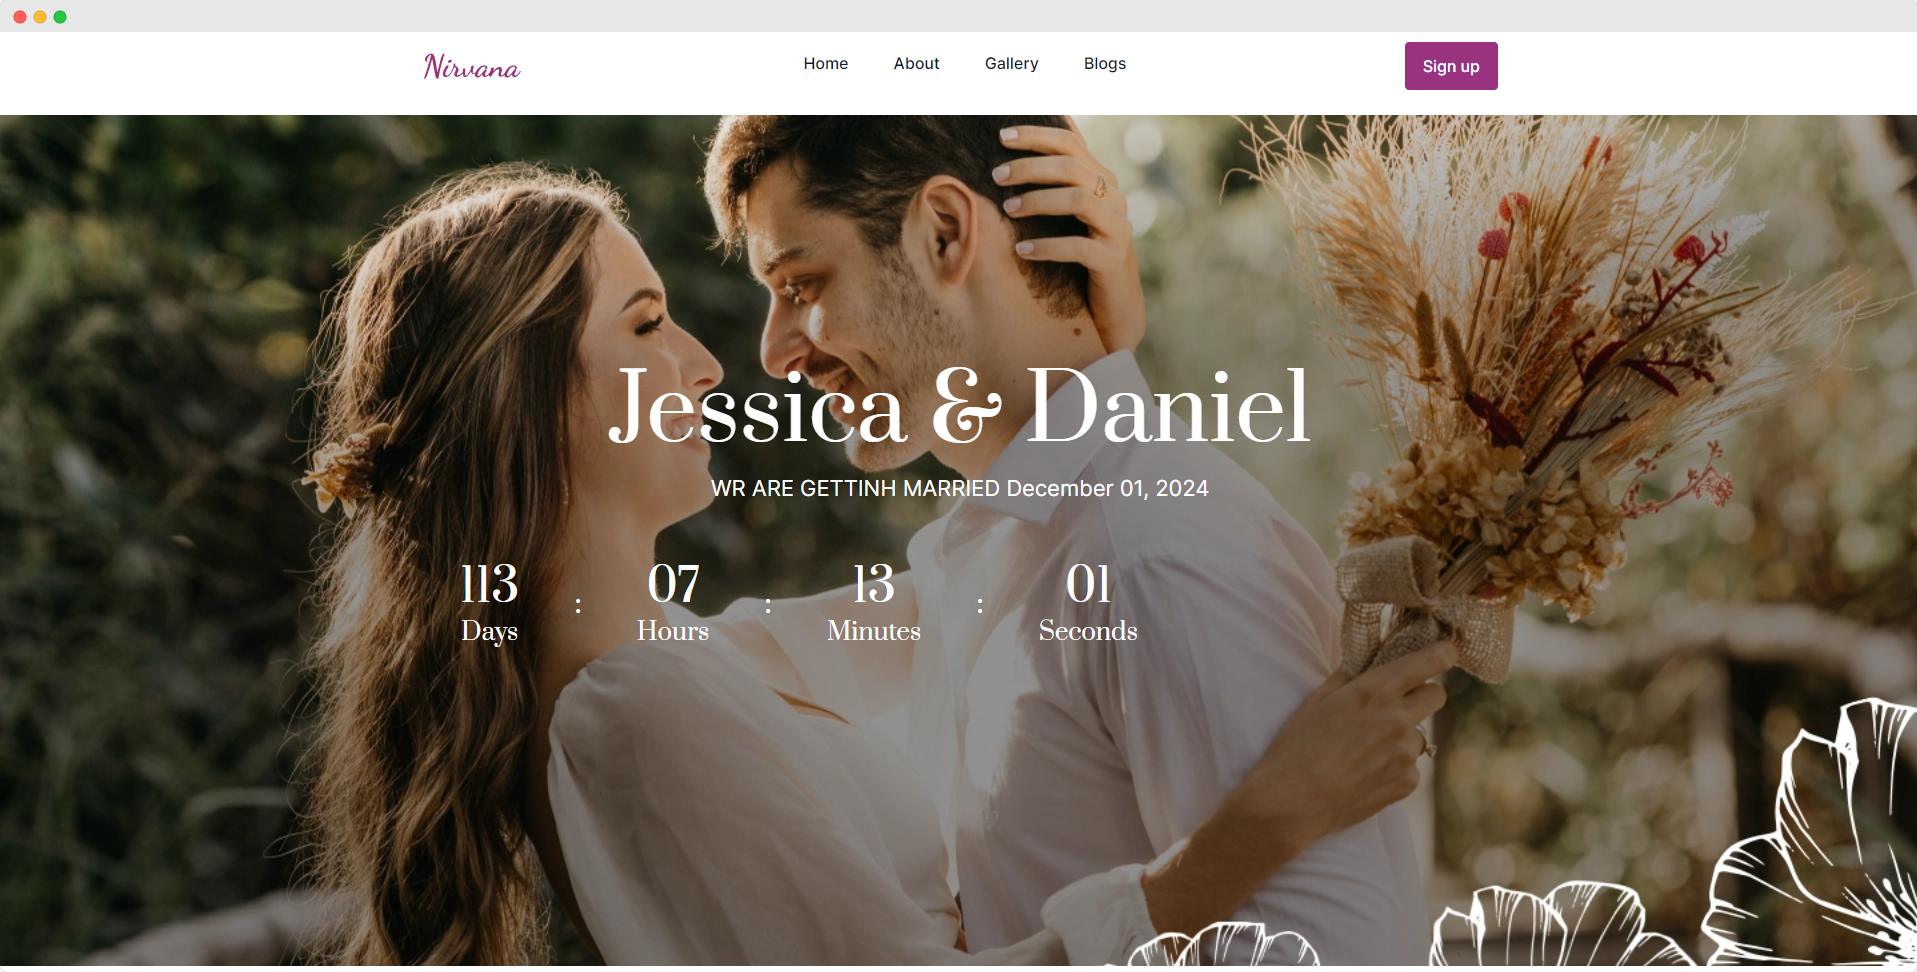
For example: "We can't wait to celebrate with you on [date]! Join us as we tie the knot in just [countdown]."
Event Details
Provide a clear timeline of all wedding-related events, including the ceremony, reception, and any additional activities like welcome parties or farewell brunches.
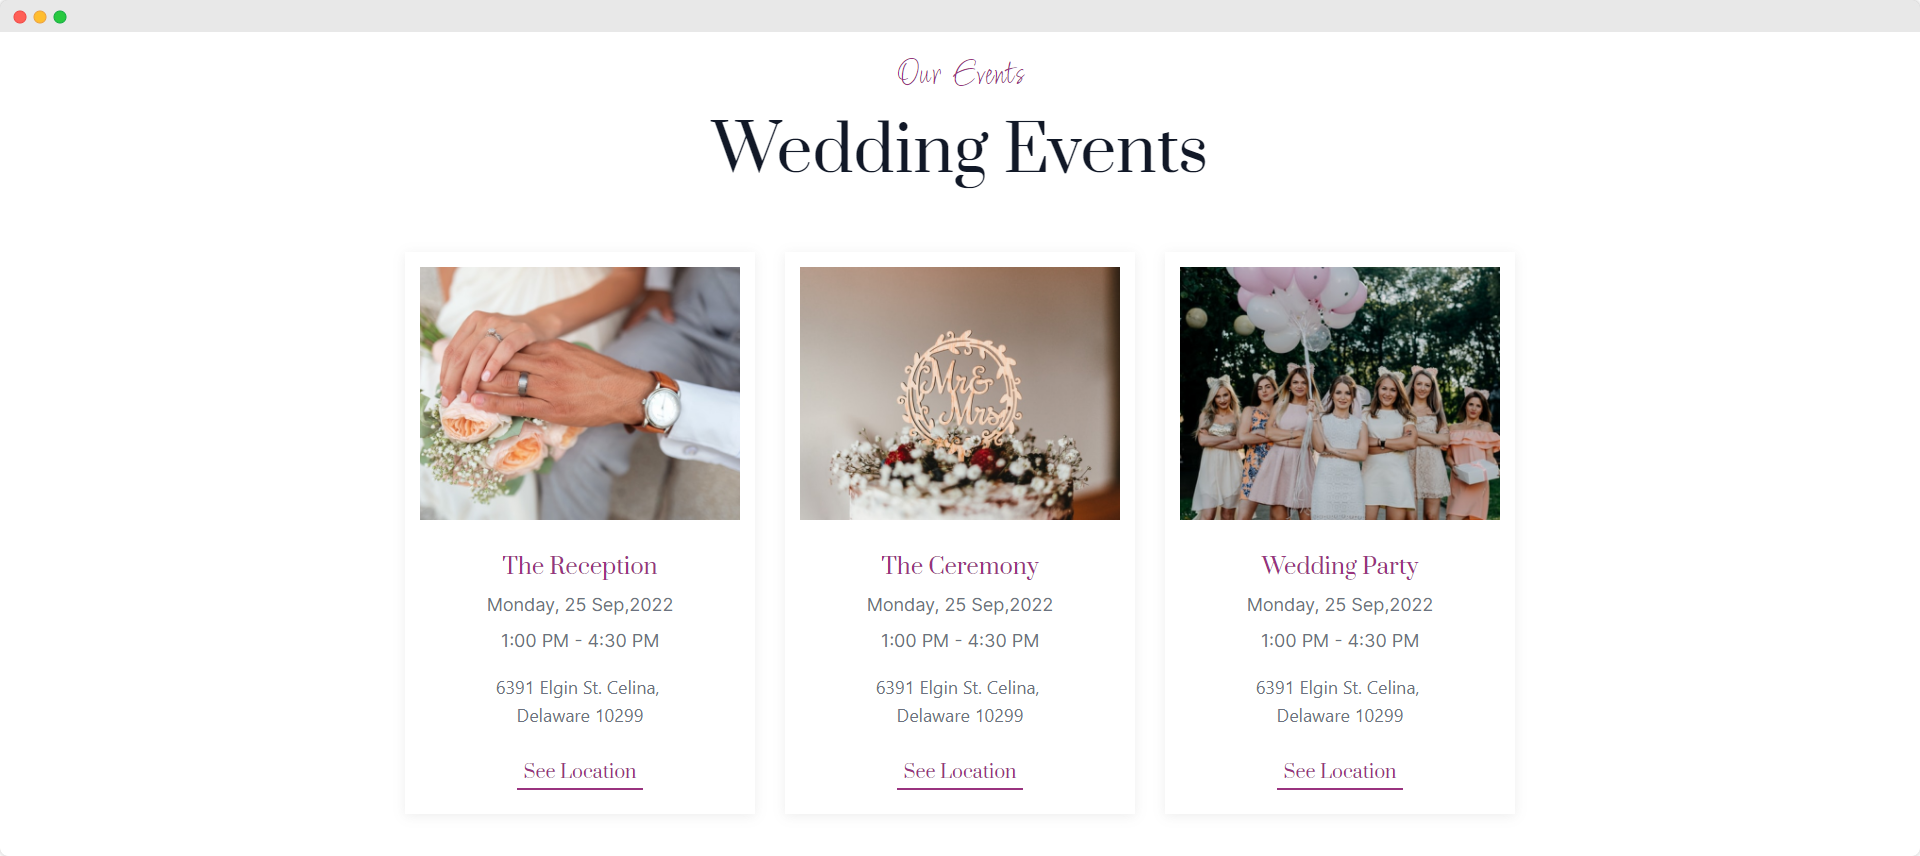
For each event, include:
-
Date, start, and end times
-
Venue name and address
-
Parking information or shuttle services
Use privacy settings for exclusive events like the rehearsal dinner to ensure only invited guests can view those details.
Travel and Accommodation
For out-of-town guests, offer information on the nearest airports, estimated travel times to the venue, and public transportation options.
Provide a list of nearby hotels, including any with reserved room blocks, booking instructions, and group rates. Consider suggesting alternative options like Airbnb for extended stays.
Dress Code
Clearly explain the dress code for each event, going beyond basic terms. For example, instead of just "Beach Formal," you might say: "We're envisioning flowy dresses for women and linen suits for men. Think elegant but comfortable for sand. Avoid heels - wedges or dressy sandals are perfect."
Give details of the bridesmaids and groomsmen's color scheme. The dress code of every upcoming event will help them prepare well.
Local Recommendations
Share your favorite spots near the venue, including restaurants, tourist attractions, and shopping areas. This is especially helpful for destination weddings or if many guests are traveling.
Both you and your fiance can suggest some of your favorite places for the guests to roam around. You can also share short stories behind these to add some extra crunch.
Photo Gallery
Finally, include a curated selection of engagement photos or meaningful snapshots from your relationship to personalize your site.
Here’s how to add a photo gallery to your wedding website:
Step 1: Add the Image Gallery Element
-
Navigate to an empty row or section on your website.
-
Click on "Add Element."
-
In the "General Elements" section, select "Image Gallery."
Step 2: Add Images to the Gallery
-
Once the Image Gallery element is added, open the Image Gallery editor.
-
Click on the "Images" option.
-
To add new images:
-
Click on the option to add images.
-
Upload or select the images you want to include in your gallery.
-
For a more detailed and visual guideline on how to utilize different features of the photo gallery element, refer to our “Image Gallery Documentation.”
👉 Related Read: How to Create Valentine's Day Website Experience
Step 5: Add an Online RSVP System
RSVP stands for "Répondez s'il vous plaît," which means "Please respond" in French. On a wedding website, it's a way for guests to confirm their attendance. It simplifies event management, saves time, and reduces the hassle of tracking paper responses or phone calls.
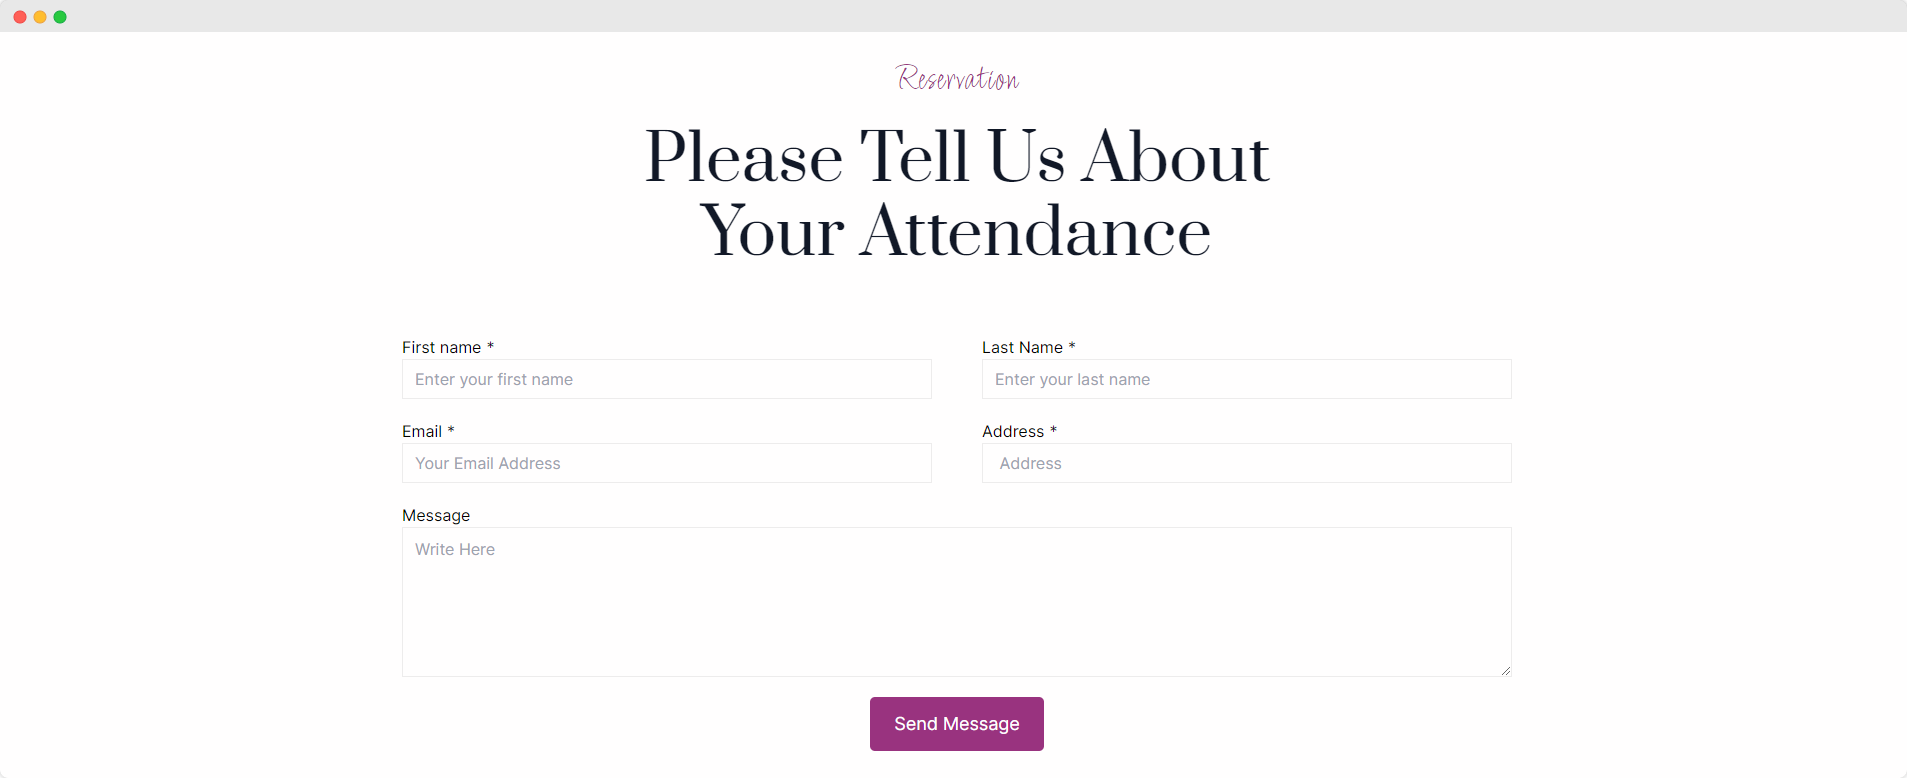
Key benefits of an online RSVP system:
-
Easily track who's attending and who's not: Guests can conveniently confirm their attendance, plus-ones, and meal preferences through your website.
-
Collect important details: Use the RSVP form to gather contact information, dietary requirements, song requests, and any other relevant details.
-
Automate response tracking: No more manual data entry - the system compiles all responses in one place, helping you stay organized.
-
Set RSVP deadlines: Clearly communicate your desired timeline by including the RSVP due date on your website and invitations.
-
Provide a user-friendly experience: A well-designed RSVP system allows guests to respond quickly and eliminates the need for mailing physical cards.
When creating your RSVP form, consider including fields for:
-
Guest names
-
Email addresses
-
Attendance confirmation
-
Number of guests
-
Meal preferences (e.g., entrée choices, dietary restrictions)
-
Any additional notes
Here’s how to add a custom RSVP form to get your guest's response in your email:
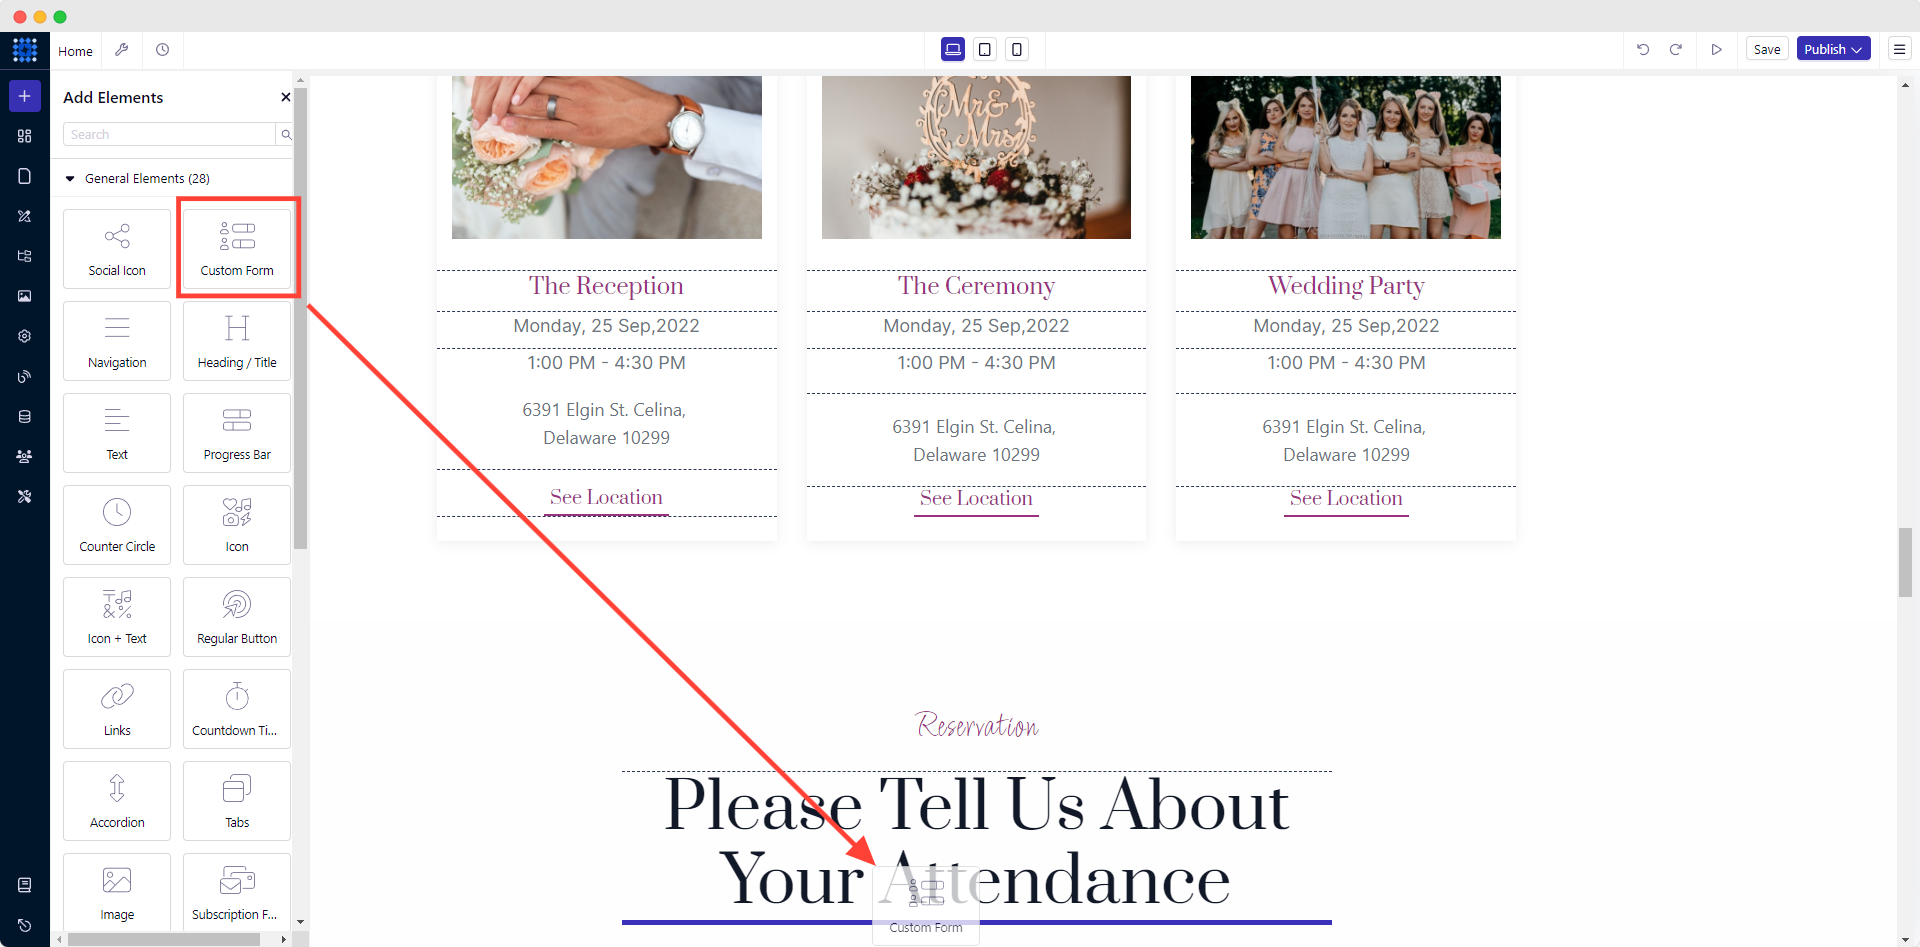
1. Click on “Add Elements” from the left sidebar.
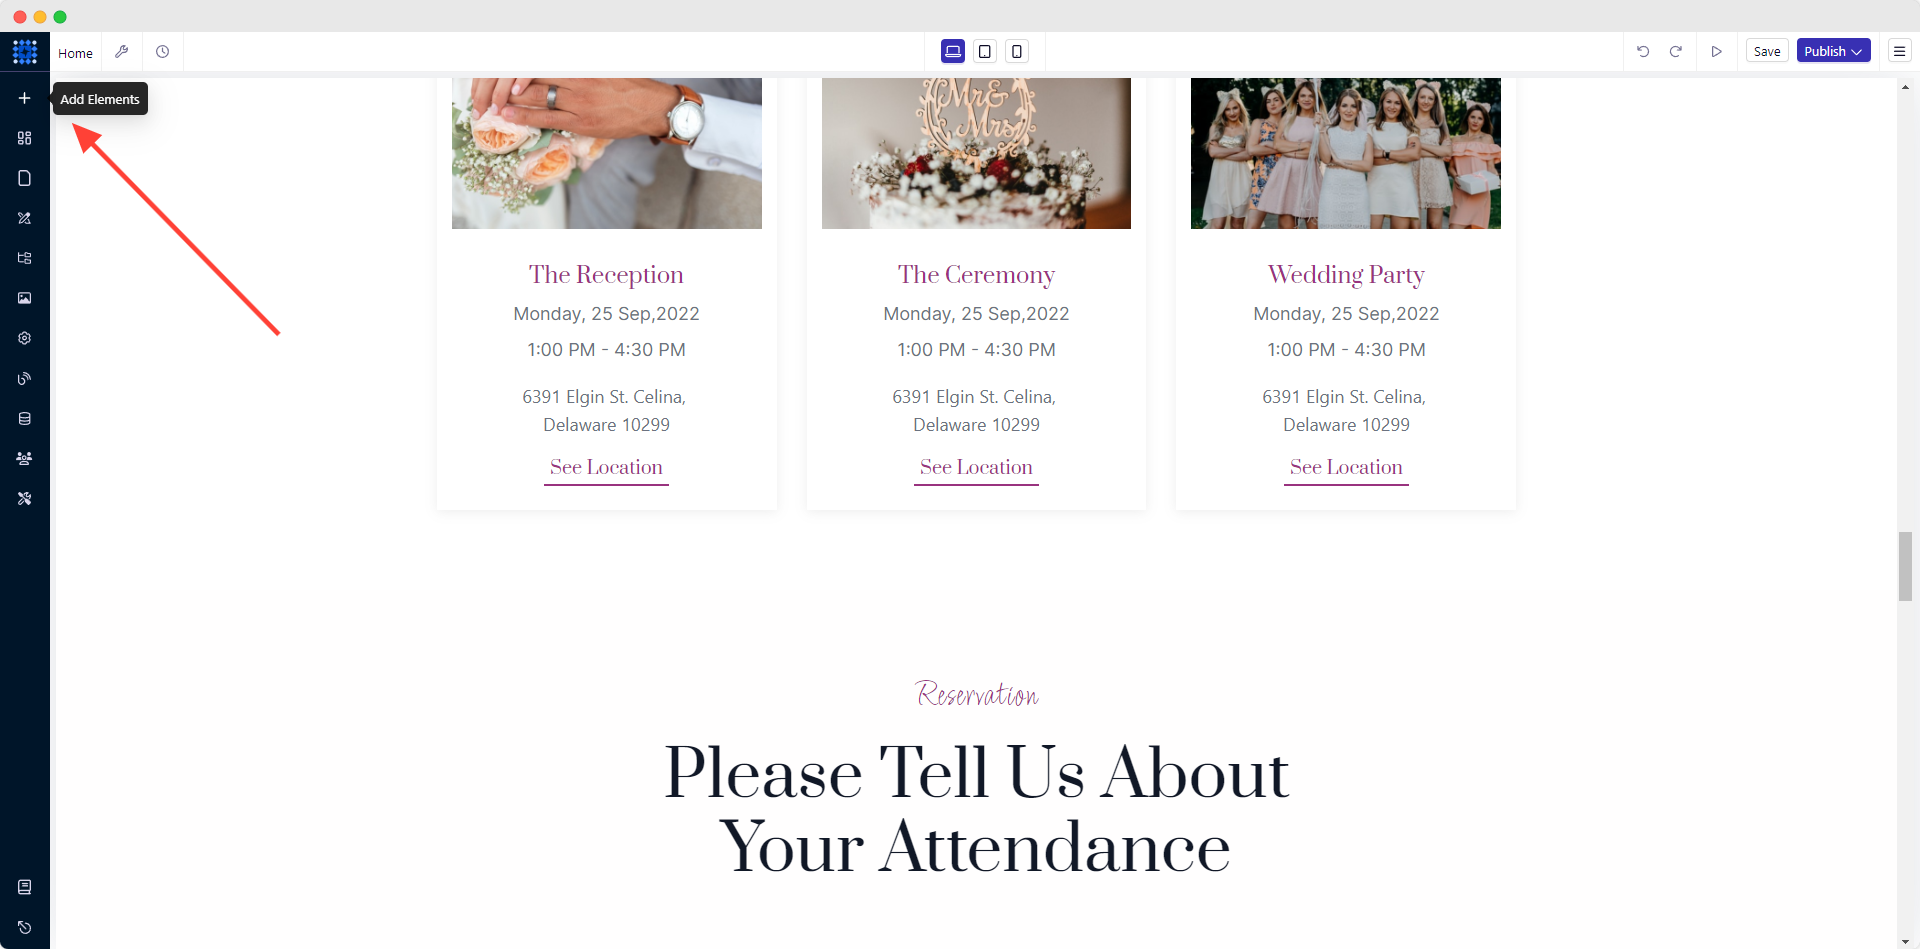
2. Find “Custom Form” and drag and drop the 'Custom Form Element' to your desired location.
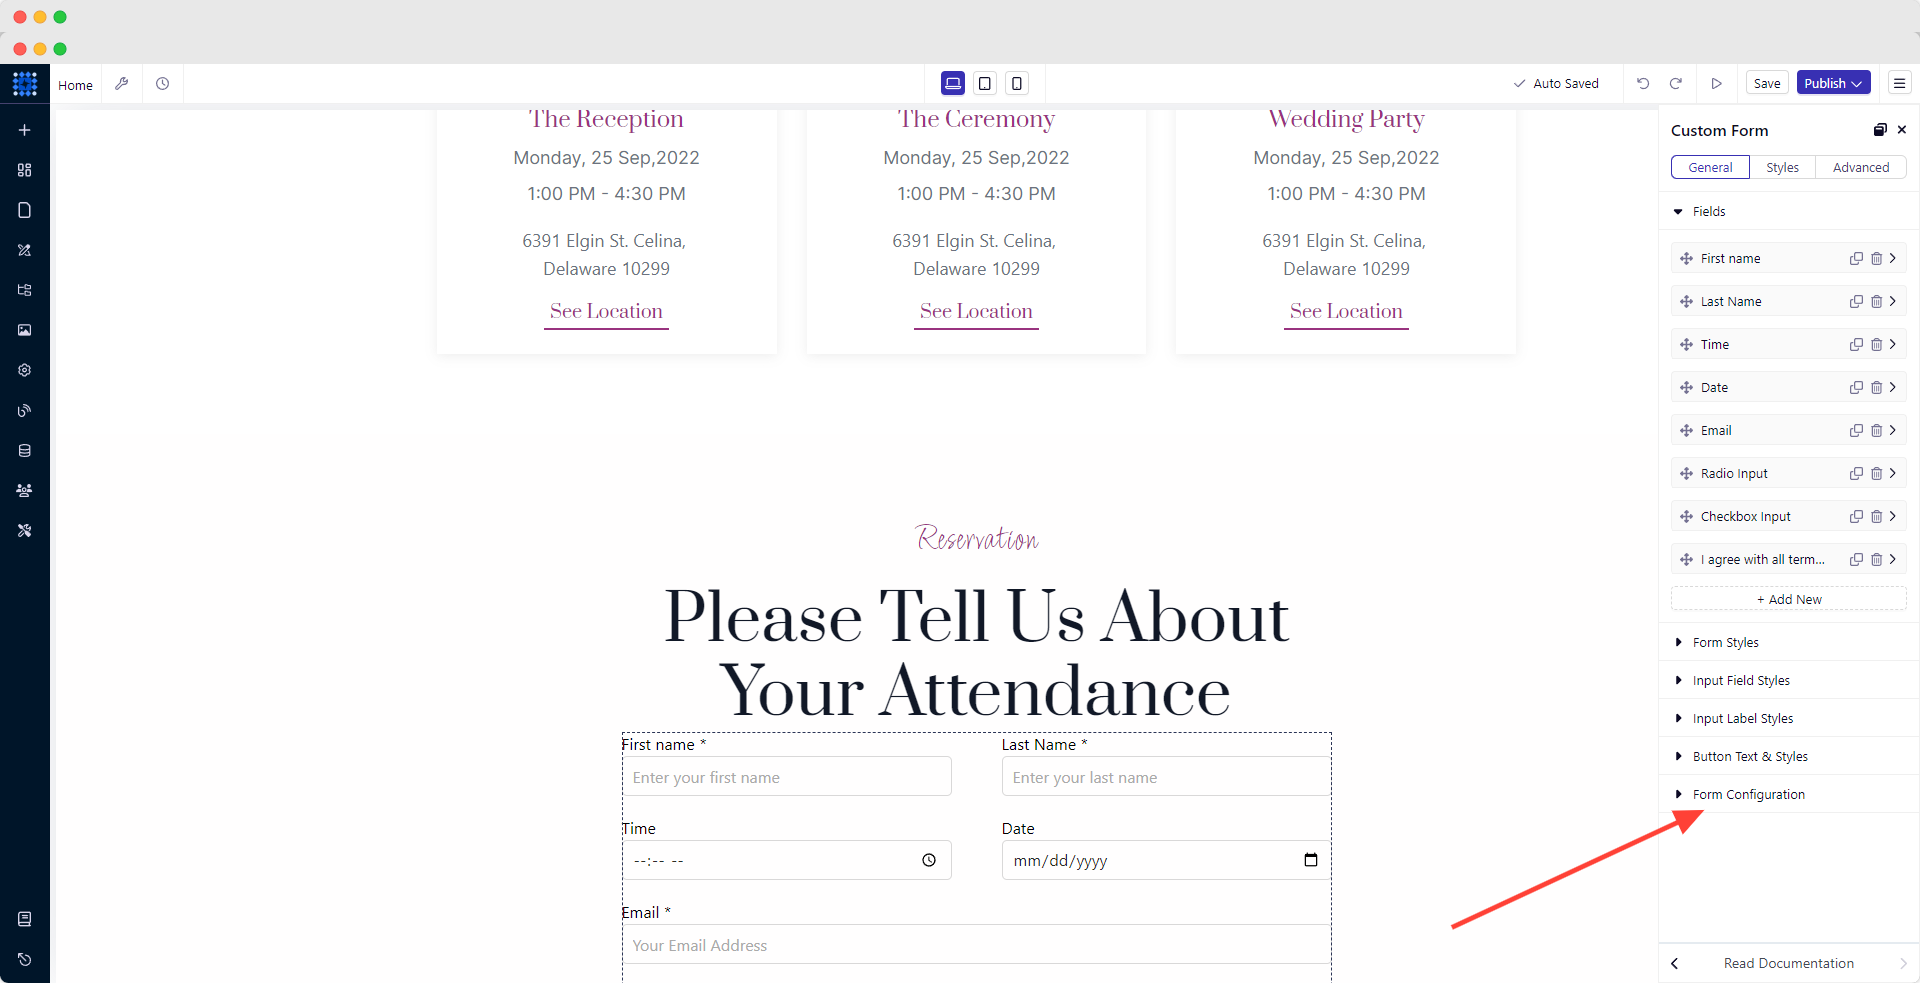
3. Click on the form element to edit and customize the fields from the “Editing Modal.”
-sHTk9.png)
4. Click on the “Form Configuration” dropdown.
5. Select “Send To” as “Email”.
-_if9U.png)
6. Write the email address to which you want to receive the responses in the “Receive At” field.
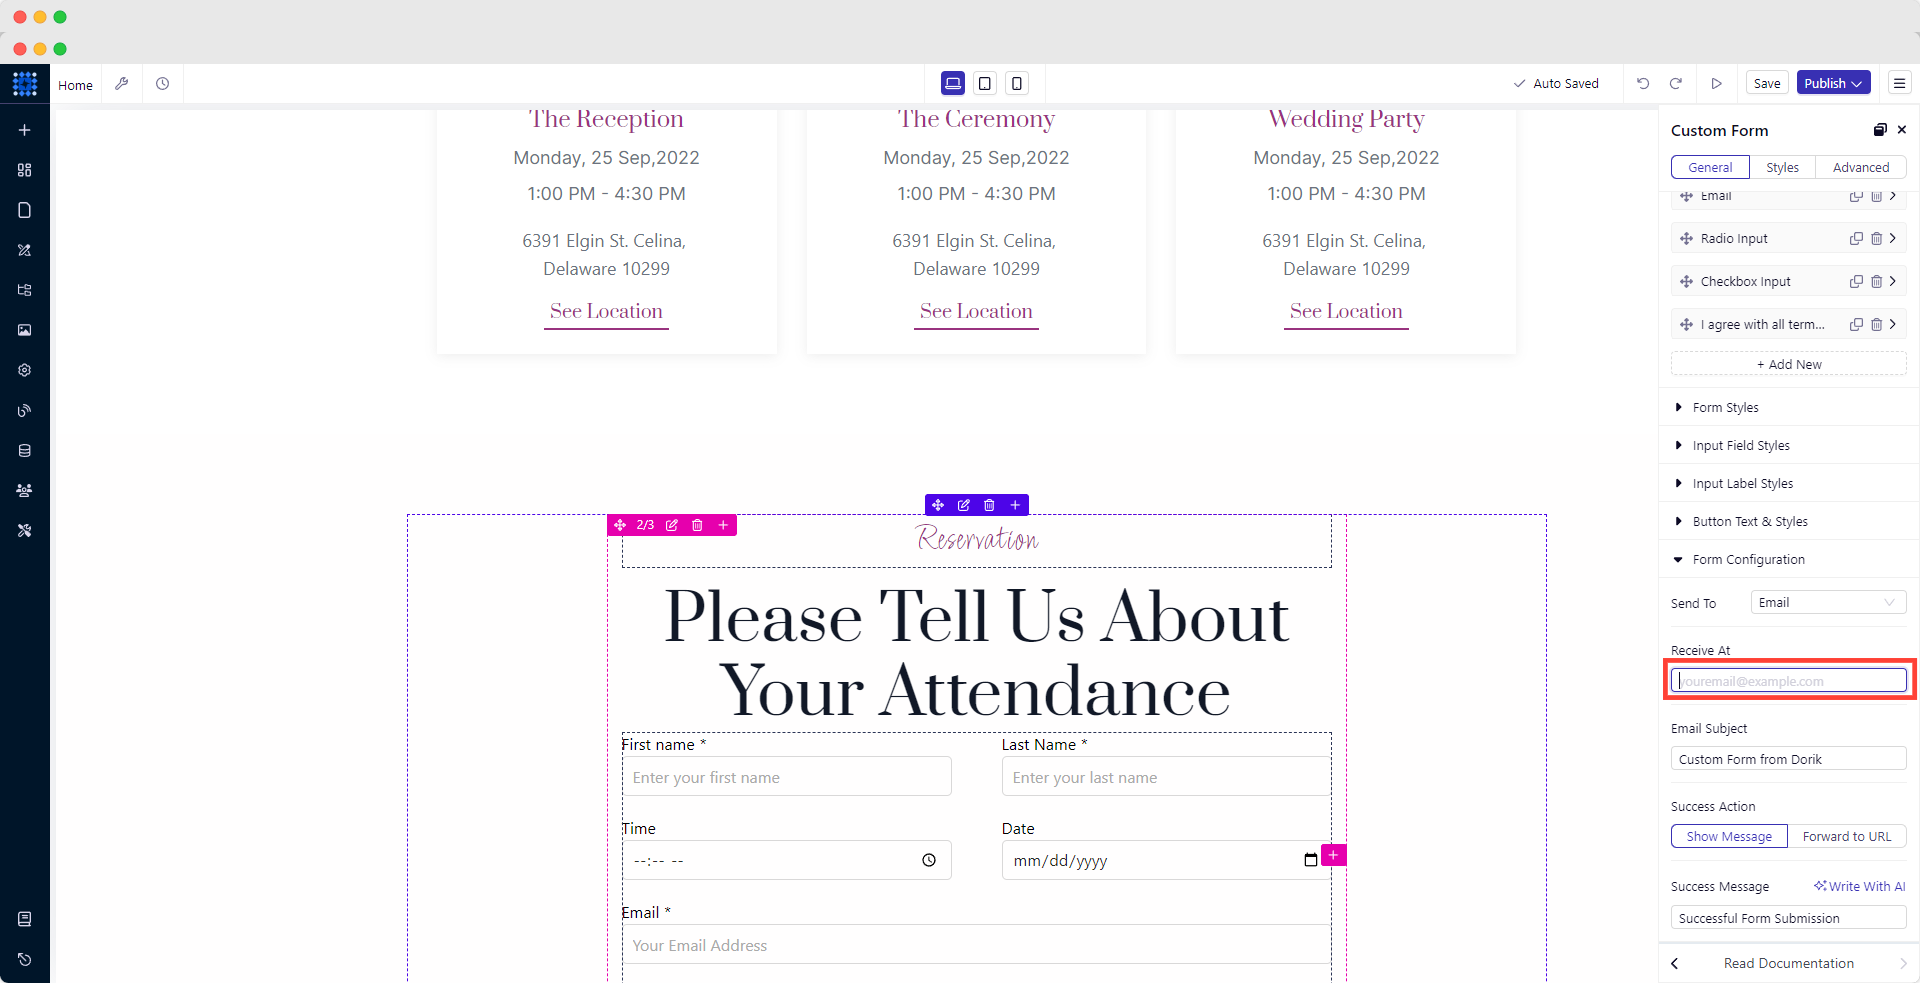
You can also customize the email subject and success message from “Form Configuration.”
However, if you want to get all the responses in your Airtable for better organization and efficiency, you can also do that with Dorik.
Here’s how you can add a custom RSVP form to your wedding website using the Airtable integration feature via Integromart:
Step 1: Add the Custom Form Element
Step 2: Configure the Form to Send Data to Airtable
-
In the "Send To" field, select "Integromat."
Step 3: Set Up Integromat for Airtable Integration
-
Go to the make.com dashboard and click "+ Create a new scenario."
-
Add a new module and select "Webhooks."
-
Create a new webhook, copy the webhook URL, and run the module.
Step 4: Connect Your Form to Integromat
-
Go back to your website builder.
-
Click "Edit Element" on your custom form.
-
Scroll down to "Form Configuration" and enter the webhook URL in the input field.
-
Publish your site to send test data.
Step 5: Set Up Airtable
-
Go to your Airtable dashboard.
-
Create a table that matches the fields of your RSVP form (e.g., Name, Email, RSVP status).
Step 6: Finalize the Integration in Integromat
-
Return to the make.com dashboard.
-
Add a new module to your scenario, select "Airtable," and add a connection.
-
Select your Airtable Base & Table, map the form fields to Airtable columns, and run the scenario once.
Step 7: Publish and Verify
-
Publish your wedding website.
-
Submit a test RSVP to ensure the data is being collected correctly in Airtable.
Remember, online RSVPs are convenient, but some guests may prefer traditional paper cards. So, offer both options to accommodate all your loved ones.
Step 6: Add a Gift/Cash Registry
Your wedding website is the ideal platform to showcase your gift registry preferences and cash fund options for your special day.
Gift Registry
A gift registry is a curated list of items you'd like to receive as wedding gifts. It saves your guests time and stress in selecting presents and ensures you receive items that suit your new life together.
When it comes to your traditional gift registry, link directly to your accounts across your favorite retailers. This allows guests to browse and purchase the items you've selected easily. Be sure to include a variety of price points to accommodate different budgets. Additionally, consider registering for experiences, like cooking classes or wine tastings, that you and your partner can enjoy together.
There are numerous wedding registries you can choose from. I’ll explain here how you can add an Amazon wedding registry to your website:
1. Login or Sign up to your Amazon account.
2. Go to Amazon’s wedding registry and fill up your credentials.
3. Follow the on-screen instructions.
4. Select “Create My Registry.”
5. Add items (Gifts and Gift Card Funds) to your registry.
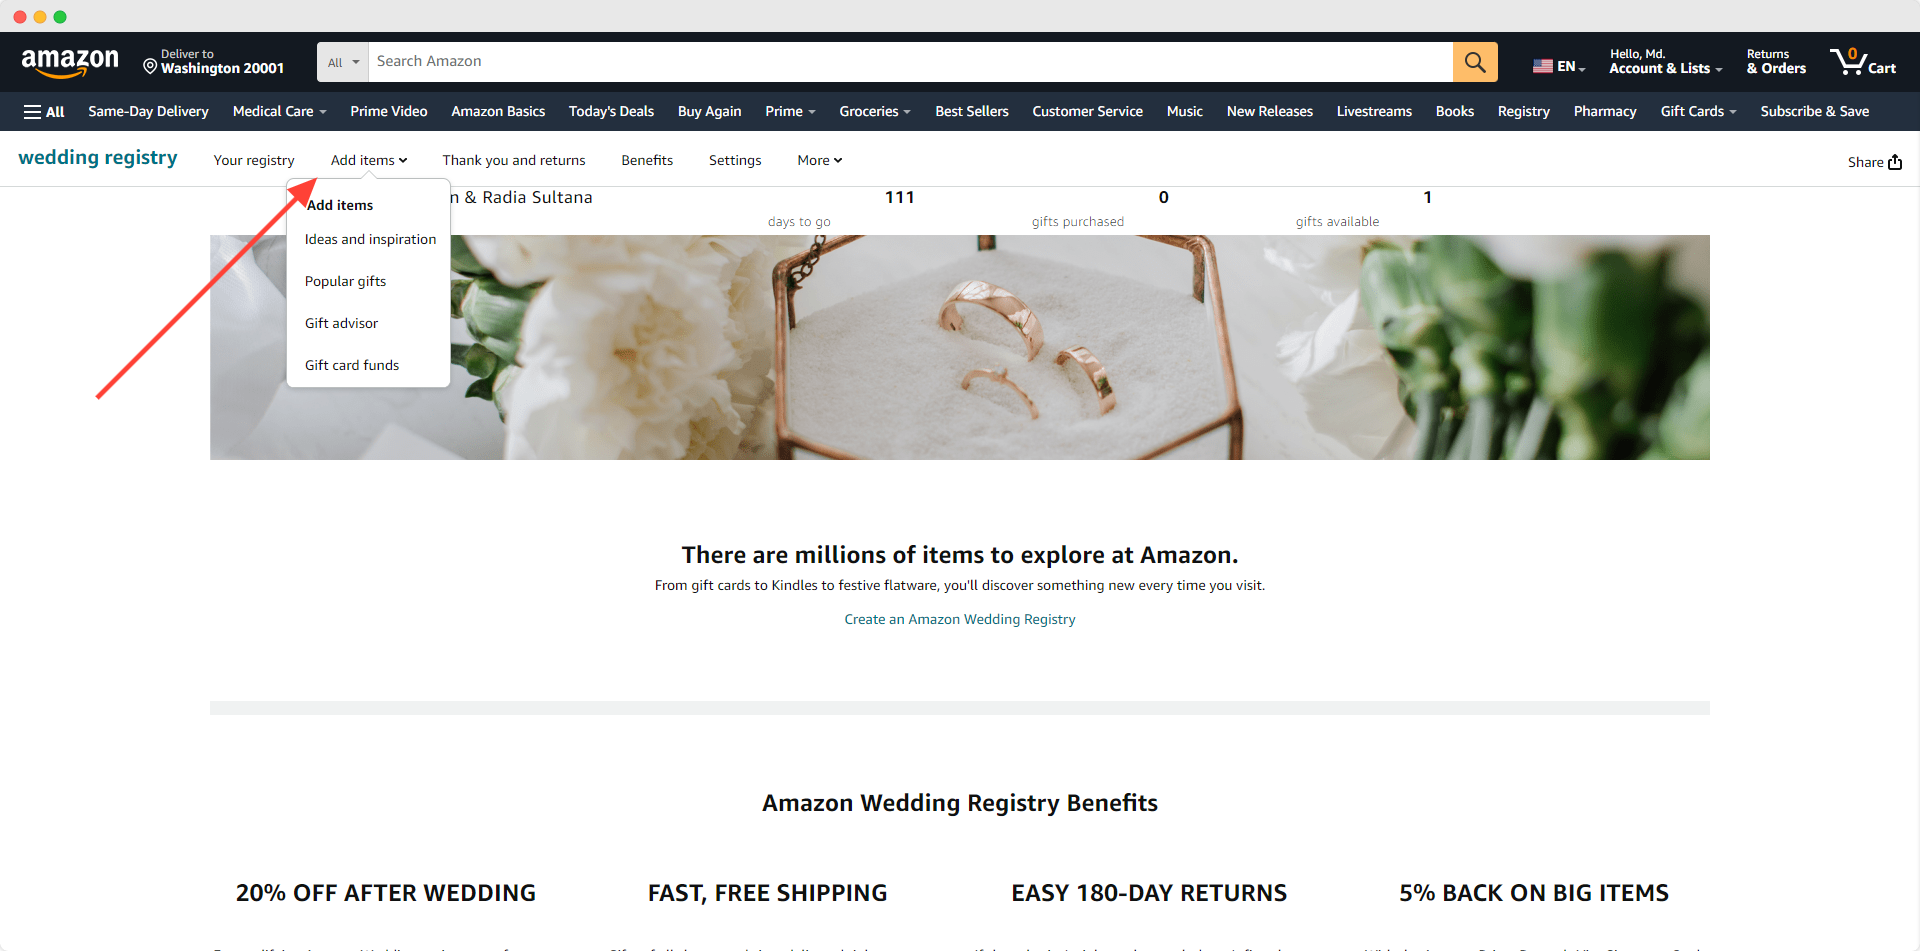
6. Click on the “Share” button.
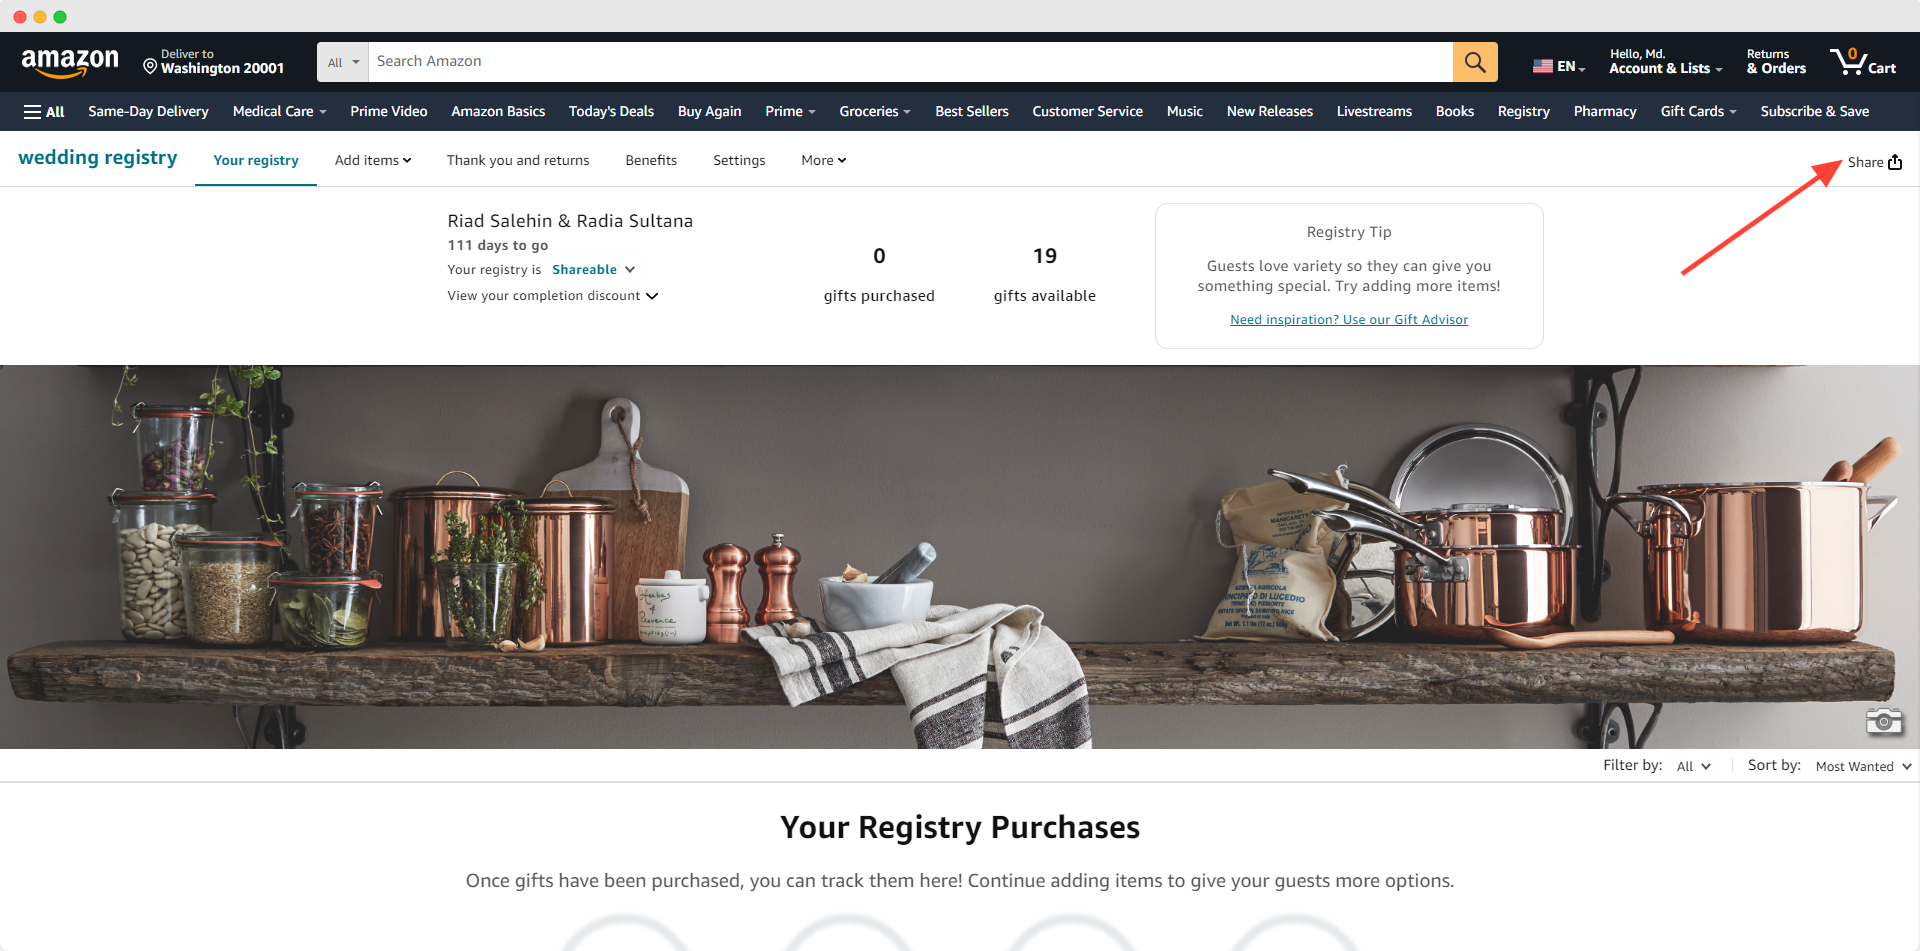
7. Share your registry link on your website.
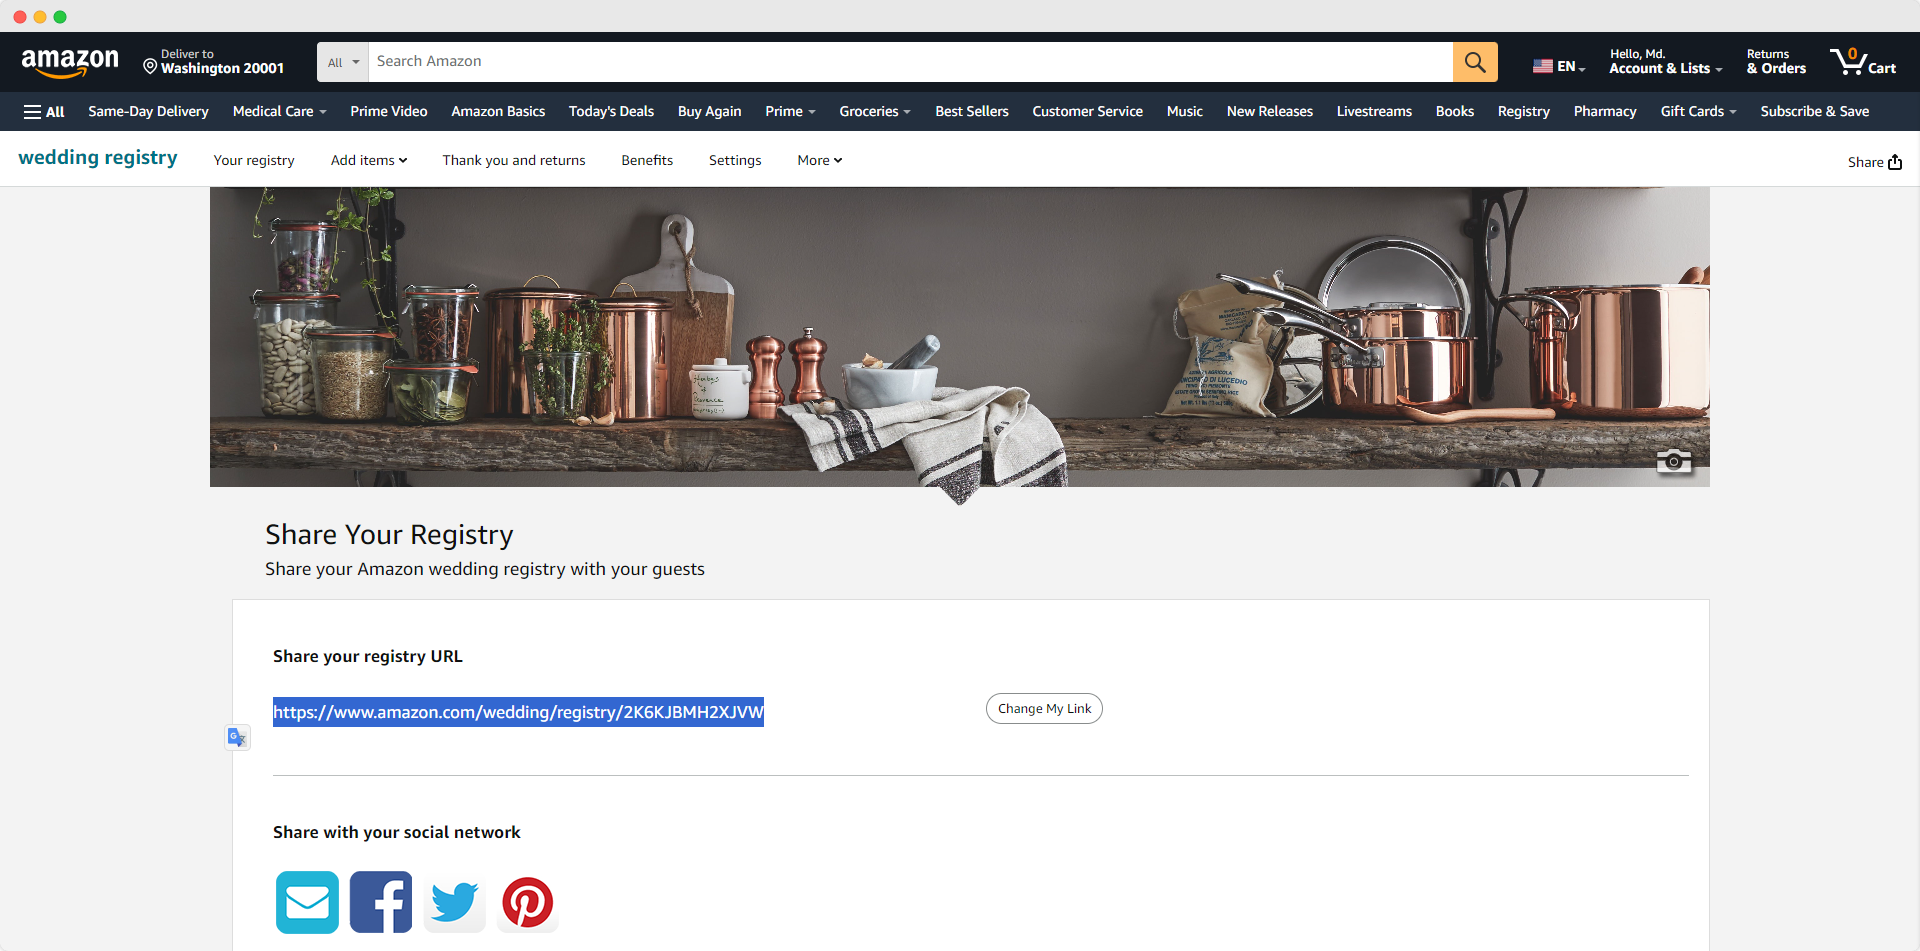
Pro Tip: Sharing the link directly on your website might clutter the look of your website. Hence, I suggest you add a well-designed button to trigger the link instead.
Tips for Creating an Effective Wedding Gift Registry
-
Diversify your gift selection: Include items at various price points to accommodate different budgets. This ensures all guests can find something within their means.
-
Register early: Set up your registry shortly after engagement. This allows guests to purchase gifts for pre-wedding events and gives you time to refine your selections.
-
Over-register: Aim for 2-3 gifts per guest. This provides ample choices and ensures options remain available as items are purchased.
-
Think long-term: Include items you may need in the future, not just immediate necessities. This could include seasonal items or upgrades to existing home goods.
-
Add some luxury items: Don't shy away from higher-priced products for group gifts or splurges.
-
Update regularly: Check your registry often, especially as the wedding approaches. Replenish options as items are purchased to maintain a good selection.
Areas to Consider for Your Gift Registry
-
Kitchen and Dining: From small appliances to dinnerware sets
-
Bedding and Bath: Sheets, towels, and bathroom accessories
-
Home Decor: Artwork, throw pillows, and decorative items
-
Home Appliances: Vacuum cleaners, air purifiers, etc.
-
Storage and Organization: Shelving units, storage containers
-
Outdoor and Patio: Grilling equipment, outdoor furniture
-
Electronics: Smart home devices, sound systems
-
Travel: Luggage sets, travel accessories
Gift Registry Etiquette
-
Avoid listing registry information on formal invitations. Instead, include it on your wedding website or share it through word of mouth.
-
Send thank-you notes promptly. Aim to send them within two weeks for gifts received before the wedding and within two months for gifts received on or after the wedding day.
-
Keep your registry active for up to a year after your wedding. Some guests may prefer to send gifts after the event.
Unlike mentioning gifts on invitations, which can seem impolite, your website is the perfect place for registry information. It allows guests to discreetly access your wishlist, making gift-giving more comfortable and convenient for everyone involved.
Cash Registry
In addition to a traditional gift registry, you can also offer a cash registry option on your website. This could include a honeymoon fund, where guests contribute towards your dream vacation.
Alternatively, you may collect donations for a cause close to your heart, such as a charity or a down payment on a new home. Clearly explain the purpose of the cash registry and provide easy-to-use payment methods for your guests.
Just like you’ve added a gift registry button, you can add a payment button for your cash registry as well.
Follow this this tutorial to set up your wedding cash registry: How to integrate different payment platforms.
Tips for Setting Up a Cash Registry
-
Be specific: Clearly explain how you plan to use the funds to make giving more personal.
-
Offer various contribution levels: Allow guests to give amounts they're comfortable with.
-
Combine with traditional registry: Offer both cash and physical gift options to suit all preferences.
-
Use a reputable platform: Choose a secure, well-known cash registry service to ensure safe transactions.
Etiquette for Cash Registries
-
Word it thoughtfully: Frame it as a "wish" rather than an expectation.
-
Provide context: Explain why you're opting for a cash registry to help guests understand your choice.
-
Express gratitude: Send personalized thank-you notes detailing how you plan to use the gift.
Regardless of the registry options you choose, be sure to update your website regularly as items are purchased. This ensures your guests have the most up-to-date information when shopping for the perfect gift.
Step 7: Add an FAQ Section
An FAQ section on your wedding website is a list of common questions and answers about your big day. It is a helpful guide available 24/7 to address your guests' concerns. This section saves time by reducing repetitive questions, ensures everyone has access to common information, and helps guests feel more prepared and comfortable about attending your wedding.
Common Wedding Website FAQs to Add:
-
What's the dress code?
-
Are kids welcome?
-
What time should I arrive?
-
Is there parking at the venue?
-
Will transportation be provided?
-
Can I take photos during the ceremony?
-
What's the RSVP deadline?
-
How do I let you know about dietary restrictions?
-
Where can I find your gift registry?
-
Is the venue wheelchair accessible?
-
What's the wedding hashtag?
-
Will there be an open bar?
-
How late will the reception run?
-
What's the best way to get to the venue?
-
Are plus-ones allowed?
Here’s how to add an FAQ section to your website:
1. Click on “Components” from the left sidebar.
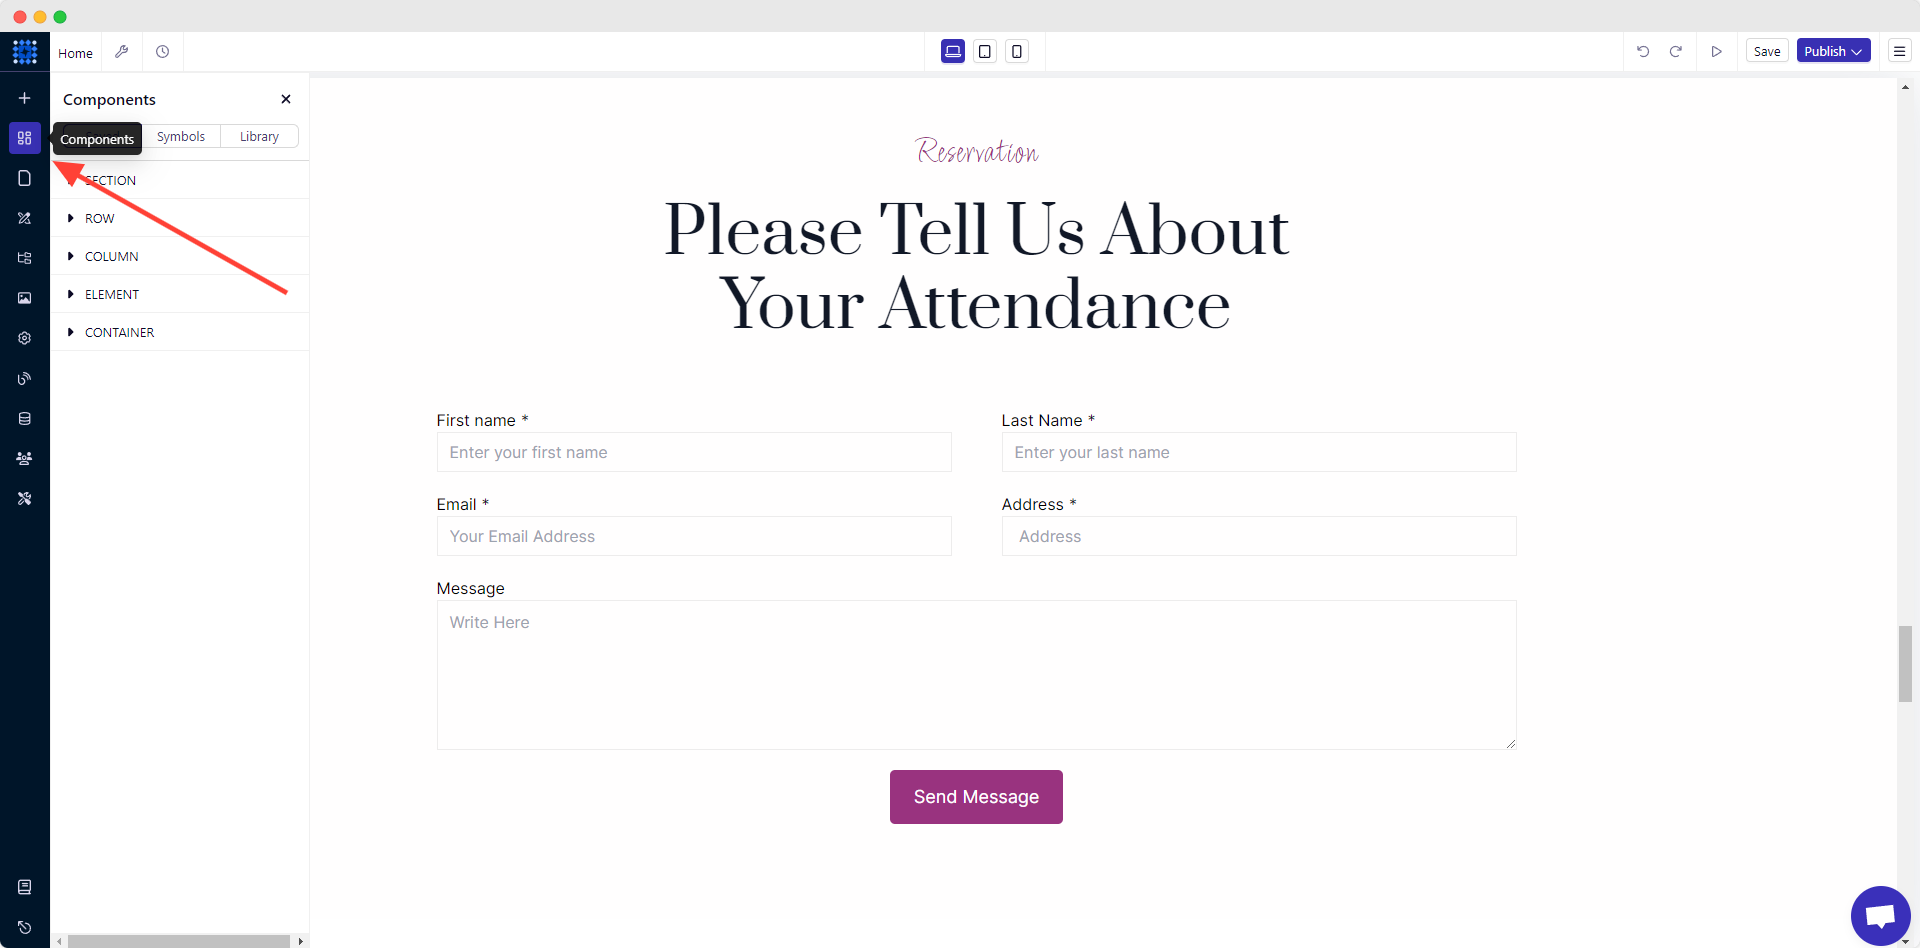
2. Select the “Library” tab.
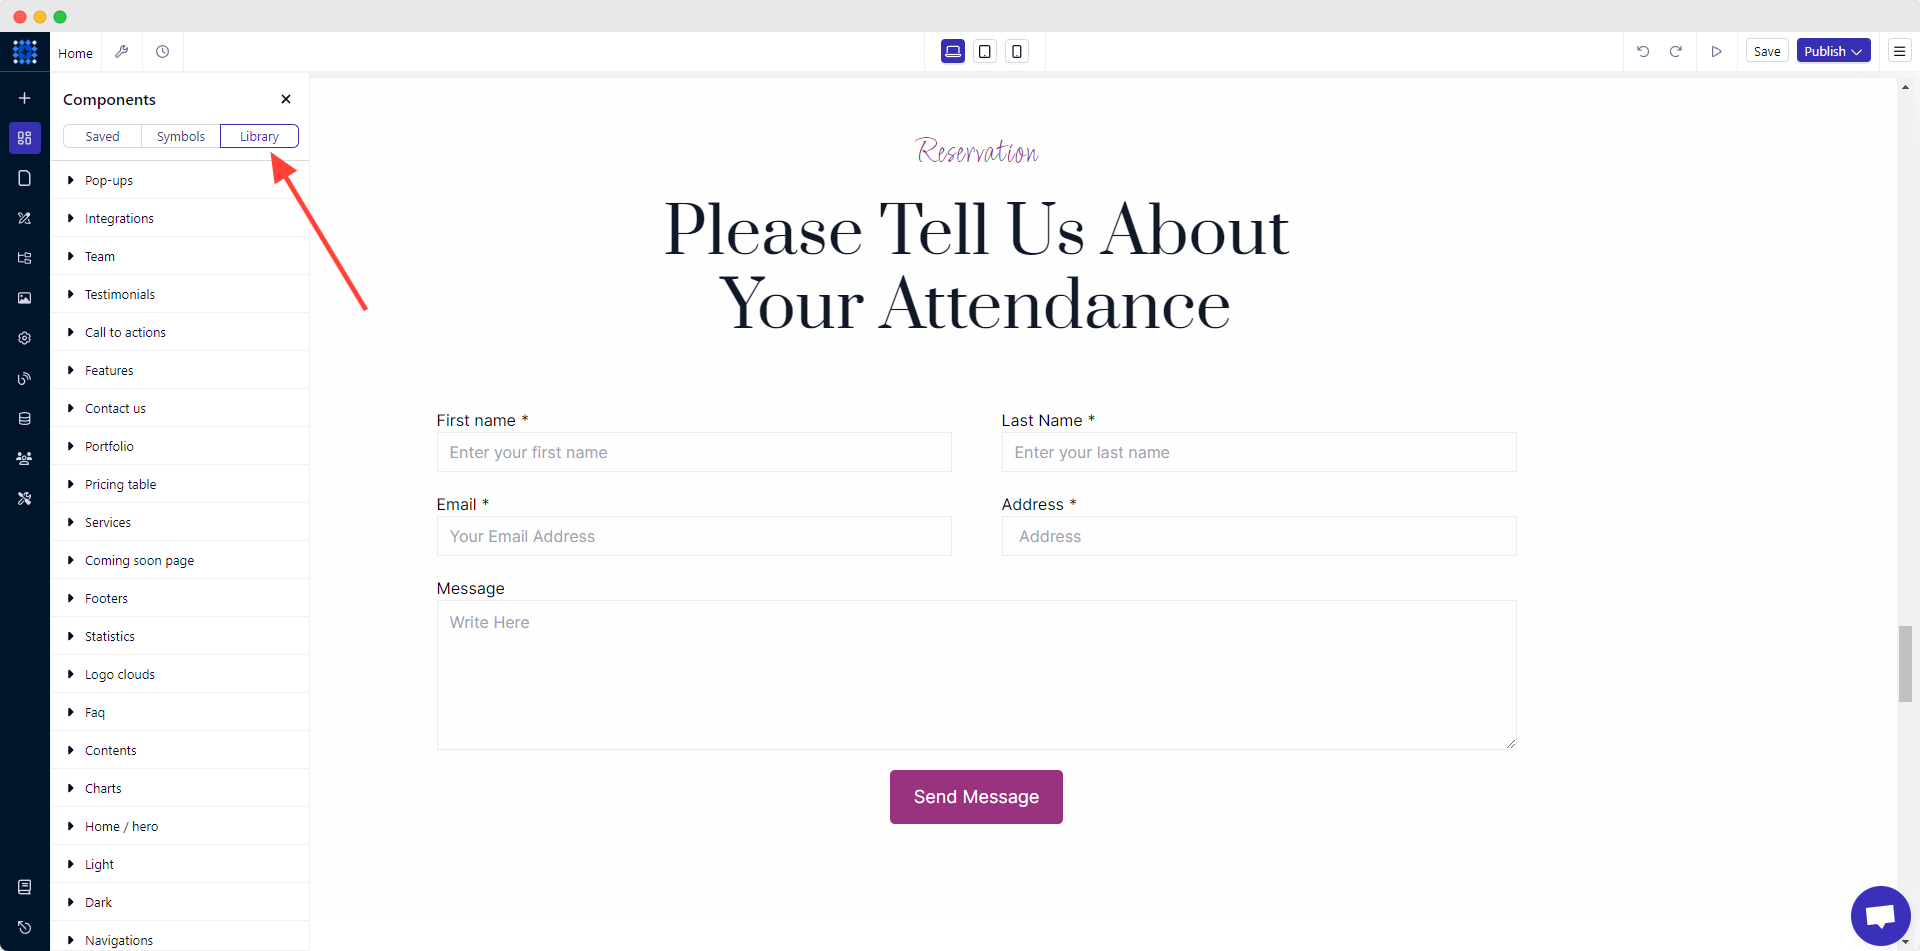
3. Click on the “Faq” dropdown from the component list.
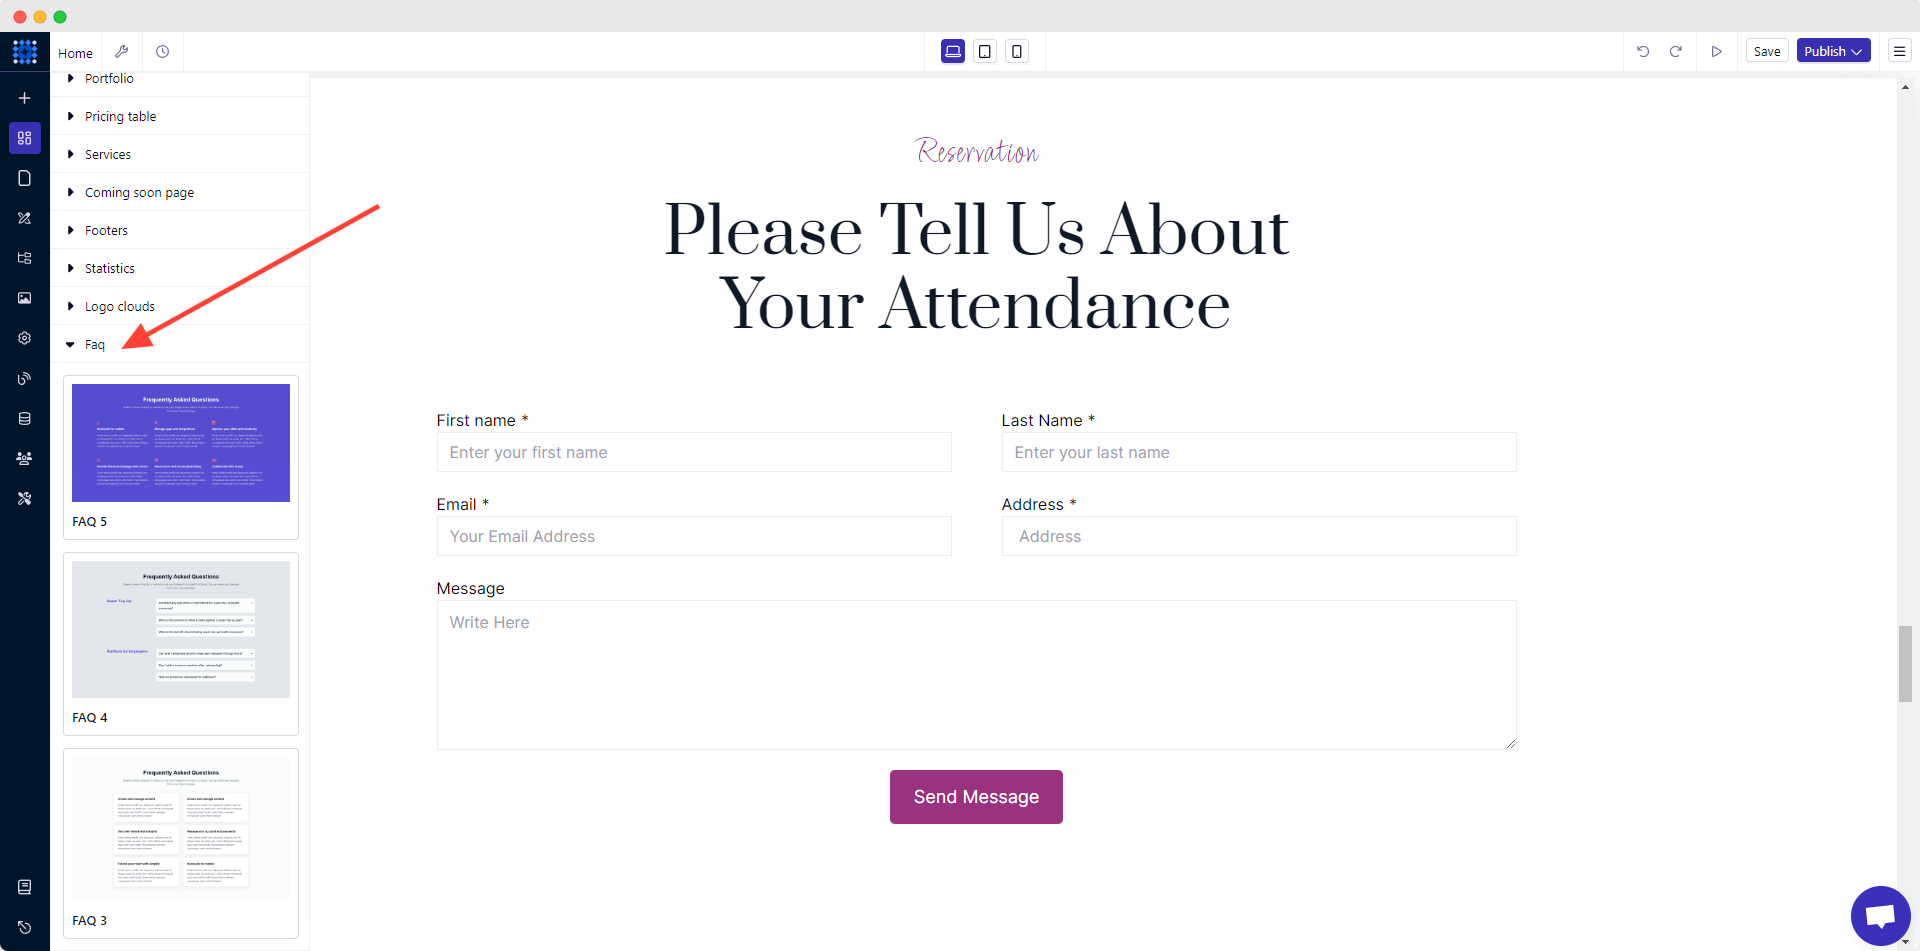
4. Hover over to the pre-designed faq components to have a look at each.
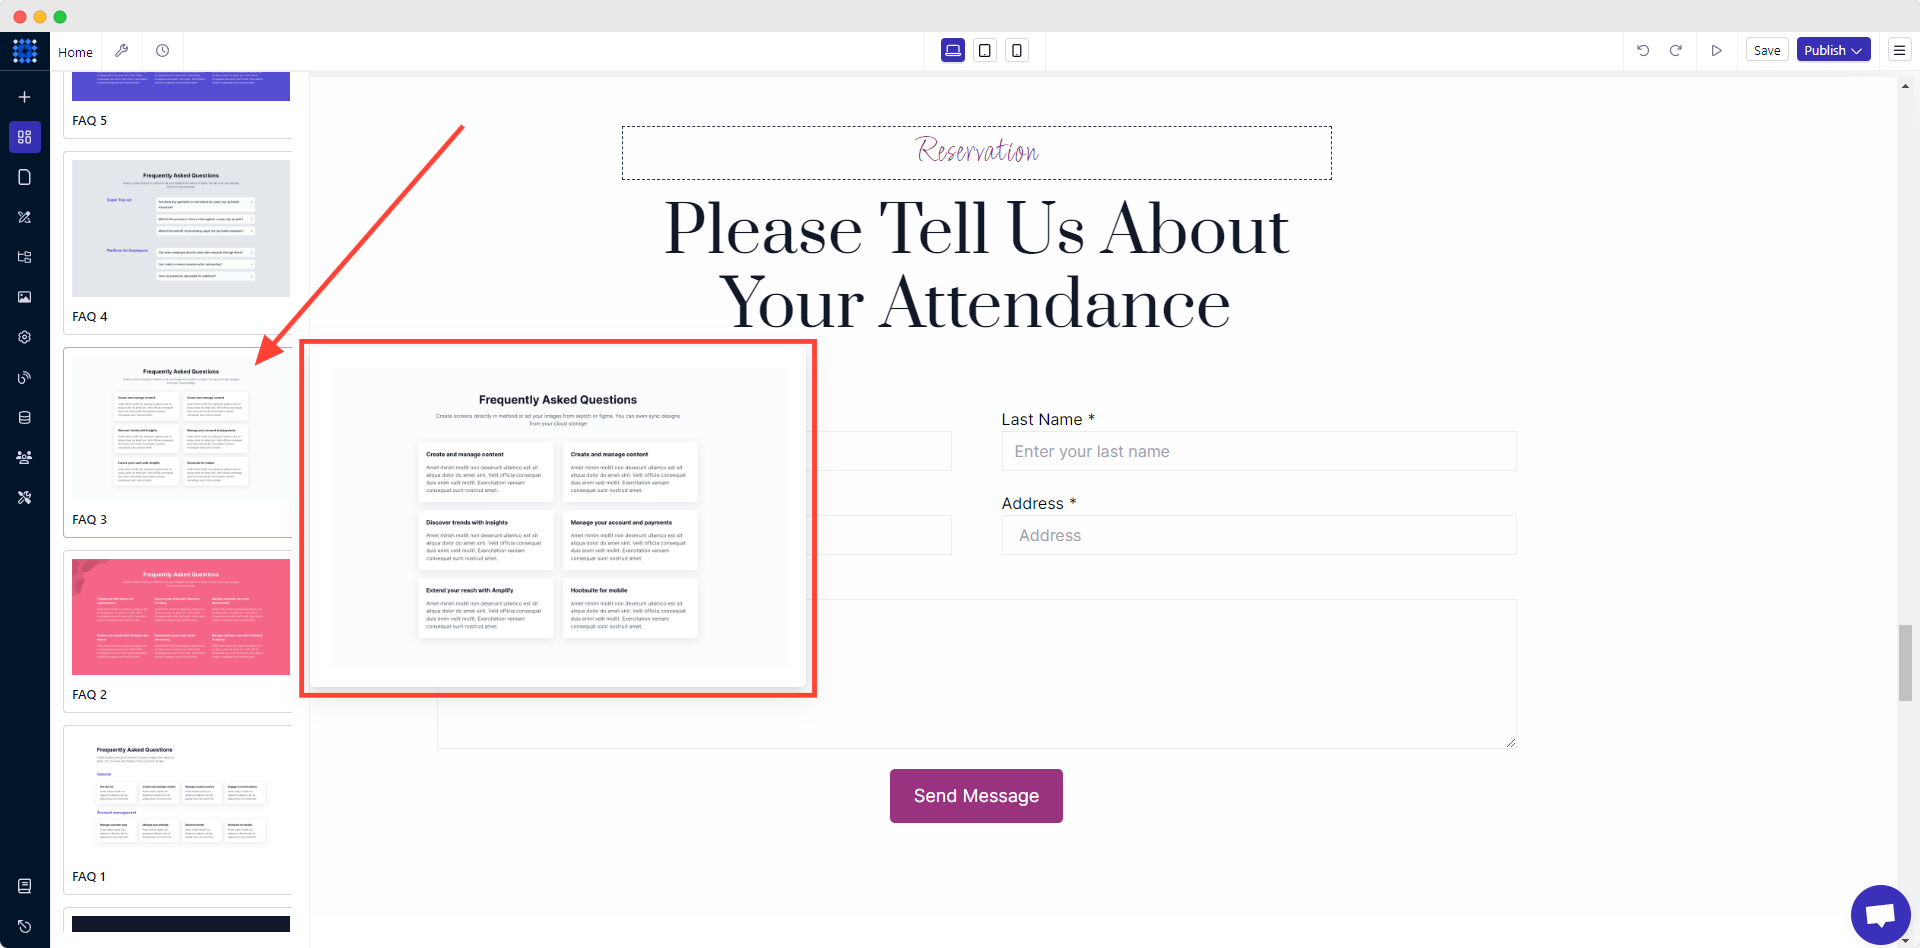
5. Drag and drop the one that best suits your liking.
-uyjR_.gif)
That’s it. Your FAQ section is added. You can now customize the entire section and each element within it using the editing modal.
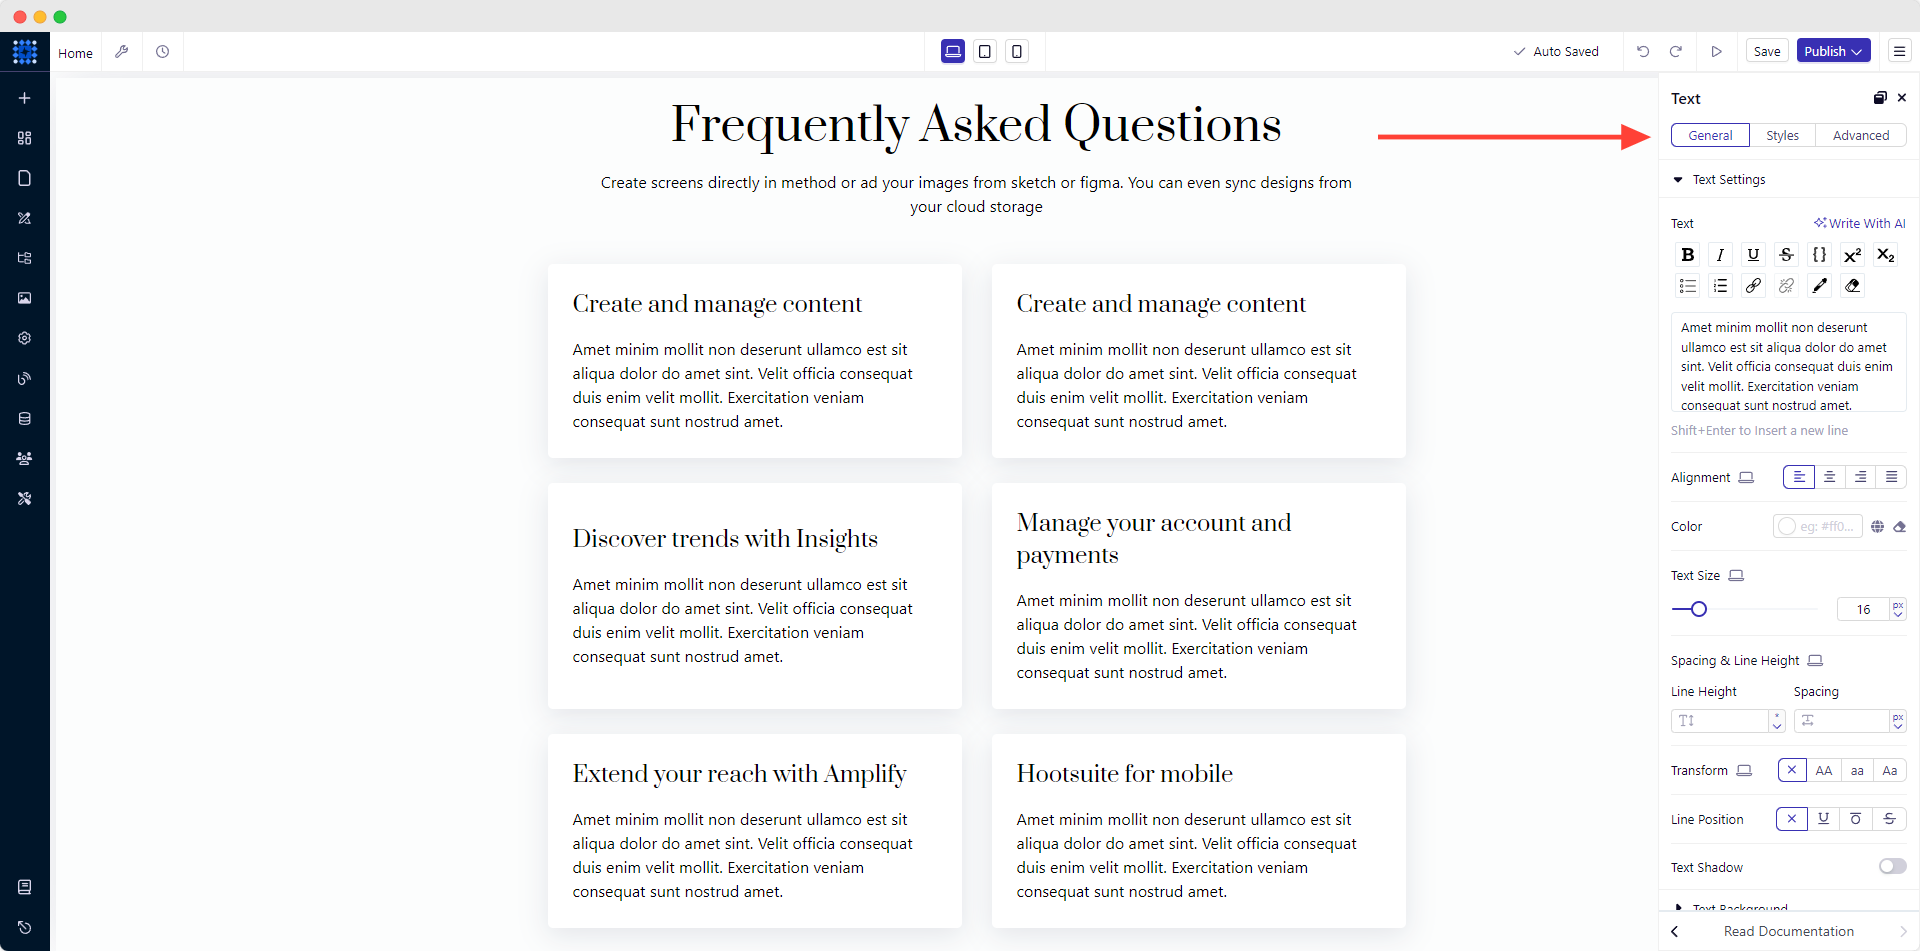
Step 8: Password-Protect Your Website
Consider password-protecting your wedding website to keep personal details private. This ensures that only invited guests can access event information, RSVP details, and other sensitive content. Provide the password discreetly through your save-the-dates and invitations.
Here’s how to password-protect a page on Dorik:
-
Open Page Settings: Access the page you want to protect from your site dashboard.
-
Enable Password Protection: Turn on password protection in the Advanced tab under Page Settings.
-
Set a Secure Password: Enter a password that meets the security requirements.
-
Save and Publish: Save your changes and publish your site to activate protection.
For a visual guideline, read our “Password Protected Page” documentation.
Step 9: Optimize for Mobile
Optimizing your wedding website for mobile helps people who view it on smartphones or tablets. Mobile optimization ensures that all your guests can easily access and navigate your website, view information, and interact with features like RSVP forms, regardless of their device.
Make sure your wedding website has a responsive, mobile-friendly design with the following:
-
Large, easy-to-read fonts
-
Intuitive, uncluttered navigation
-
Properly sized and compressed images
-
Fast page load speeds
A mobile-optimized wedding website is not only guest-friendly but also Google-friendly!
With Dorik, you don’t need to worry about all these. Every website created with Dorik is automatically optimized for mobiles and other devices backed up with CDN hosting for fast page load speed.
Step 10: Test Your Website Functionality Before Going Live
Test your website thoroughly before launch, including proofreading content, checking all functionality, and validating responsiveness across devices. This helps you catch errors, broken links, or design issues that confuse or frustrate your guests.
Here are some steps to test your website before going live:
-
Proofread: Go through all the content on your website and check for typos, grammar errors, and spelling mistakes.
-
Functionality: Check all links, buttons, forms, and interactive elements to ensure they function correctly.
-
Responsiveness: Test your website on different devices, including desktop, tablet, and mobile, to ensure it is responsive and displays correctly on all devices.
-
Speed: Test your website's loading speed using online tools like Google PageSpeed Insights to optimize your website's performance.
-
Security: Make sure your website hosting service is secure and protected against malware and viruses.
-
Compatibility: Check your website's compatibility with different browsers, such as Chrome, Firefox, Safari, and Internet Explorer.
Step 11: Publish and Share Your Wedding Website
Since you’ve already tested your website and ensured it functions as expected, it’s time to let the world know. To do that, I recommend you use a custom domain to give your website a personal touch.
Securing and Connecting the Domain
Consider purchasing a custom domain name to give your wedding website a unique, memorable identity. This will make your site more professional and easier for guests to find and remember.
When choosing a domain, keep it short, simple, and intuitive - ideally, a combination of your first names with ".com" at the end. If your preferred name is unavailable, try variations like adding "wedding" or using your location. Many website builders offer free domain name options as well.
After you’ve purchased it, connect the domain to your site.
Publishing the Website
Once you've secured your domain, it's time to publish your wedding website. Decide whether you want to make it public, accessible to anyone online, or private, viewable only by invited guests.
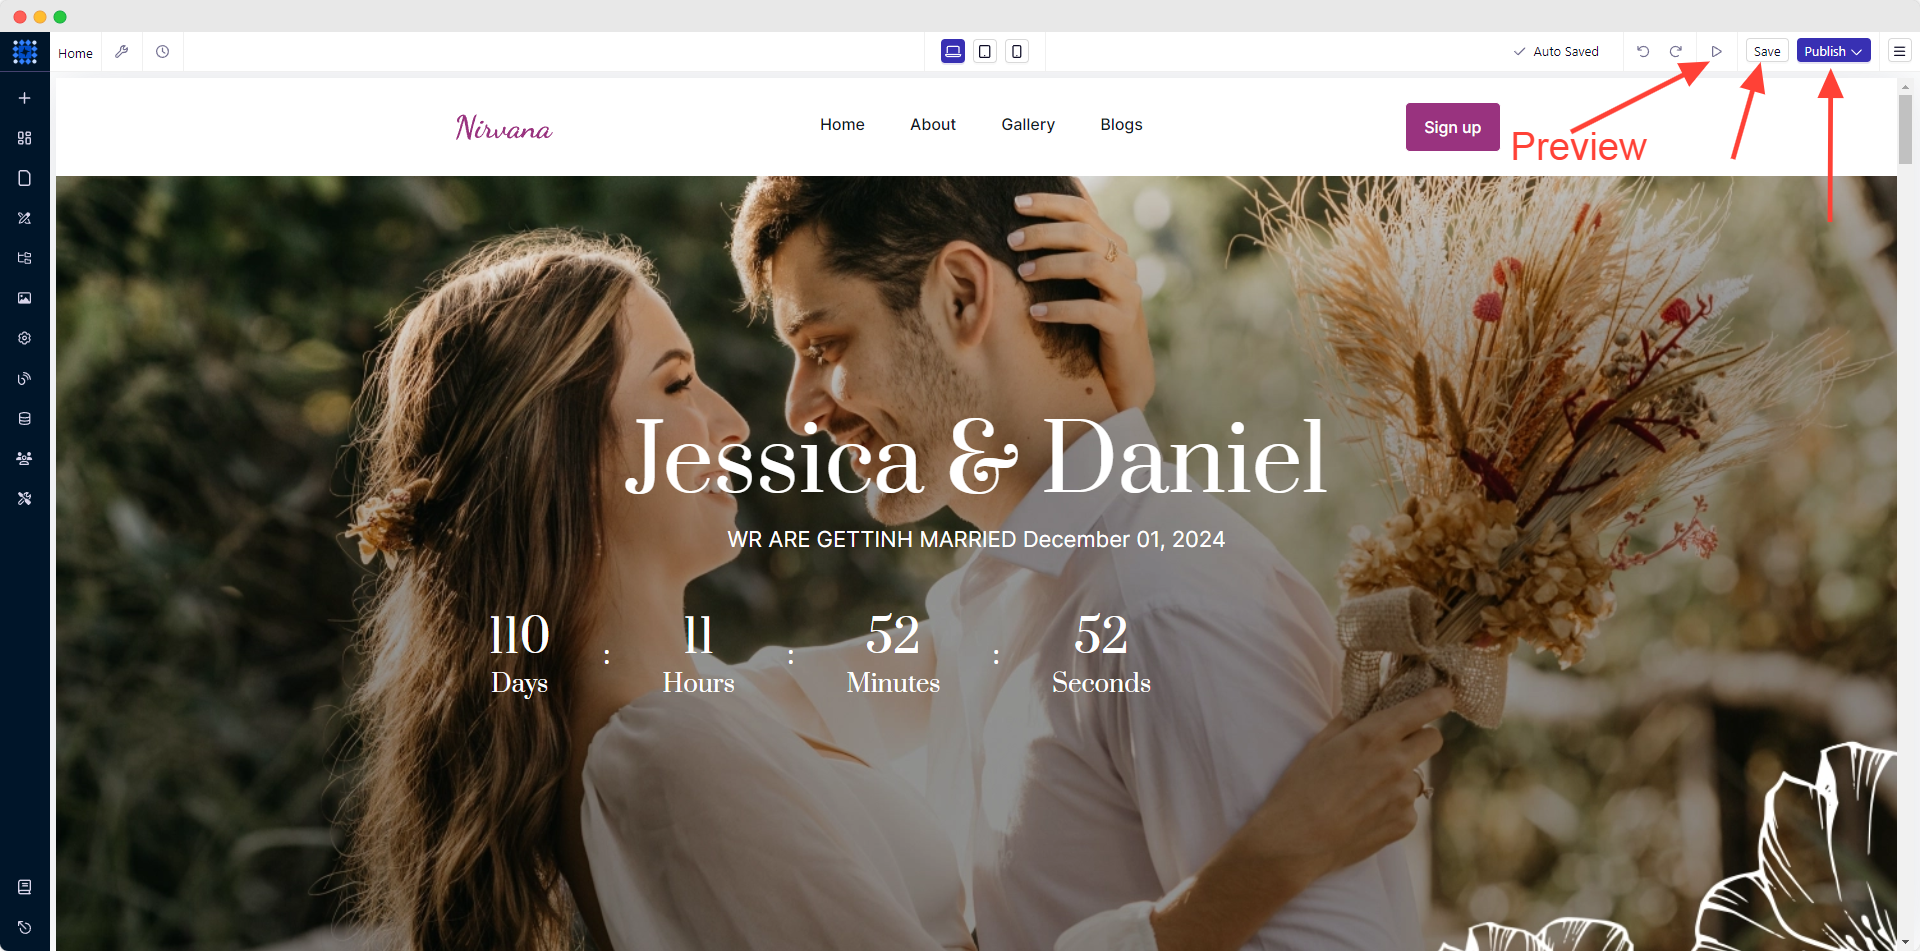
Here’s how you can save, preview, and publish your website.
Sharing the Website
Share your wedding website URL with guests through multiple channels:
-
Include it on your save-the-date cards and formal invitations
-
Send the link in email announcements
-
Share it discreetly on your personal social media accounts
Avoid posting the website publicly on open social media, as this can lead to confusion about who is actually invited to your celebration.
Your wedding website is a living, breathing platform that should be updated regularly with the latest details. As plans evolve, make timely updates and notify guests of any changes. A well-maintained website ensures your loved ones have the information they need to participate fully in your special day.
FAQs
Are Wedding Websites Worth it?
Wedding websites are absolutely worth it. They simplify wedding planning by centralizing information, streamlining communication with guests, and reducing stress. A well-designed wedding website saves time, keeps guests informed, and creates excitement for your special day. It's a digital hub for sharing your love story, event details, RSVPs, and registry information, making the entire wedding process smoother for both you and your guests.
What are The Benefits of a Wedding Website?
The benefits of a wedding website include:
-
Centralized information sharing
-
Easy RSVP management
-
Streamlined guest communication
-
Sharing your love story and photos
-
Providing travel and accommodation details
-
Showcasing your gift registry
-
Offering a mobile-friendly experience for guests
-
Reducing paper waste and costs
-
Allowing for easy updates as plans change
-
Creating excitement and anticipation for your big day
Can I Make a Wedding Website for Free?
While some platforms offer free wedding websites, Dorik provides a more comprehensive solution starting at $18/month. This includes professional templates, customization options, and unlimited free CDN hosting. Although not free, Dorik's paid plans offer superior features and reliability, ensuring your wedding website looks beautiful and functions flawlessly for all your guests.
How Much Does it Cost to Create a Wedding Website?
Creating a wedding website typically costs between $20 to $70 per month. This range includes the website builder, hosting, and domain expenses. Website builder plans usually start at $10 to $30 per month, while domain costs range from $10 to $20 annually. Some platforms offer free options, but investing in a paid plan ensures better features, customization, and reliability. For a cost-effective solution, consider Dorik, which offers plans starting at $18/month, including the website builder and free CDN hosting.
When Should I Create My Wedding Website?
Create your wedding website at least 6-9 months before your wedding date. This timeline allows ample time to design your site, add essential information, and share the link with guests. By creating your website early, you can include it on save-the-dates and invitations, giving guests plenty of time to access important details and RSVP for your big day.
Should I Make My Wedding Website Private?
Yes, you should make your wedding website private. Password-protecting your site ensures that only invited guests can access personal details, event information, and RSVP features. This privacy measure prevents confusion about who's invited and protects sensitive information. Share the password discreetly through save-the-dates and invitations to maintain security while keeping guests informed.
Should I Put the Menu on My Wedding Website?
Yes, you should put the menu on your wedding website. Including menu information helps guests prepare for the meal and addresses any dietary concerns in advance. List main courses, appetizers, and desserts. Also, provide a way for guests to communicate any special dietary requirements. This thoughtful touch enhances the guest experience and helps with your planning.
Should I Put the Rehearsal Dinner on My Wedding Website?
No, you shouldn't put rehearsal dinner details on your main wedding website. Rehearsal dinners are typically more exclusive events for the wedding party and close family. To avoid confusion, keep rehearsal dinner information off the public website. Instead, communicate these details directly to invited guests through separate invitations or a password-protected section of your site.
What to Include on a Wedding Website?
Key elements to include on a wedding website:
-
Welcome message and countdown timer
-
Your love story and photos
-
Wedding date, time, and venue details
-
RSVP system
-
Travel and accommodation information
-
Gift registry details
-
FAQ section
-
Dress code information
-
Wedding party introductions
-
Schedule of events
-
Contact information for questions, etc.
How to Make a Private Wedding Website?
To make a private wedding website, use Dorik's password protection feature. Go to Page Settings, access the Advanced tab, and enable password protection. Set a secure password and save changes. Share this password only with invited guests through save-the-dates and invitations. This ensures your wedding details remain private while still being easily accessible to your guests.
How Do I Put My Wedding Website on an Invitation?
To put your wedding website on an invitation, add it discreetly at the bottom of the invitation or on a separate enclosure card. Use a simple phrase like "For more details, please visit our wedding website at [URL]” or a QR code. Avoid cluttering the main invitation with the full web address. If using a custom domain, choose something short and memorable for easy reference.
How Do I Announce/Share My Wedding Website?
Announce your wedding website by including it on save-the-dates and formal invitations. Send the link in email announcements to guests. Share it discreetly on personal social media accounts. Ask your wedding party to spread the word. For a personal touch, mention it during engagement celebrations. Ensure the URL is simple and memorable, making it easy for guests to access and remember your wedding information hub.
Bottom Line
We've walked through the 11 key steps, from selecting the right website builder to publishing and sharing your site.
A well-crafted wedding website can significantly enhance your wedding experience, keeping everyone informed and excited about your celebration. It's not just a trend but a practical tool that simplifies planning and adds a personal touch to your wedding journey.
Try Dorik today to create your stunning, functional wedding website. With its user-friendly interface, beautiful templates, and features like AI-powered design and free CDN hosting, Dorik makes it easy to craft a website that's as unique as your love story. Start building your perfect wedding website now and take the first step towards a beautifully organized celebration!
Best wishes for your wedding!
Good Reads:


