

Do you want to automate repetitive tasks and save time for more important work? That's where Zapier comes in.
This robust automation tool connects your favourite apps and automates tasks, streamlining your workflow and boosting productivity.
In this blog post, we'll discuss what is Zapier, how it works, and how you can get started with this game-changing tool.
What is Zapier?
Zapier is a powerful web-based automation tool that allows you to streamline your workflows and connect different web applications seamlessly.
With Zapier, you can automate repetitive tasks and integrate various web apps without the need for coding or technical expertise. It functions as a connector between multiple applications.
For example, imagine you run a small business website. You receive new orders through it. Now, you want to automatically update your inventory in a Google Sheet and notify your team on Slack.
With Zapier, you can create a Zap that triggers when a new order is received and performs actions like updating the inventory spreadsheet and sending a Slack notification.
Therefore, you need not enter any data manually. It ensures your inventory transfer data is constantly updated while keeping your team informed in real time.
Main Components of Zapier
Zapier operates using two main building blocks: triggers and actions. To create a Zap, you must set your trigger and action.
Let's know them in detail!
Triggers
Triggers are the events or actions that initiate an automation workflow. When a trigger event happens in one app, Zapier detects it and triggers the associated actions in the connected apps.
Triggers act as the starting point for automation, allowing you to automate tasks based on specific events or conditions.
For example, receiving a new email, a new form submission, or a new entry in a spreadsheet can all act as triggers. When a trigger event ensues, Zapier detects it and initiates the automation.
Triggers in Zapier vary depending on the app you are using. Each app has its own set of trigger events you can choose from when creating a Zap (automation sequence).
There are two main Trigger types in Zapier. They are:
-
Polling triggers
-
Instant triggers
Actions
Actions are the tasks an app performs due to a trigger event. Once a trigger is activated, actions are carried out automatically to complete the desired task.
Actions can include:
-
Creating a new entry.
-
Sending a message or notification
-
Updating a record.
-
Performing any other function supported by the connected apps.
Zaps
Zaps are the automated workflows created in Zapier. A Zap comprises a trigger and one or multiple actions executed when the trigger event transpires.
When a Zap is active, it continuously monitors the trigger and performs the associated actions whenever the trigger event occurs.
Let's say you run a lead generation website. You want to automatically add new leads from a Google Form submission to your email marketing tool, such as Mailchimp.
Here's how the trigger and action would work in Zapier:
Trigger: "New Form Response in Google Forms"
(Whenever a new lead fills out the Google Form)
Action: "Add Subscriber to Mailchimp"
(Automatically add the lead as a subscriber in your Mailchimp email list.)
In this example, when someone submits the Google Form (trigger), Zapier will add that person to your Mailchimp email list as a subscriber.
This automation ensures that the leads captured through the form are seamlessly added to your email marketing system, allowing you to send targeted campaigns and nurture customer relationships.
So, we can say Zap= Action + Trigger.
Assuming you have a clear understanding of these three factors.
Next, I'll demonstrate the step-by-step breakdown of how Zapier works.
How Does Zapier Work?
The full process requires multiple steps. So, we'll discuss everything in detail so that you can understand them clearly.
Step 1: Create Your Zapier Account
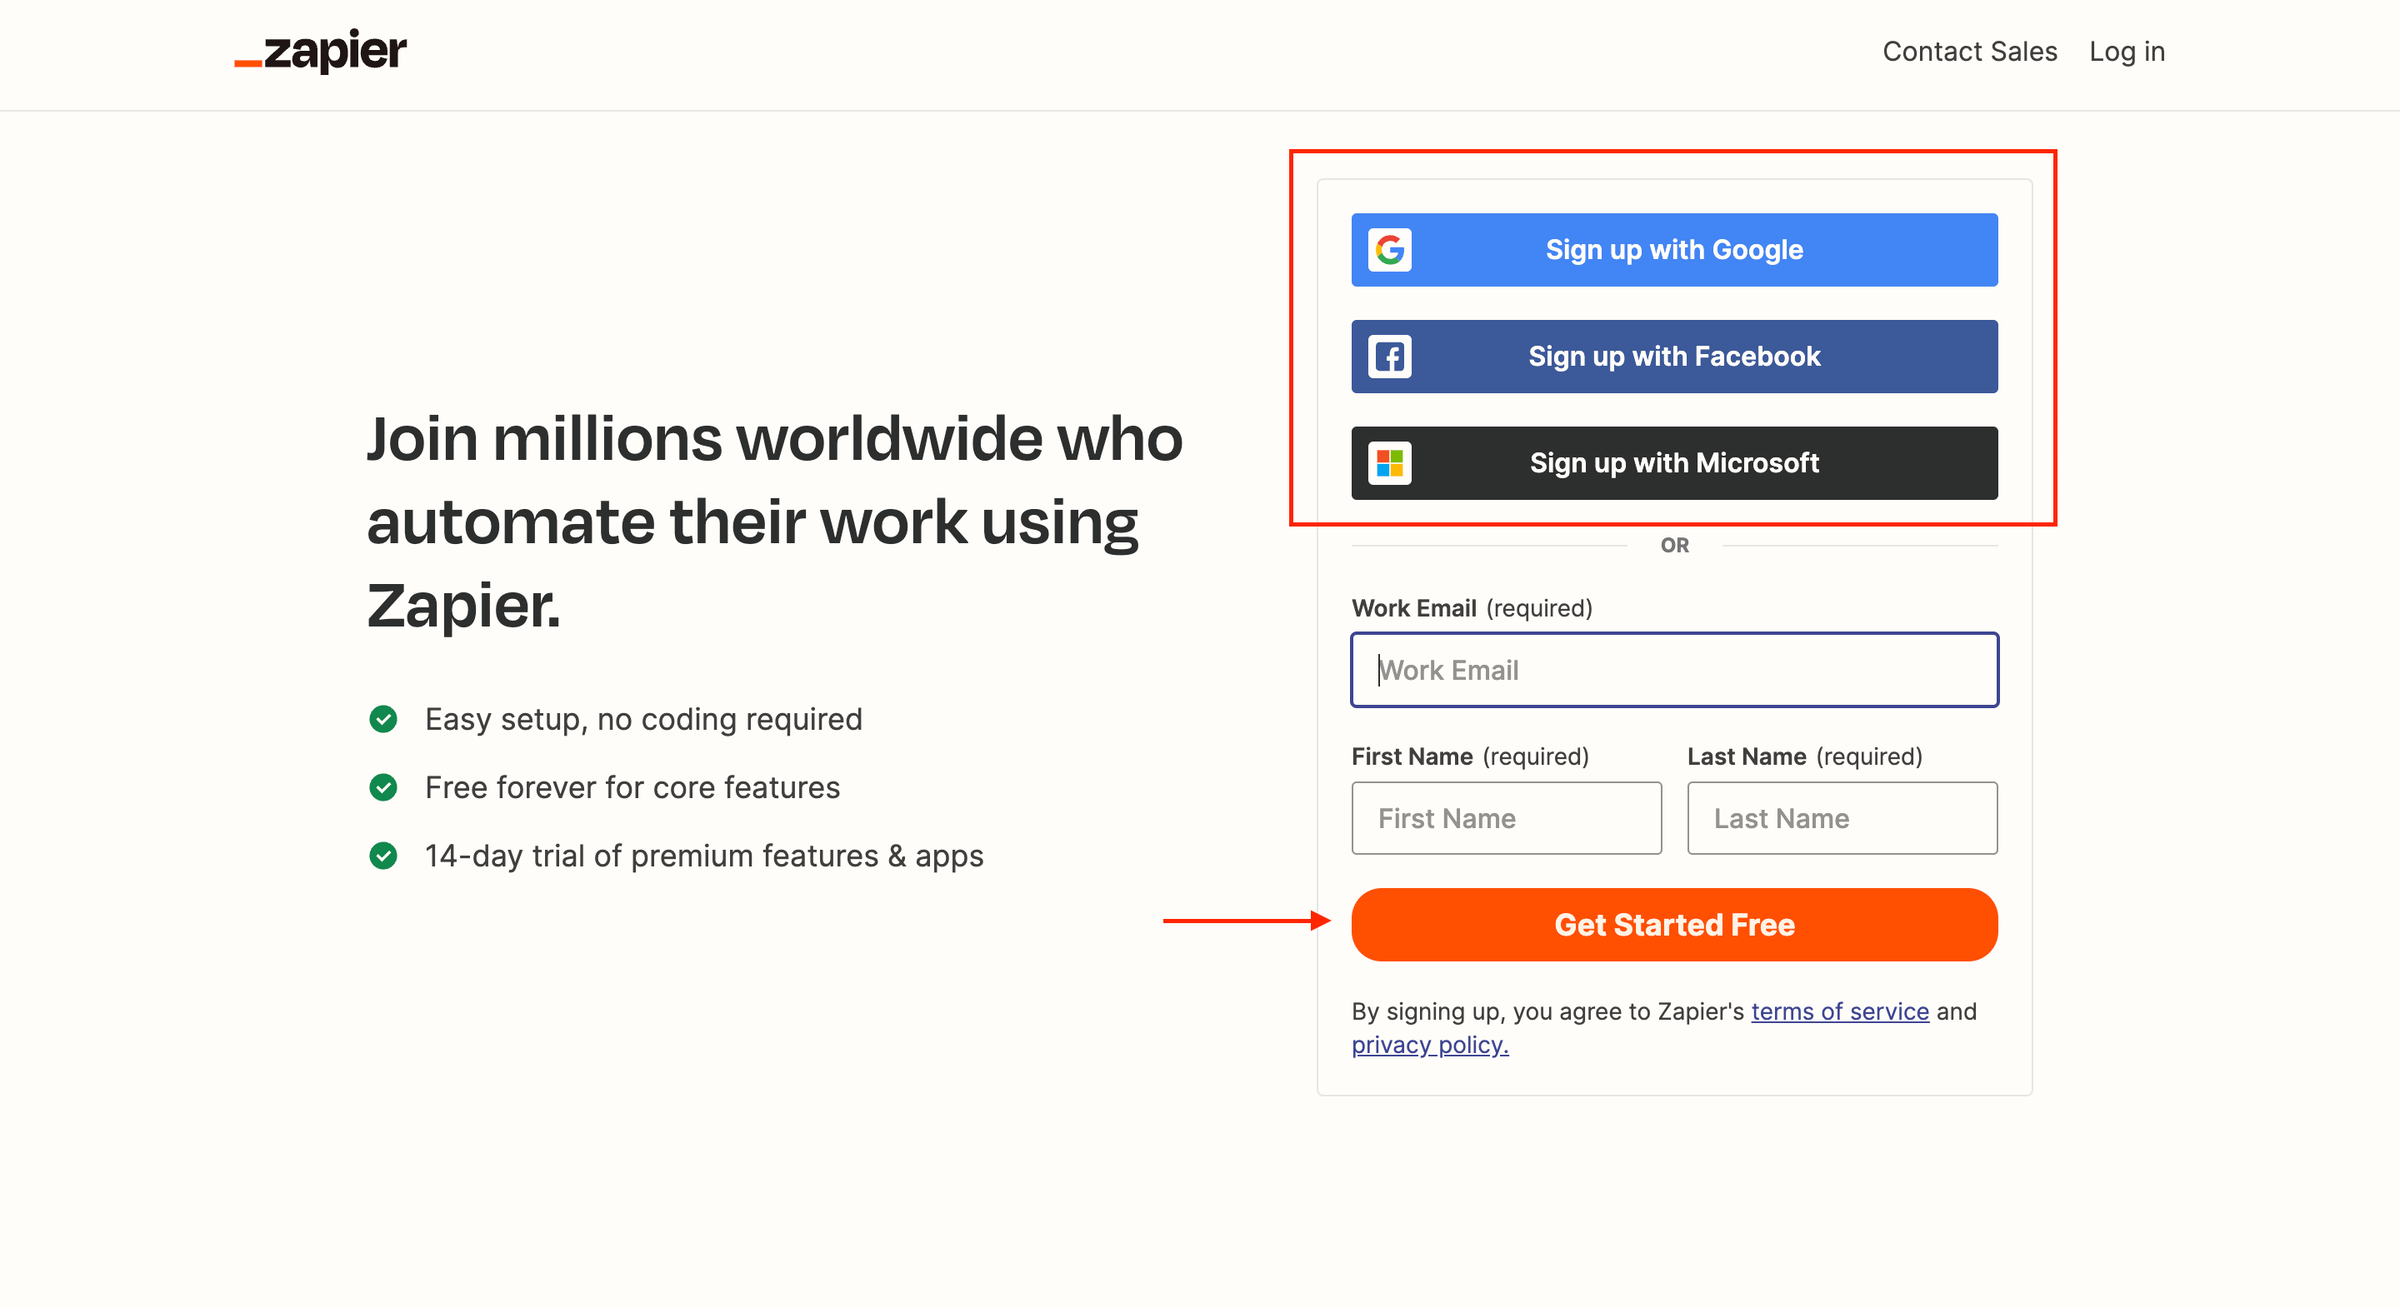
To sign up for an account, follow these steps:
-
Go to the Zapier website.
-
Click the "Get Started Free" or the "Sign Up" button.
-
Sign up using your Google, Facebook, or Microsoft account. Alternatively, you can sign up with your work email account.
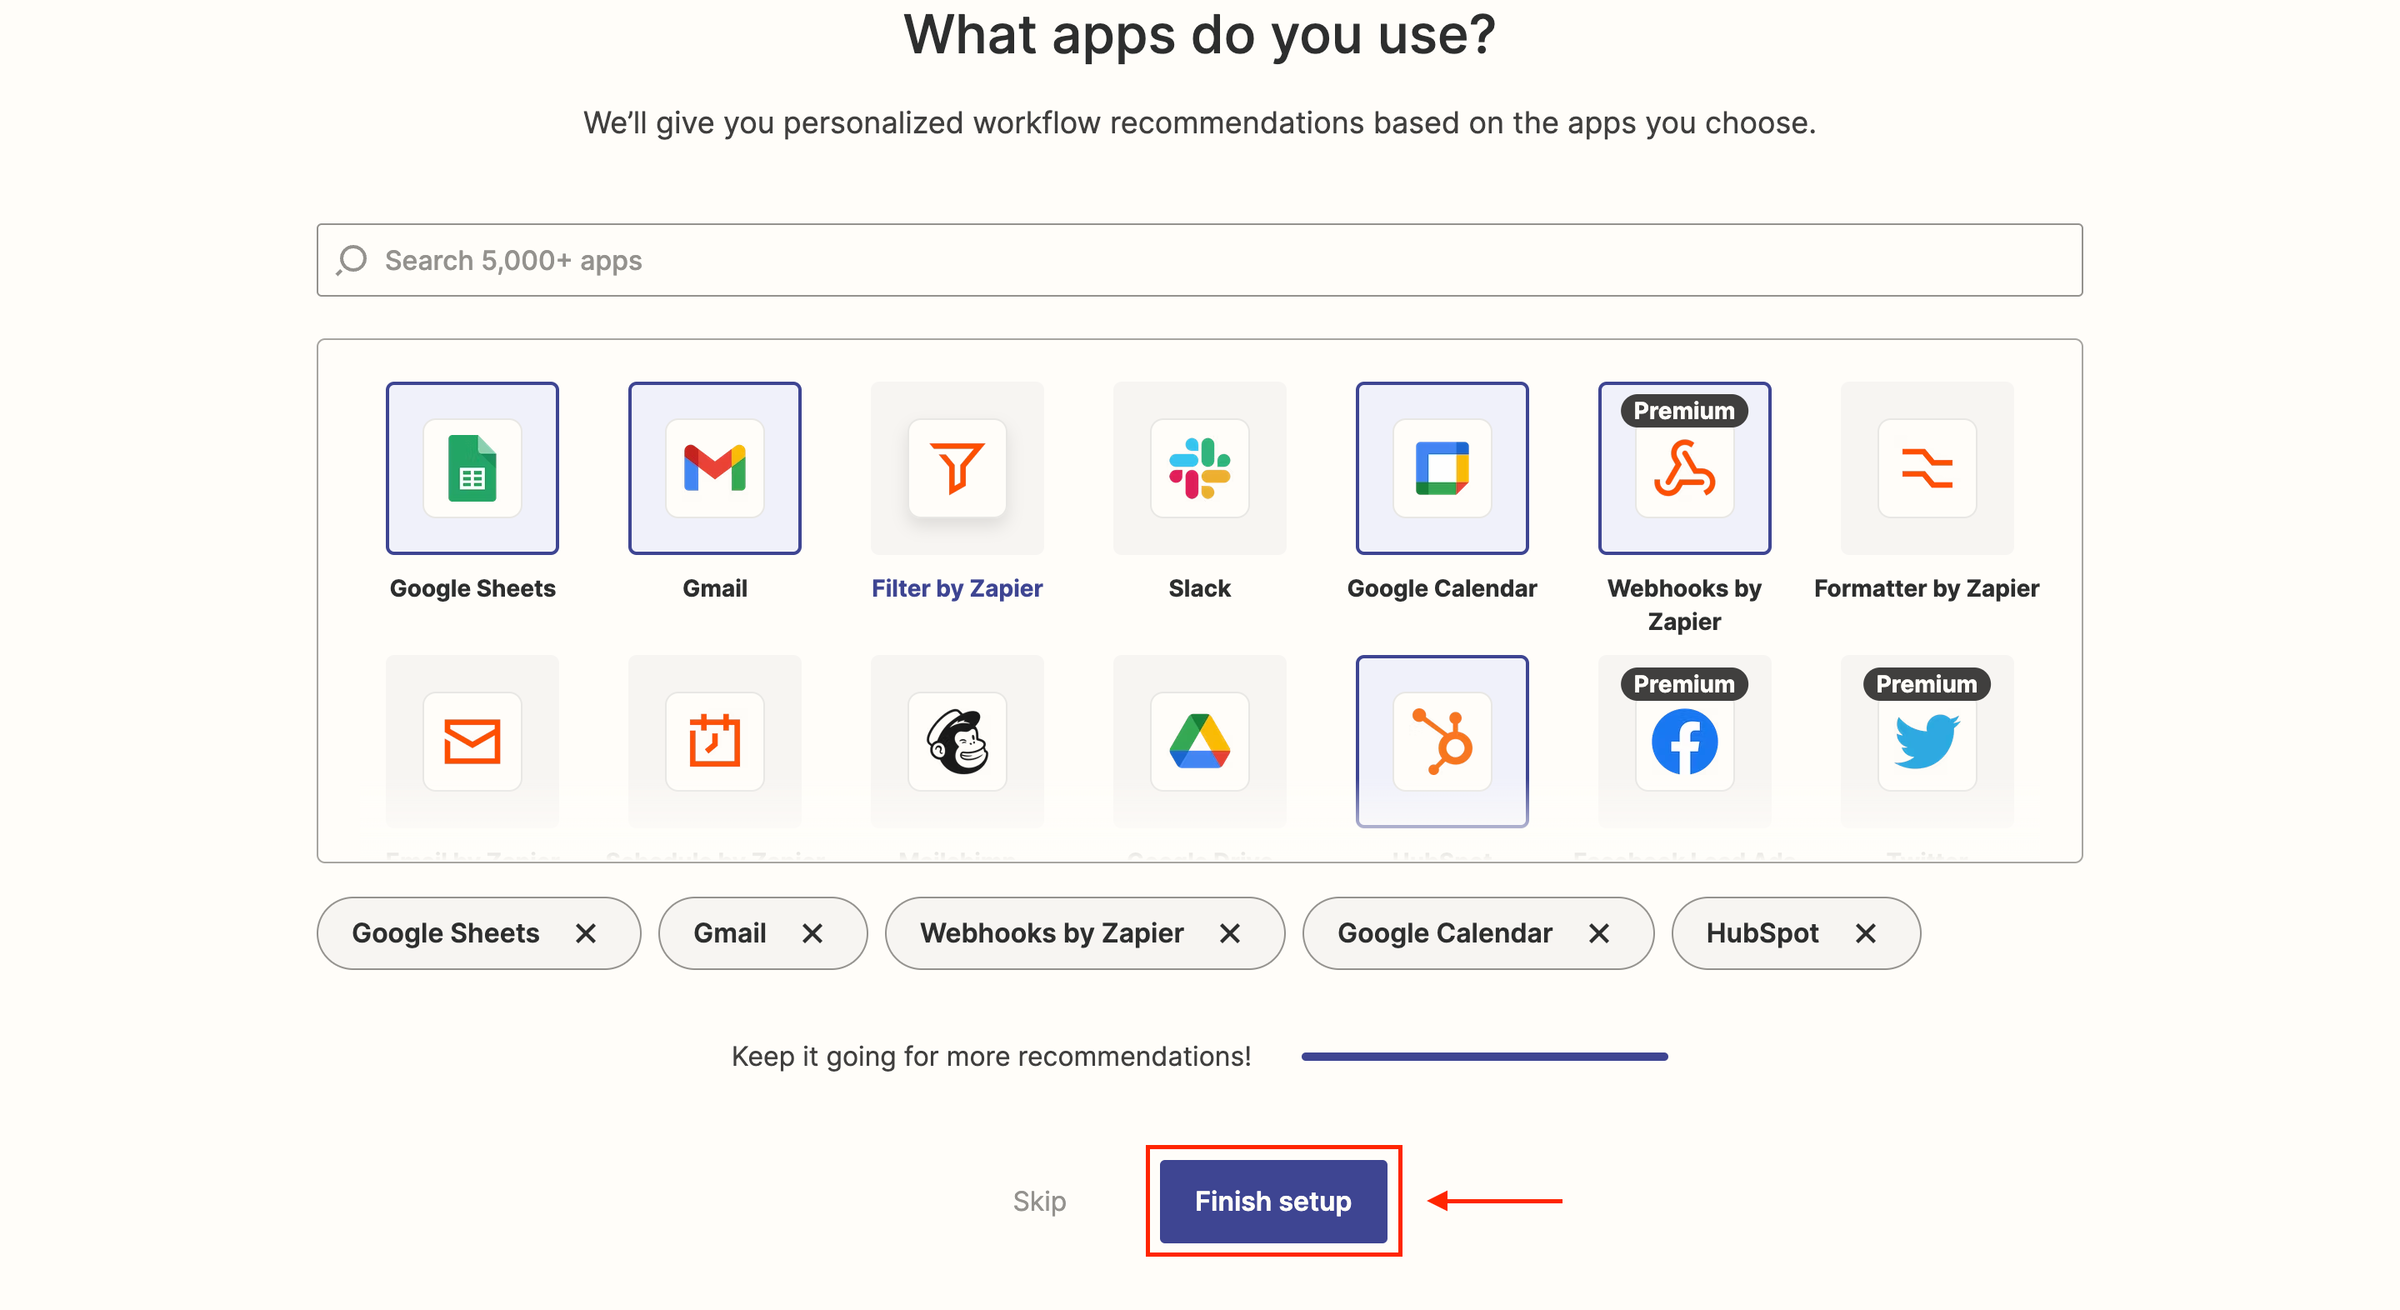
4. Complete the process following the on-screen instructions. Choose the apps you use and click the Finish Setup button.
5. After that, you'll be redirected to the Zapier dashboard. You can start creating your first Zap from there.
Step 2: Set Up Your Zap
To create a Zap in your Zapier account, follow these steps:
-
Log in to your Zapier account.
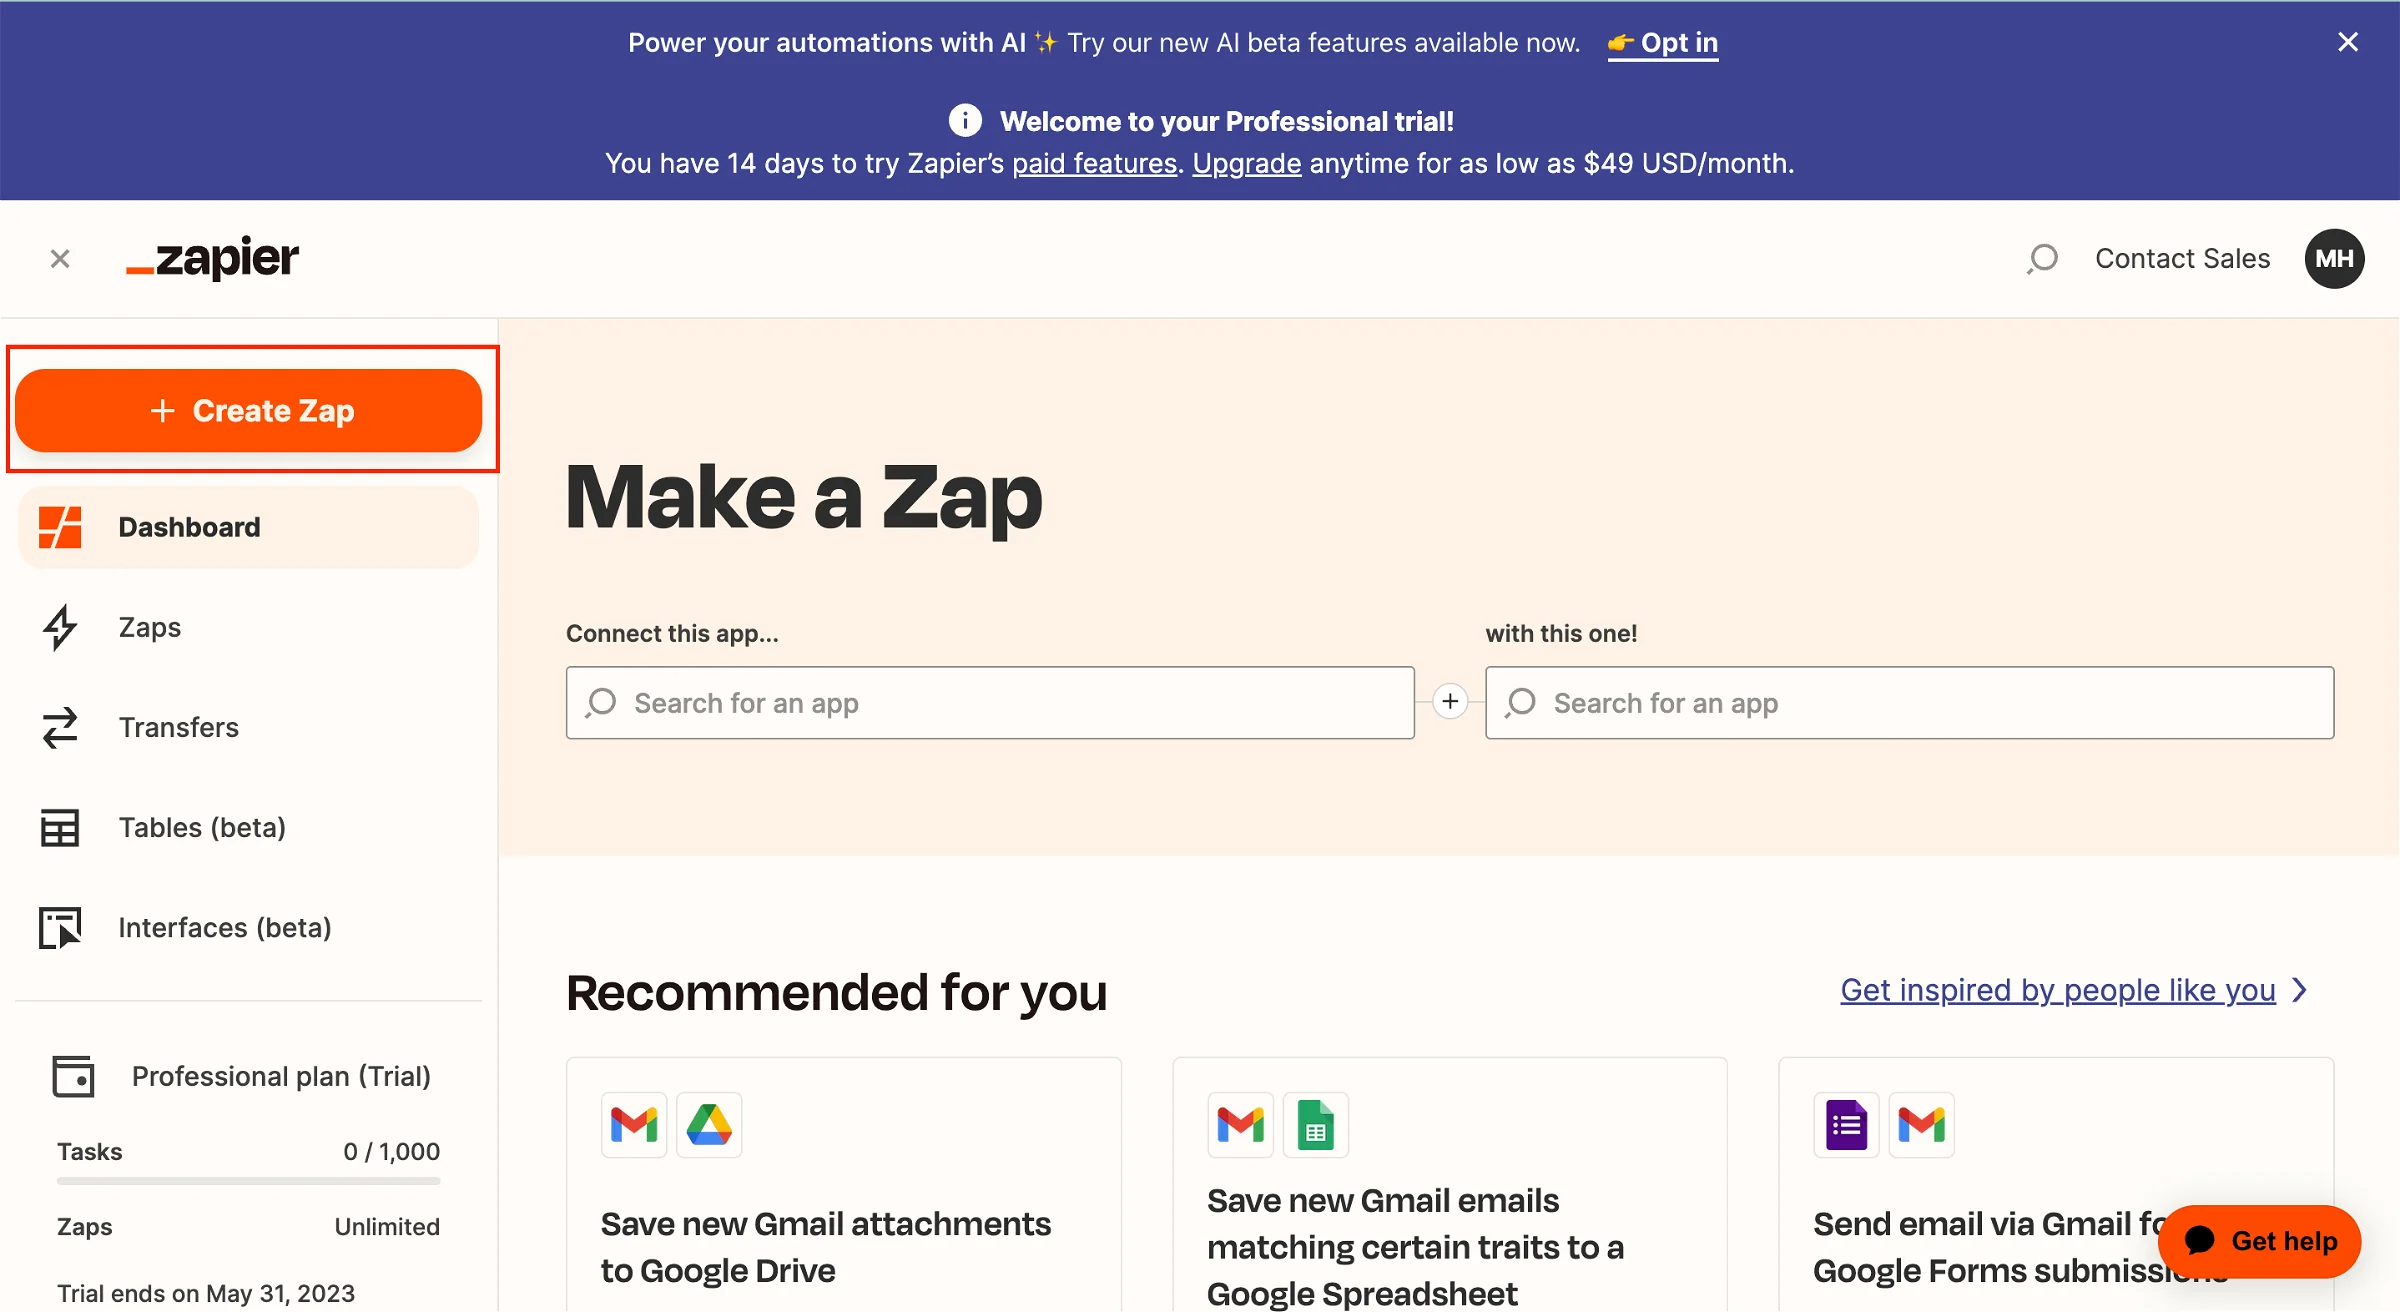
-
Click on the "+ Create Zap" button from the top left corner of the dashboard.

3. You'll be taken to the Zap editor. Start by giving your Zap a name. Click on the Edit icon where it says "Untitled Zap." Input your preferred Zap name.
You are done here. In the next step, we'll set up the "Trigger."
Step 3: Set up your "Trigger"
Now, you'll set up the "Trigger" app. This is the app that will initiate the automation.
-
In the "App & Event" search box, type the preferred app name you want to use as the trigger. Then select it from the list.
-
Choose the specific trigger event from the list of available options, and click "Continue."
-
Connect your account to the trigger app by clicking "Sign in to [App Name]." Follow the prompts to authorize Zapier to access your account. Click "Continue" when you're done.
-
Test the trigger by clicking "Test trigger."
-
Click "Continue" once the test is successful. Zapier will fetch data from the connected app to ensure the trigger works correctly.
Step 4: Configure your "Action" App
Now, you'll set up the "Action" app. This is the app that will perform an action based on the trigger.
-
In the "App & Event" search box, type your preferred app's name you want to use as the action and select it from the list. For example, Mailchimp
-
Choose the specific action event from the list of available options, and click "Continue."
-
Connect your account to the action app by clicking "Sign in to [App Name]." Follow the prompts to authorize Zapier to access your account. You will see it in a listing if you are already connected to the targeted app. Then select it from that list.
-
Set up the action by configuring any required fields. To utilize data from the trigger app, click on the field and choose the appropriate data from the available options. Click "Continue" when you're done.
-
Test the action by clicking "Test & Continue." Zapier will perform the action using the data from the trigger test. Verify that the action was successful in the connected app.
Once the test is successful, You will find that your first version of the Zap has already been published.
Your Zap is now live and will run automatically whenever the specified trigger event occurs. You can always return to the Zap editor to make changes or turn off the Zap if needed.
Automate Your Workflow by Integrating Zapier with Dorik
You can integrate Zapier with Dorik Subscription Form, Contact Form, and Dorik Custom Form.
But today, we will demonstrate the process of integrating Zapier with the Dorik Subscription Form. For the other types of form, the technique is almost similar.
How to Integrate Zapier With Dorik Subscription Form
Zapier integration is easy and simple with Dorik. Let's do it by following the below steps.
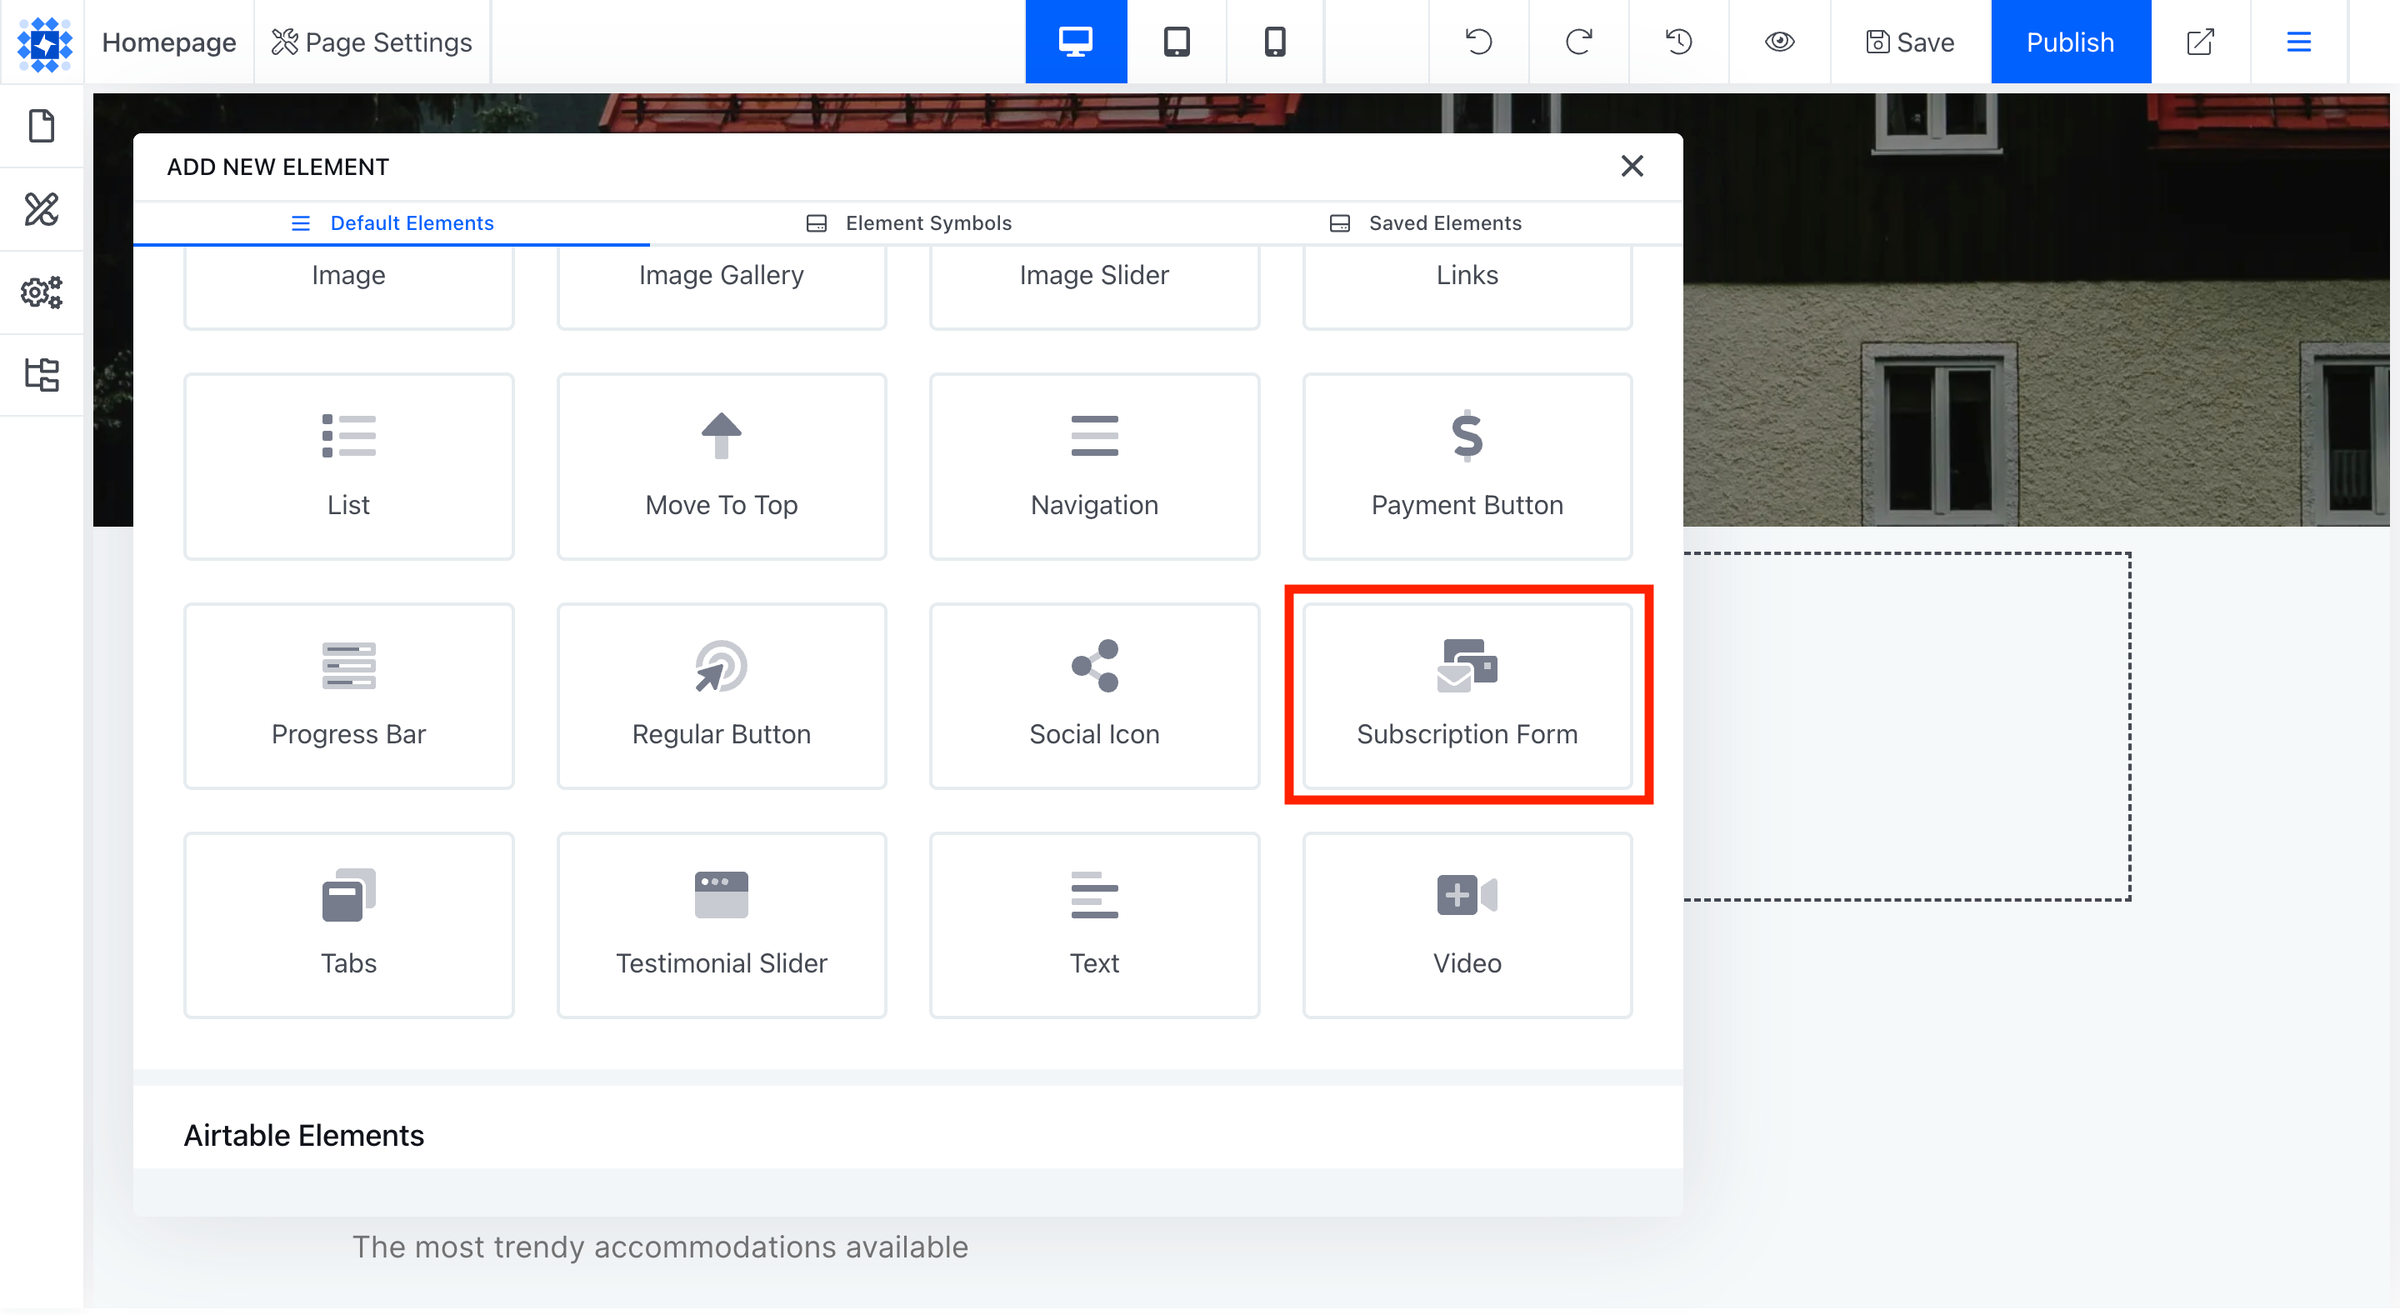
Step 1: Log in to Dorik and visit your site's dashboard. Locate the default subscription form that comes with the template. Or add a new form to your preferred section.
Hit the Add New Element and select Subscription Form to do it from scratch.
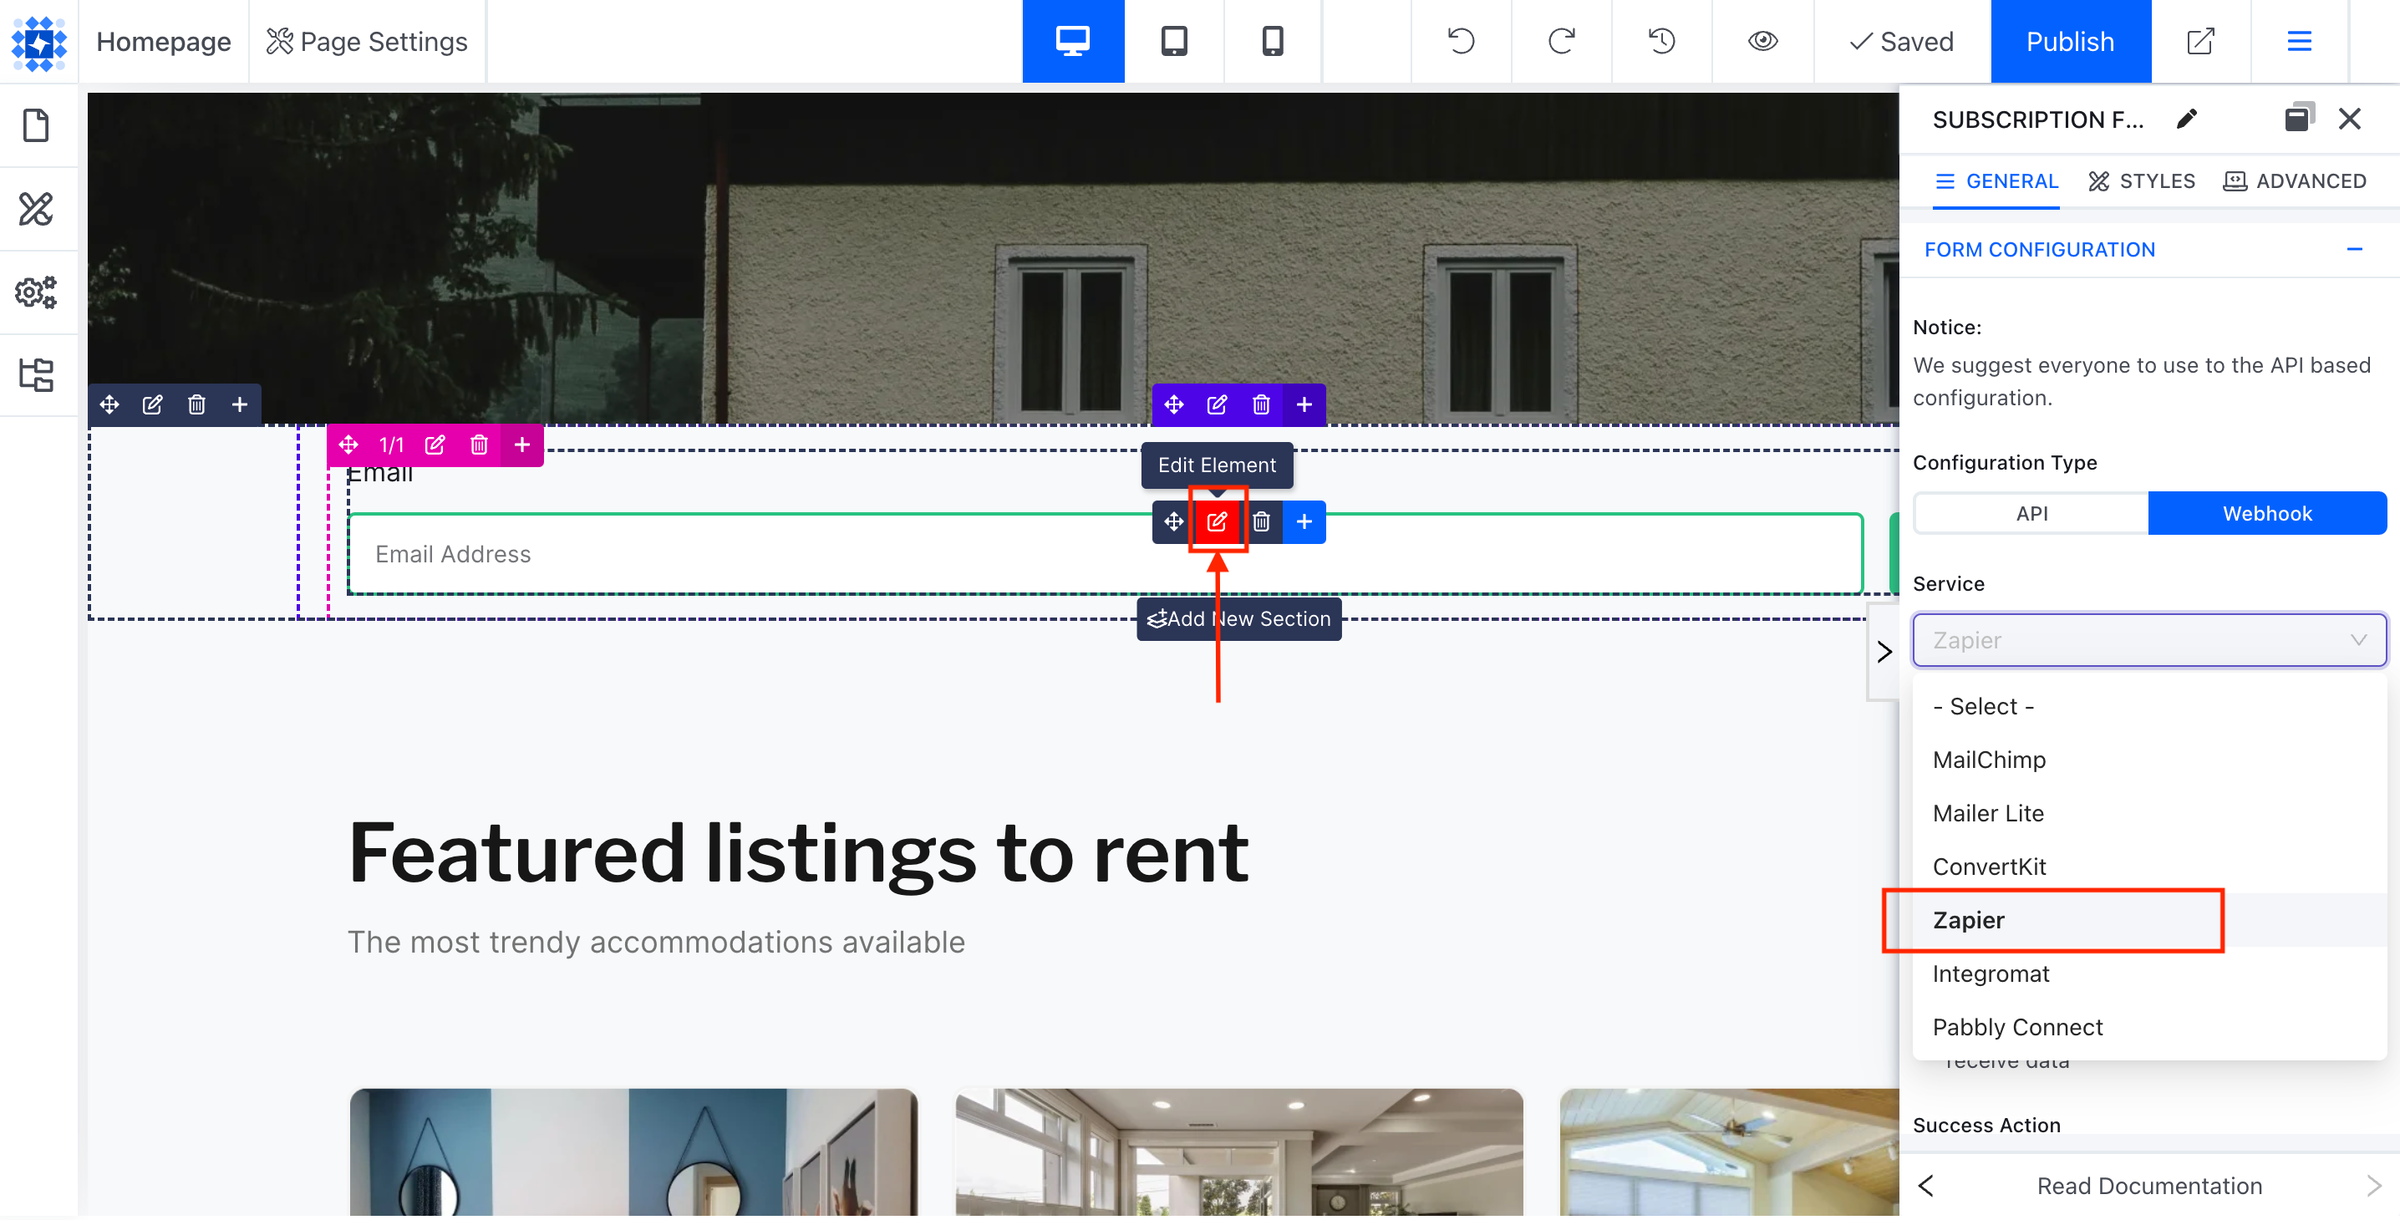
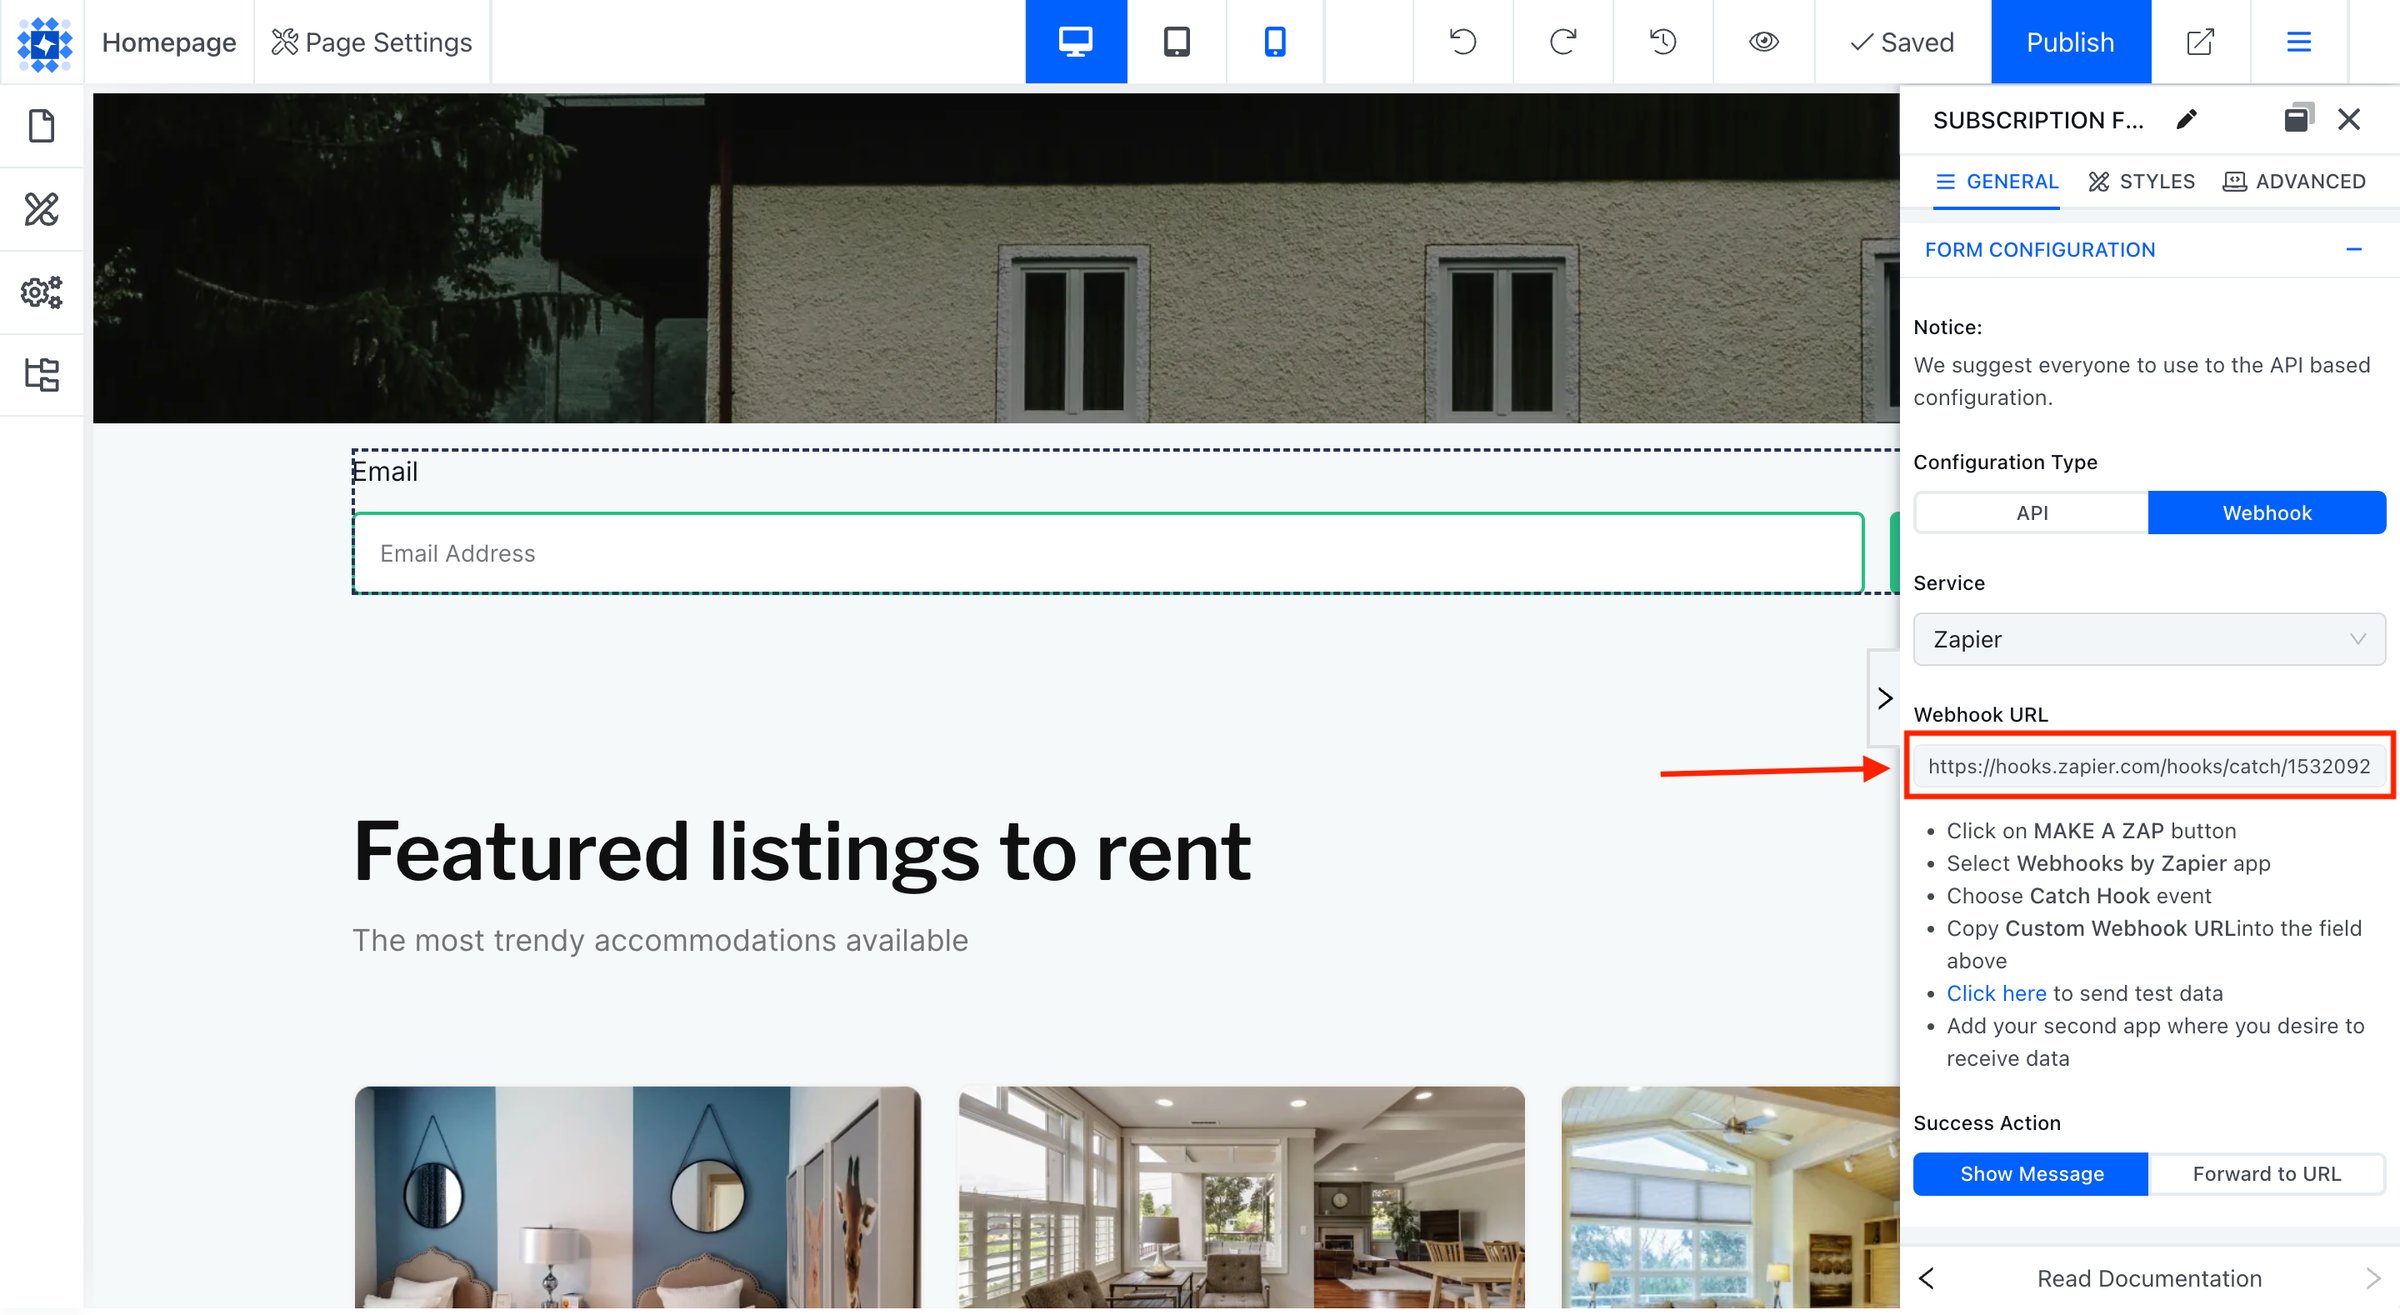
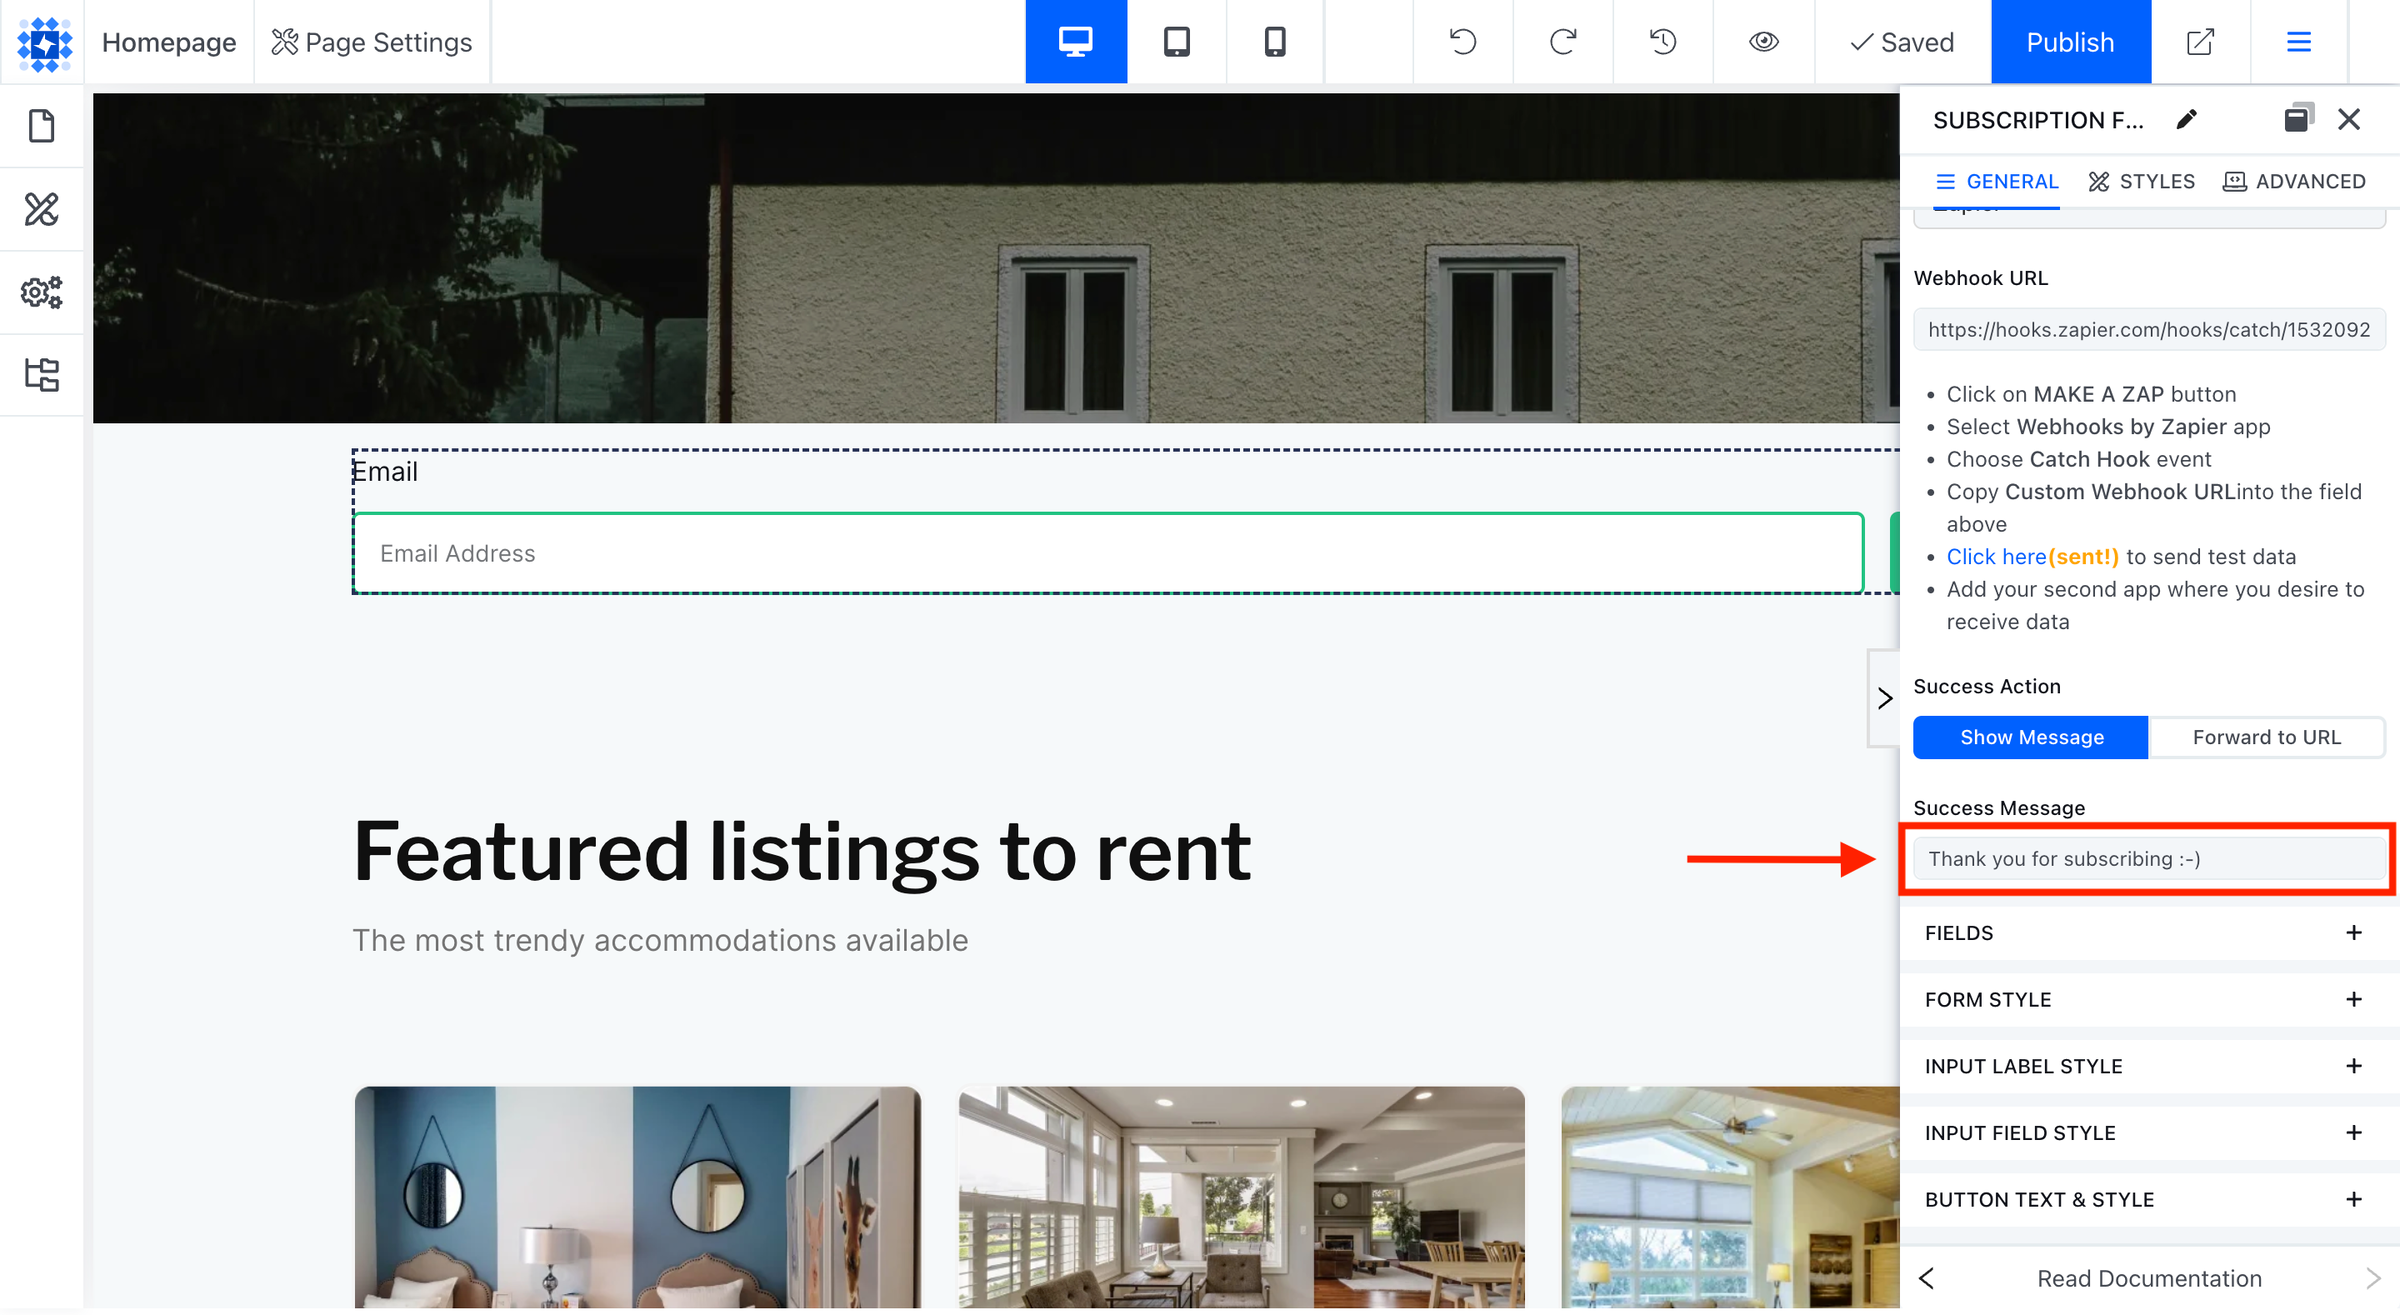
Step 2: Click on the Edit Element. An editing panel will appear. Click Webhook from the Configuration Type option.
Then select Zapier from the Service section. You can also do it using the API option.
Step 3: Go to your Zapier Account and click Create Zap.
Step 4: Search for Webhook and select Webhooks by Zapier option from the Trigger step.
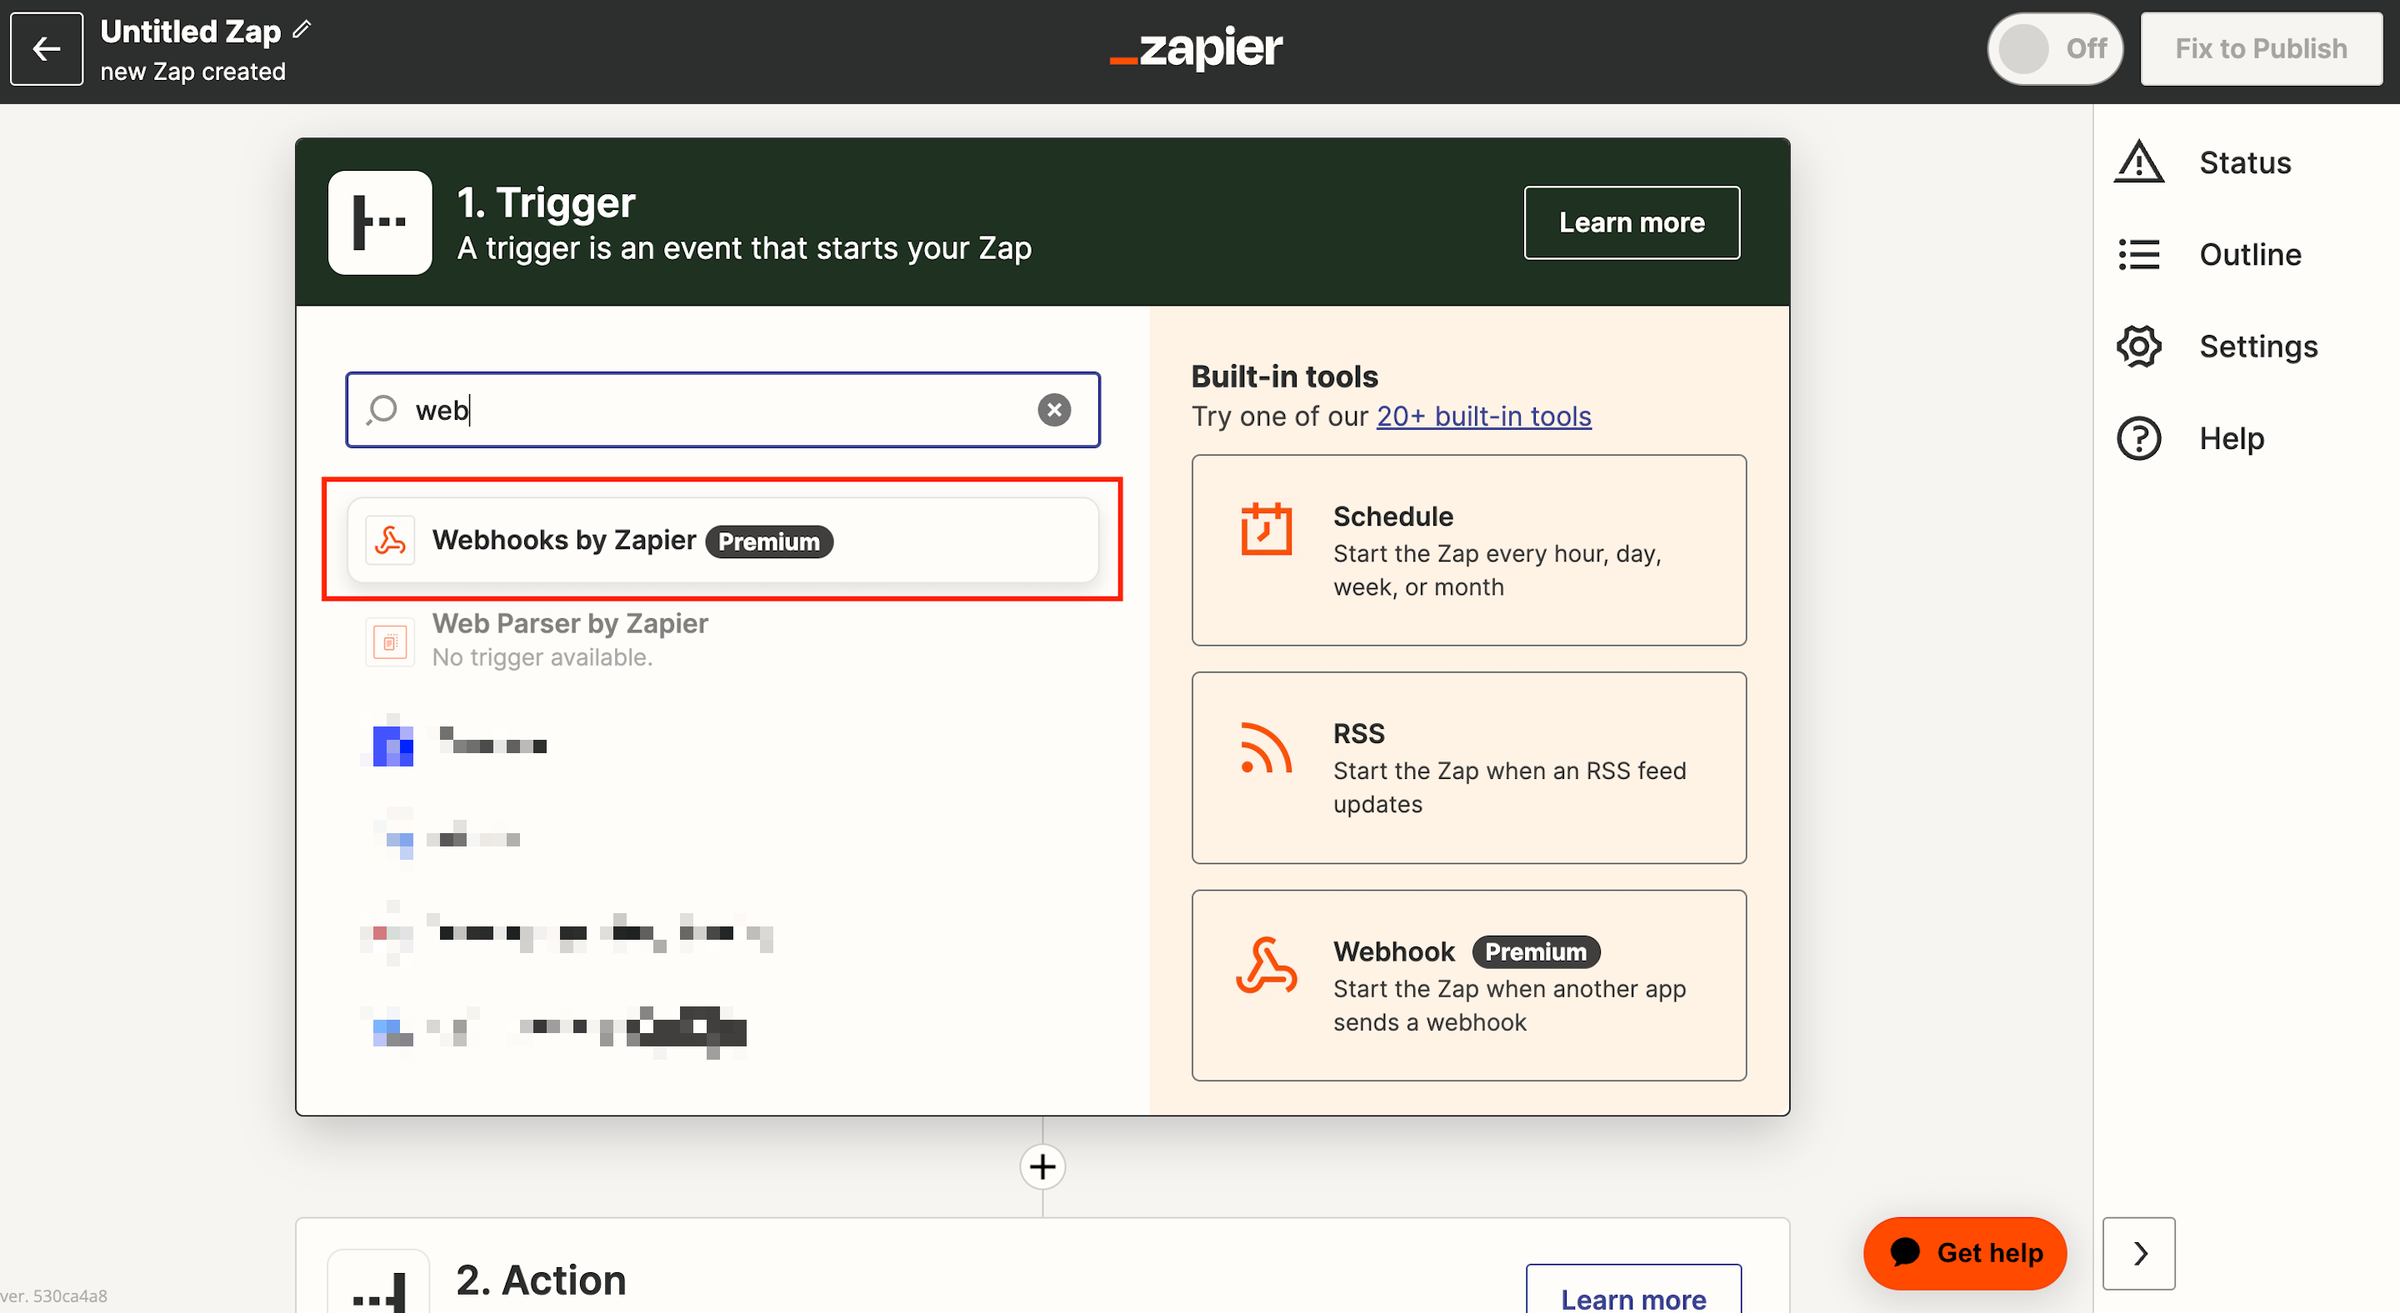
Step 5: Select Catch Hook as the Triggert Event from the dropdown and click on the Continue button.

Step 6: Go to Test Trigger and copy the Webhook URL.

Step 7: Return to your site and click Edit Element on your Subscription Form.
Then paste the copied Webhook URL on the Form Configuration option under the Webhook URL input field. After that, Publish your site.
Step 8: Hit the Click here link on the bullet instructions given in your modal editor. It will send some test data to Zapier.
After that, go back to your Zapier account, and click on the Test trigger button.

Step 9: You will see some test data from your Subscription Form element. After that, click on the Continue button.
Step 10: You can now integrate hundreds of other applications, like Google Forms, Google Sheets, Docs, Google Calendar, Gmail, Mailchimp, etc., from Zapier.
The event data from your site will be sent to those third-party applications through Zapier.
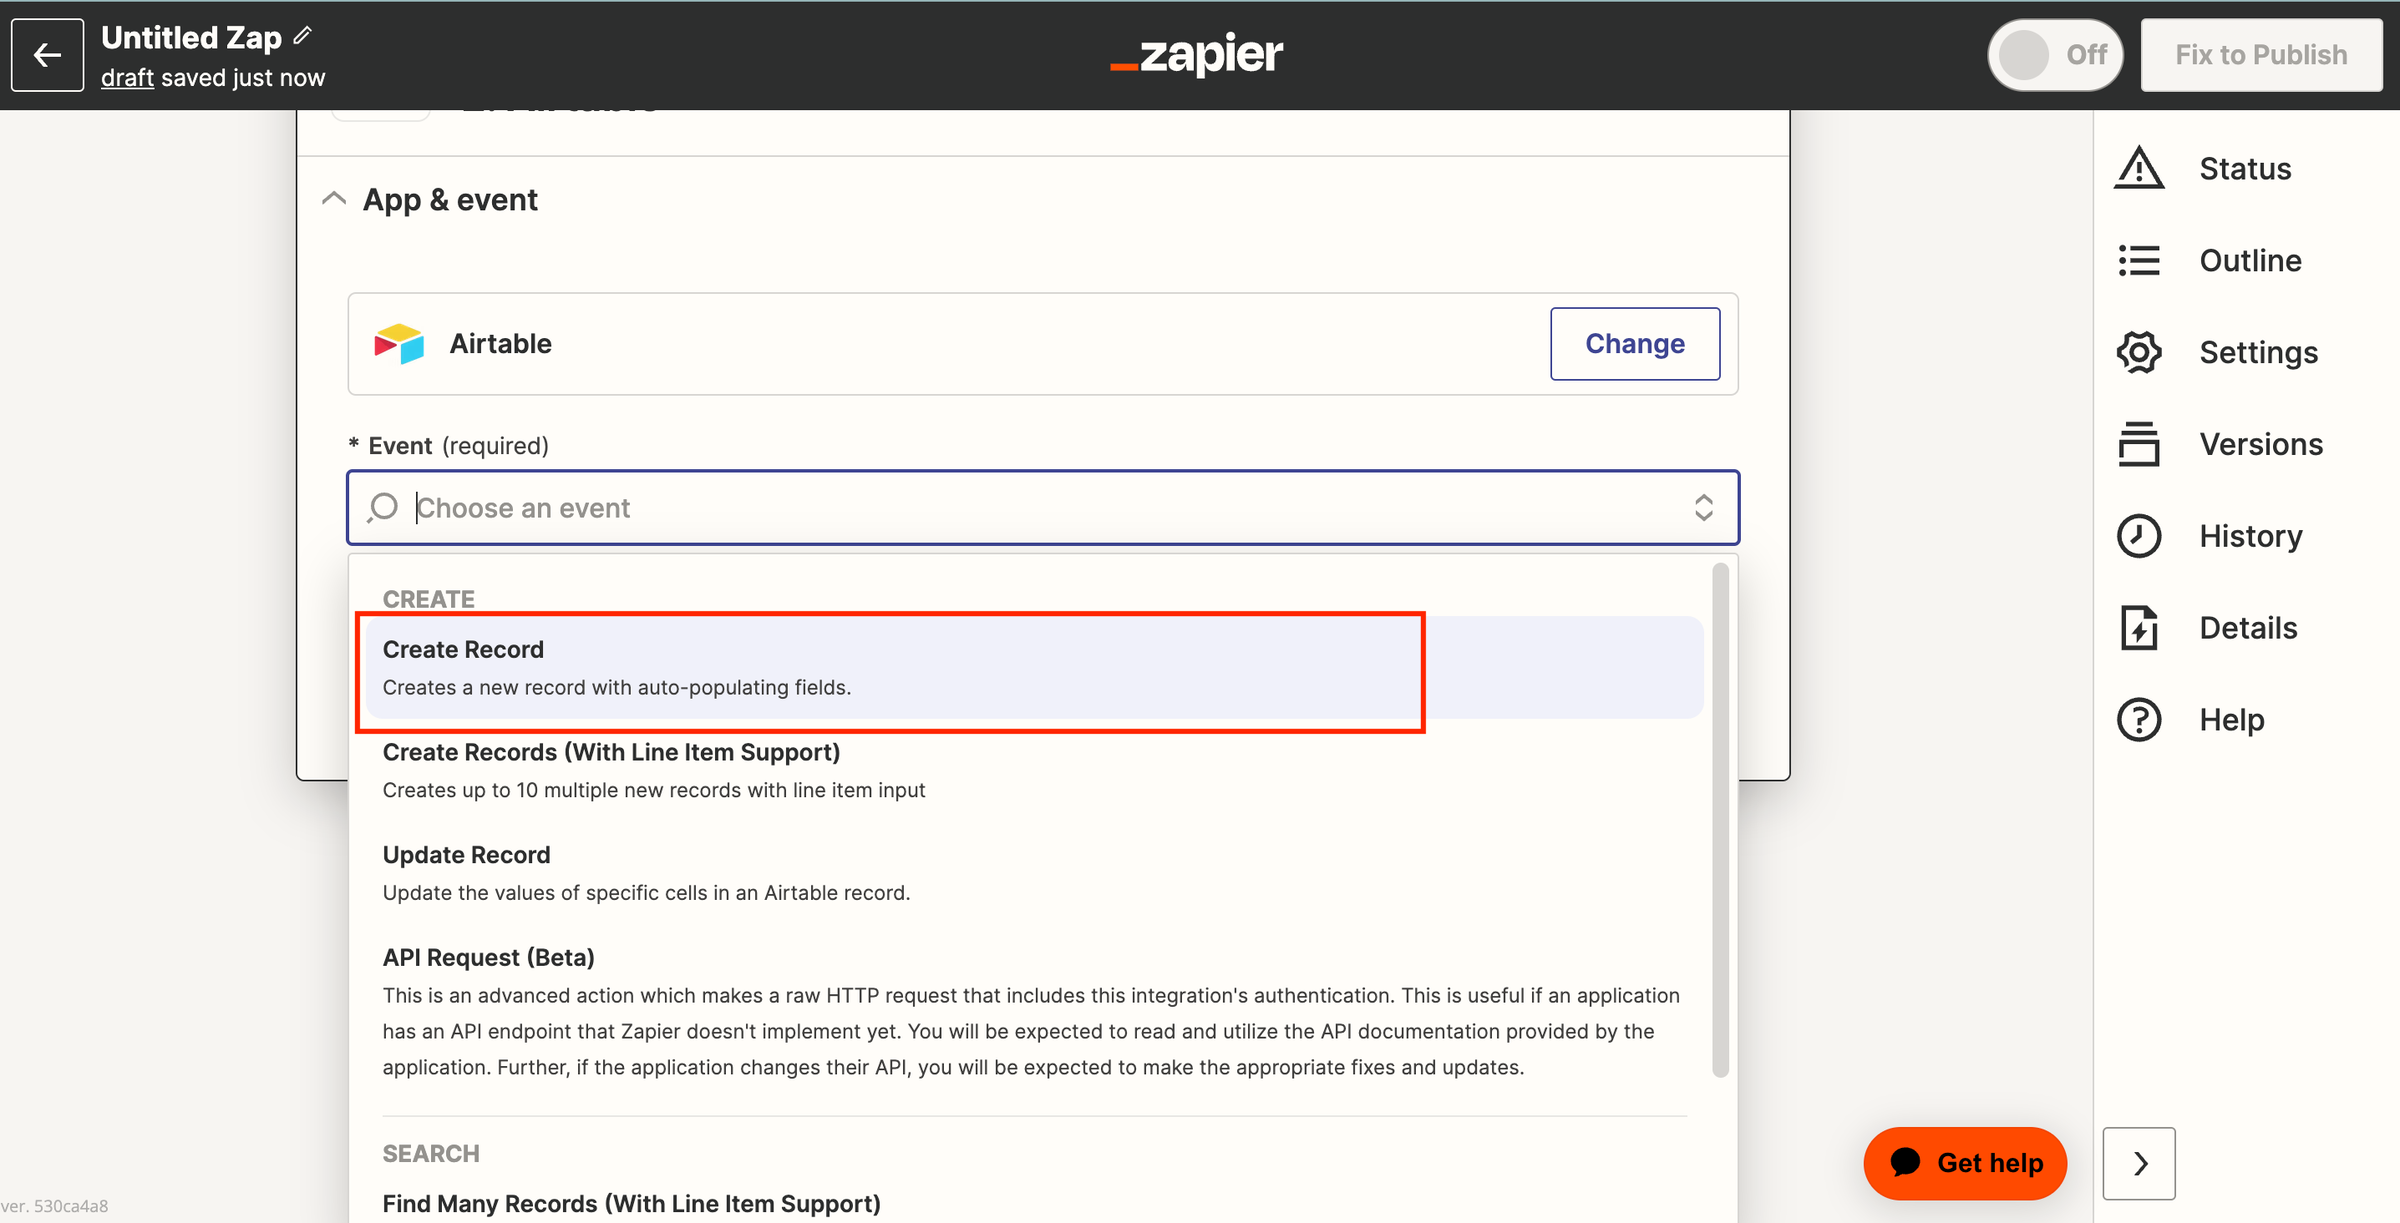
For now, we will select Airtable from Zapier.
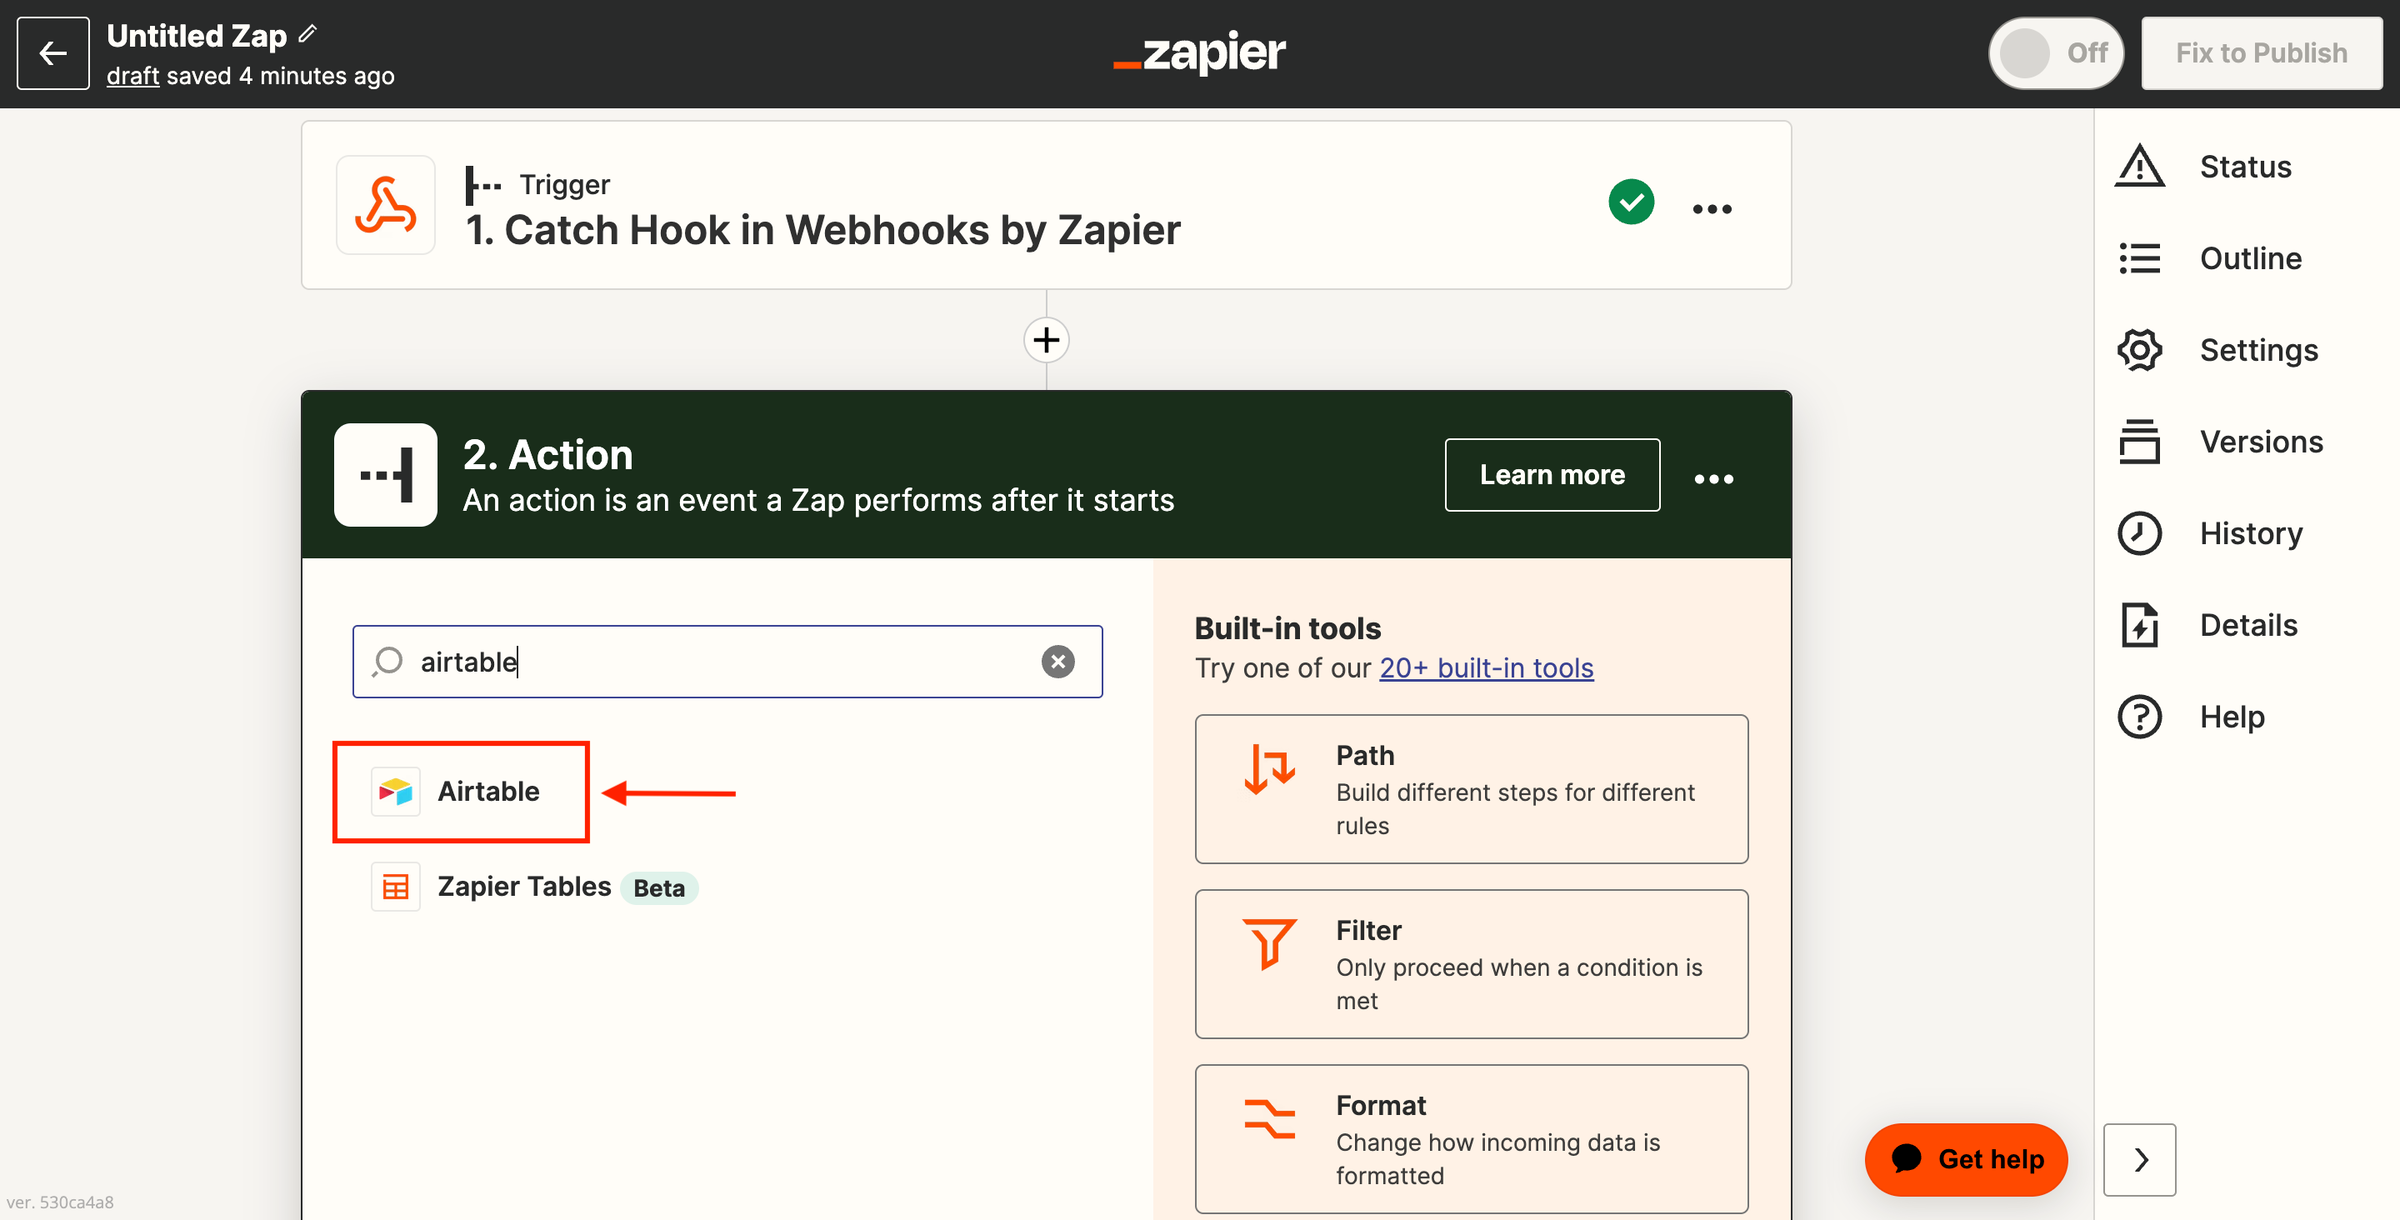
Step 11: After selecting Airtable, select Create Record from the Event field and click on the Continue button.
Related Read: What is Airtable and How Does It Work?
Step 12: Select your Airtable Account. Then hit the Continue button.
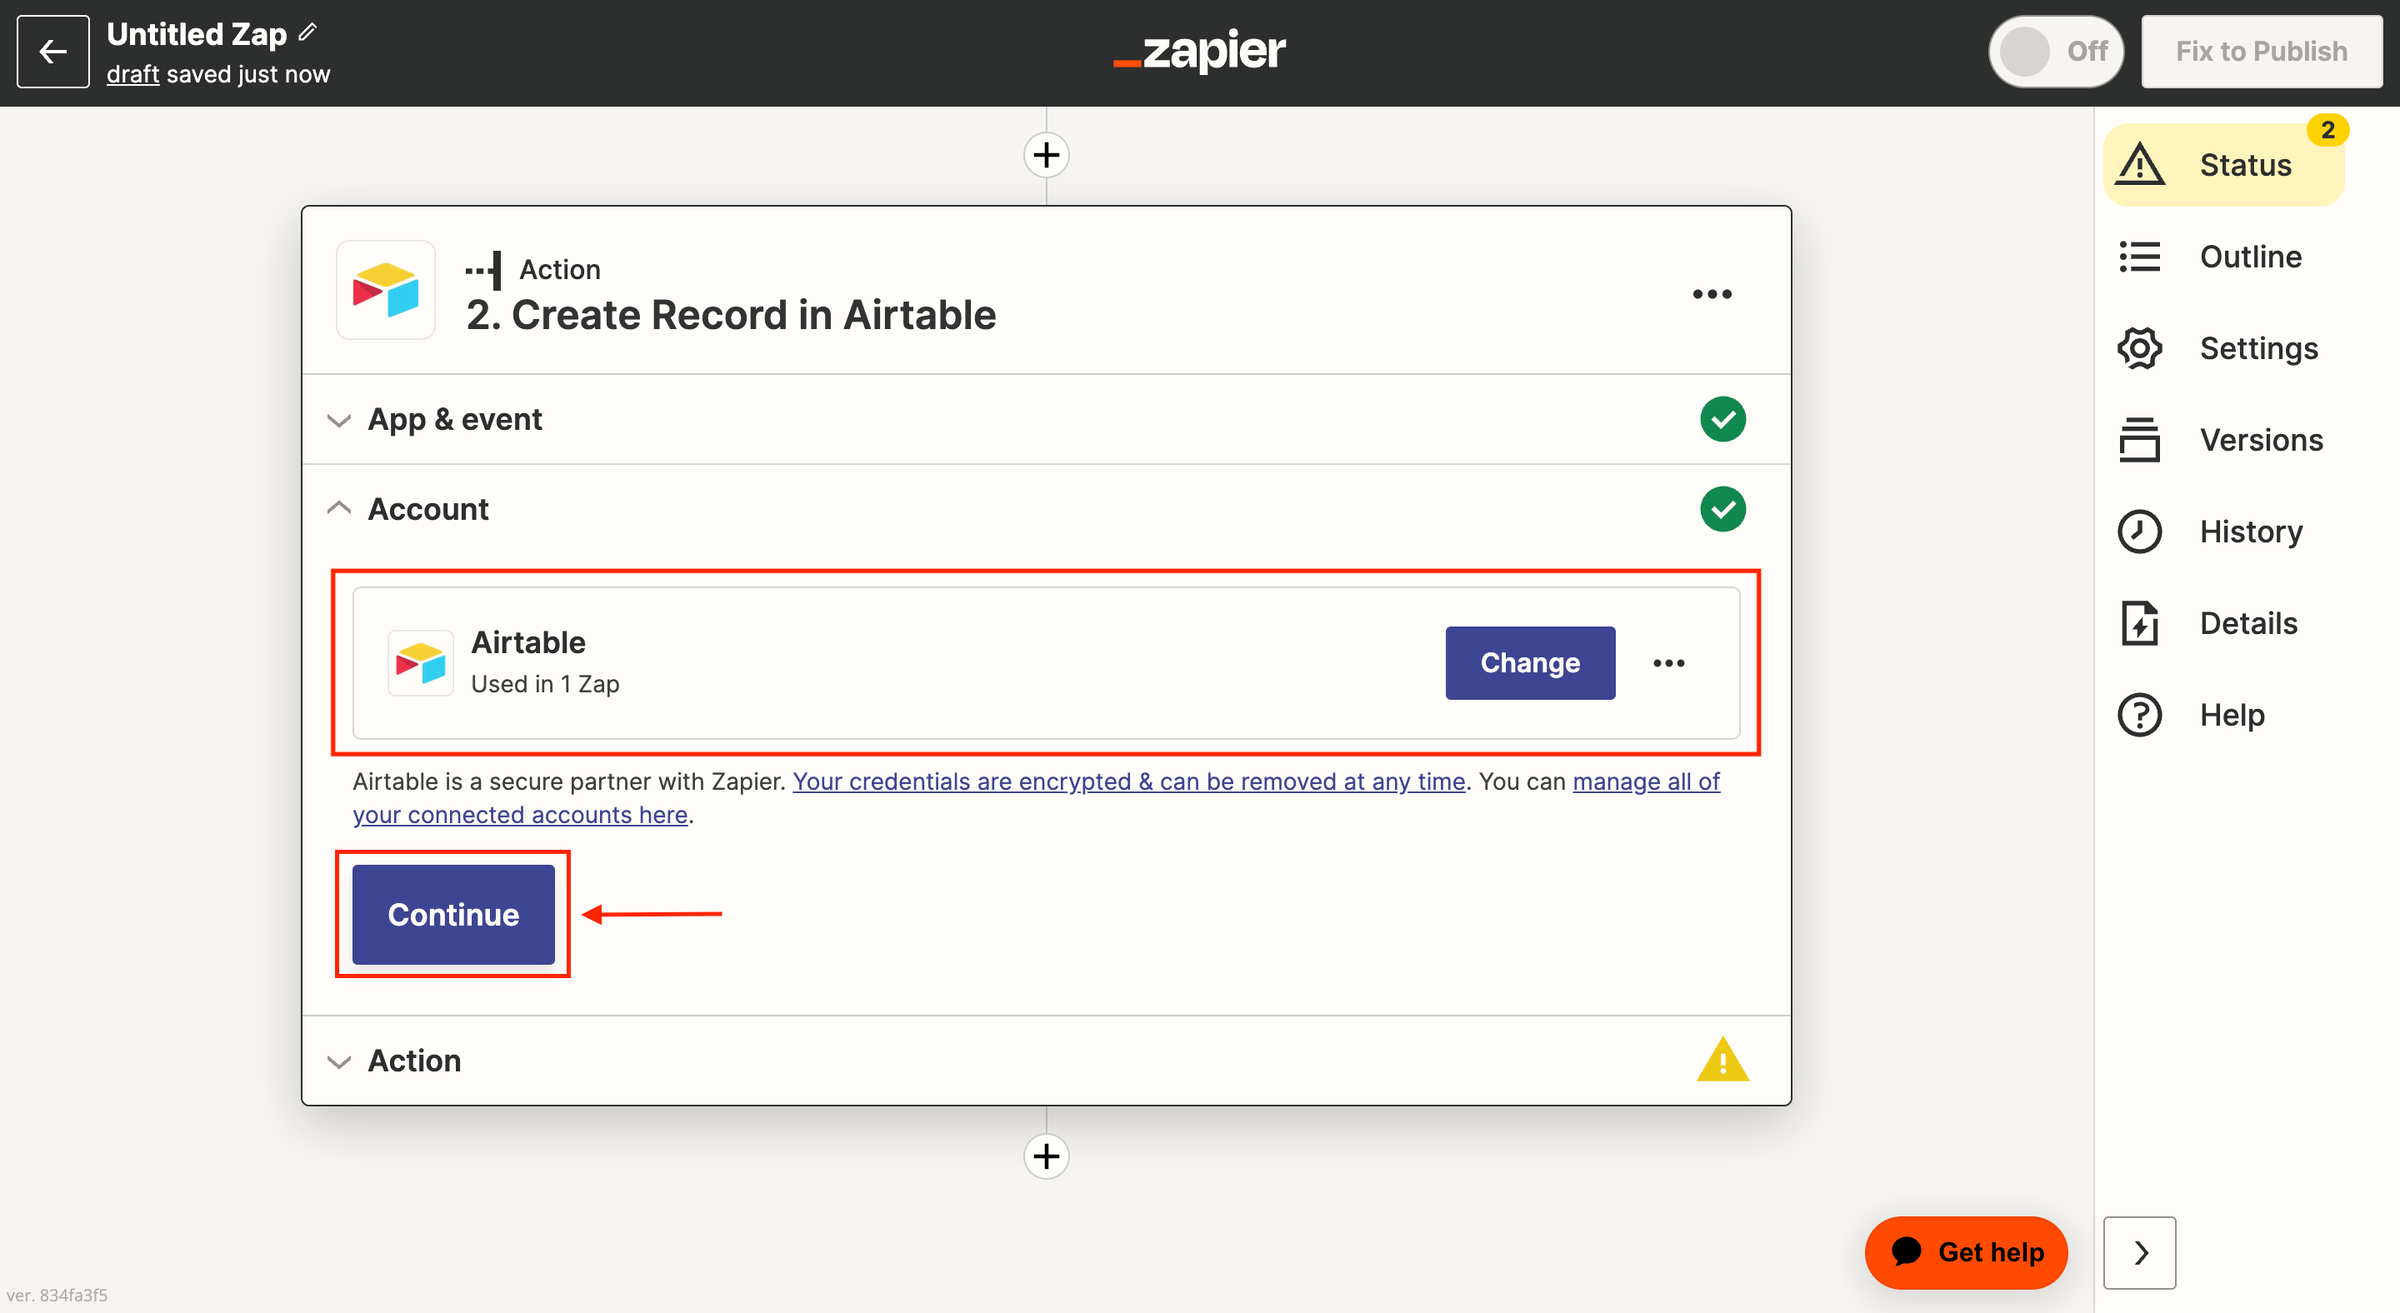
Note: If you don't have an Airtable account connected with Zapier, click Sign in and connect it by following the onscreen instructions.
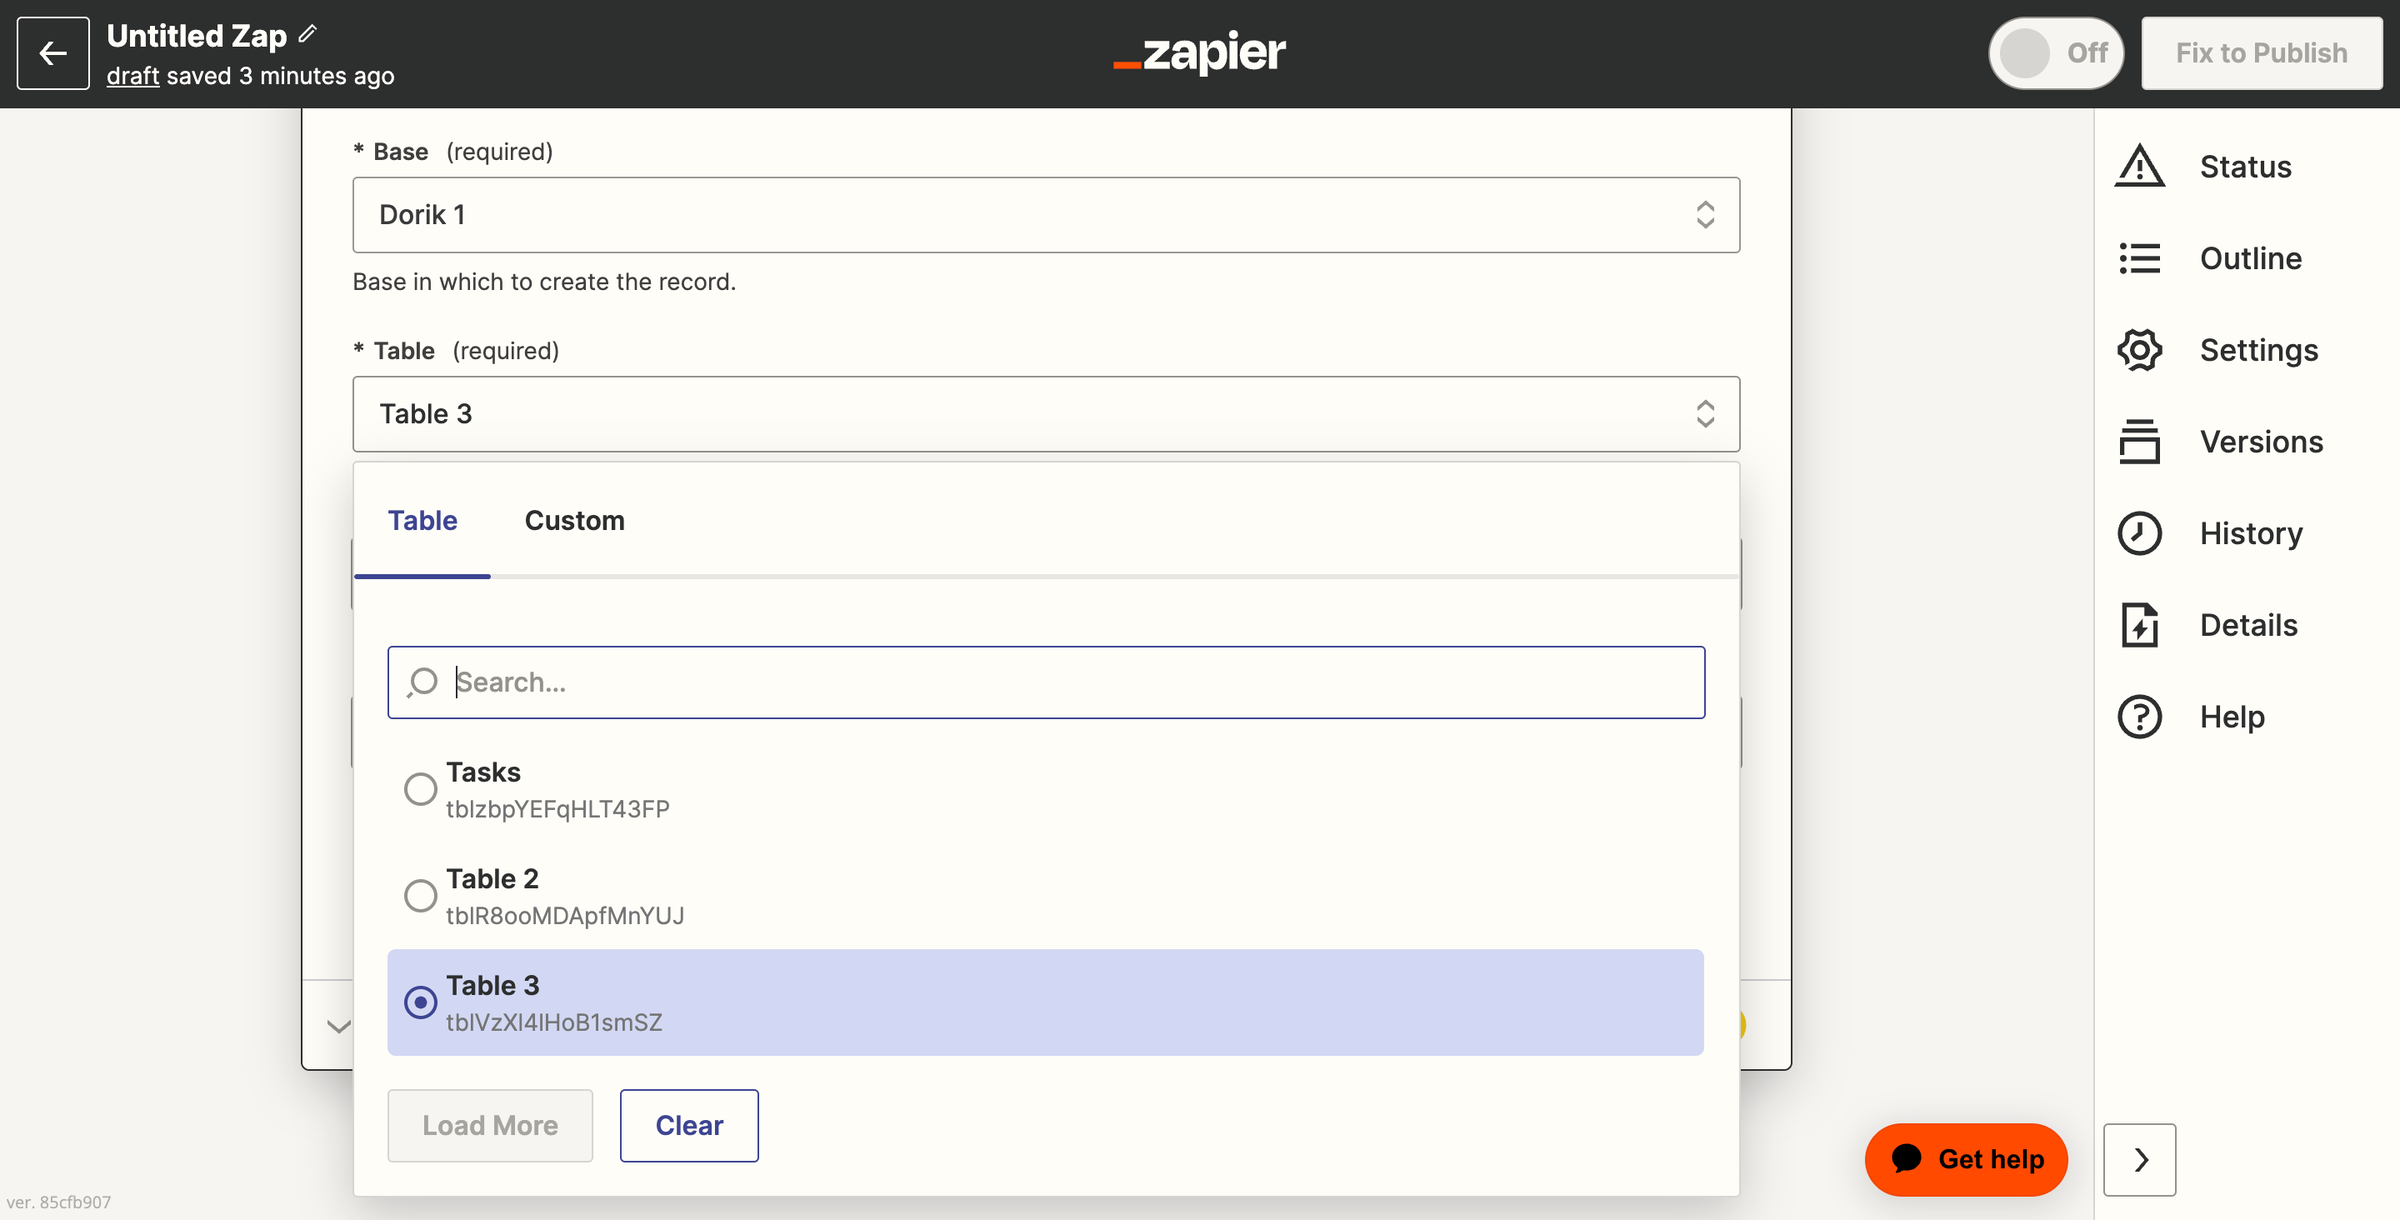
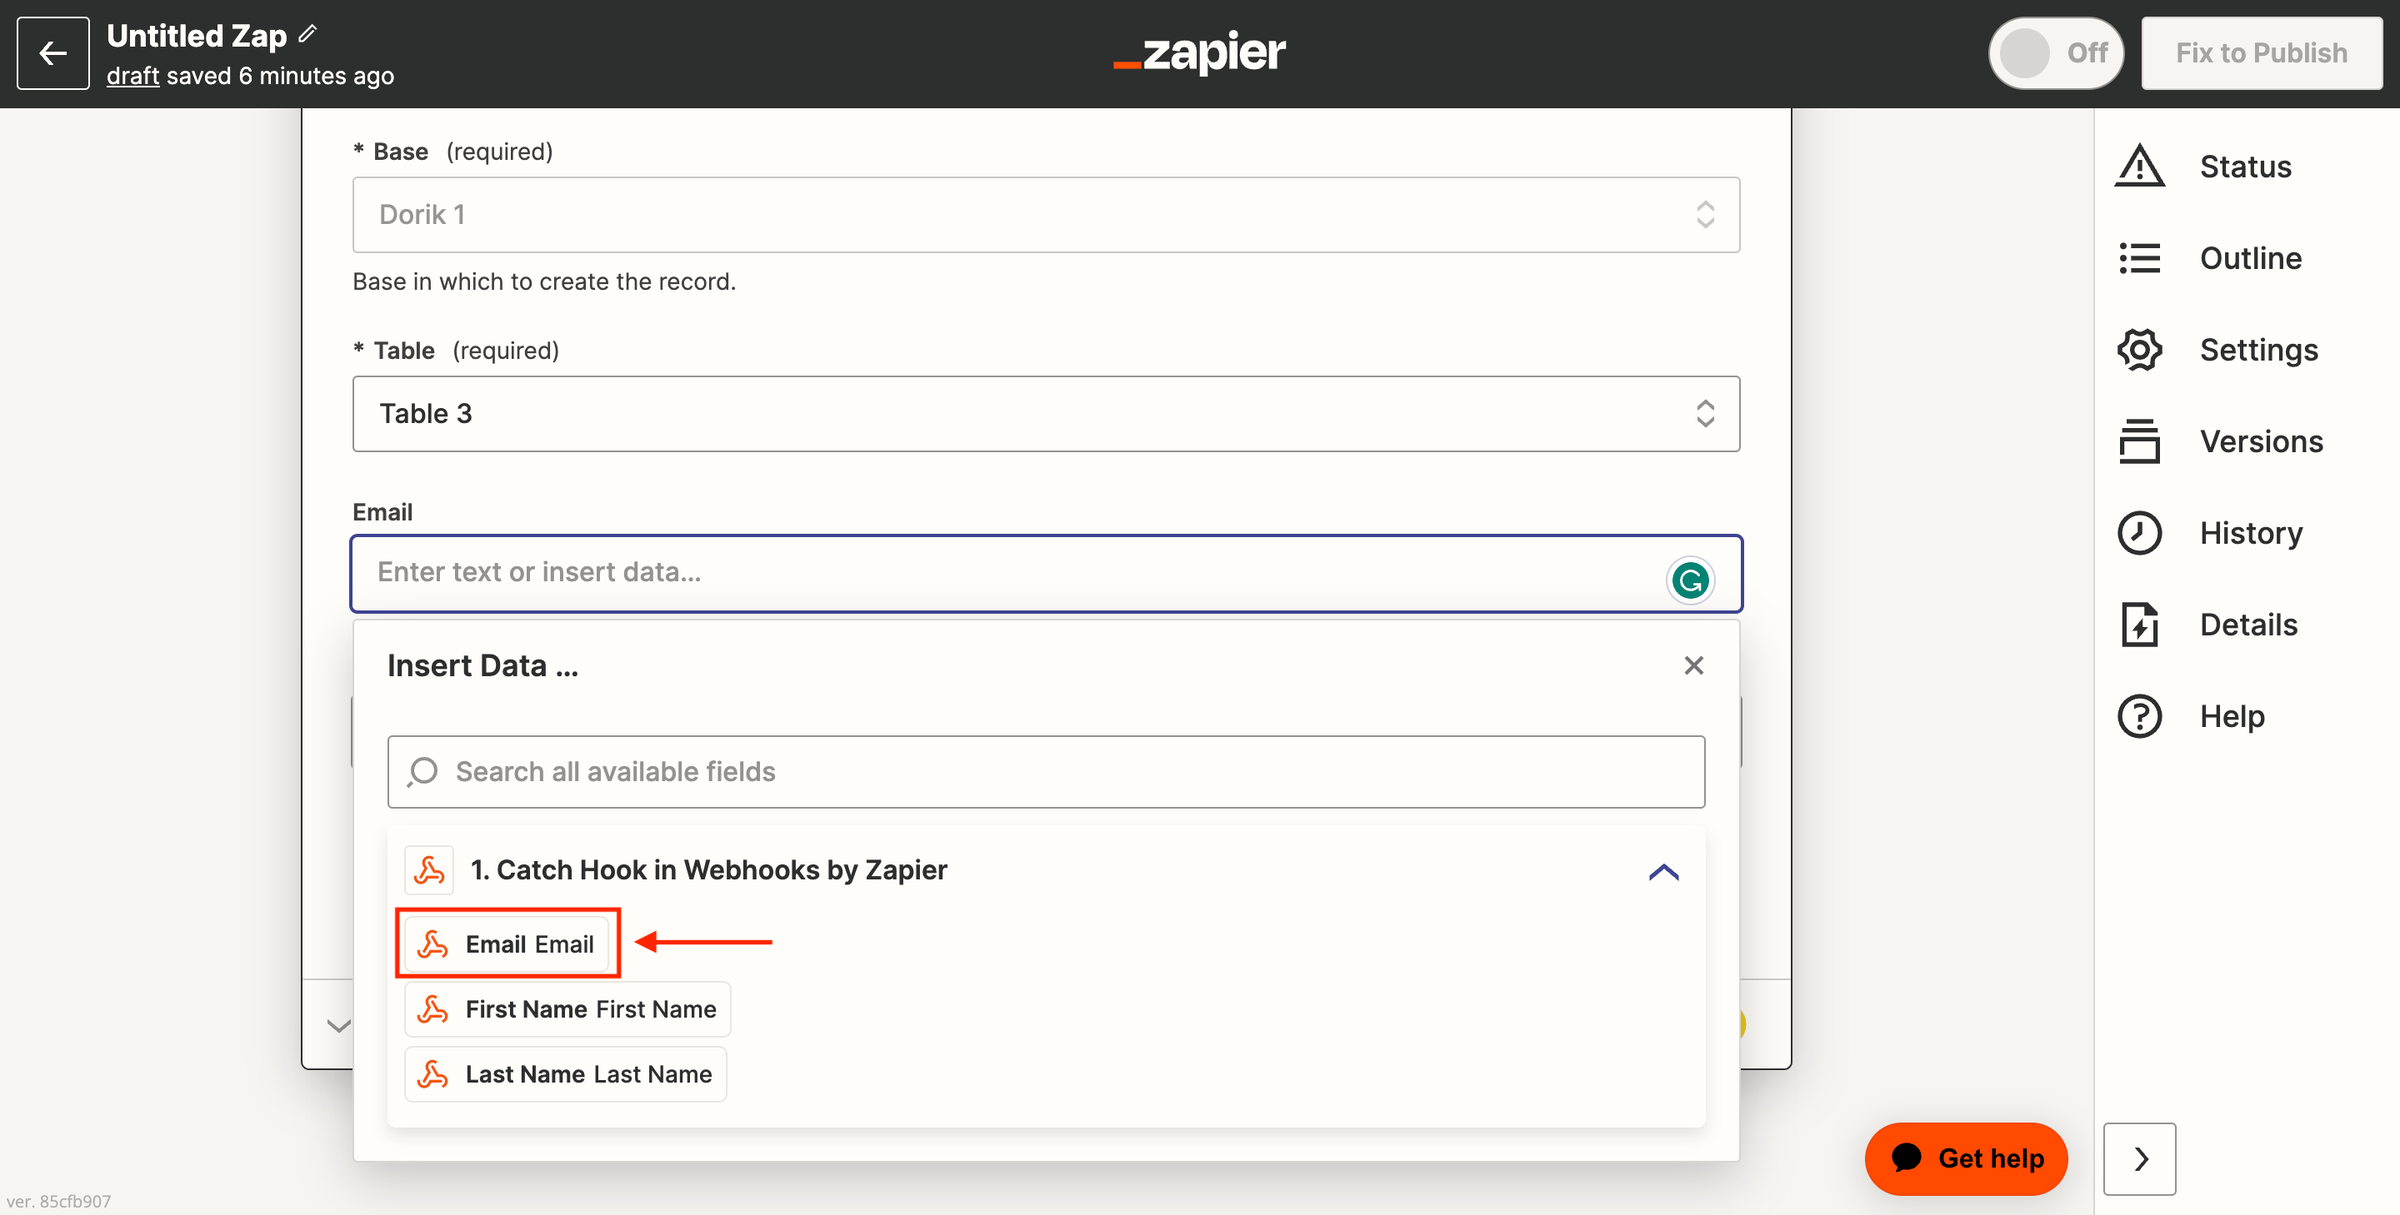
Step 13: Next, select your Airtable Base.
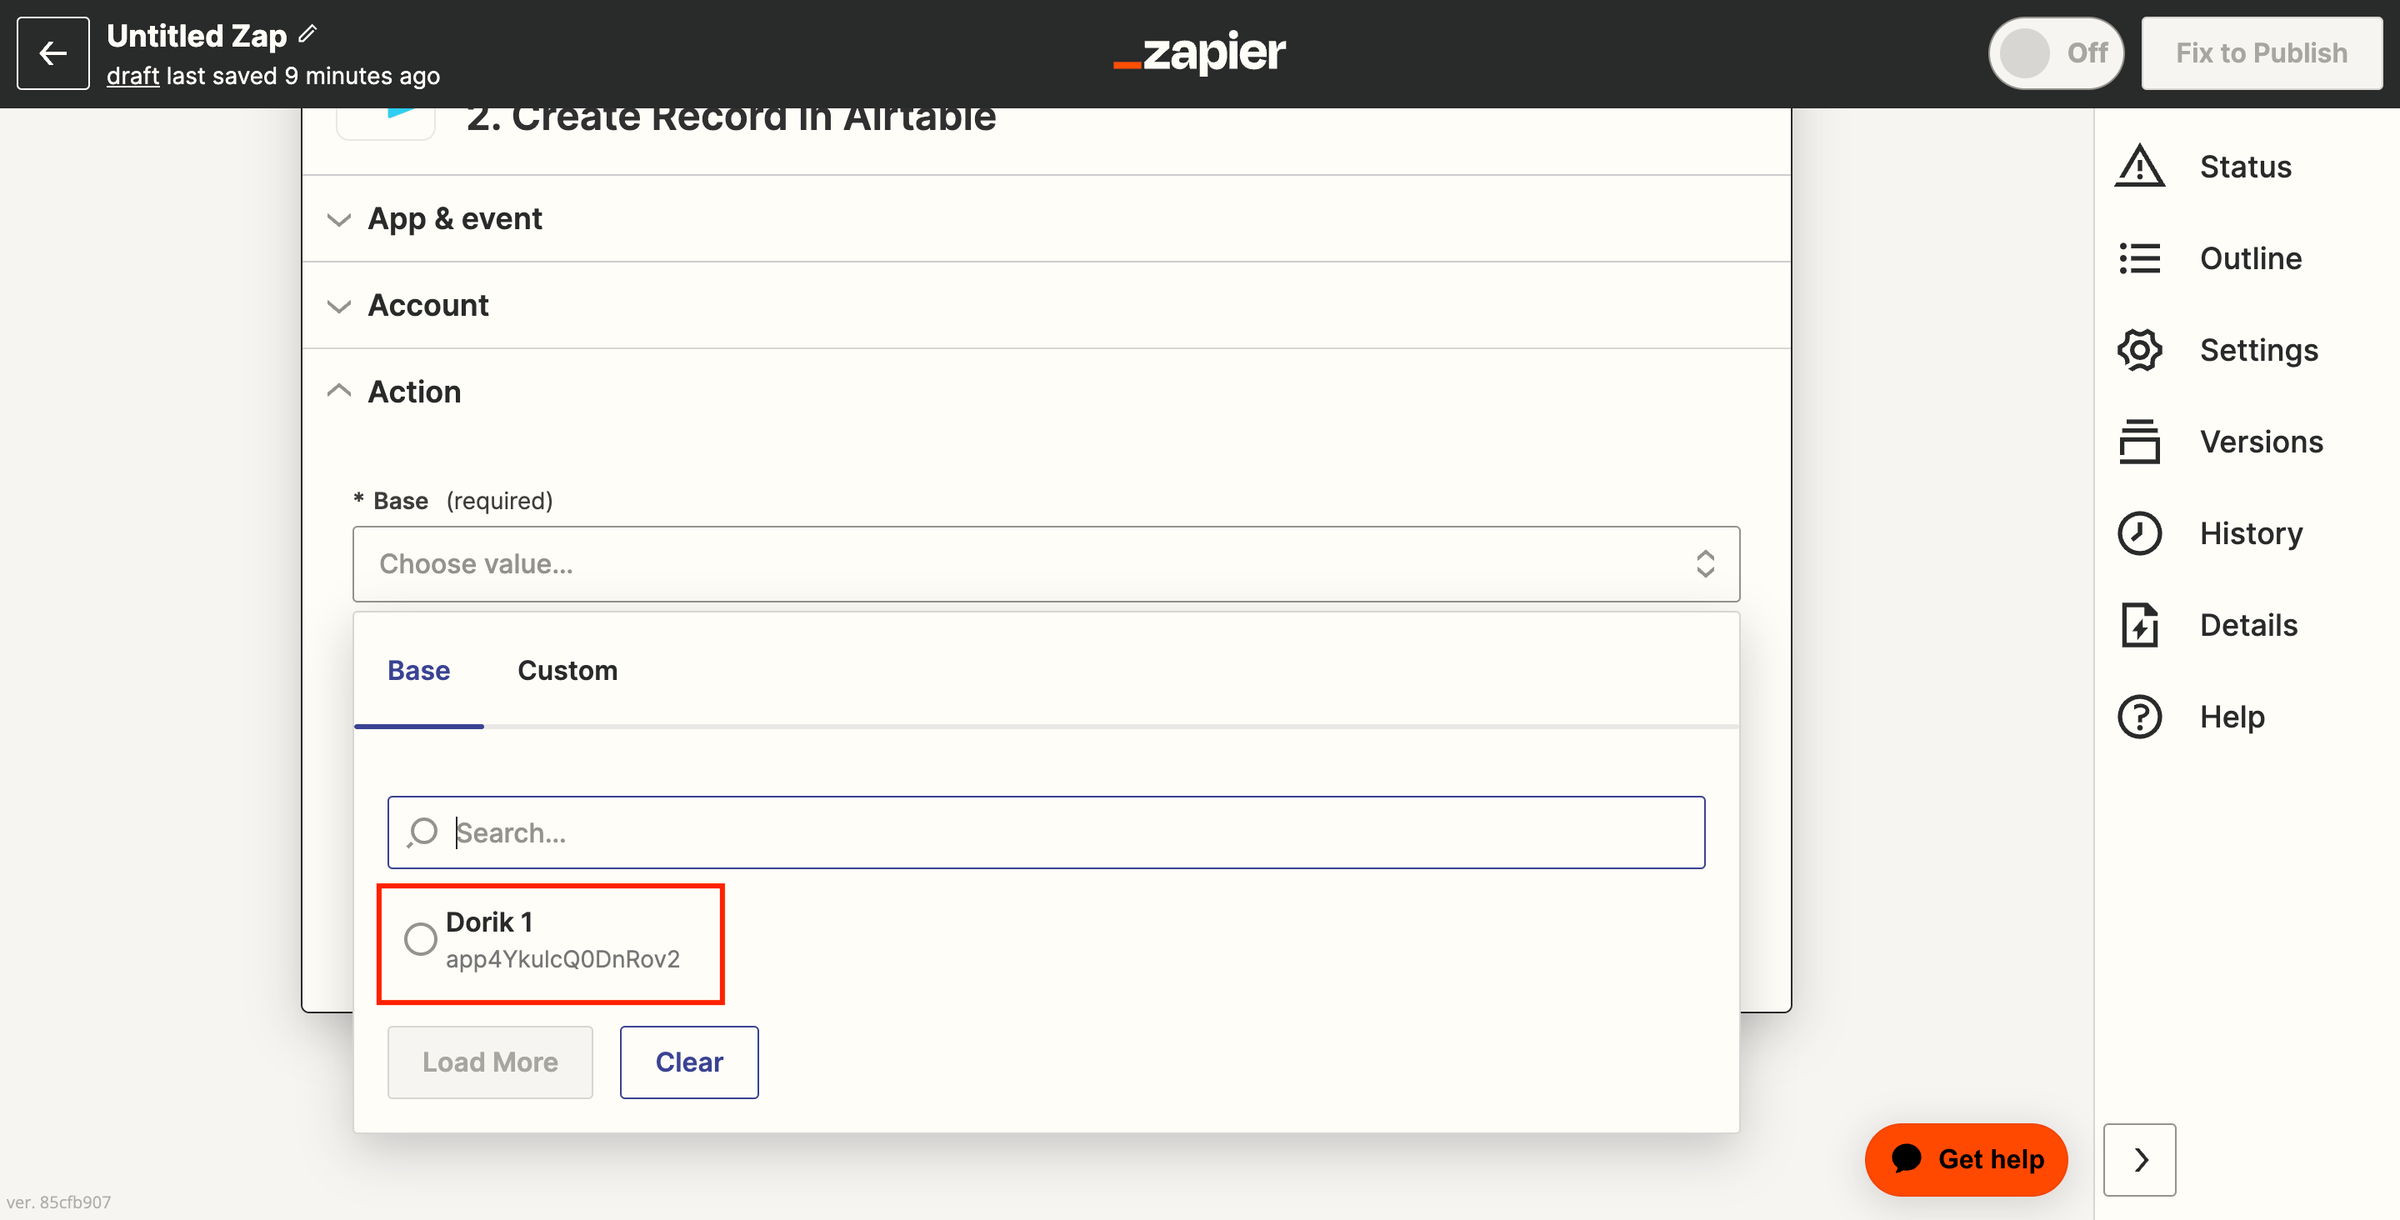
And select your Airtable Table.
After that, select Email for the Email Column and also the First and Last Name. Hit the Continue button.
Step 14: Now, click on the Test Action Button.
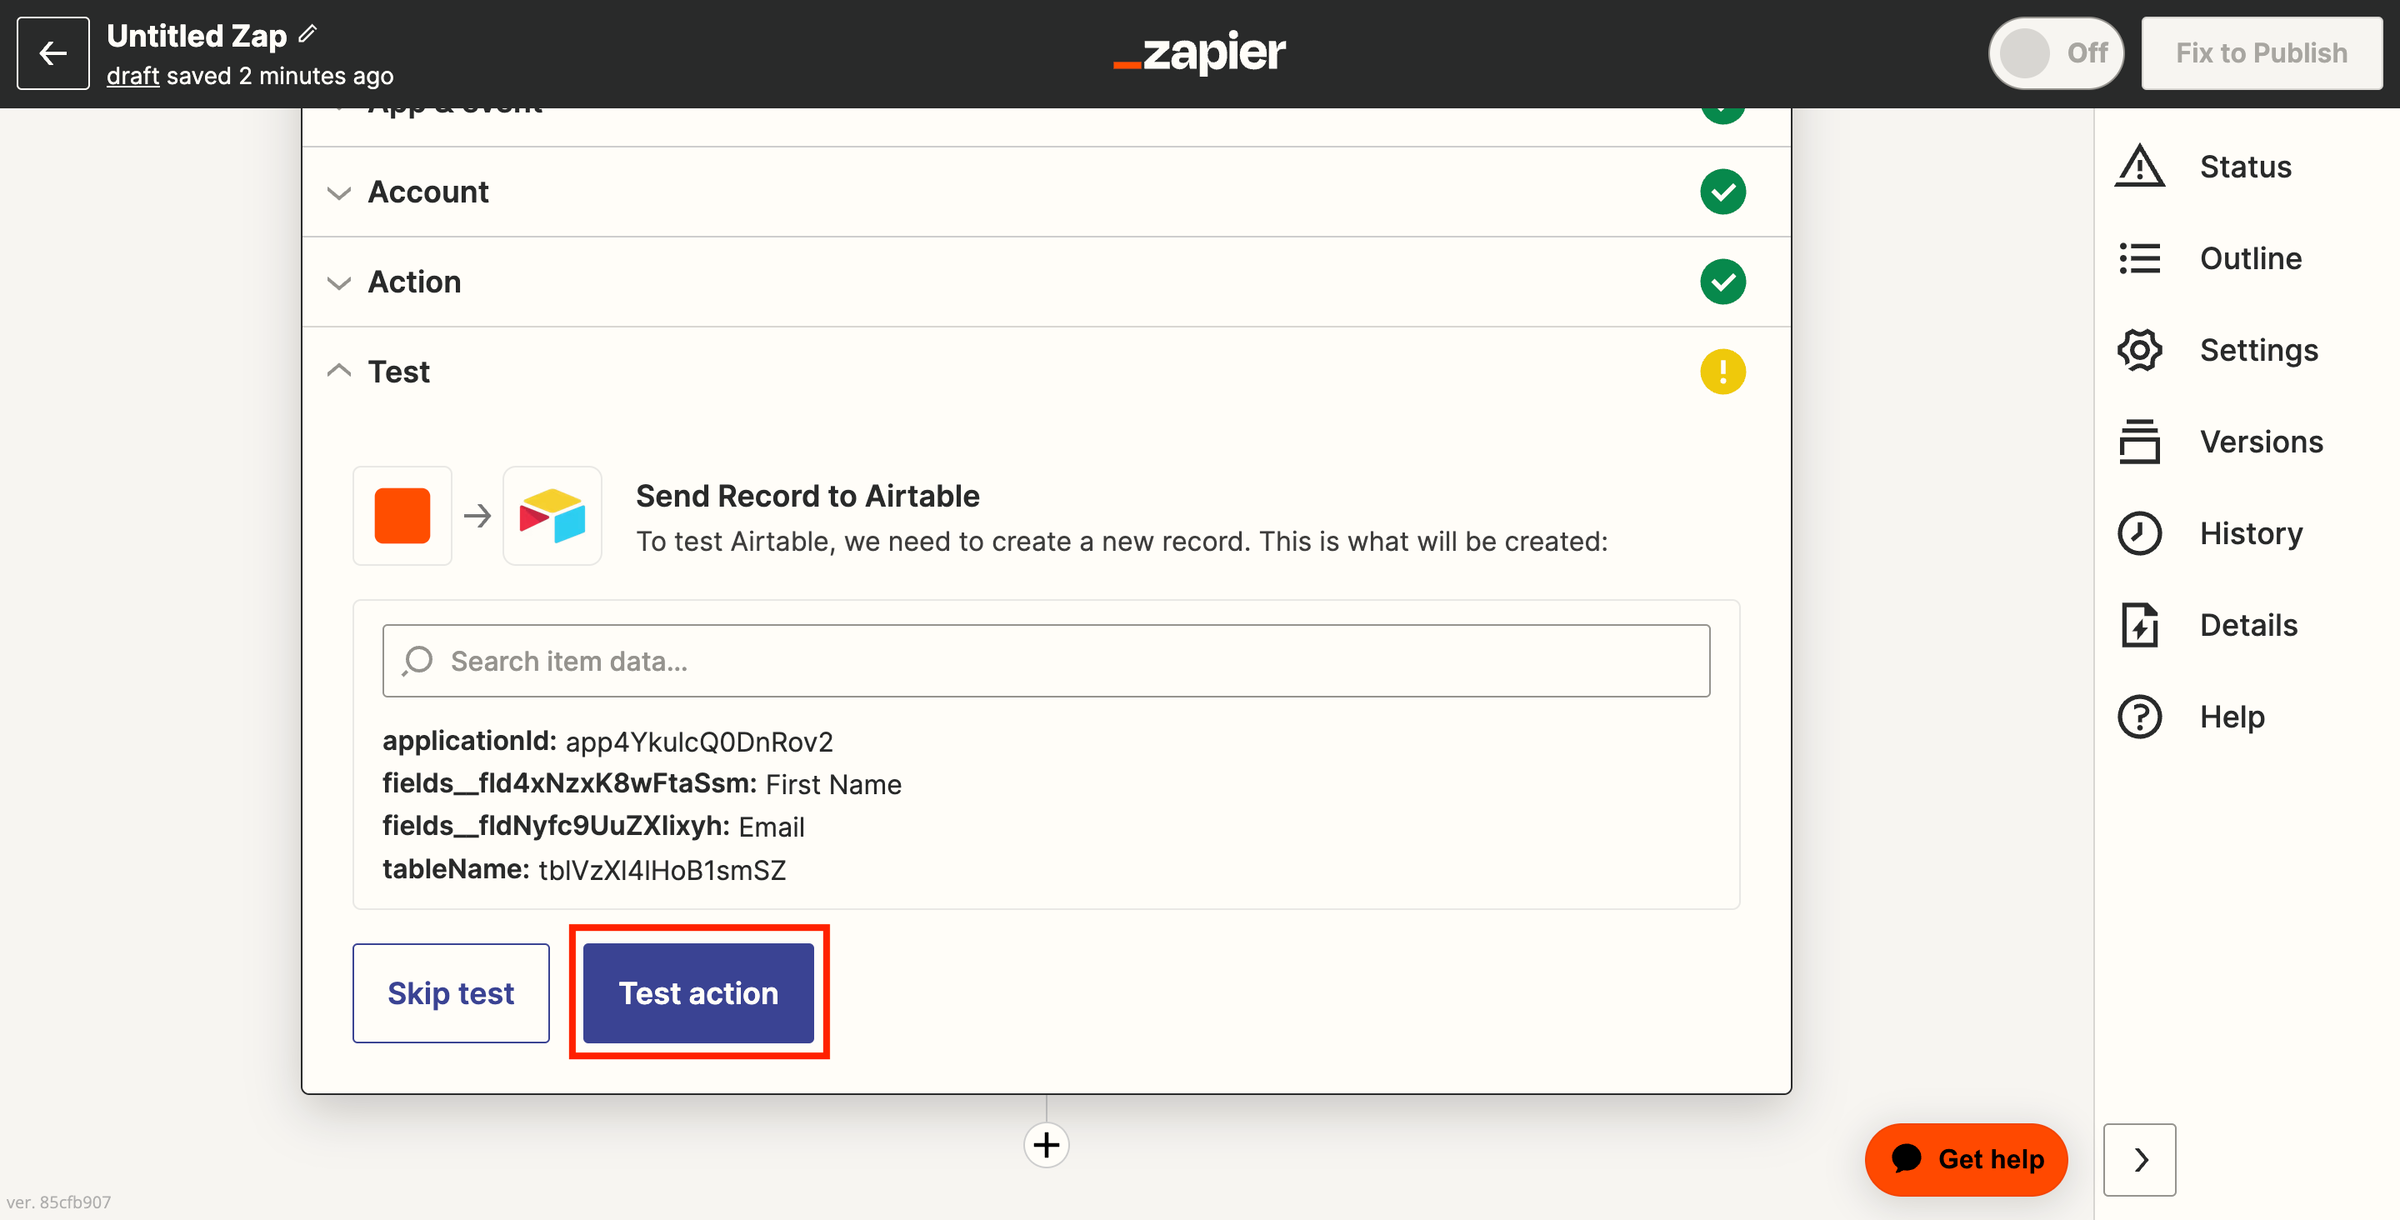
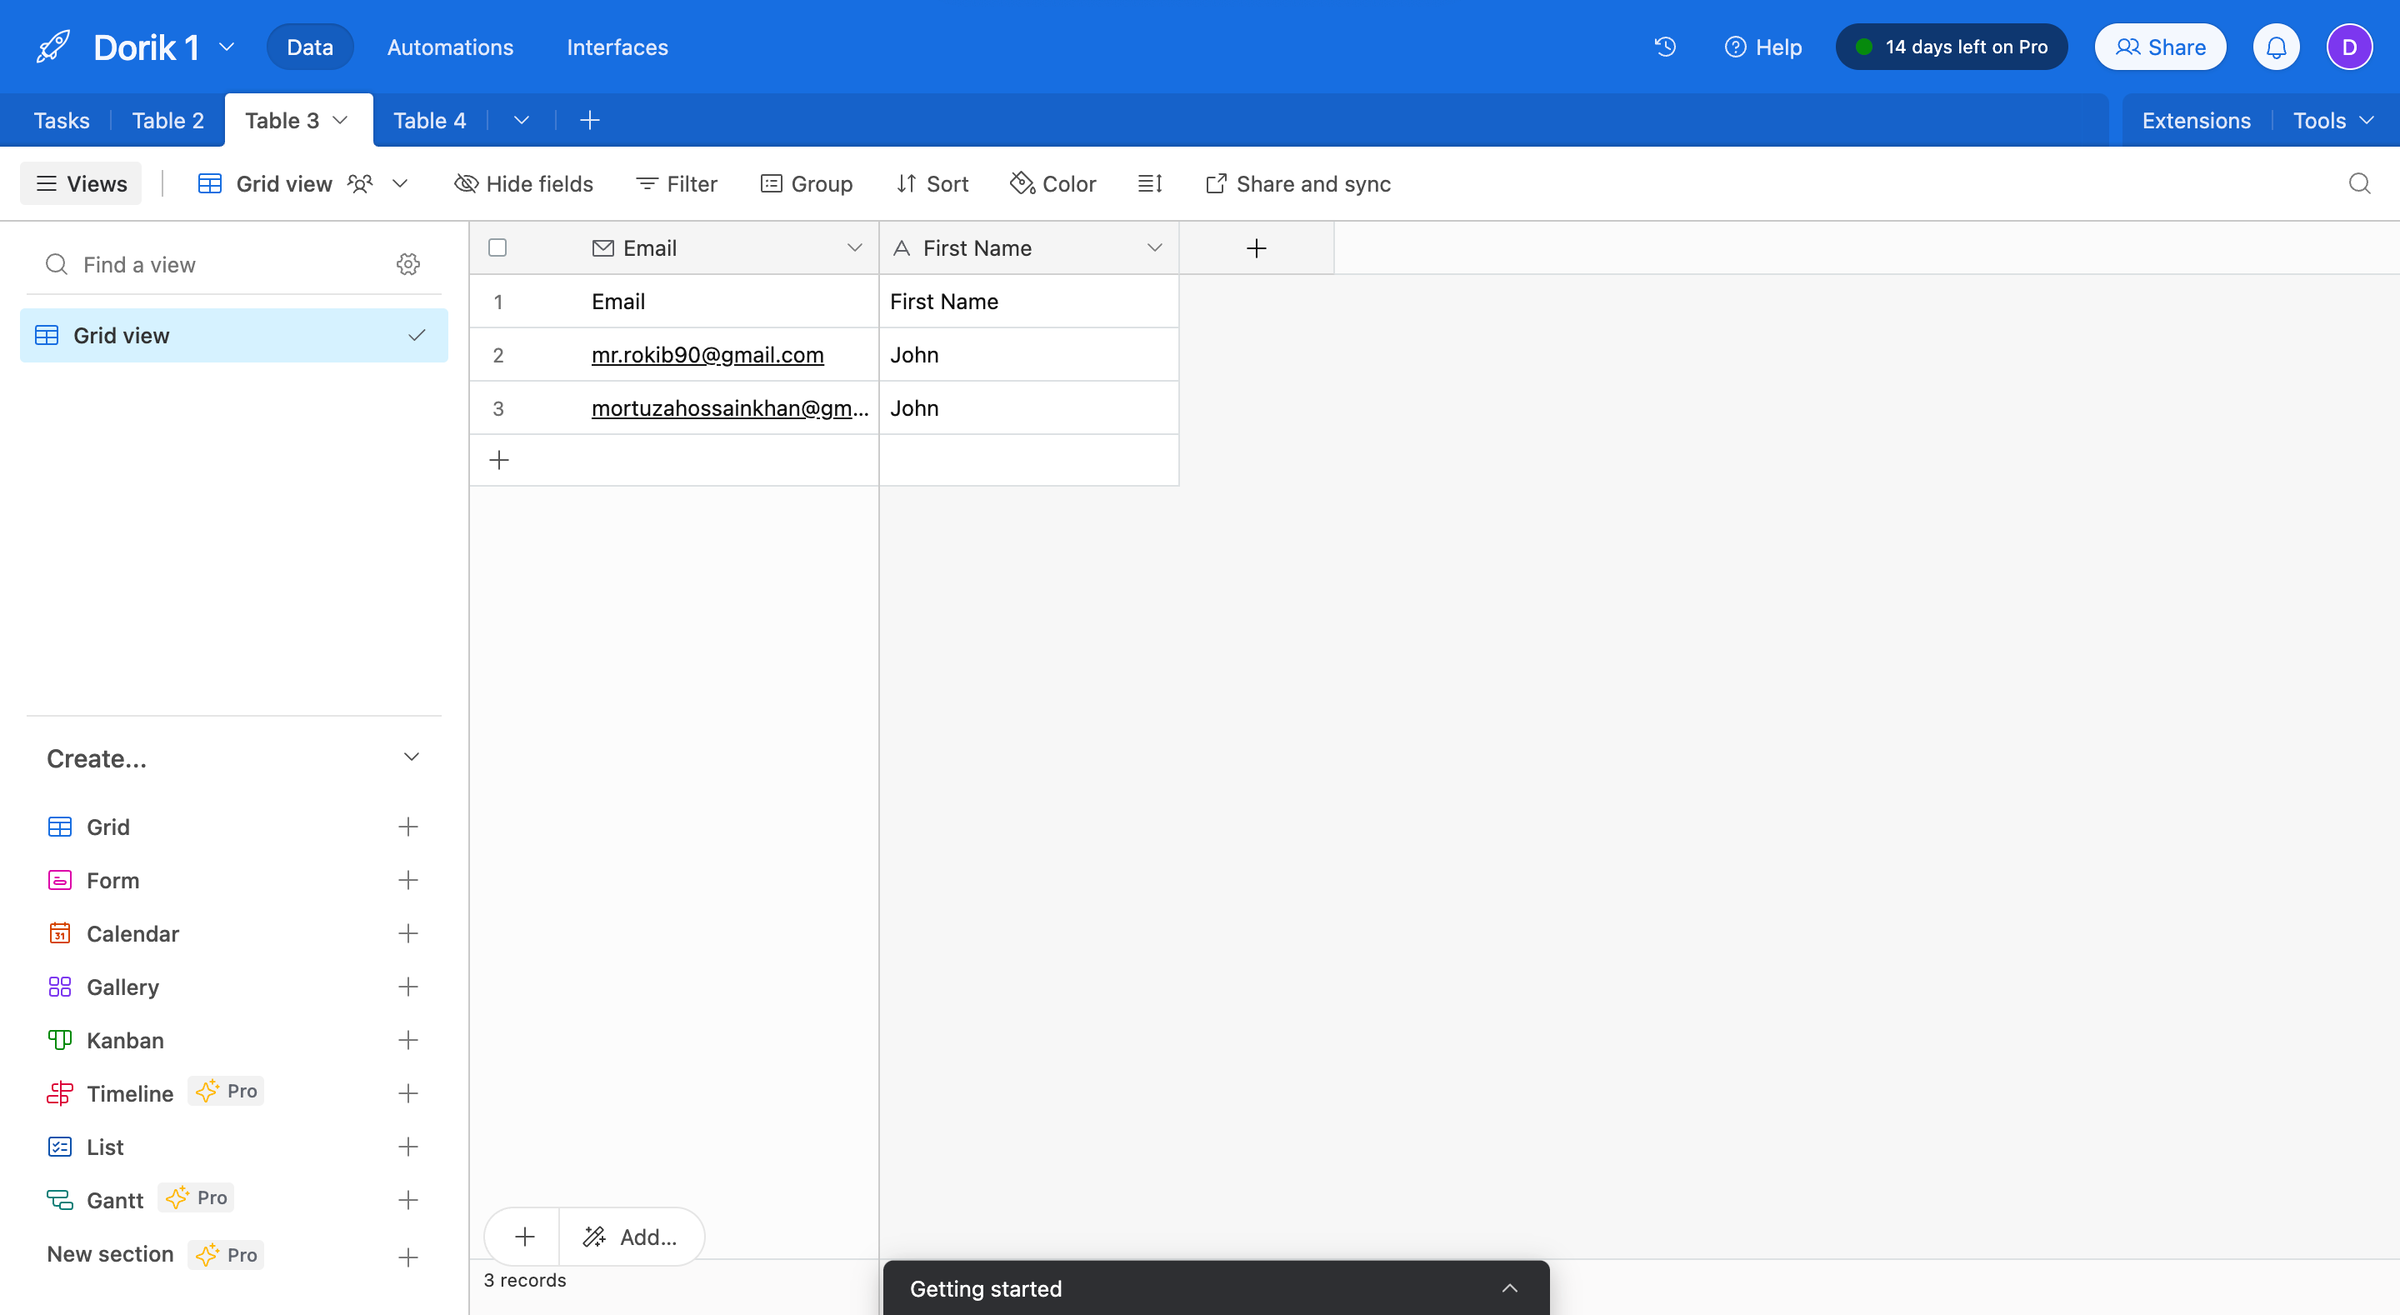
It will send the test record to your Airtable.
Step 15: At last, click on the Publish button.
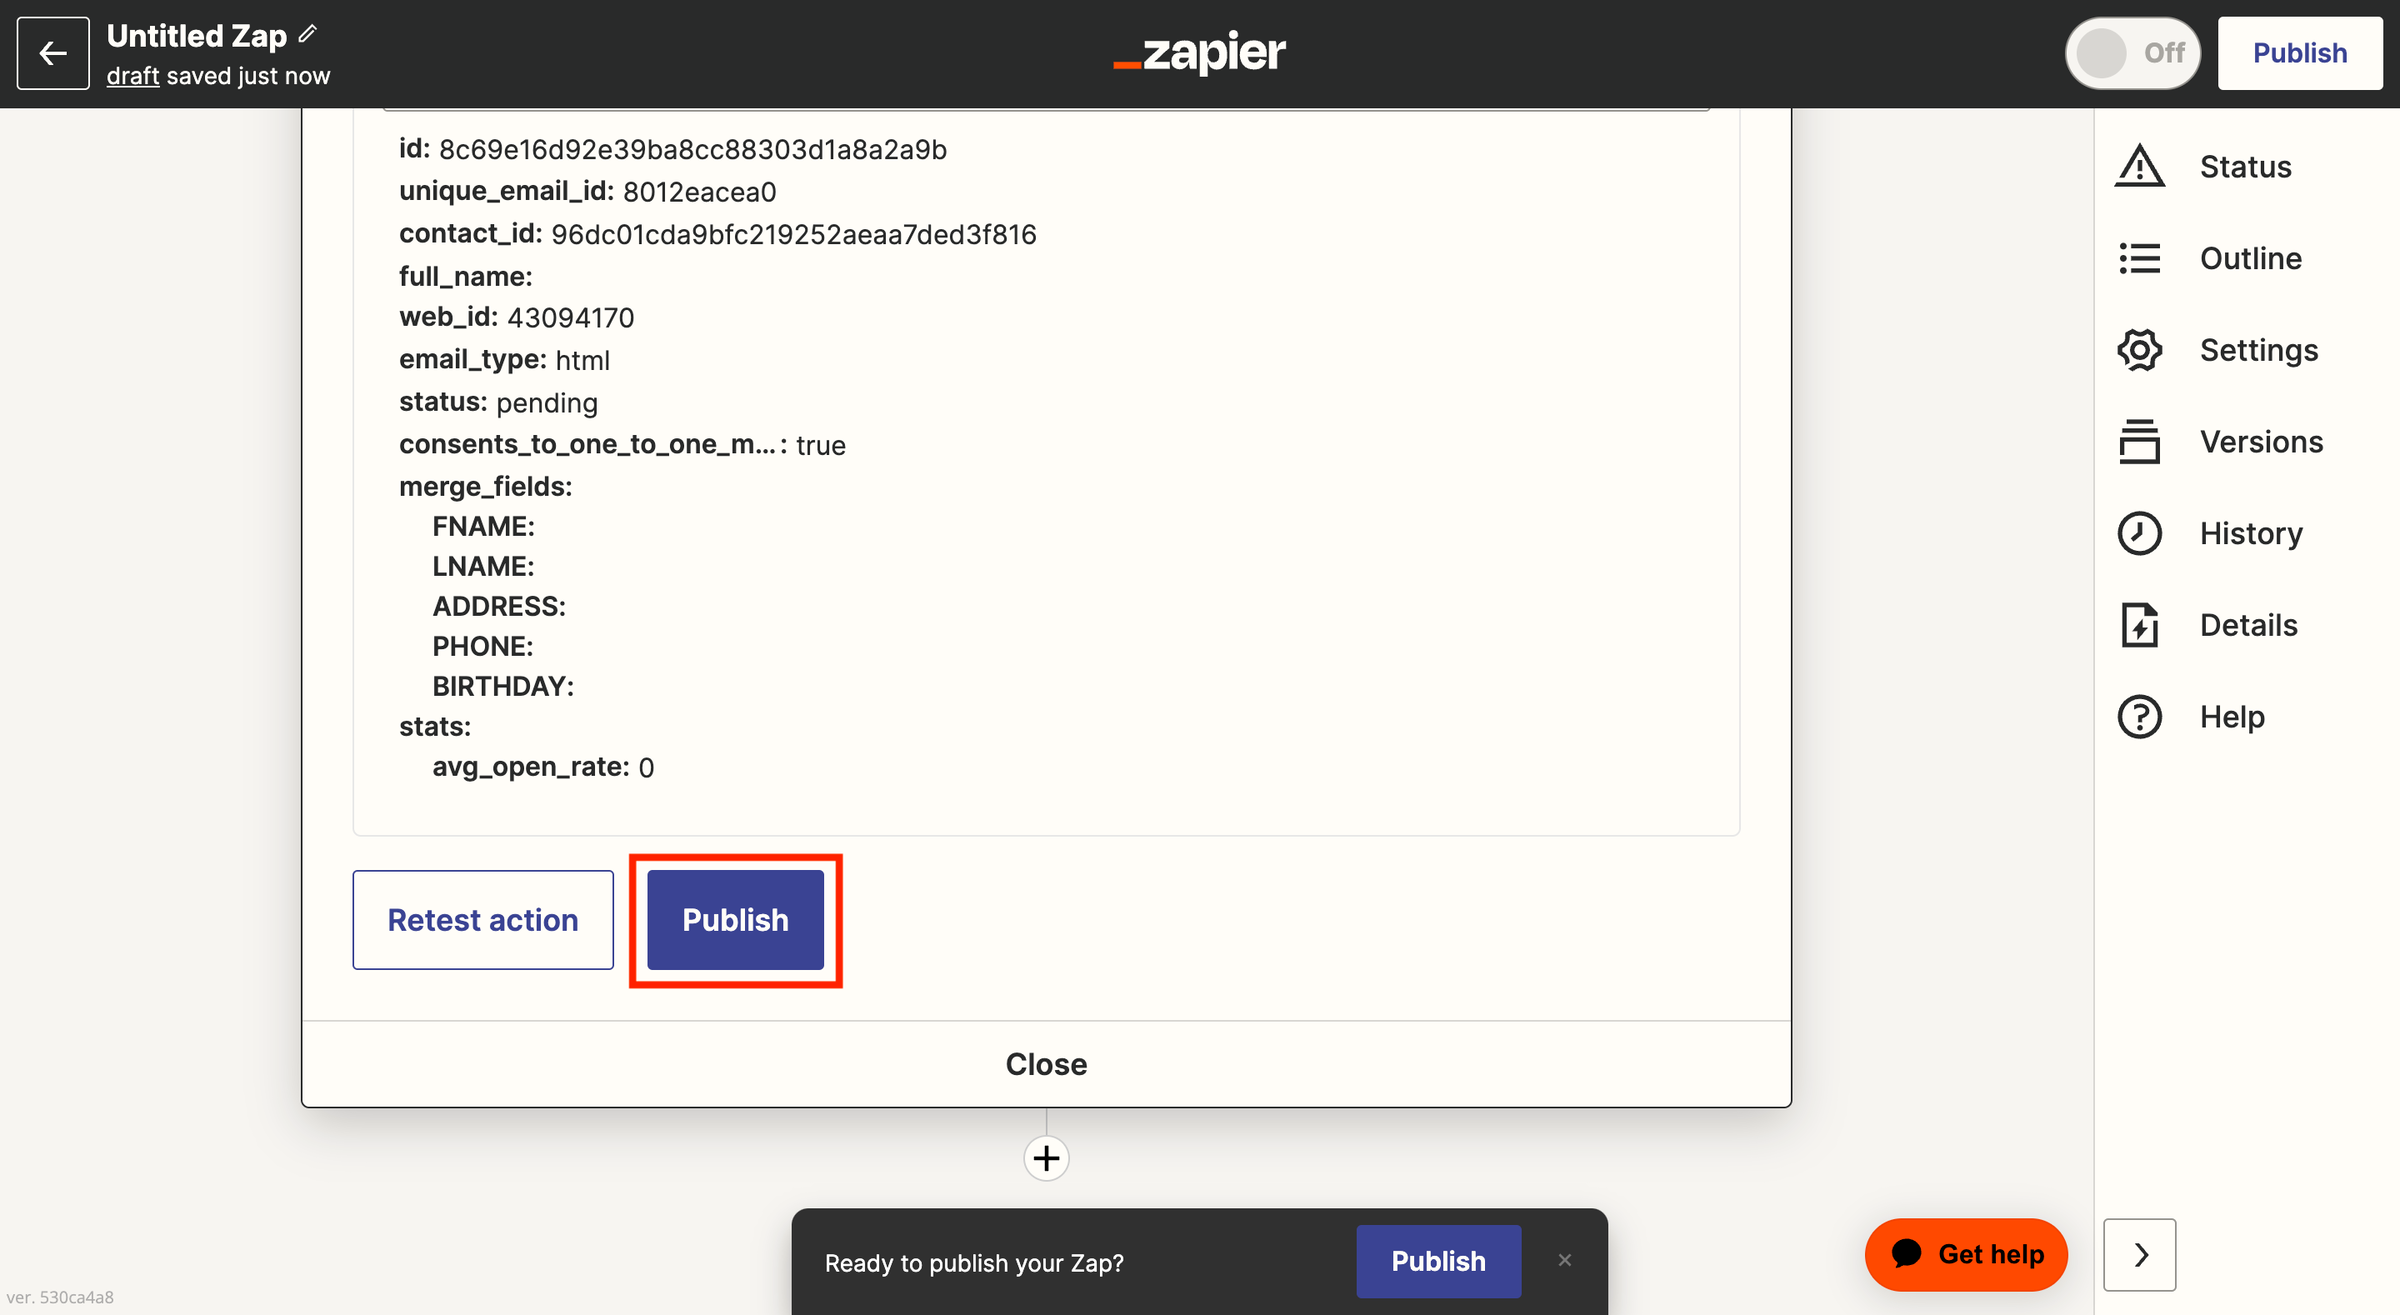
After publishing your zap, test it again to ensure everything functions correctly.
Step 16: Return to your Dorik, one of the best website builders, if you want to write custom success messages. For example: Thank you for subscribing.
Thus, you can integrate Zapier with the Subscription Form.
Best Practices for Using Zapier Effectively
To use Zapier effectively, follow these best practices:
1. Define clear goals: Identify the tasks you want to automate and the desired outcomes. This will help you create efficient and targeted Zaps (automated workflows).
2. Start simple: Begin with basic Zaps to familiarize yourself with the platform. You can create more complex workflows after gathering some experience.
3. Use built-in apps: Zapier offers built-in apps like Formatter, Email, and Webhooks. These can help you manage data, send emails, or interact with APIs.
4. Use filters: Filters allow you to set conditions for when a Zap should run. This helps you avoid unnecessary actions and ensures your Zaps only trigger when needed.
5. Test your Zaps: Always test your Zaps before implementing them. This ensures they work as intended and helps you identify any issues early on.
6. Organize your Zaps: Use folders to categorize your Zaps based on their purpose or the different apps they connect. This makes it easier to manage and locate specific Zaps.
7. Monitor and maintain: Regularly review your Zaps to ensure they run smoothly. Check for errors, update outdated information, and optimize your workflows.
8. Use multi-step Zaps: Multi-step Zaps allow you to perform multiple actions in a single workflow. This can help you automate more complex business processes and save time.
9. Explore Zap templates: Zapier offers pre-built templates for common workflows. Browse these templates for inspiration and to learn new ways to use the platform.
10. Learn from the community: Join the Zapier community to learn from other users, share your own experiences, and stay updated on new features and best practices.
Popular Zapier Use Cases
Now, we will explore some common use cases for Zapier. Let's jump in!
1. Streamlining Email Marketing
Zapier can also help streamline your email marketing efforts. It can automate list management, campaign creation, performance tracking, etc.
Suppose you have connected your email marketing platform (e.g., Mailchimp, SendinBlue, or ActiveCampaign) to Zapier. In that case, you can automatically add new subscribers to your mailing list, segment contacts based on specific criteria, and trigger personalized email campaigns.
For example, if you run a lead generation website, you can collect emails by integrating Zapier to Dorik subscription, contact, or custom forms.
2. Automating Social Media Posting
Imagine you have started blogging on your website. Once a new blog is published, you want to share separate posts related to it on social media platforms like Twitter, LinkedIn, Facebook, etc.
In this scenario, Zapier can reduce the burden of your manual work.
If you add your social media accounts to Zapier, you can create automated workflows that post content across multiple platforms simultaneously.
You can set up zaps that automatically publish customized posts whenever you release a new blog post or make an announcement on your website, utilizing your RSS feed as the trigger.
Additionally, you can create zaps that distribute a single post across various social media channels.
For instance, if Twitter is your primary platform, you can create zaps to automatically share your tweets on other platforms such as Facebook and LinkedIn.
It streamlines the process and ensures your content reaches a broader audience with minimal effort.
3. Managing Projects and Deadlines
You have to admit Project management is a complex and time-consuming process. But Zapier can help you simplify it by automating your tasks and deadline tracking.
For example, you operate an event website. Now, you want to manage your projects and deadlines automatically. Here, Zapier will assist you a lot.
By connecting your project management tool (e.g., Trello, Asana, or Basecamp) to Zapier, you can create automated workflows that assign tasks, update progress, and send notifications based on specific triggers.
An illustration of this is setting up a Zap that automatically generates a new task in your project management tool whenever a new lead is added to your CRM system.
It ensures that no jobs fall through the cracks and deadlines are met consistently.
4. Integrating CRM and Sales Tools
Zapier can also help streamline your sales process by integrating your CRM system with other sales tools.
Through the connection of your CRM platform (such as Salesforce, HubSpot, or Pipedrive) with Zapier, you can automate tasks like lead assignment, deal creation, and follow-up reminders.
For instance, you can establish a Zap that automatically generates a new deal in your CRM system when a prospect completes a contact form on your website. It will save you time.
Besides, it ensures effective lead tracking and management throughout the sales journey.
5. Organizing and Tracking Customer Support Tickets
Zapier can also enhance your customer support process by automating the organization and tracking of support tickets.
You can create workflows that automatically categorize, prioritize and assign tickets based on specific conditions by integrating your customer support platform (Zendesk, Freshdesk, Crisp, or Help Scout) with Zapier.
For example, you can establish a Zap that assigns high-priority tickets to your most skilled support agents, ensuring prompt resolution of urgent issues.
Moreover, integrating your customer support platform with tools like Slack or email lets you keep your team well-informed and updated on ticket status.
6. Managing E-commerce Website
You can streamline your order processing and inventory management by connecting your e-commerce platform to your inventory management system or fulfillment service.
For instance, you can create a Zap that connects Shopify to ShipStation. So every time a new order is placed, the shipping information is sent to ShipStation for fulfillment.
FAQs on What is Zapier, Answered
How secure is Zapier for my data?
Zapier takes data security seriously and ensures the safety of user data by implementing various measures. It uses industry-standard encryption and follows best practices for data handling and storage.
Additionally, the automation tool does not store any personal data from your connected apps, providing an extra layer of privacy.
Is there any alternative to Zapier?
Yes, if you're exploring alternatives to Zapier, you will find Integrately and Make to be suitable options. These platforms allow you to automate tasks across numerous applications, tailored to both personal and professional use.
Is Zapier beginner-friendly?
Yes, this online tool is designed to be user-friendly, even for beginners. It provides a visual interface and step-by-step guidance for creating Zaps, making it accessible for users with little to no coding experience.
Can I customize my Zaps in Zapier?
Yes, Zapier lets users customize their Zaps according to their specific needs. You can define the triggers and actions, set up filters to refine the data, and add conditional logic to control how the automation behaves.
Can Zapier handle large volumes of data?
Zapier is capable of handling large volumes of data. But sometimes, you may face limitations based on the specific apps and services you use.
Some apps may have their own data limitations, which can impact the flow and processing of data within your Zaps.
Can I use Zapier for free?
Yes, Zapier offers a free plan allowing users to utilize its automation capabilities without cost. The free plan provides a limited number of tasks (also known as "Zaps") per month and supports basic features and Zapier integrations.
Automate Your Workflow with Zapier
In conclusion, you can streamline your processes by understanding what is Zapier and how it works. If you implement the best practices shared in this comprehensive guide, you can save time and boost your productivity.
Therefore, embrace the power of automation and unlock the full potential of your business by integrating Zapier with Dorik.
Automate your business and make your daily tasks more efficient.
Related Blogs:
9 Best Marketing Newsletter Sites
How to Create a Website Step-by-Step
How to Build a Professional Restaurant Website
