Are you tired of constantly checking for updates or manually triggering actions between your apps and services? Do you find yourself wasting valuable time on repetitive tasks that could be automated?
Fortunately, webhooks offer a solution to these problem, enabling seamless integration and automation. So, in this blog post, we'll show you how to use webhooks easily.
How to Use Webhooks: A Definitive Guide
Setting up webhooks is a piece of cake. You just need to follow a simple three-step process:
-
Create the webhook URL from an application, to which you prefer to send data to
-
Insert that URL in the webhook section of the application from which you choose to receive data.
-
Select the event types you want the application to notify you about.
To demonstrate how this works, we’ll use Mailchimp and Requestbin (powered by Pipedream) as an example. Here, Mailchimp will send data, and Requestbin will receive that data.
Let’s get straight into it.
N.B: We won’t show you how to create accounts on Mailchimp and Requestbin. We think you can do this simple task. We’ll show you how to connect these two applications instead.
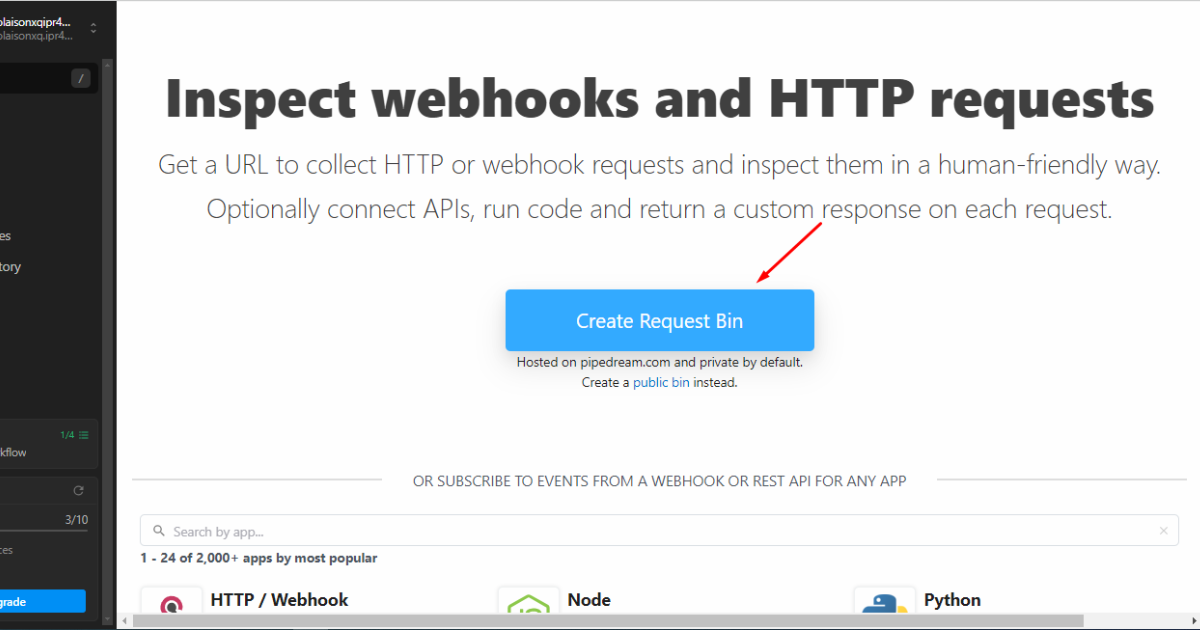
Step 1: Create Request Bin
Visit Requestbin, create or log in to your account, and click the “Create Request Bin” button.
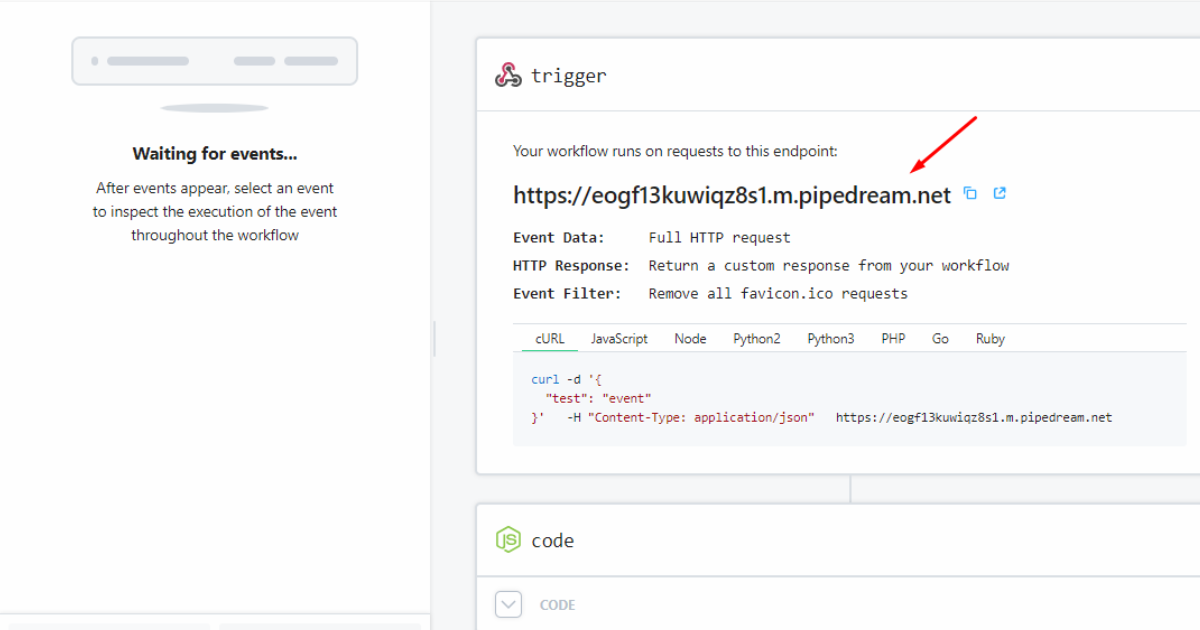
Step 2: Copy the Endpoint URL
Afterward, copy the endpoint URL and save it in Notepad.
Step 3: Create or Log in to Your Mailchimp Account
Now, create an account on Mailchimp or log in to your existing account. Then go to “Audience Dashboard” on the left sidebar of Mailchimp.
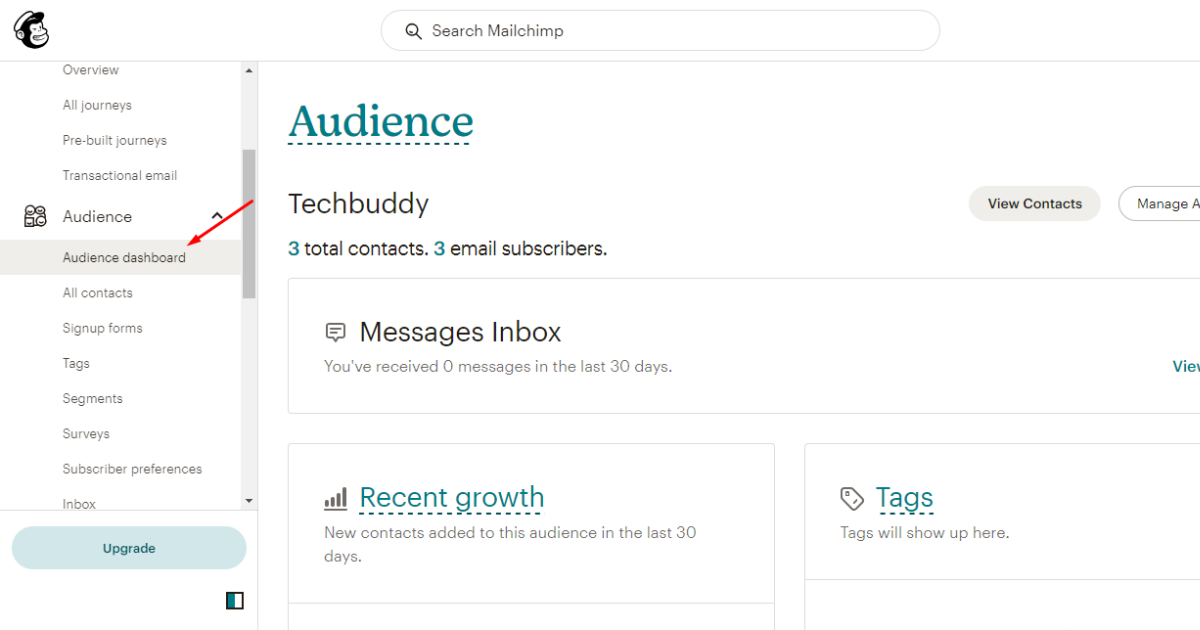
Remember, your Mailchimp account must contain some leads to proceed with webhook creation.
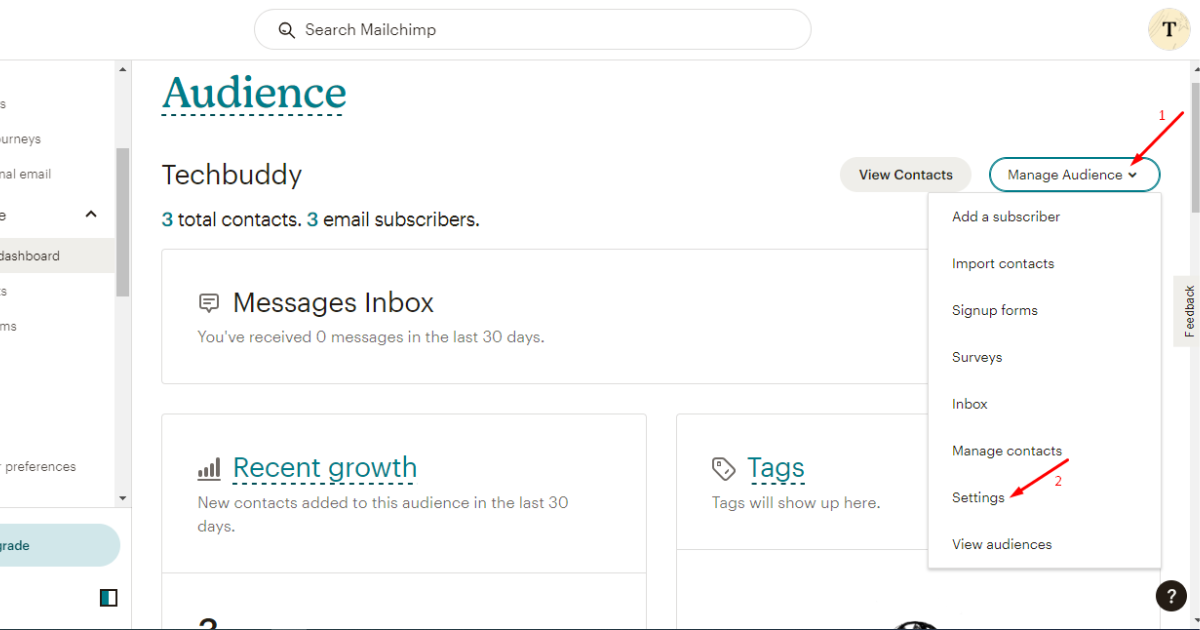
Step 4: Go to Settings in Mailchimp
At this point, navigate to “Manage Audience” on the right side and click on it. Then, hit ‘Settings.’
Step 5: Click Webhooks in Mailchimp
Scroll down a little and click ‘Webhooks.’
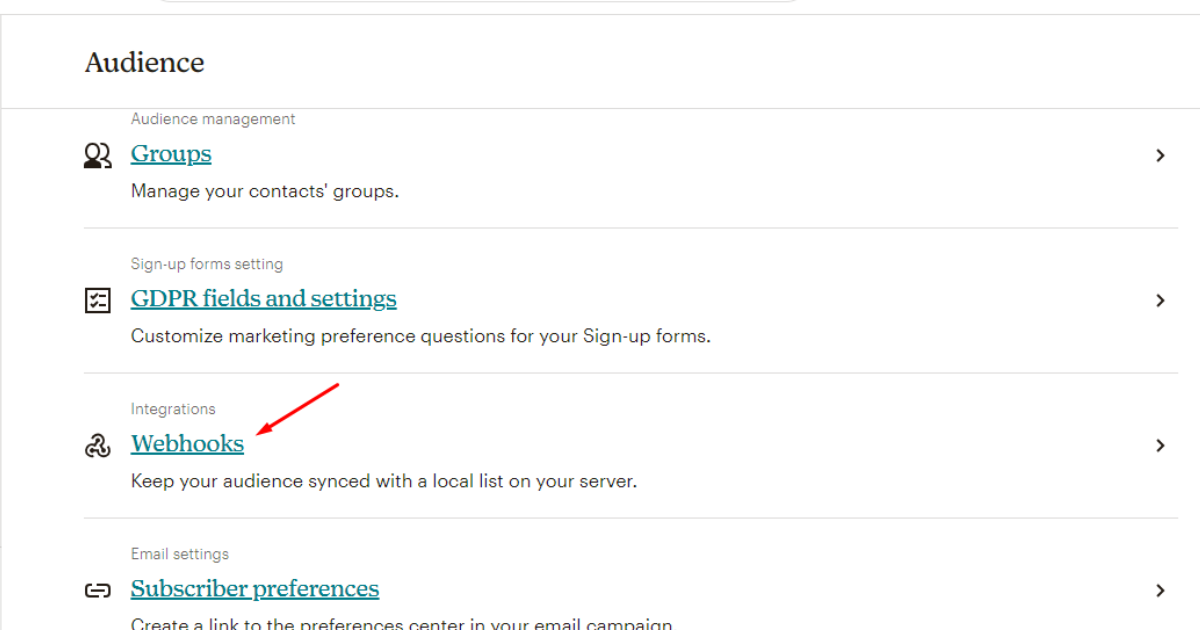
Step 6: Create a New Webhook
Right now, hit the “Create New Webhook” button.
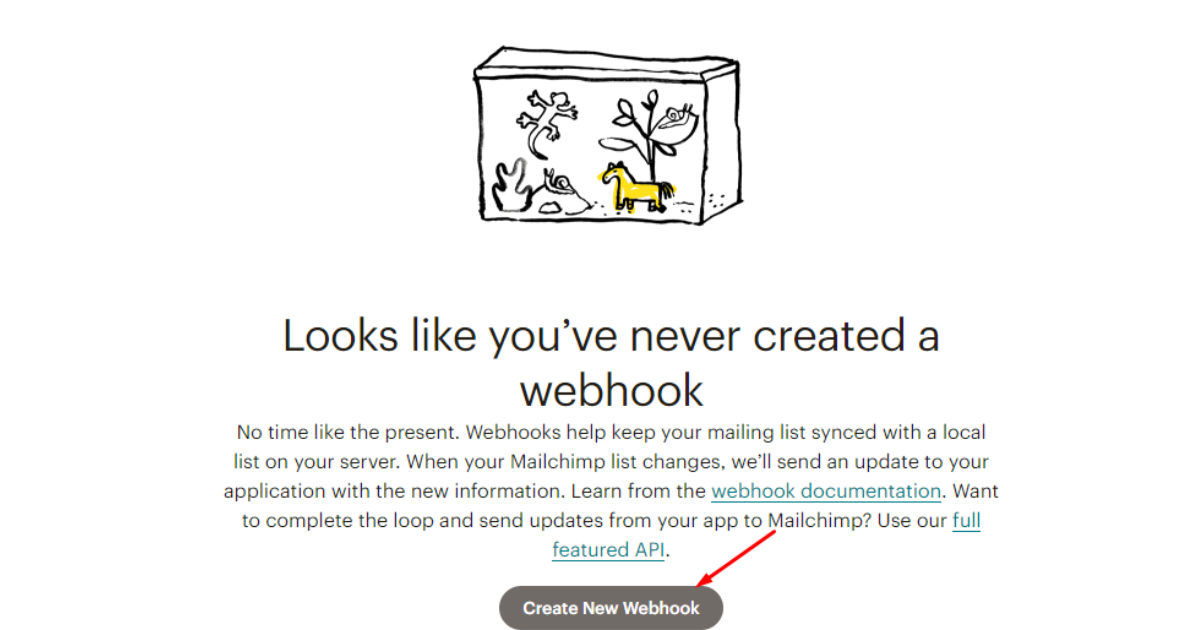
Step 7: Insert Requestbin’s Endpoint URL
After that, paste the Requestbin endpoint URL (which you copied and saved in Notepad) into the “Callback URL” field in Mailchimp.
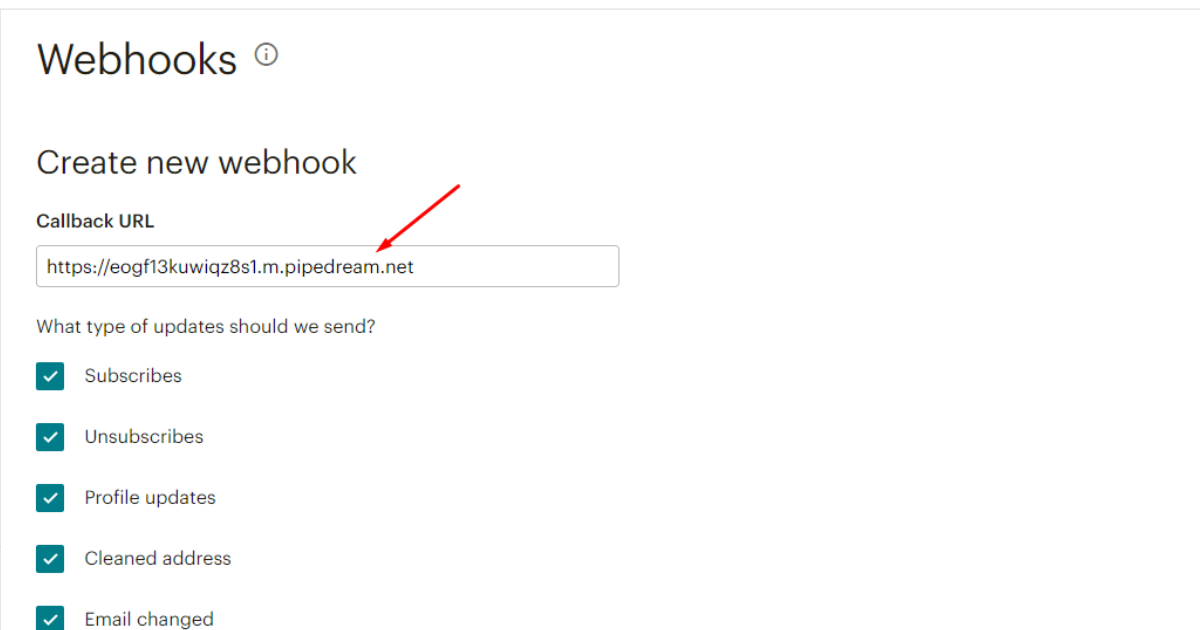
Step 8: Select Mailchimp’s Events to Send Data to Requestbin
Now, choose all the events you want to notify about and click the ‘Save’ button.
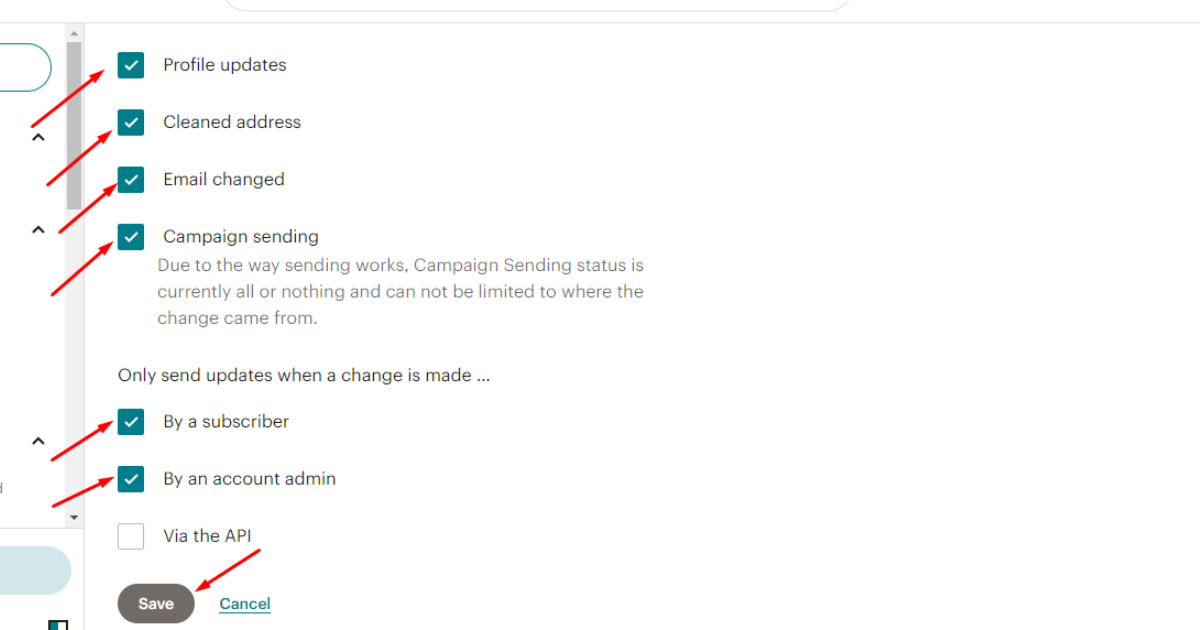
Bingo! You’ve correctly created a webhook in Mailchimp. Let’s now test the connection.
Step 9: View Mailchimp’s Data in Requestbin
By now, you should see data in Requestbin when any of your selected events occur in Mailchimp. Hence, to view Mailchimp data in Requestbin, return to Requestbin and click the new ‘Post’ option.
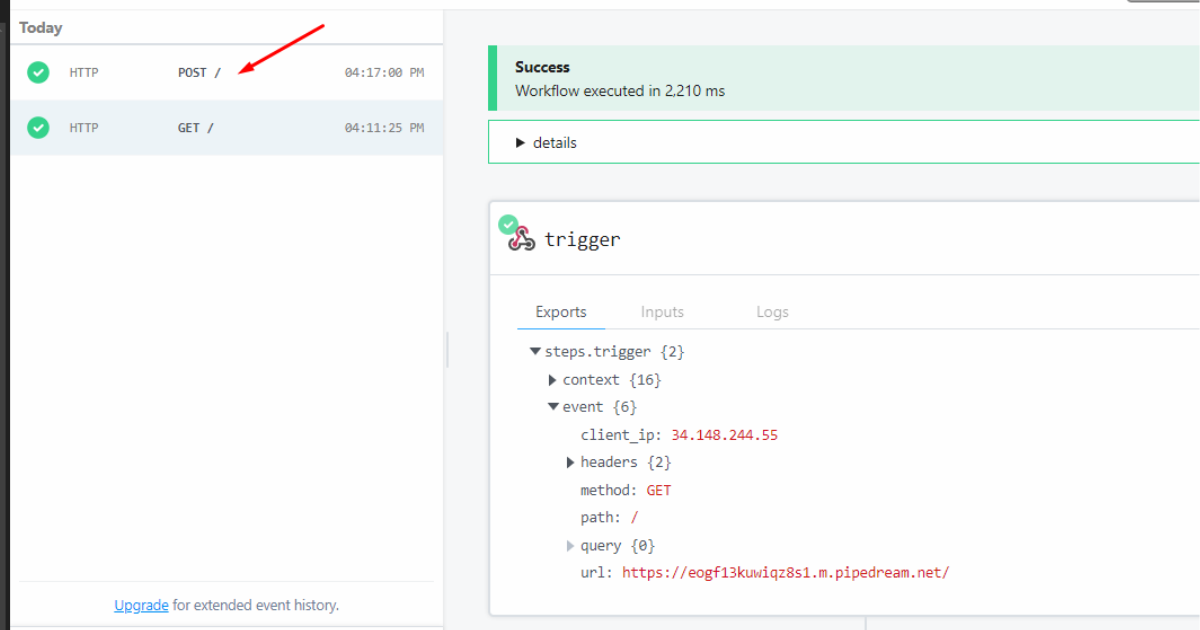
You can now see all the information on events triggered in Mailchimp.
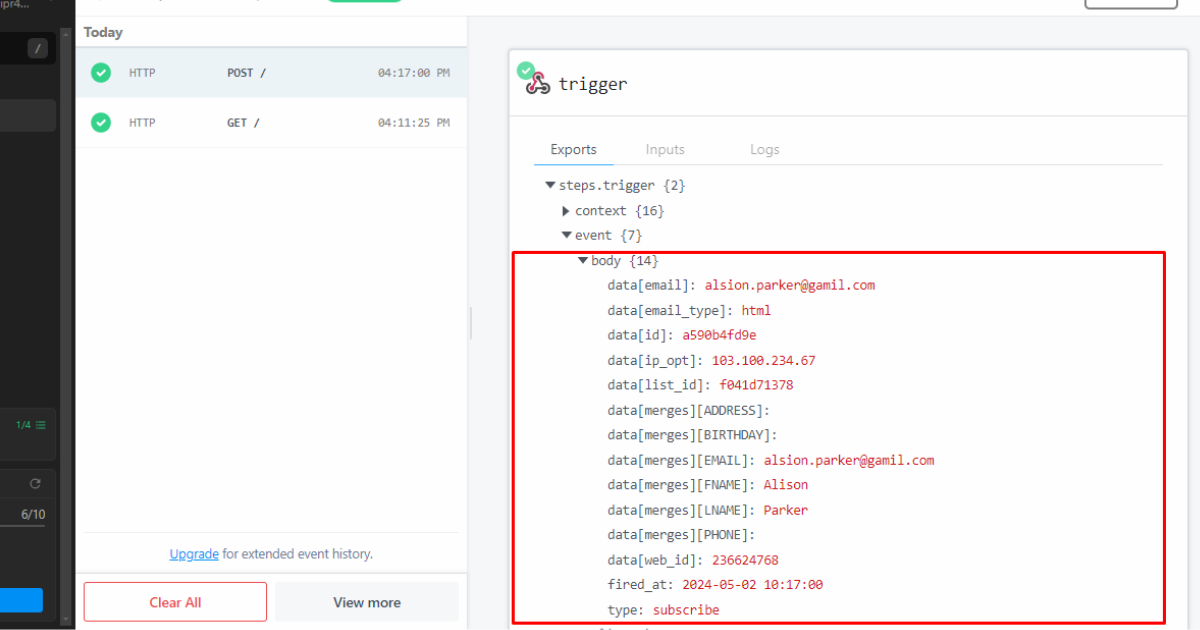
See! How easy it was to use a webhook to help two different applications communicate.
But what if your chosen application doesn’t support the webhook mechanism? What will you do then?
Take a Chill Pill. You can use middleware applications like Zapier.
Zapier features a built-in integration system that polls APIs and sends data via webhooks.
Related Read: What is an API
Bonus: How to Use Webhooks Discord
In this section, we’ll show you how to create a webhook in Discord and use it on GitHub.
Note: We won’t describe the account creation process on these two applications.
Step 1: Log in to Your Discord Account and Create a New Server
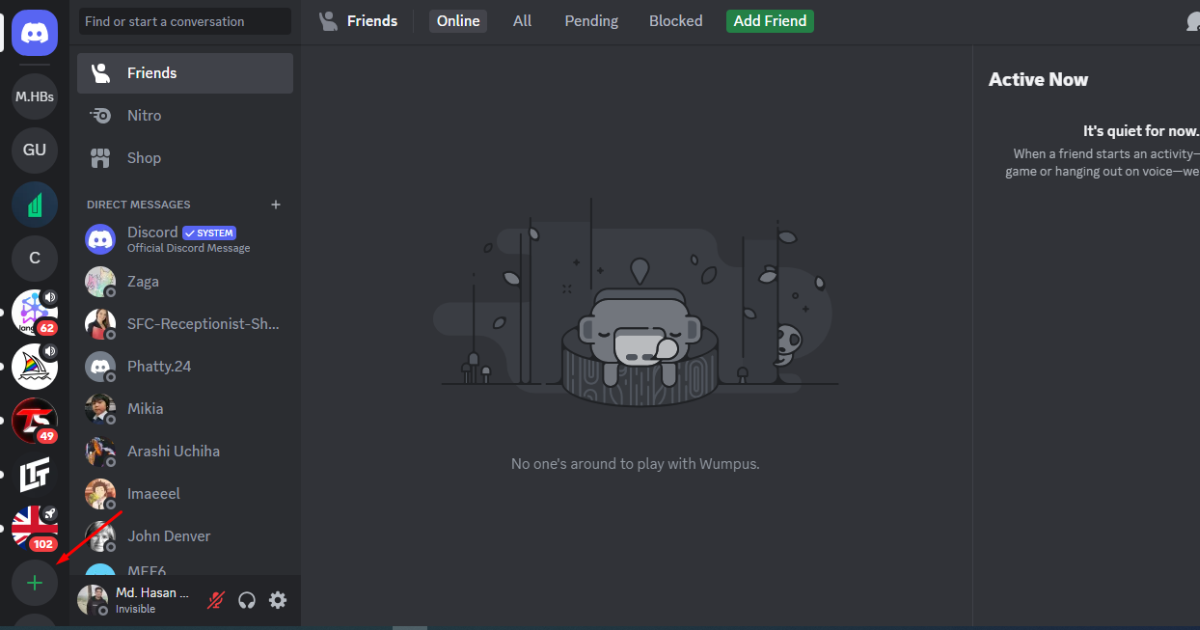
First, log in to your Discord account and create a new server (you can use an existing server, though, if you have one). To create a new server, click on the ‘+’ icon on the bottom left side of Discord.
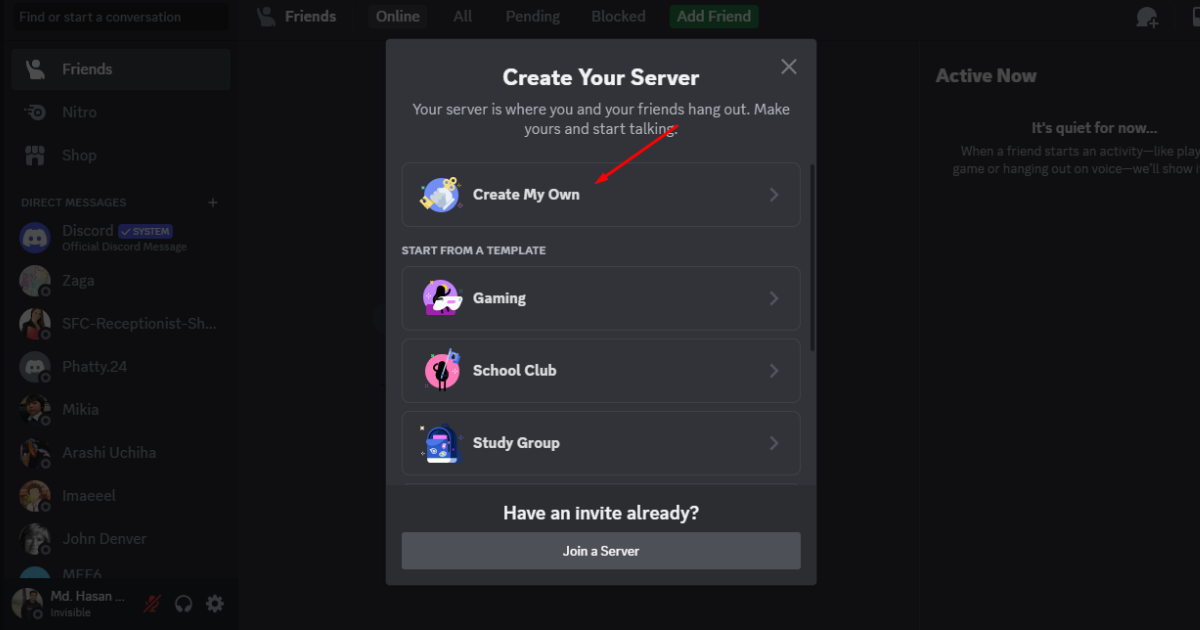
Step 2 - Create a New Server on Discord
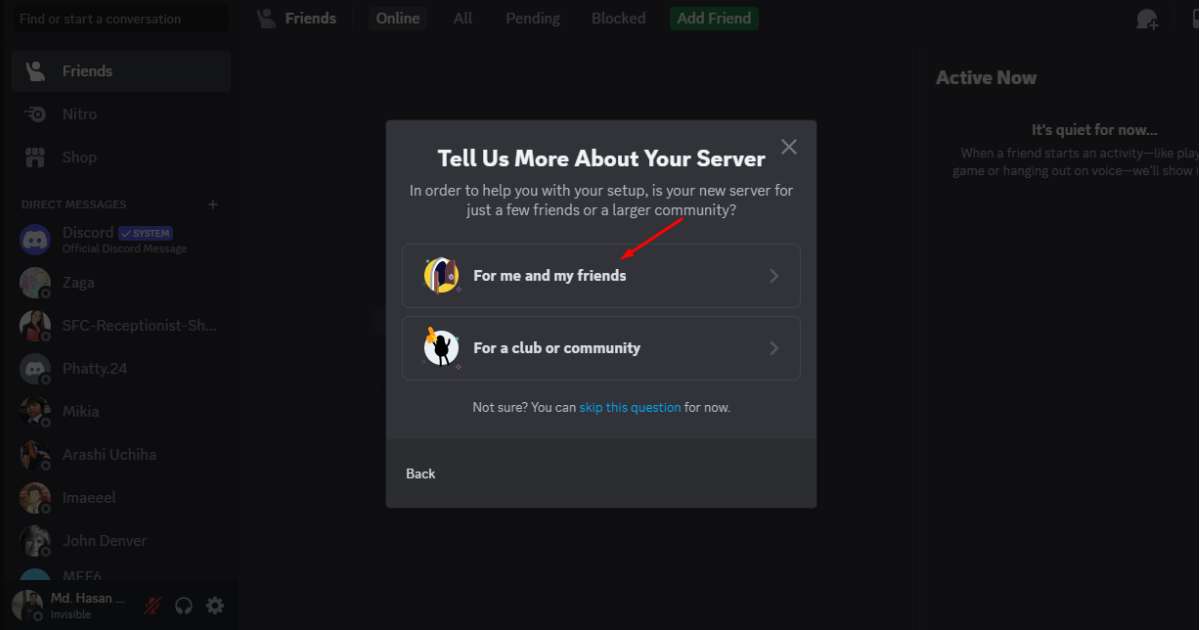
After that, click the “Create My Own” option.
Now, select your preferred community for whom the server will serve its purposes.
Finally, name your Discord server and click the ‘Create’ button.
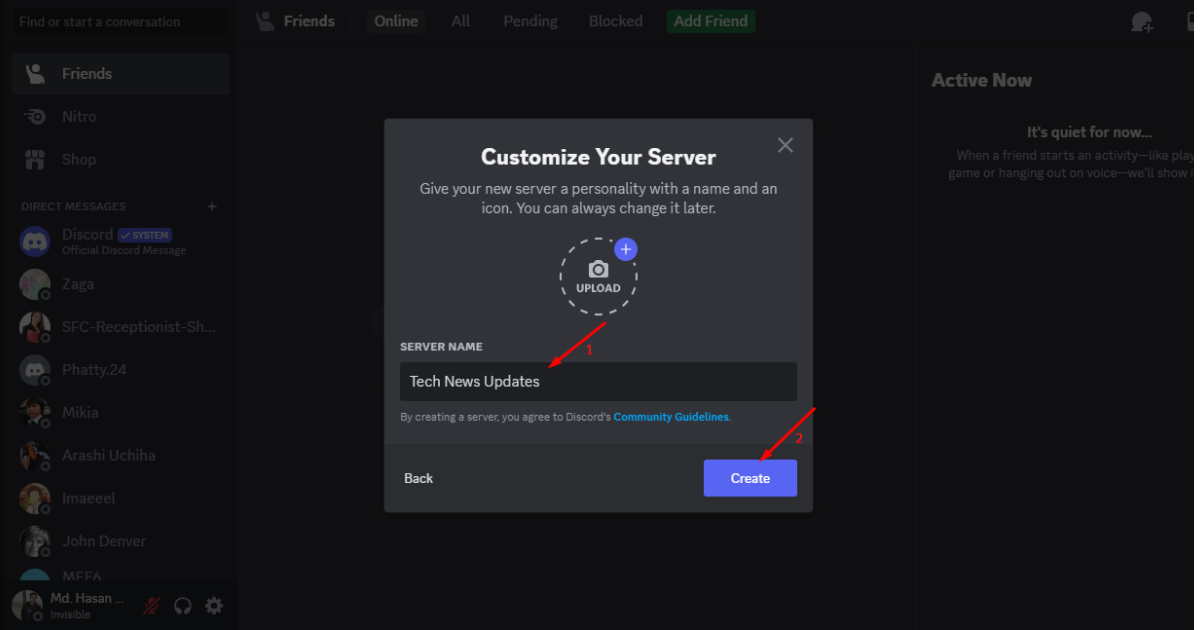
There you go. You’ve just created a server on Discord.
Step 3: Go to Server Settings on Discord
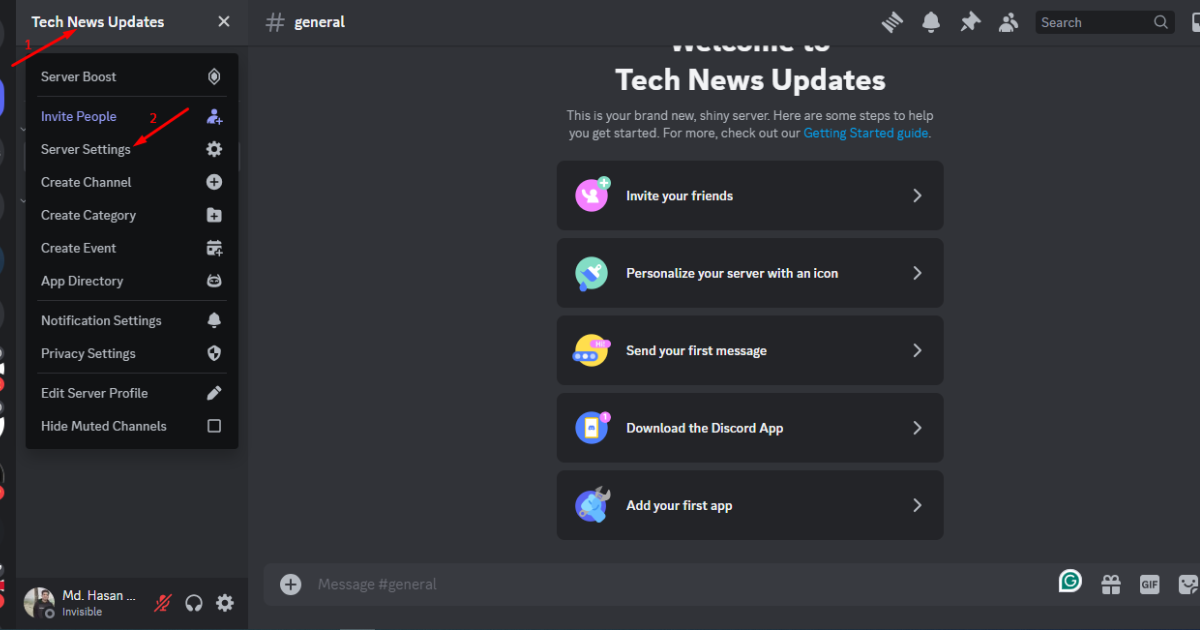
Go to the top left side, click on your server’s name, and select the “Server Settings” tab from the dropdown menu.
Step 4: Create a Webhook on Discord
Navigate to the ‘Integrations’ tab on the left side.
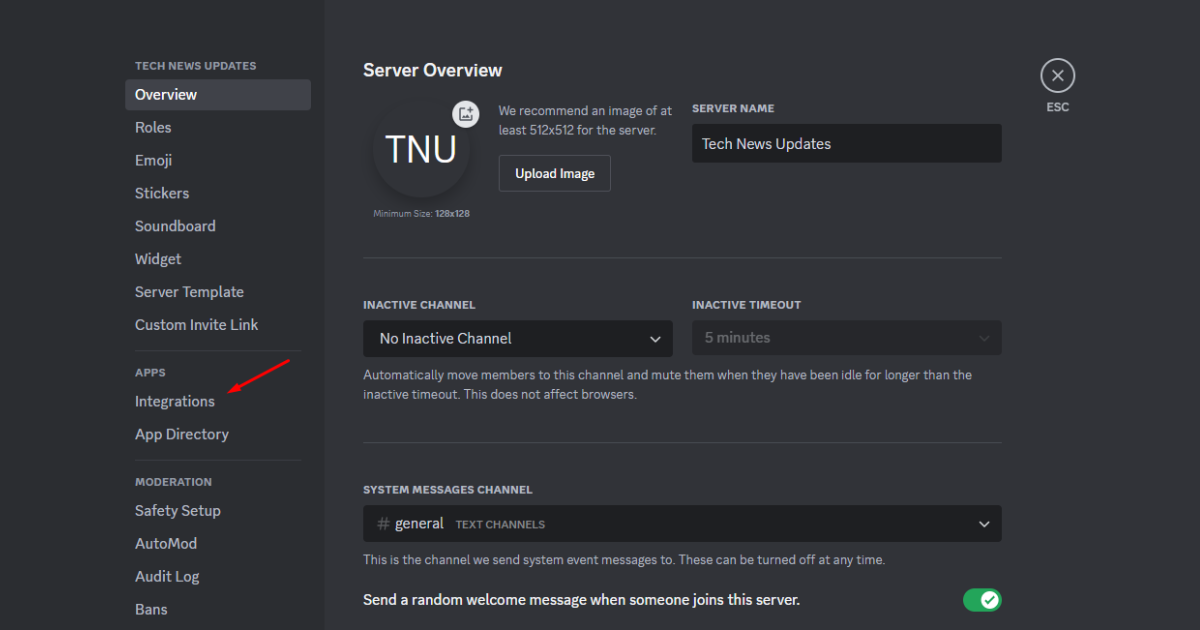
Then, hit the “Create Webhook” button.
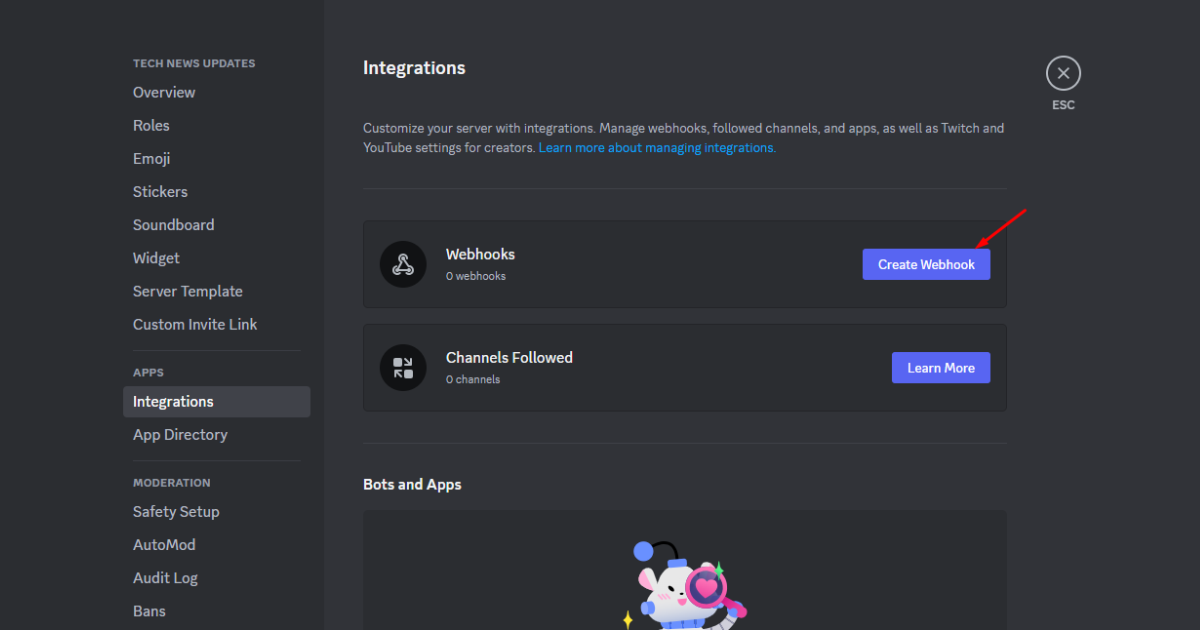
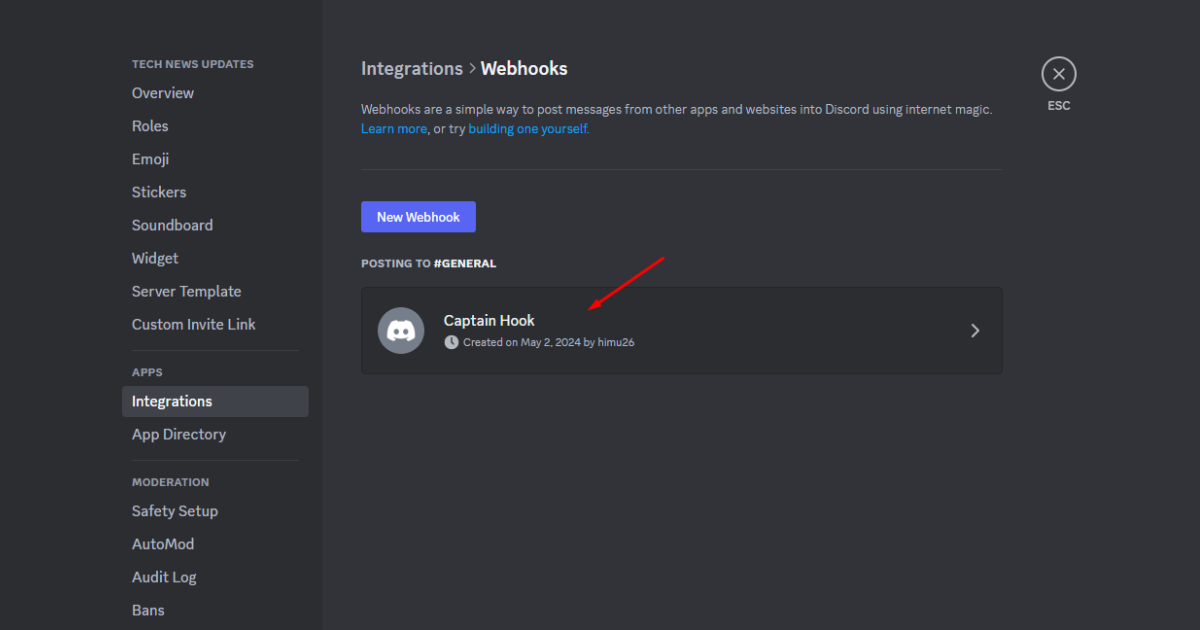
Now, edit the name of the webhook according to your preference. To edit, hit the already created webhook.
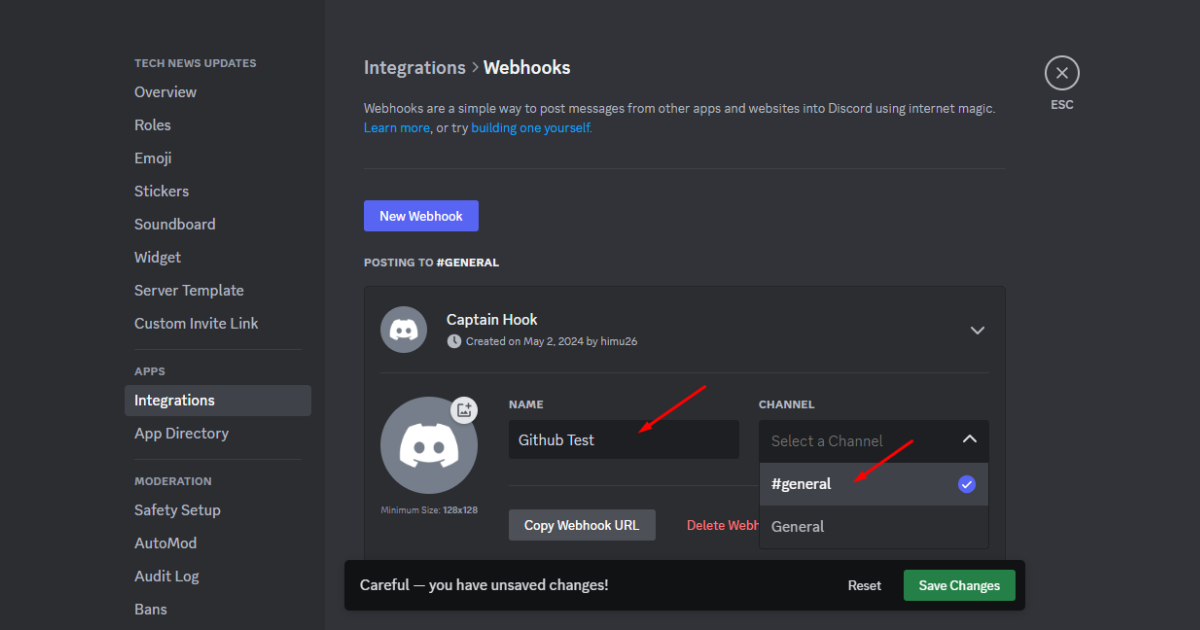
After that, name your webhook and make sure to select ‘#general’ in the Channel field.
Lastly, click the “Copy Webhook URL” button to copy the endpoint URL and save it in Notepad.
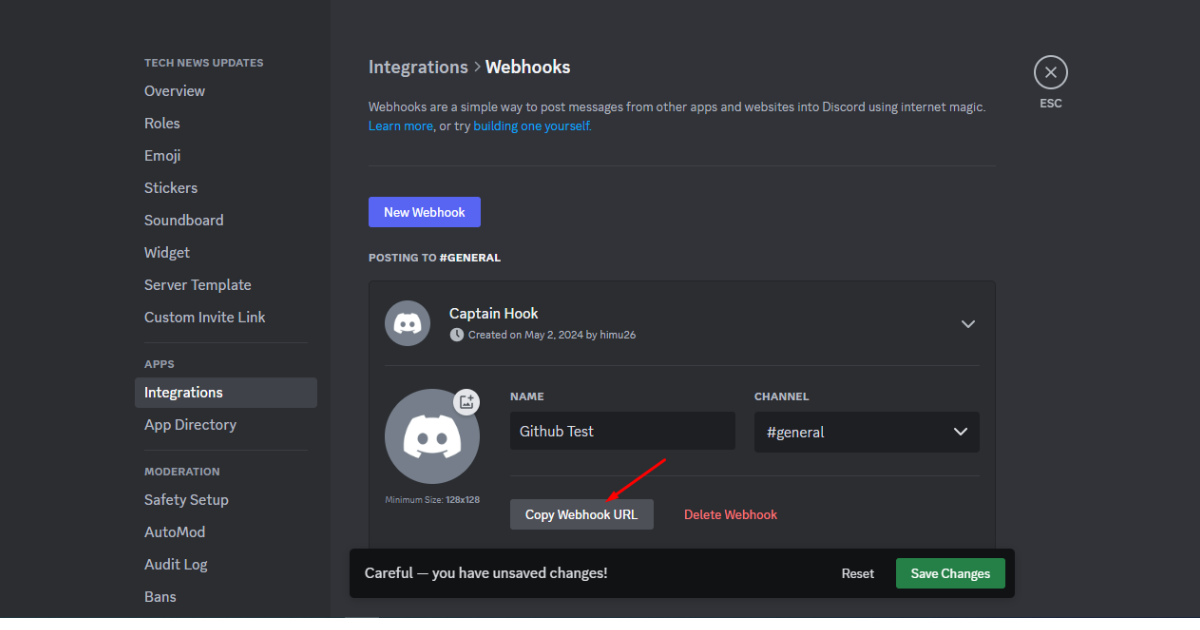
Okay, you’ve successfully created a webhook on Discord. It’s time to use it to connect Discord with GitHub.
Step 5: Log in to Your GitHub Account and Create a New Repository
As you can read in this section’s title, you need to log in to your GitHub account and create a new repository. You can choose an existing repository, however.
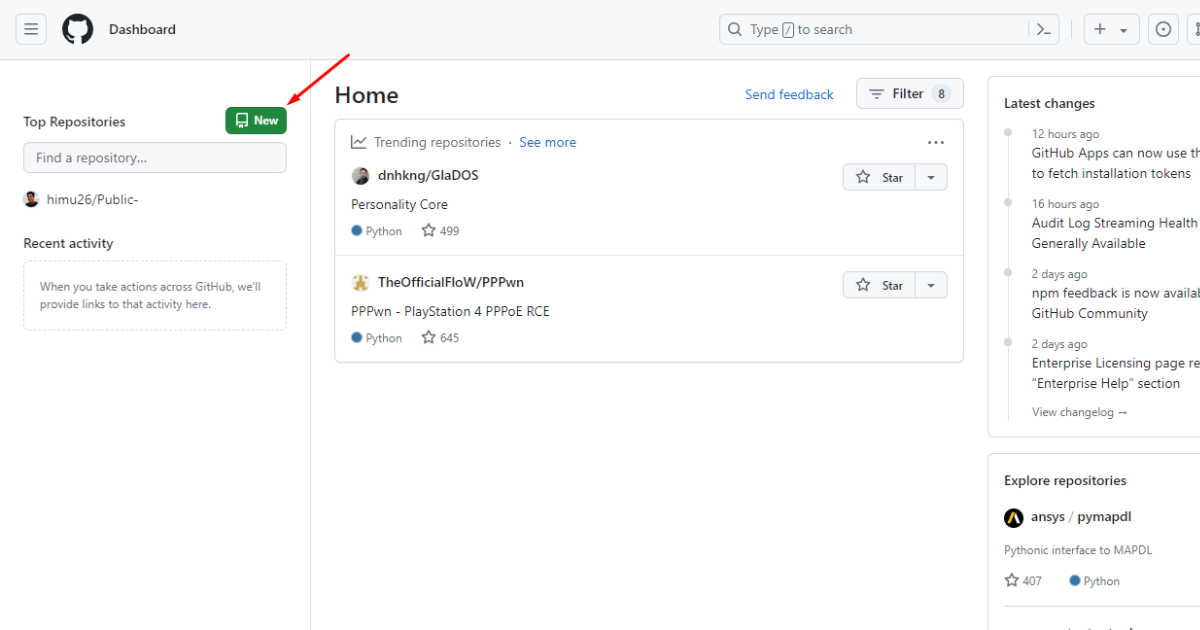
To create a new repository, click the ‘New’ button on the top left side.
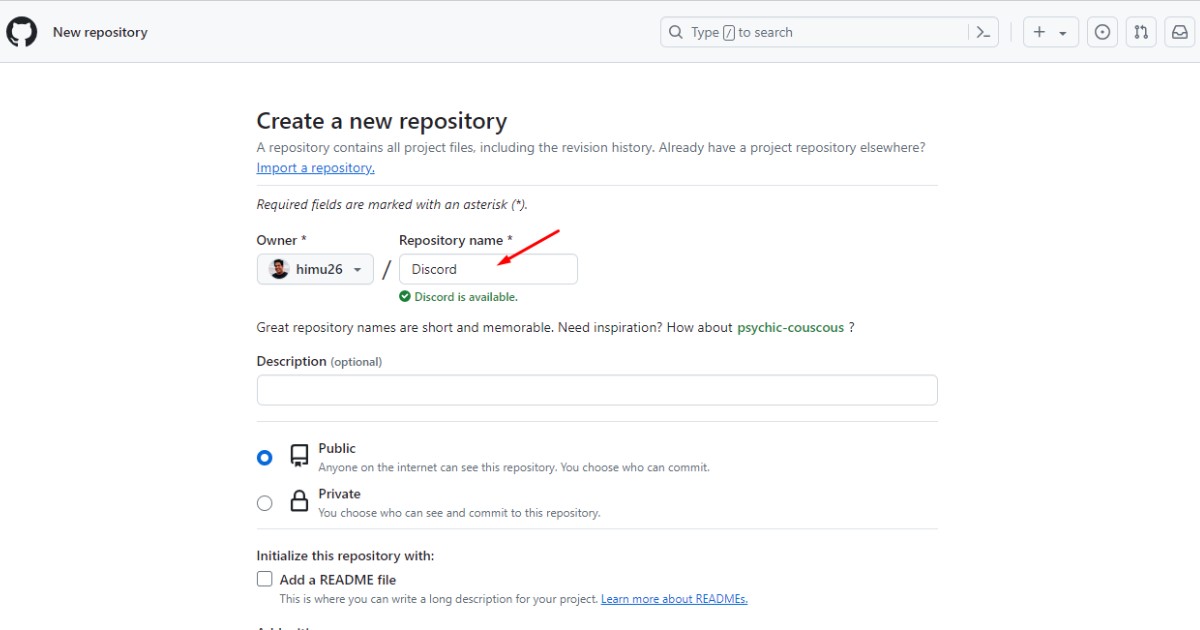
Afterward, type your repository name in the “Repository name” field.
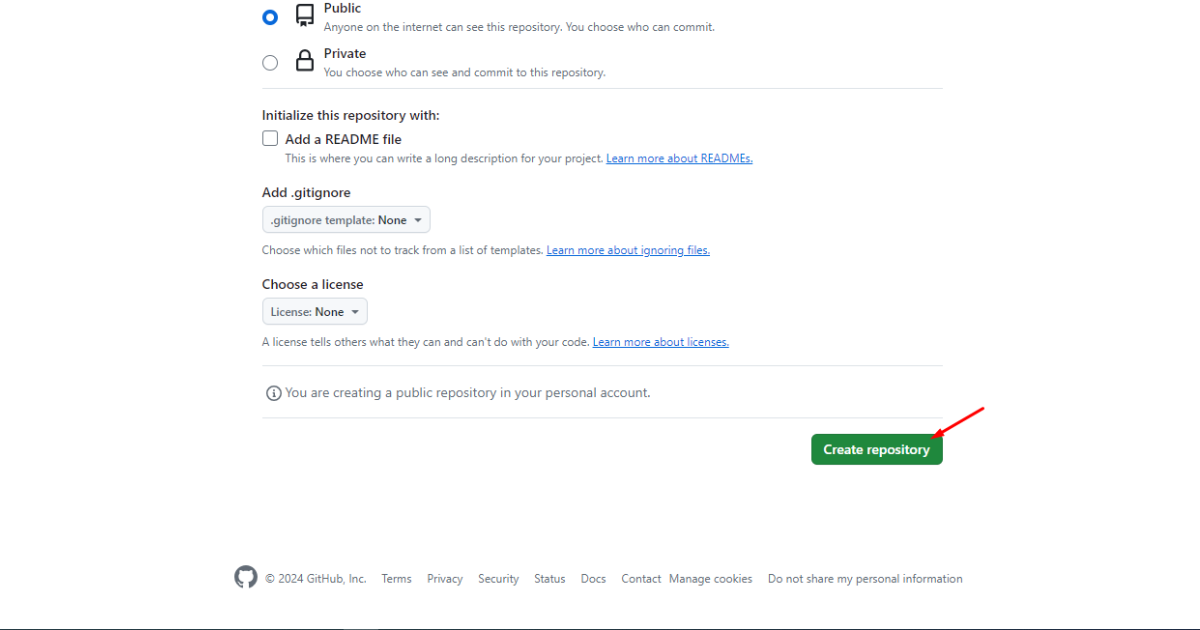
Scroll down and click on the “Create repository” button.
Step 6: Connect Discord with GitHub
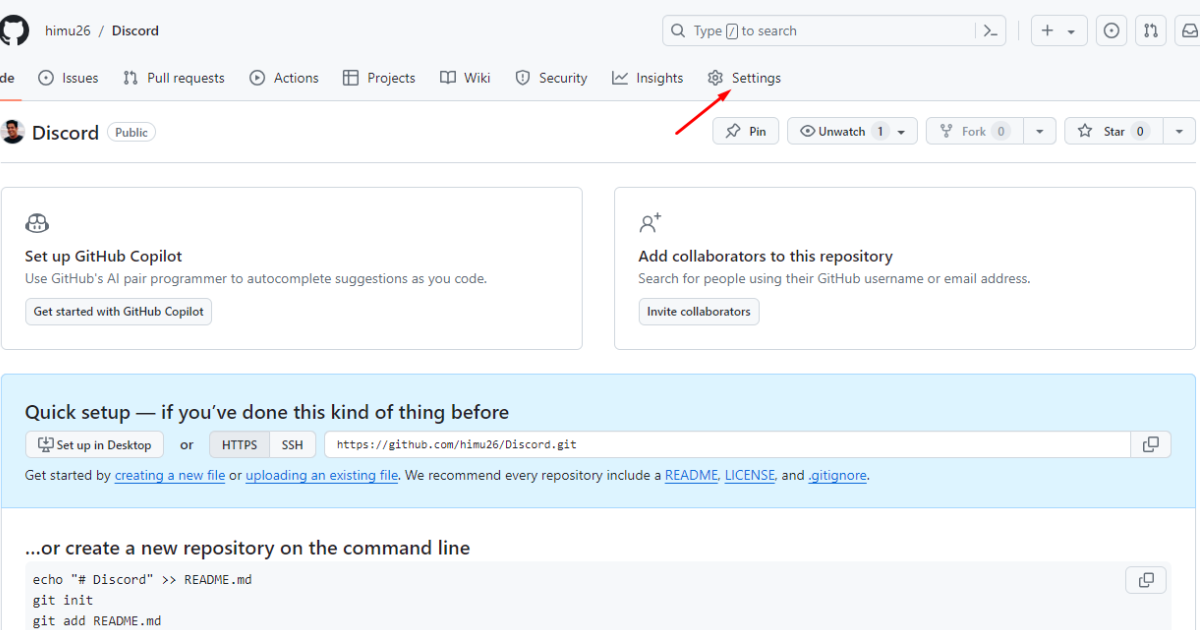
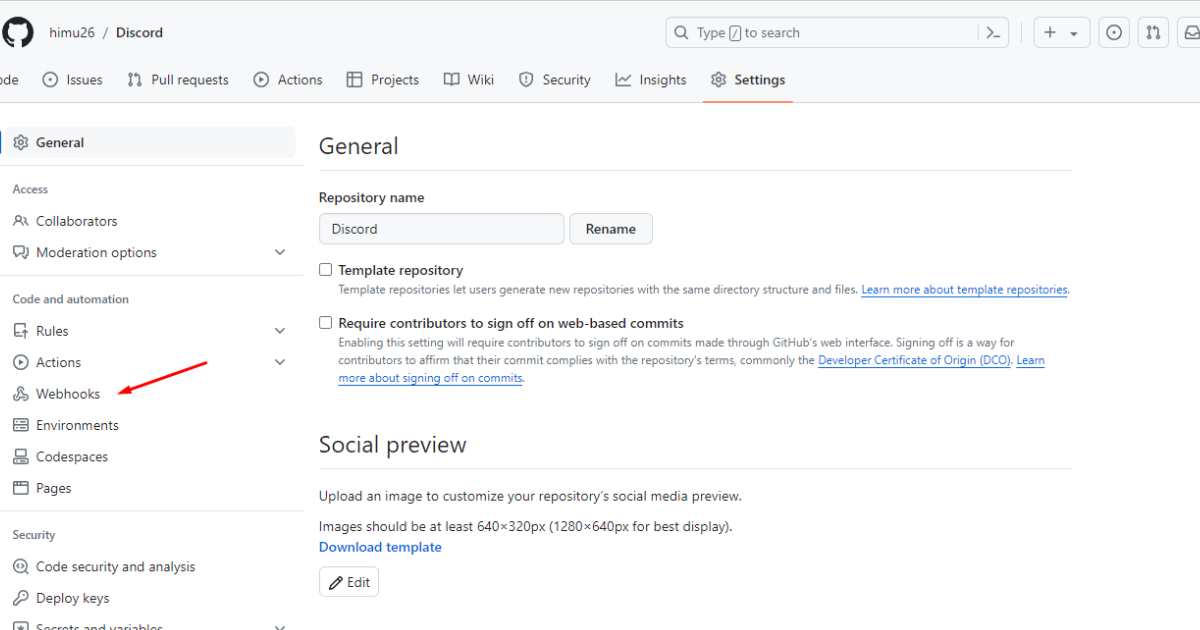
At this stage, you’ll see the repository window. Click on the ‘Settings’ tab at the top.
After that, click ‘Webhooks’ on the left side.
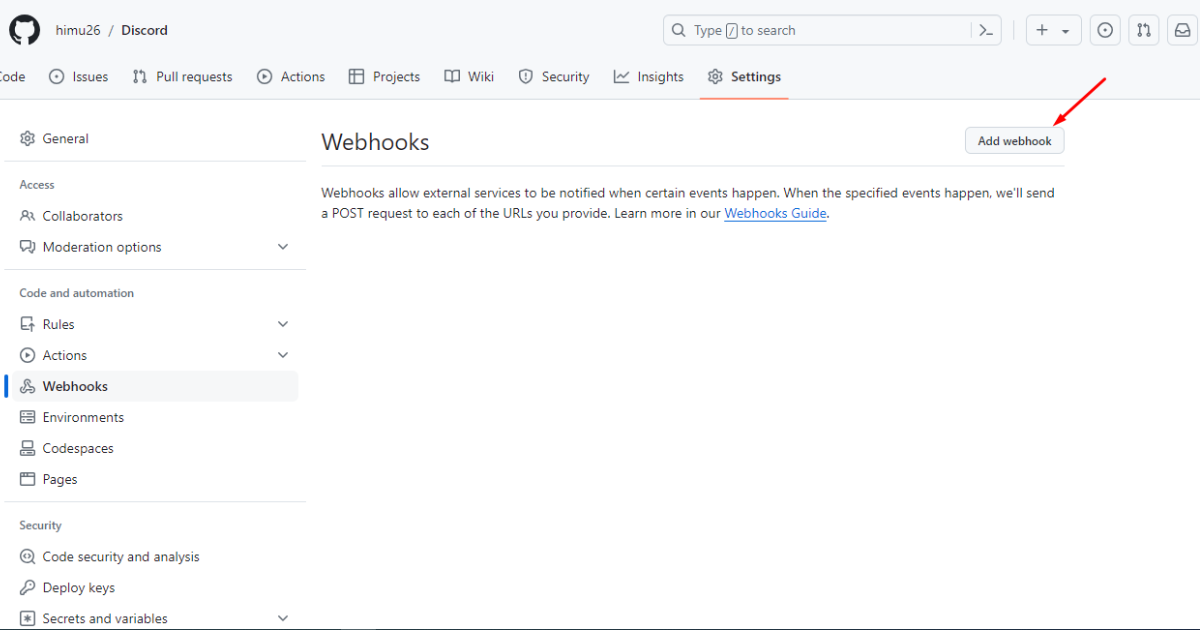
Now, click on the “Add webhook” button.
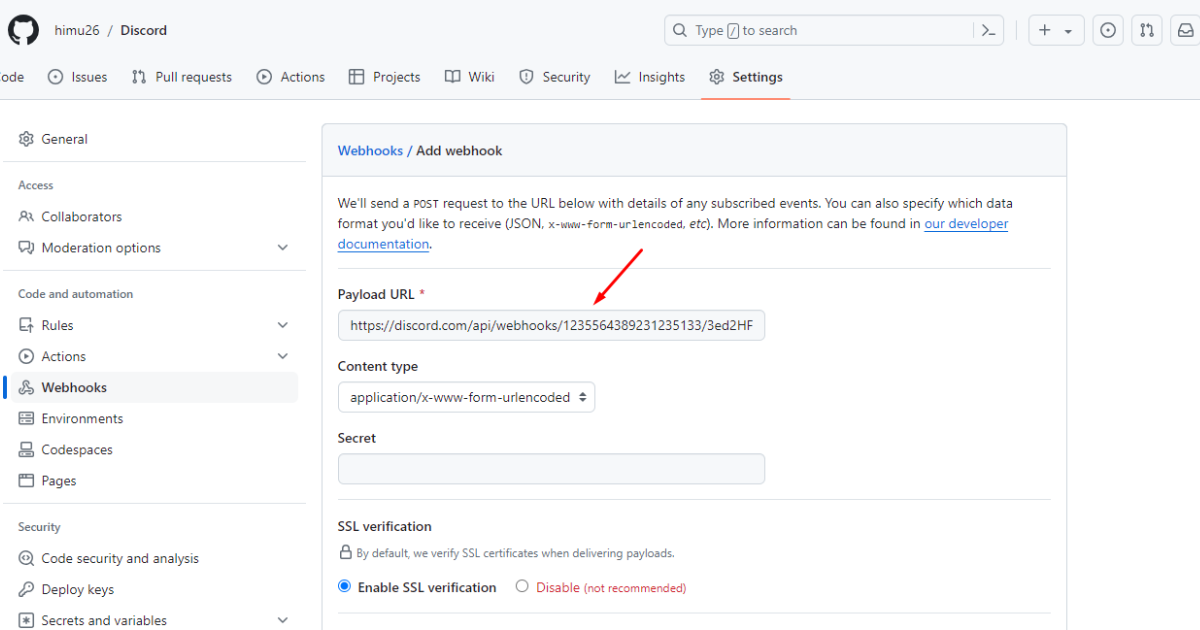
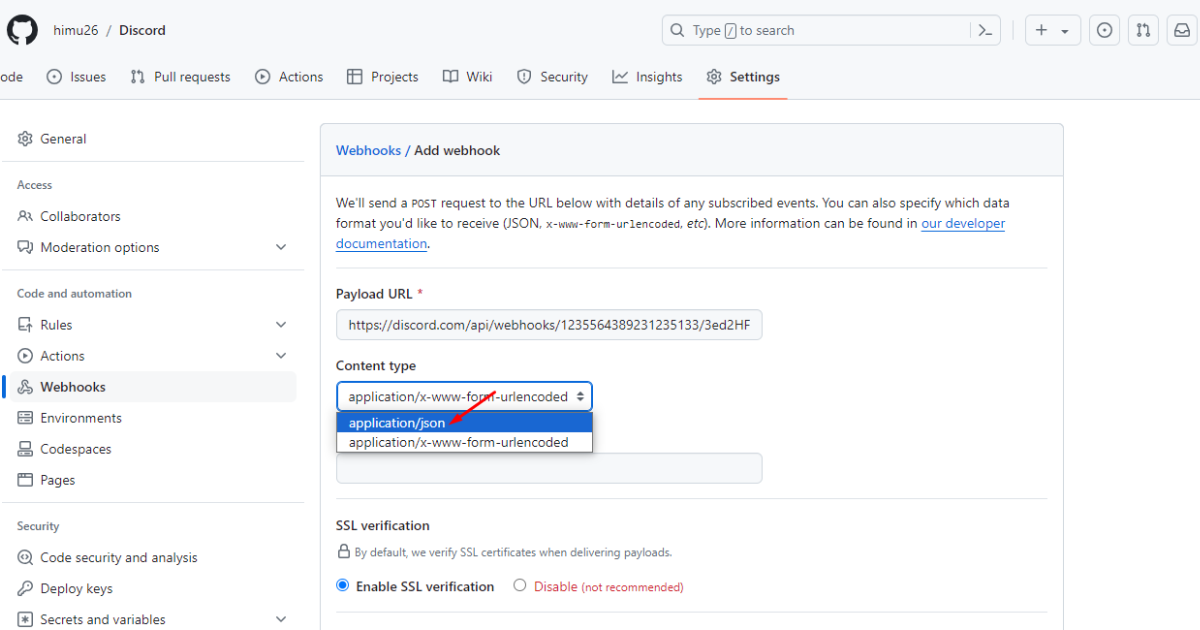
Then, insert the Discord Webhook URL (which you copied and saved in Notepad) into the “Payload URL” field.
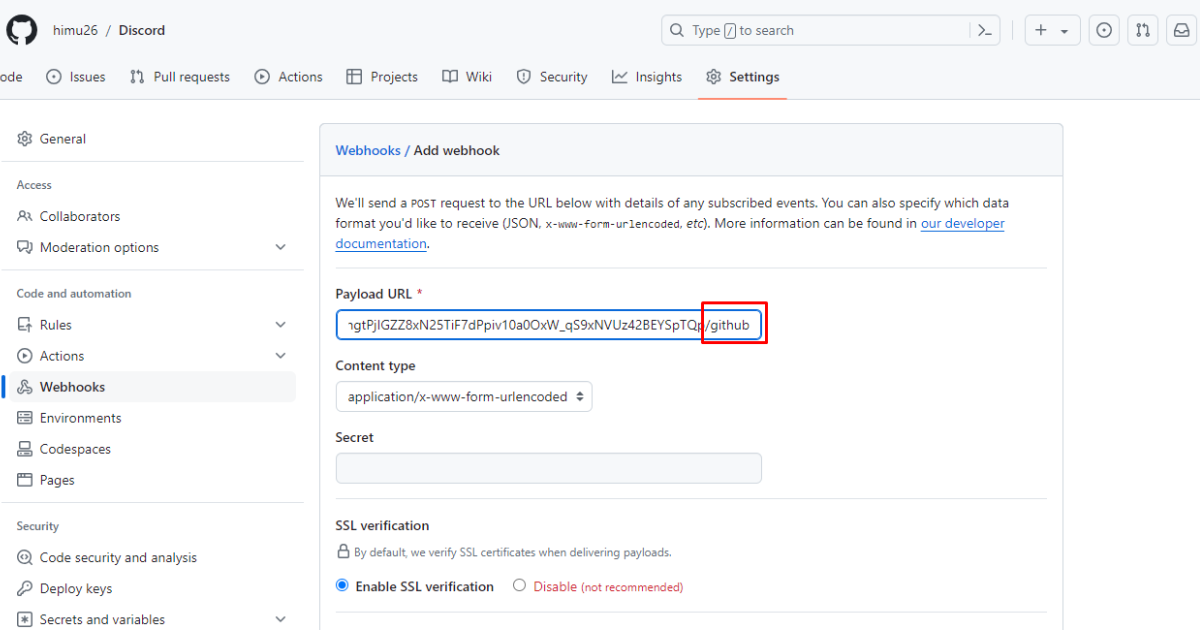
**Before pasting the Discord Webhook URL, make sure to add “/github” at the end of the URL. Otherwise, you may notice an error - 400 bad requests.**
Now, choose “Content type” as “application/json.”
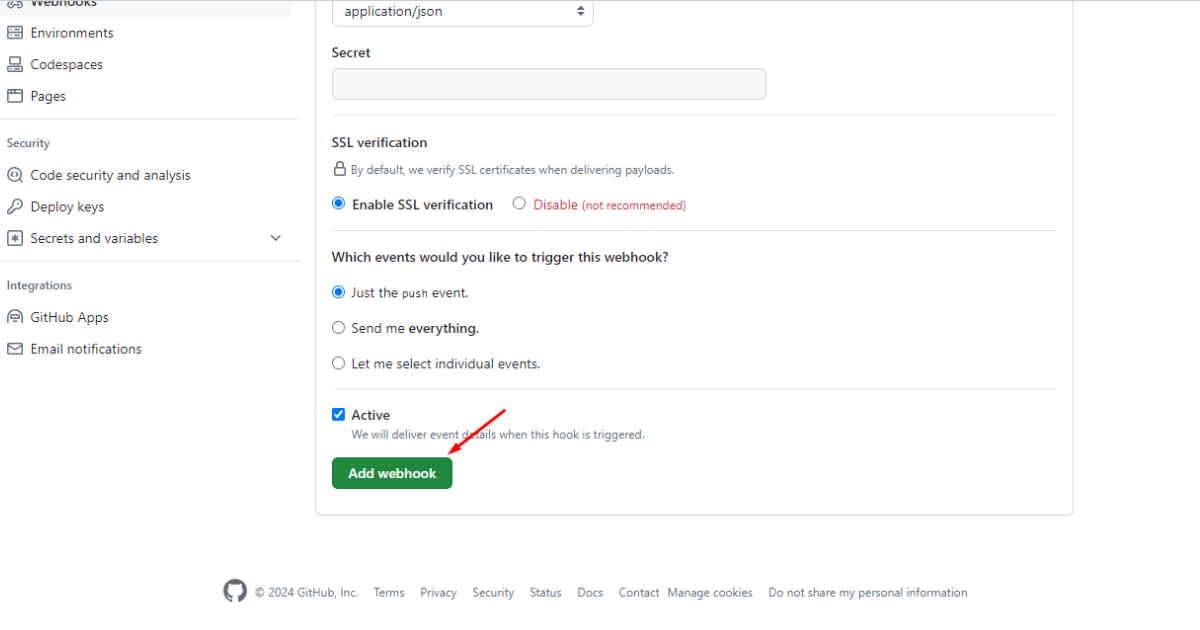
Finally, scroll down and hit the “Add webhook” button.
Boom Shakalaka! You’ve connected Discord with GitHub.
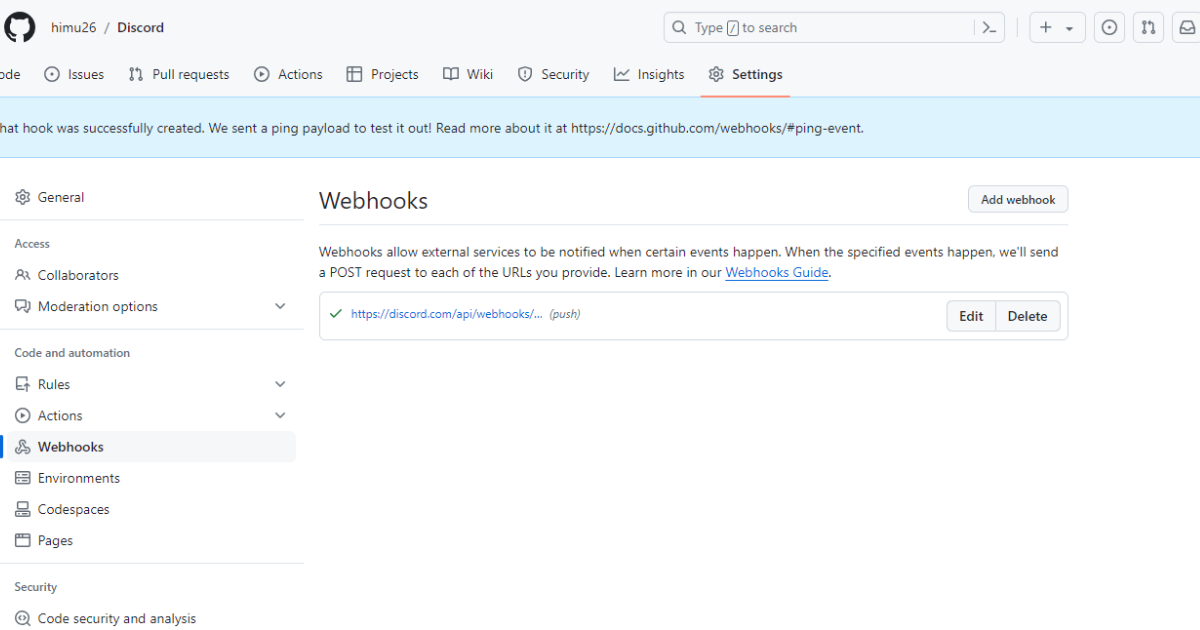
That’s all the information on how you use a webhook in Discord.
What is a Webhook?
A webhook is a way—specifically, an HTTP request—for two different applications to communicate. Simply put, webhooks work similarly to mobile phones for diverse web applications.
A webhook allows one application to send real-time data to another when a particular event begins.
For instance, imagine you have an online store where you sell a myriad of products. To manage this store while on the go, you’ve created an app you can access with your smartphone.
Then, you connect that app with your online store to get a push notification to your smartphone when a customer places an order. Consequently, you can manage that order from your phone.
In this scenario, a webhook helps you get that push notification. We believe you have a thorough understanding of what a webhook is by now. Let’s now discuss when you can use webhooks.
When Should You Use Webhooks?
You can use webhooks when you need data updates from one application to another. Here are a few more scenarios where webhooks are helpful.
Real-time updates: Webhooks can provide real-time updates when certain events occur in another system. For example, webhooks can immediately deliver this information when a new user registers or completes a transaction.
Automation: You can use webhooks to automatically notify users or yourself when certain events occur in a system.
Custom workflows: You can use webhooks to design custom workflows. You can define the exact actions to be performed when an event triggers.
Efficient data transfer: Webhooks are beneficial and efficient compared to polling systems where applications constantly request data.
Unlike the polling mechanism, webhooks only send data when they find something new to report. As a result, webhooks play a vital role in reducing server load and unnecessary network traffic.
These are a few scenarios when you feel the urge to use webhooks.
FAQs on How to Use Webhooks, Answered
1. What is the Disadvantage of Webhooks?
Despite its popularity, webhooks have disadvantages. For example, sometimes webhooks fail to send data or notifications to the destination system. This unwanted situation may arise due to malfunctions in the source system.
2. How to Use Webhooks for Beginners?
We’ve already outlined a beginner-friendly guide on how to use webhooks. Once again, here’s a rundown of the entire guide. Generate a webhook URL from an application that will send data to another.
Then, insert that URL in the webhook section of the receiving application. Finally, select the events you want to see in the receiving application. That’s it!
Rounding Up
Congratulations on reading this article about how to use webhooks. From now on, you can easily create and use webhooks for most applications.
But let’s tell you, we’ve just scratched the surface of technicalities related to webhook generation and integration. There’s much more to learn and practice since different applications might require you to follow varying paths to use their webhooks.


