Imagine having a digital assistant that understands your unique needs, effortlessly handles repetitive tasks, and adapts to any role you assign.
Whether you're streamlining customer support, automating mundane tasks, or creating compelling content, custom GPTs can revolutionize your workflow.
In this article, I'll show you how to create custom GPTs using OpenAI's GPT builder.
So, continue to discover how to boost your productivity and creativity with a GPT tailored just for you.
How to Create a Custom GPT Easily
Creating custom GPT in ChatGPT is very easy. You can create your personalized custom GPT in a few clicks. To create a custom GPT, you need access to ChatGPT Plus or Enterprise subscription.
Once you have access to a ChatGPT paid plan, you can access the GPT builder and create your own custom GPT.
Learn more about how to use ChatGPT.
Here are the steps for creating custom GPT using GPT builder:
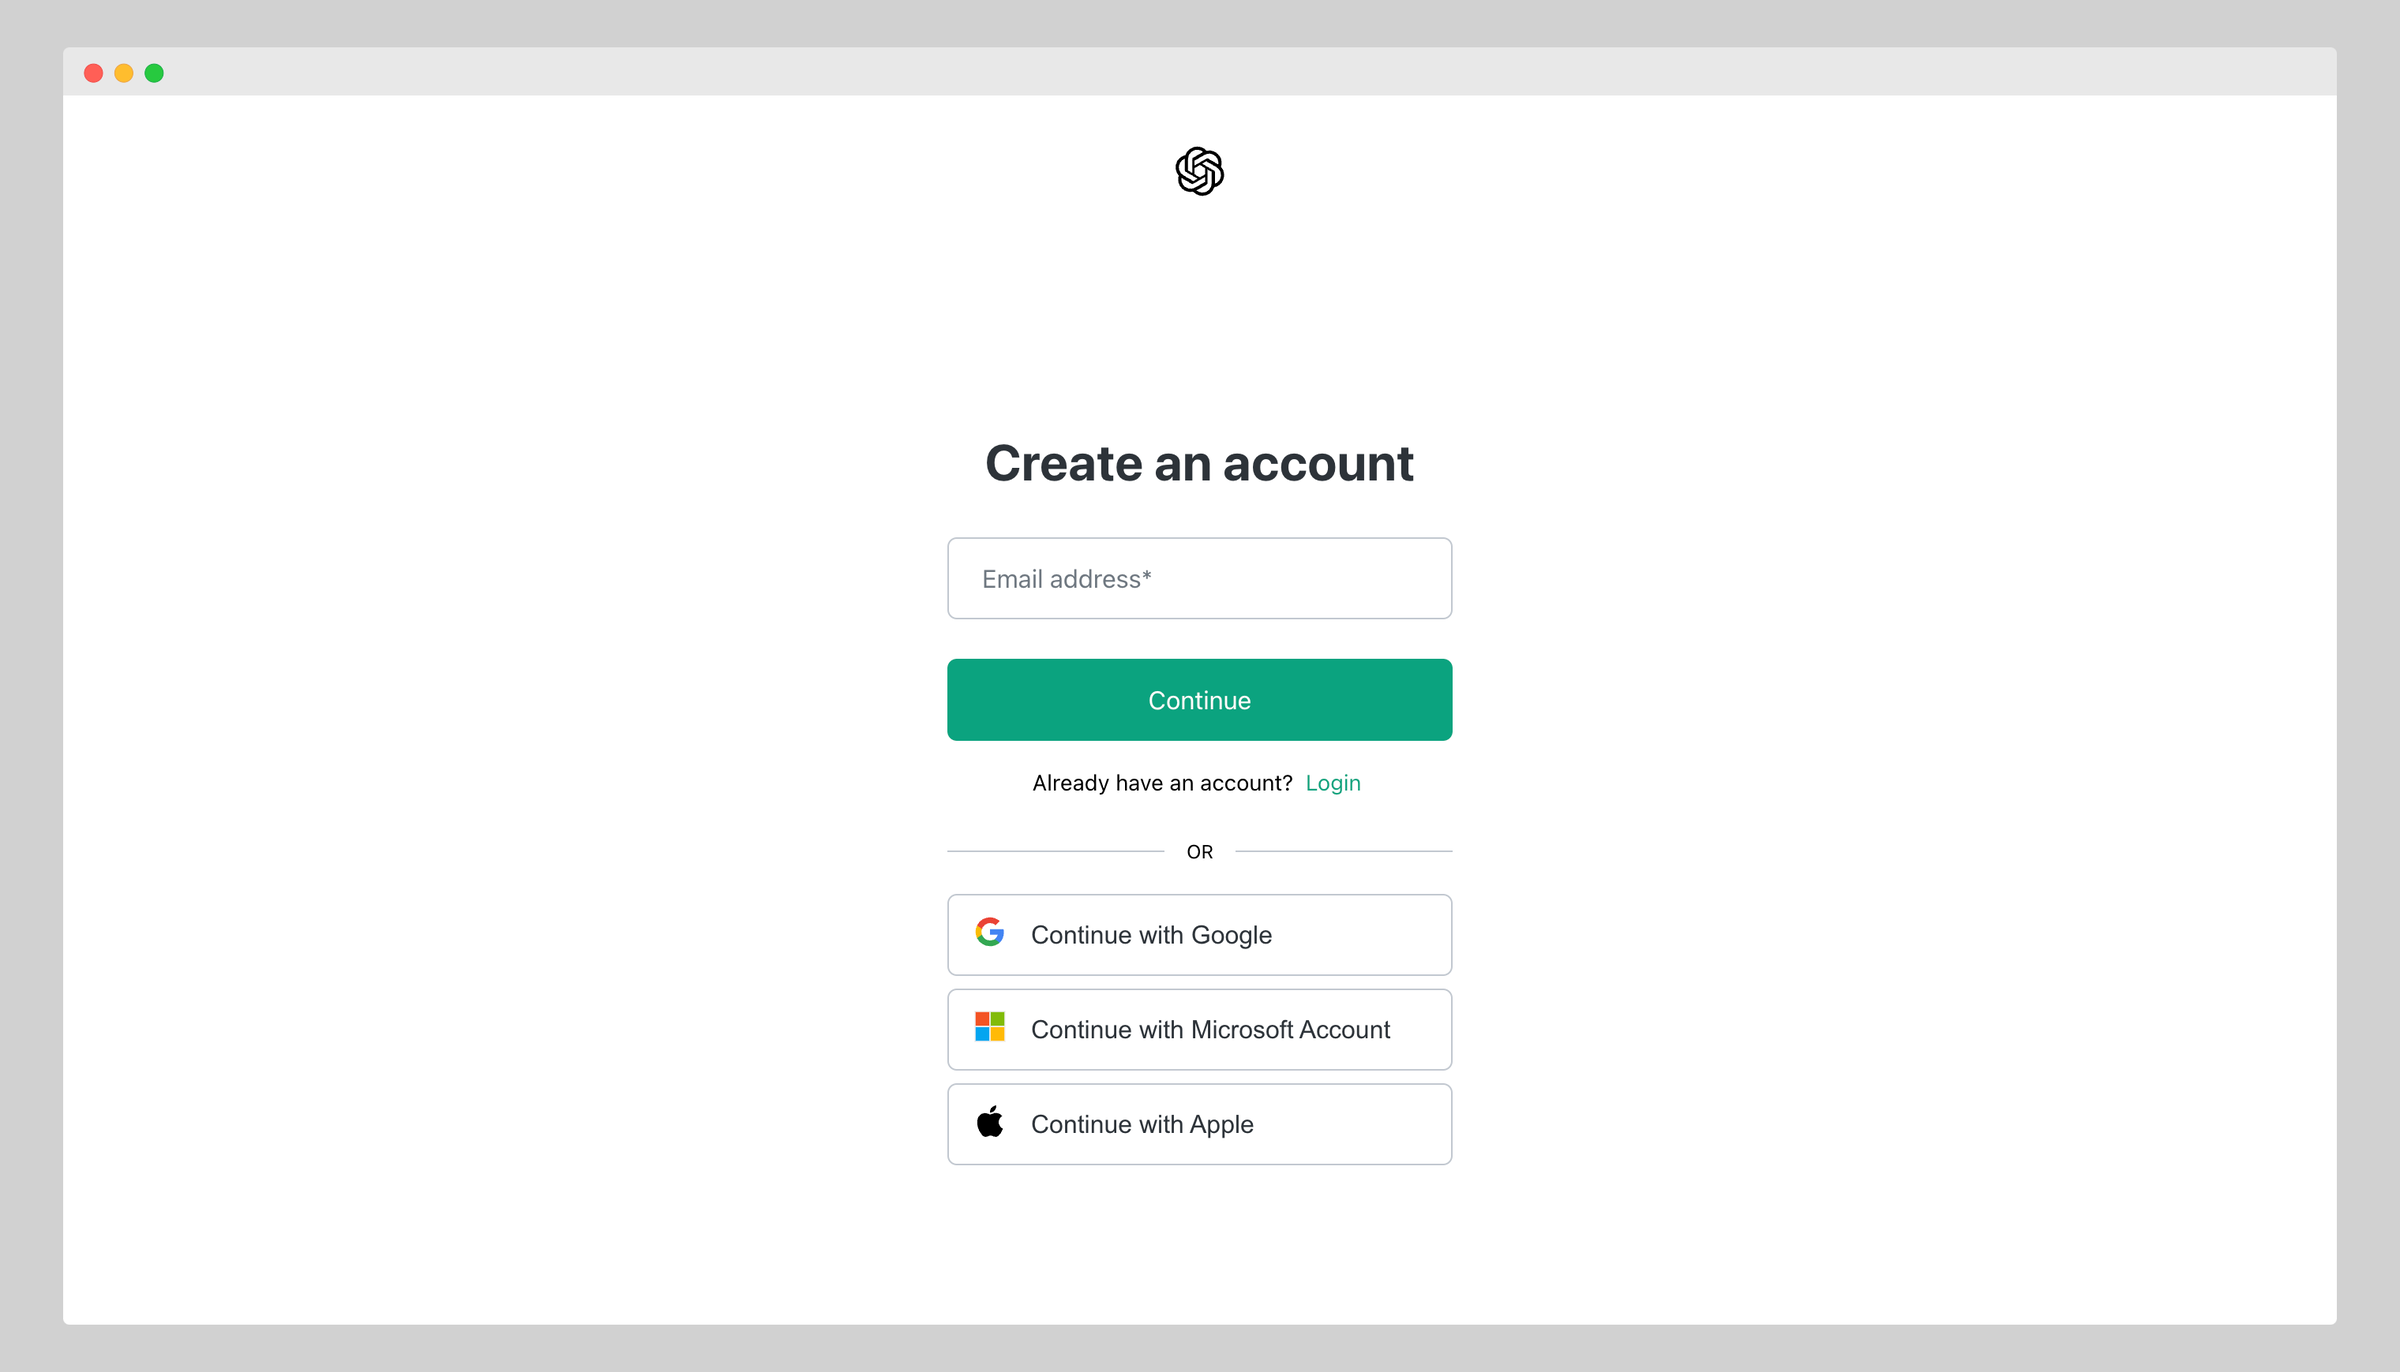
1. Login to OpenAI
Use your credentials to log into your OpenAI account. If you don’t have an OpenAI account, sign up.
2. Access to GPT Builder
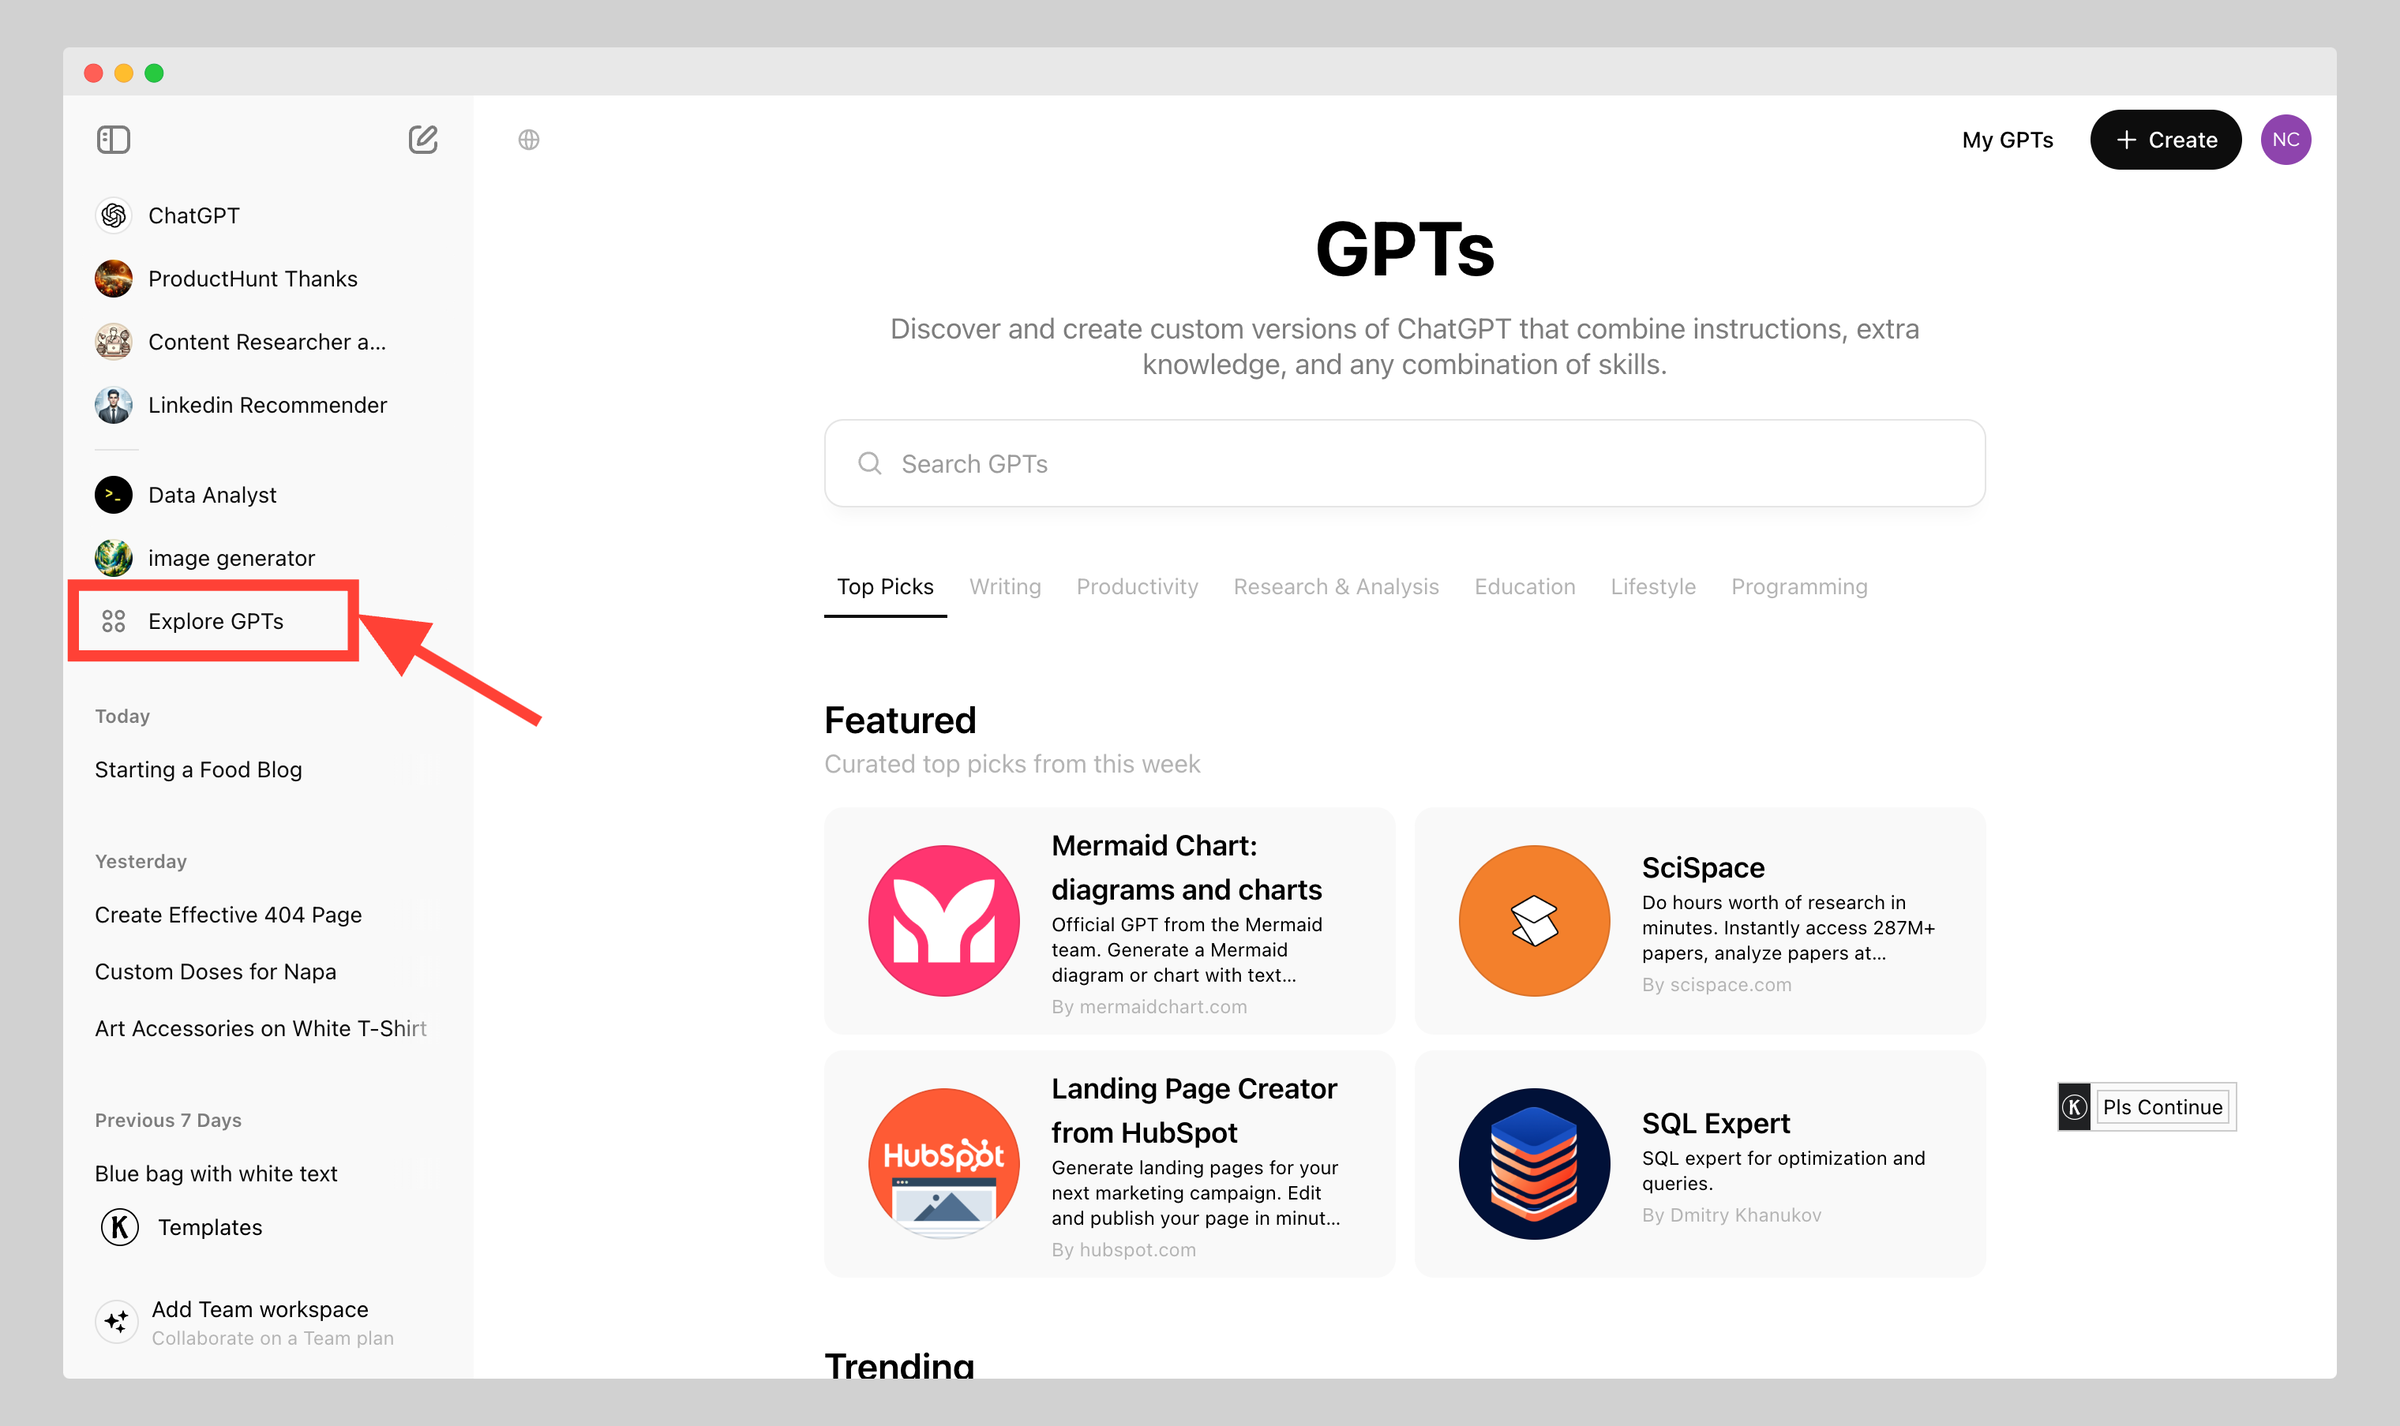
After signing into the OpenAI account, navigate to the Explore GPTs and click on it.
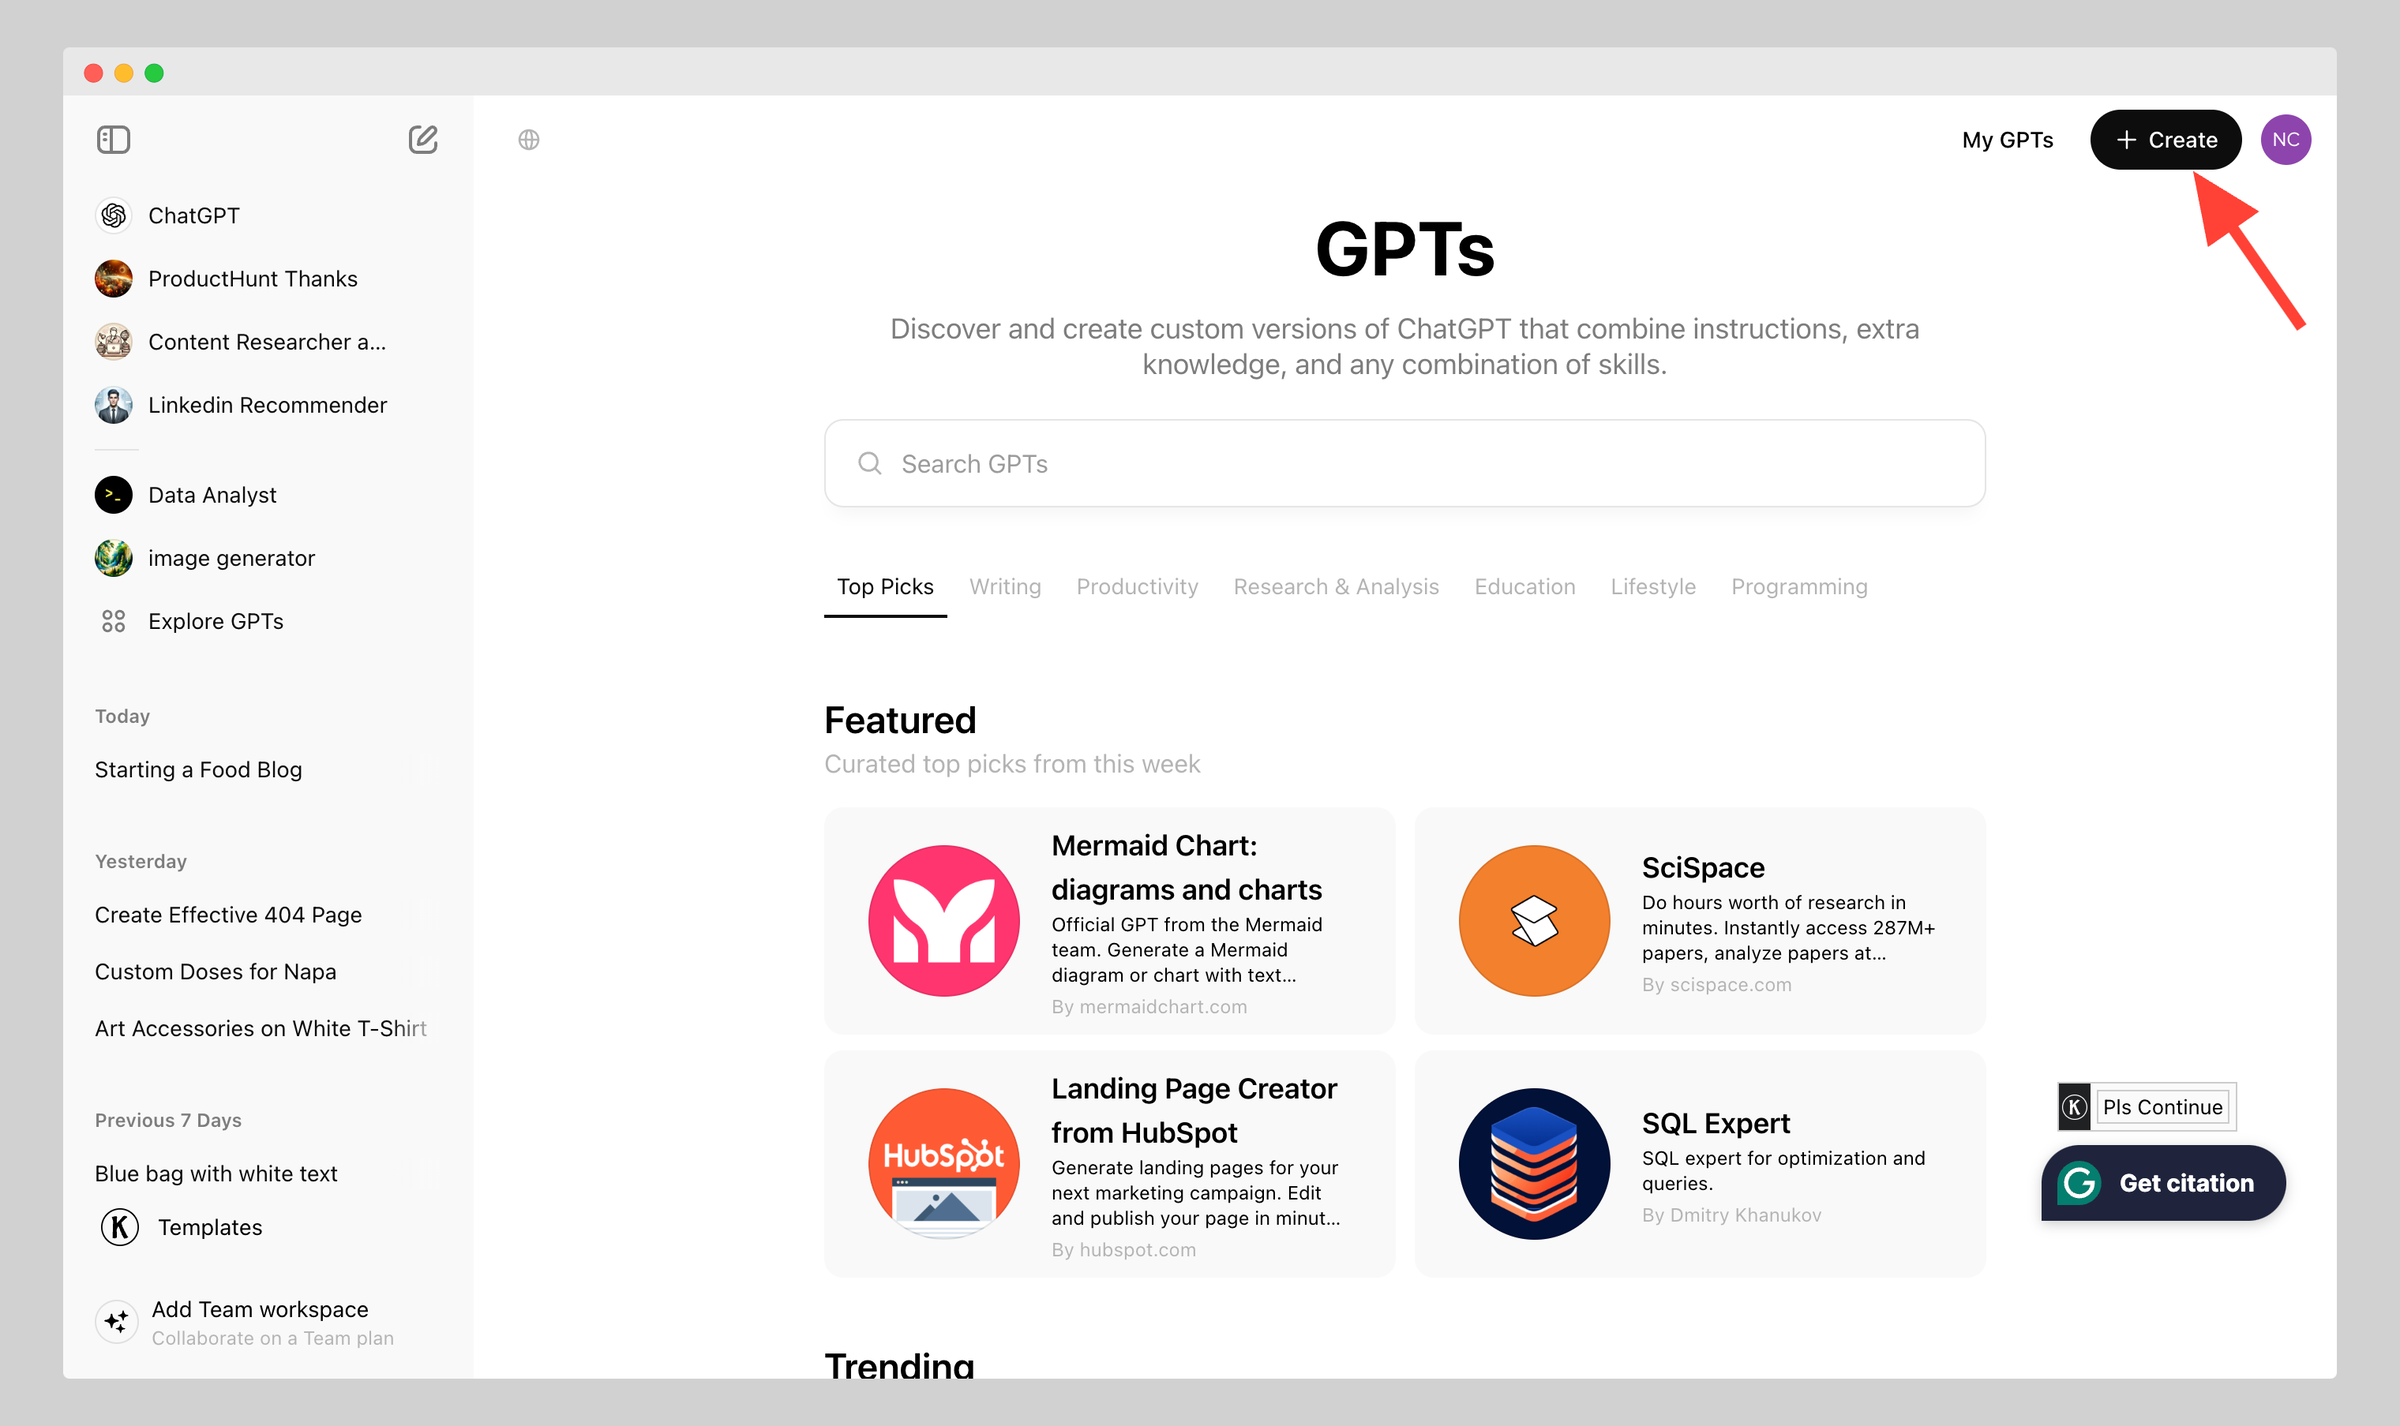
Now, click on "Create" from the right corner of your screen to start creating your custom GPT.
3. Creating Custom GPT Using the GPT Builder
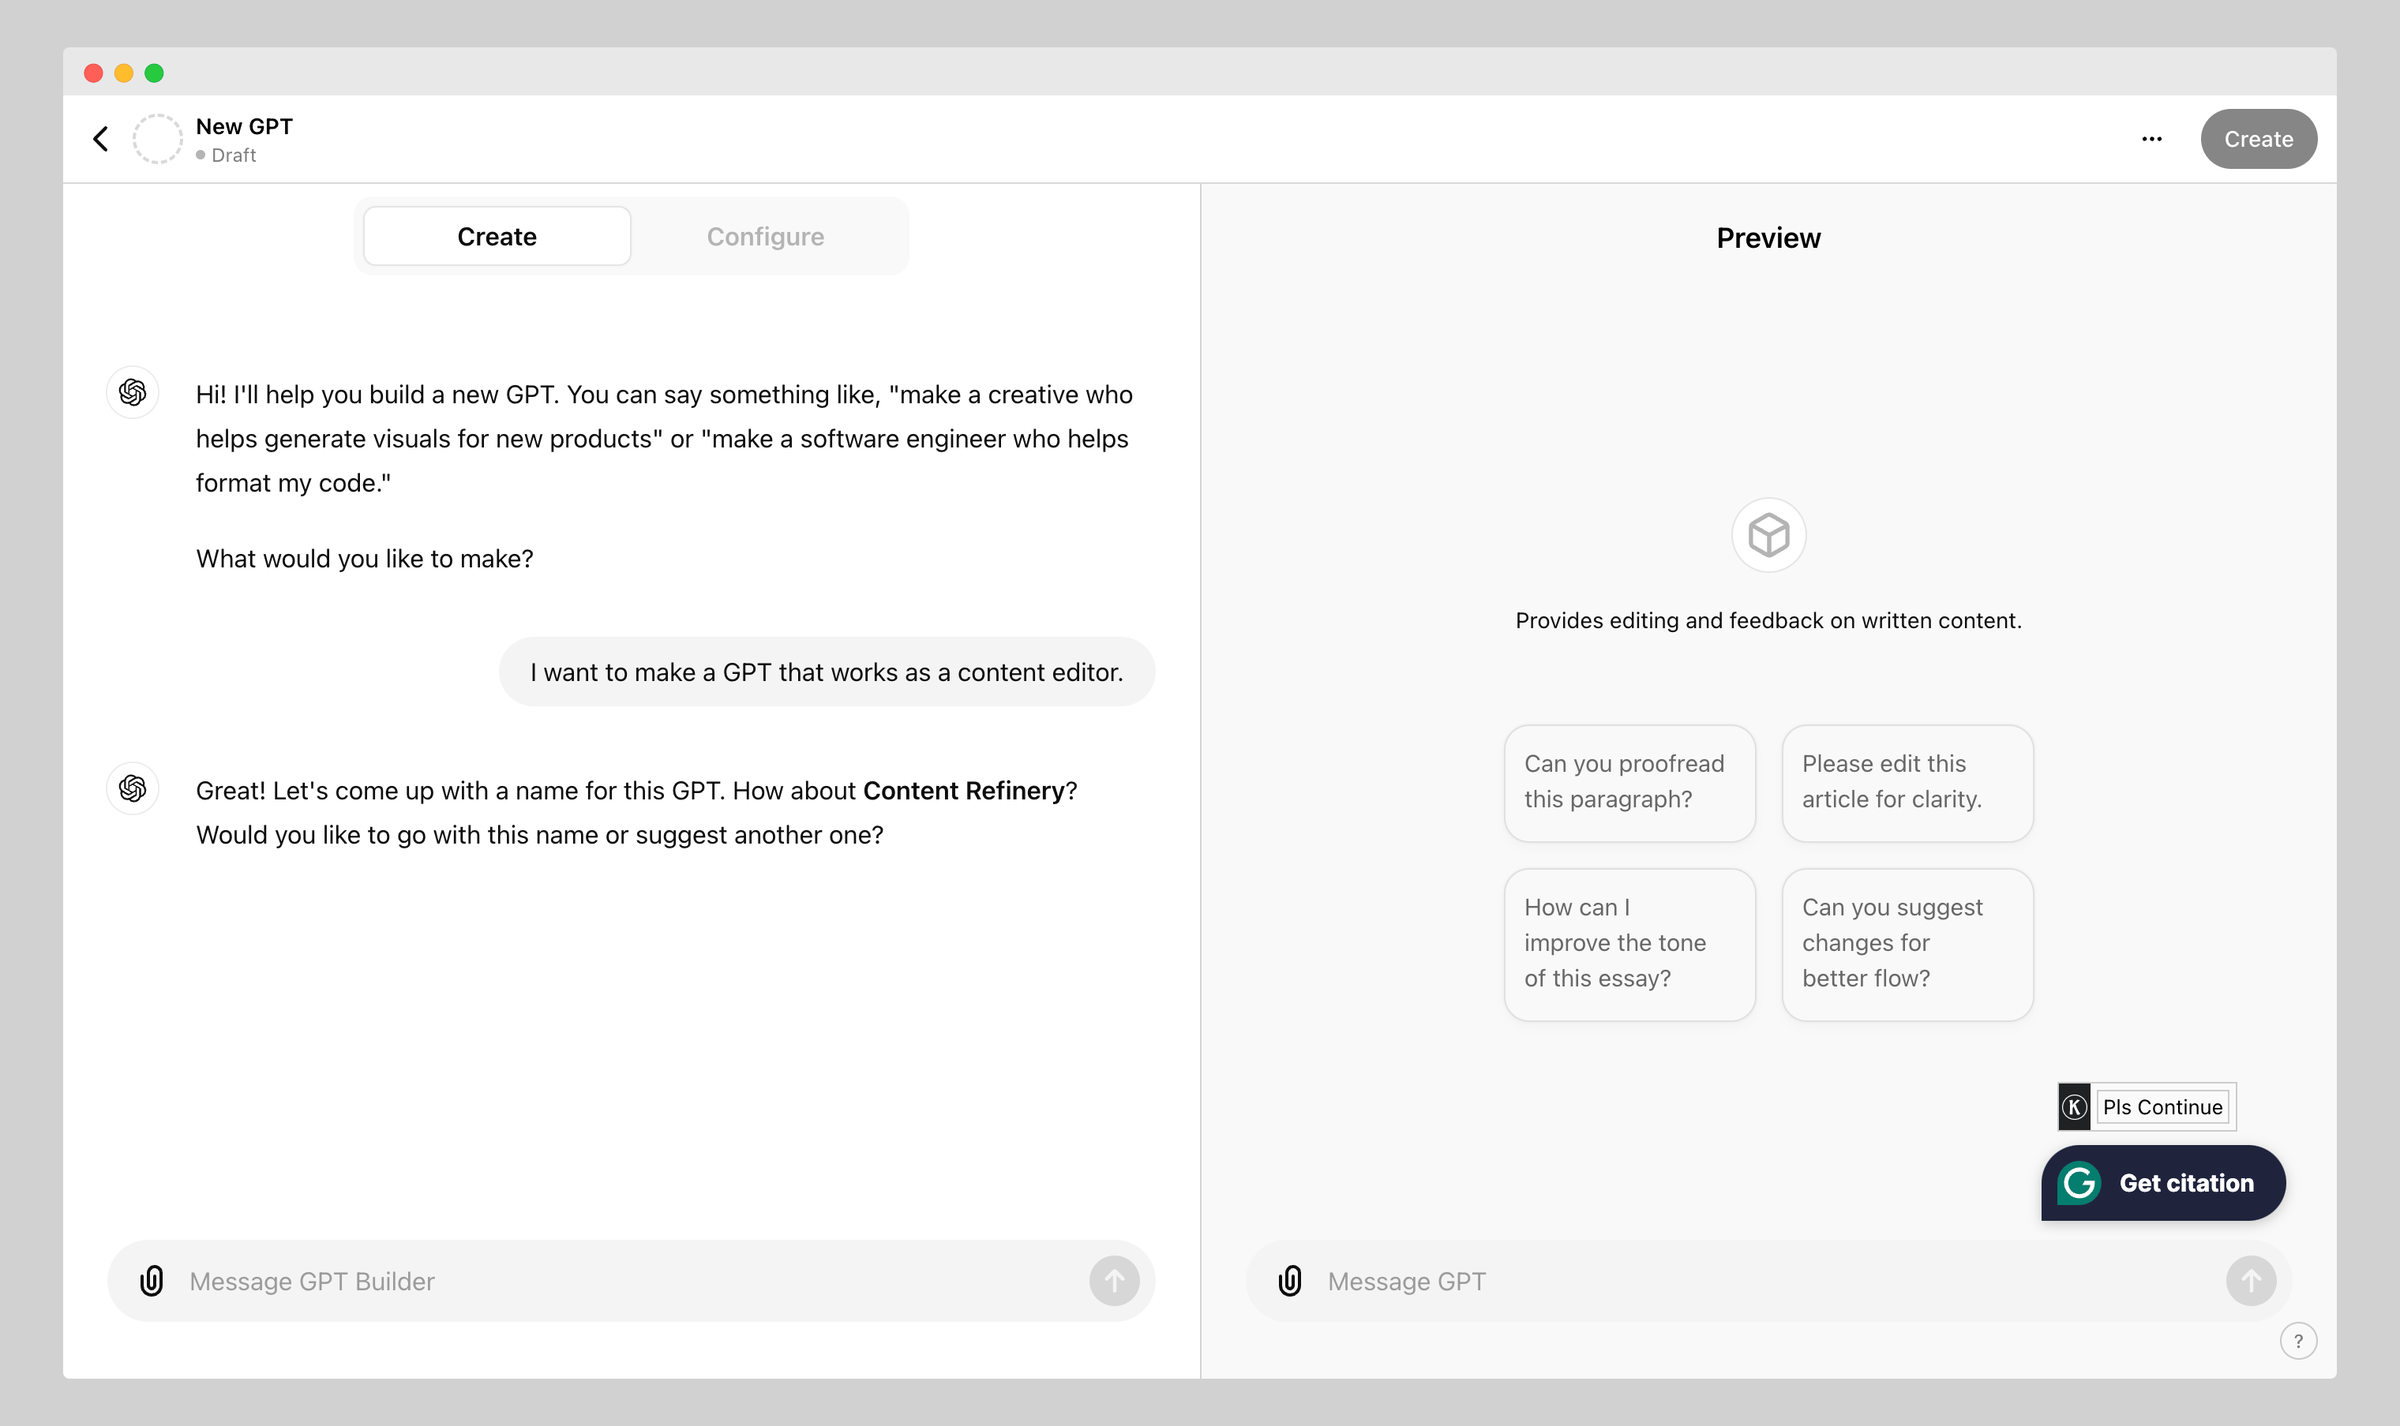
When you click Create, you will see the GPT builder asking you what you want to make.
Let’s say you want to make a GPT that works as a content editor. Then you can say:
"I want to make a GPT that works as a content editor."
After you let the GPT builder know what you want to make, the builder will provide a name. You can use the name provided by the GPT builder or your own.
You can see the changes in the Preview section in the same screen. It's really amazing!
Learn more about how to write prompts for ChatGPT.
4. Set Profile Picture
After setting the GPT name, the GPT builder will generate a profile picture for the custom GPT. If you want to use the generated picture as the profile picture, you can continue with it or ask the GPT builder to generate another one.
Learn more about the best AI image generators.
5. Providing Instructions
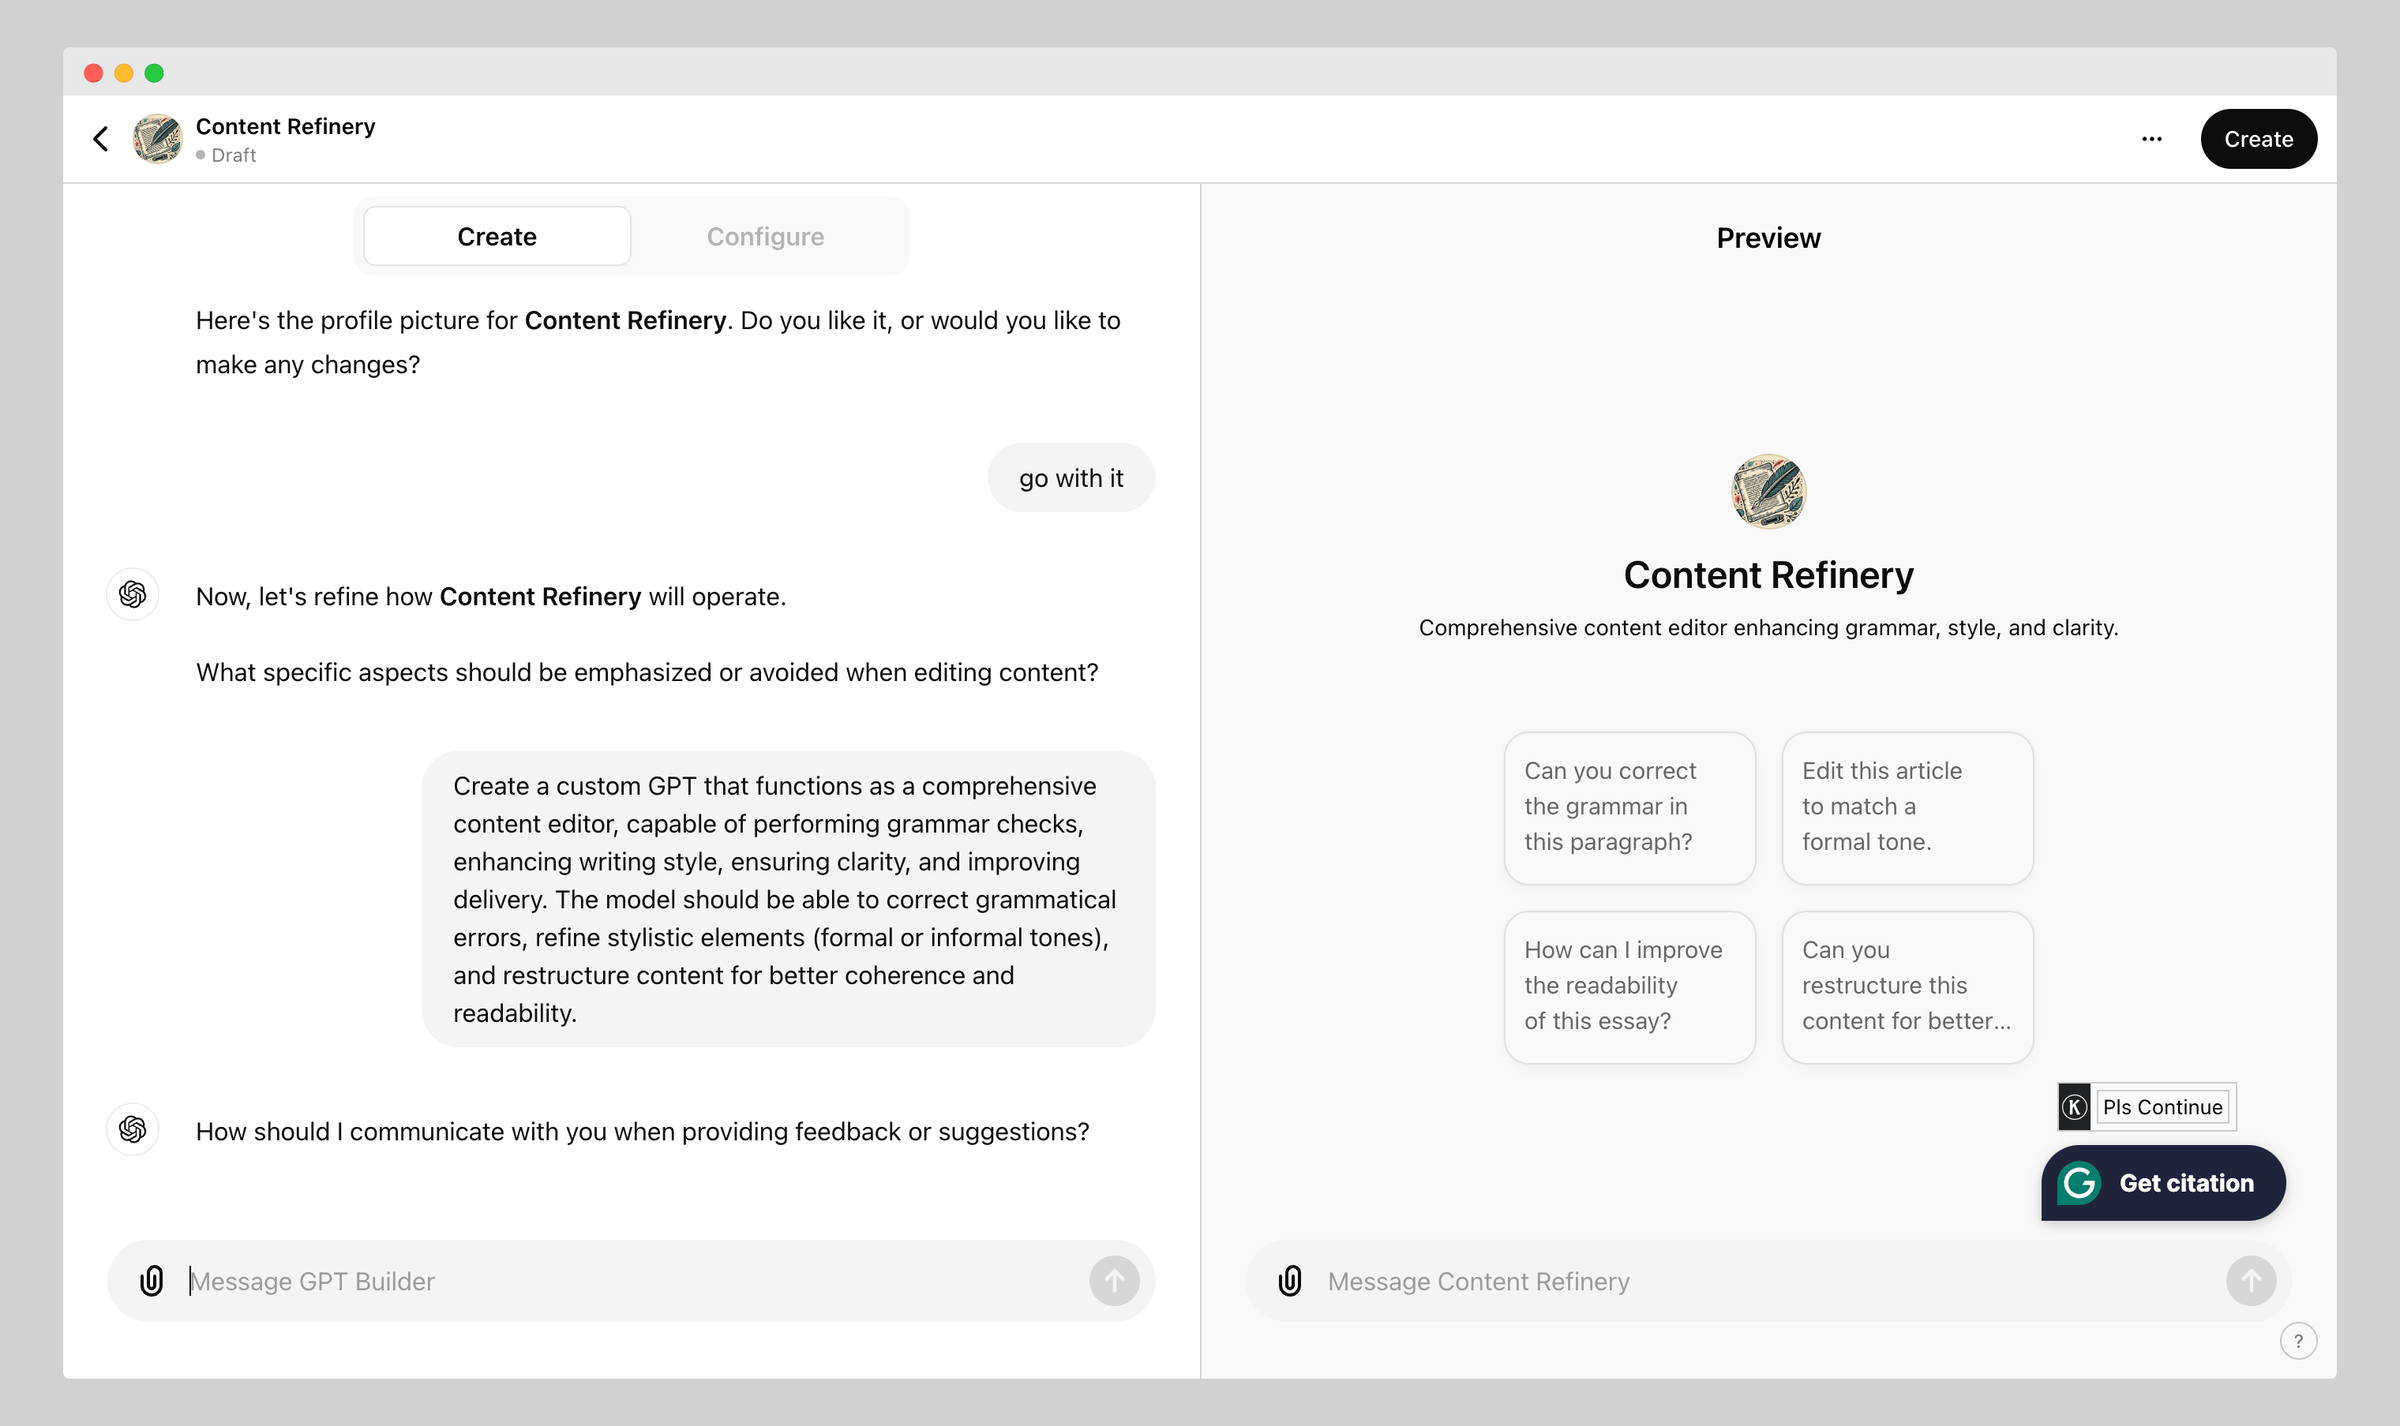
Once you are done with setting up your GPT name and profile picture, the GPT builder will ask you to provide details instructions. It is the instruction/prompt that the GPT builder needs to create a custom GPT that meets your preferences.
Let's say you want the custom GPT content editor to check grammar, clarity, style, delivery, and conciseness. For example, I've written the following instructions.
Create a custom GPT that functions as a comprehensive content editor. The model should be capable of performing grammar checks, enhancing writing style, ensuring clarity, and improving delivery. It should also be able to correct grammatical errors, refine stylistic elements (formal or informal tones), and restructure content for better coherence and readability.
You can always refine your instruction and give it additional instructions. After adding your insturctions, you will see that the default parameters are changed in the Preview section.
6. Configure Settings
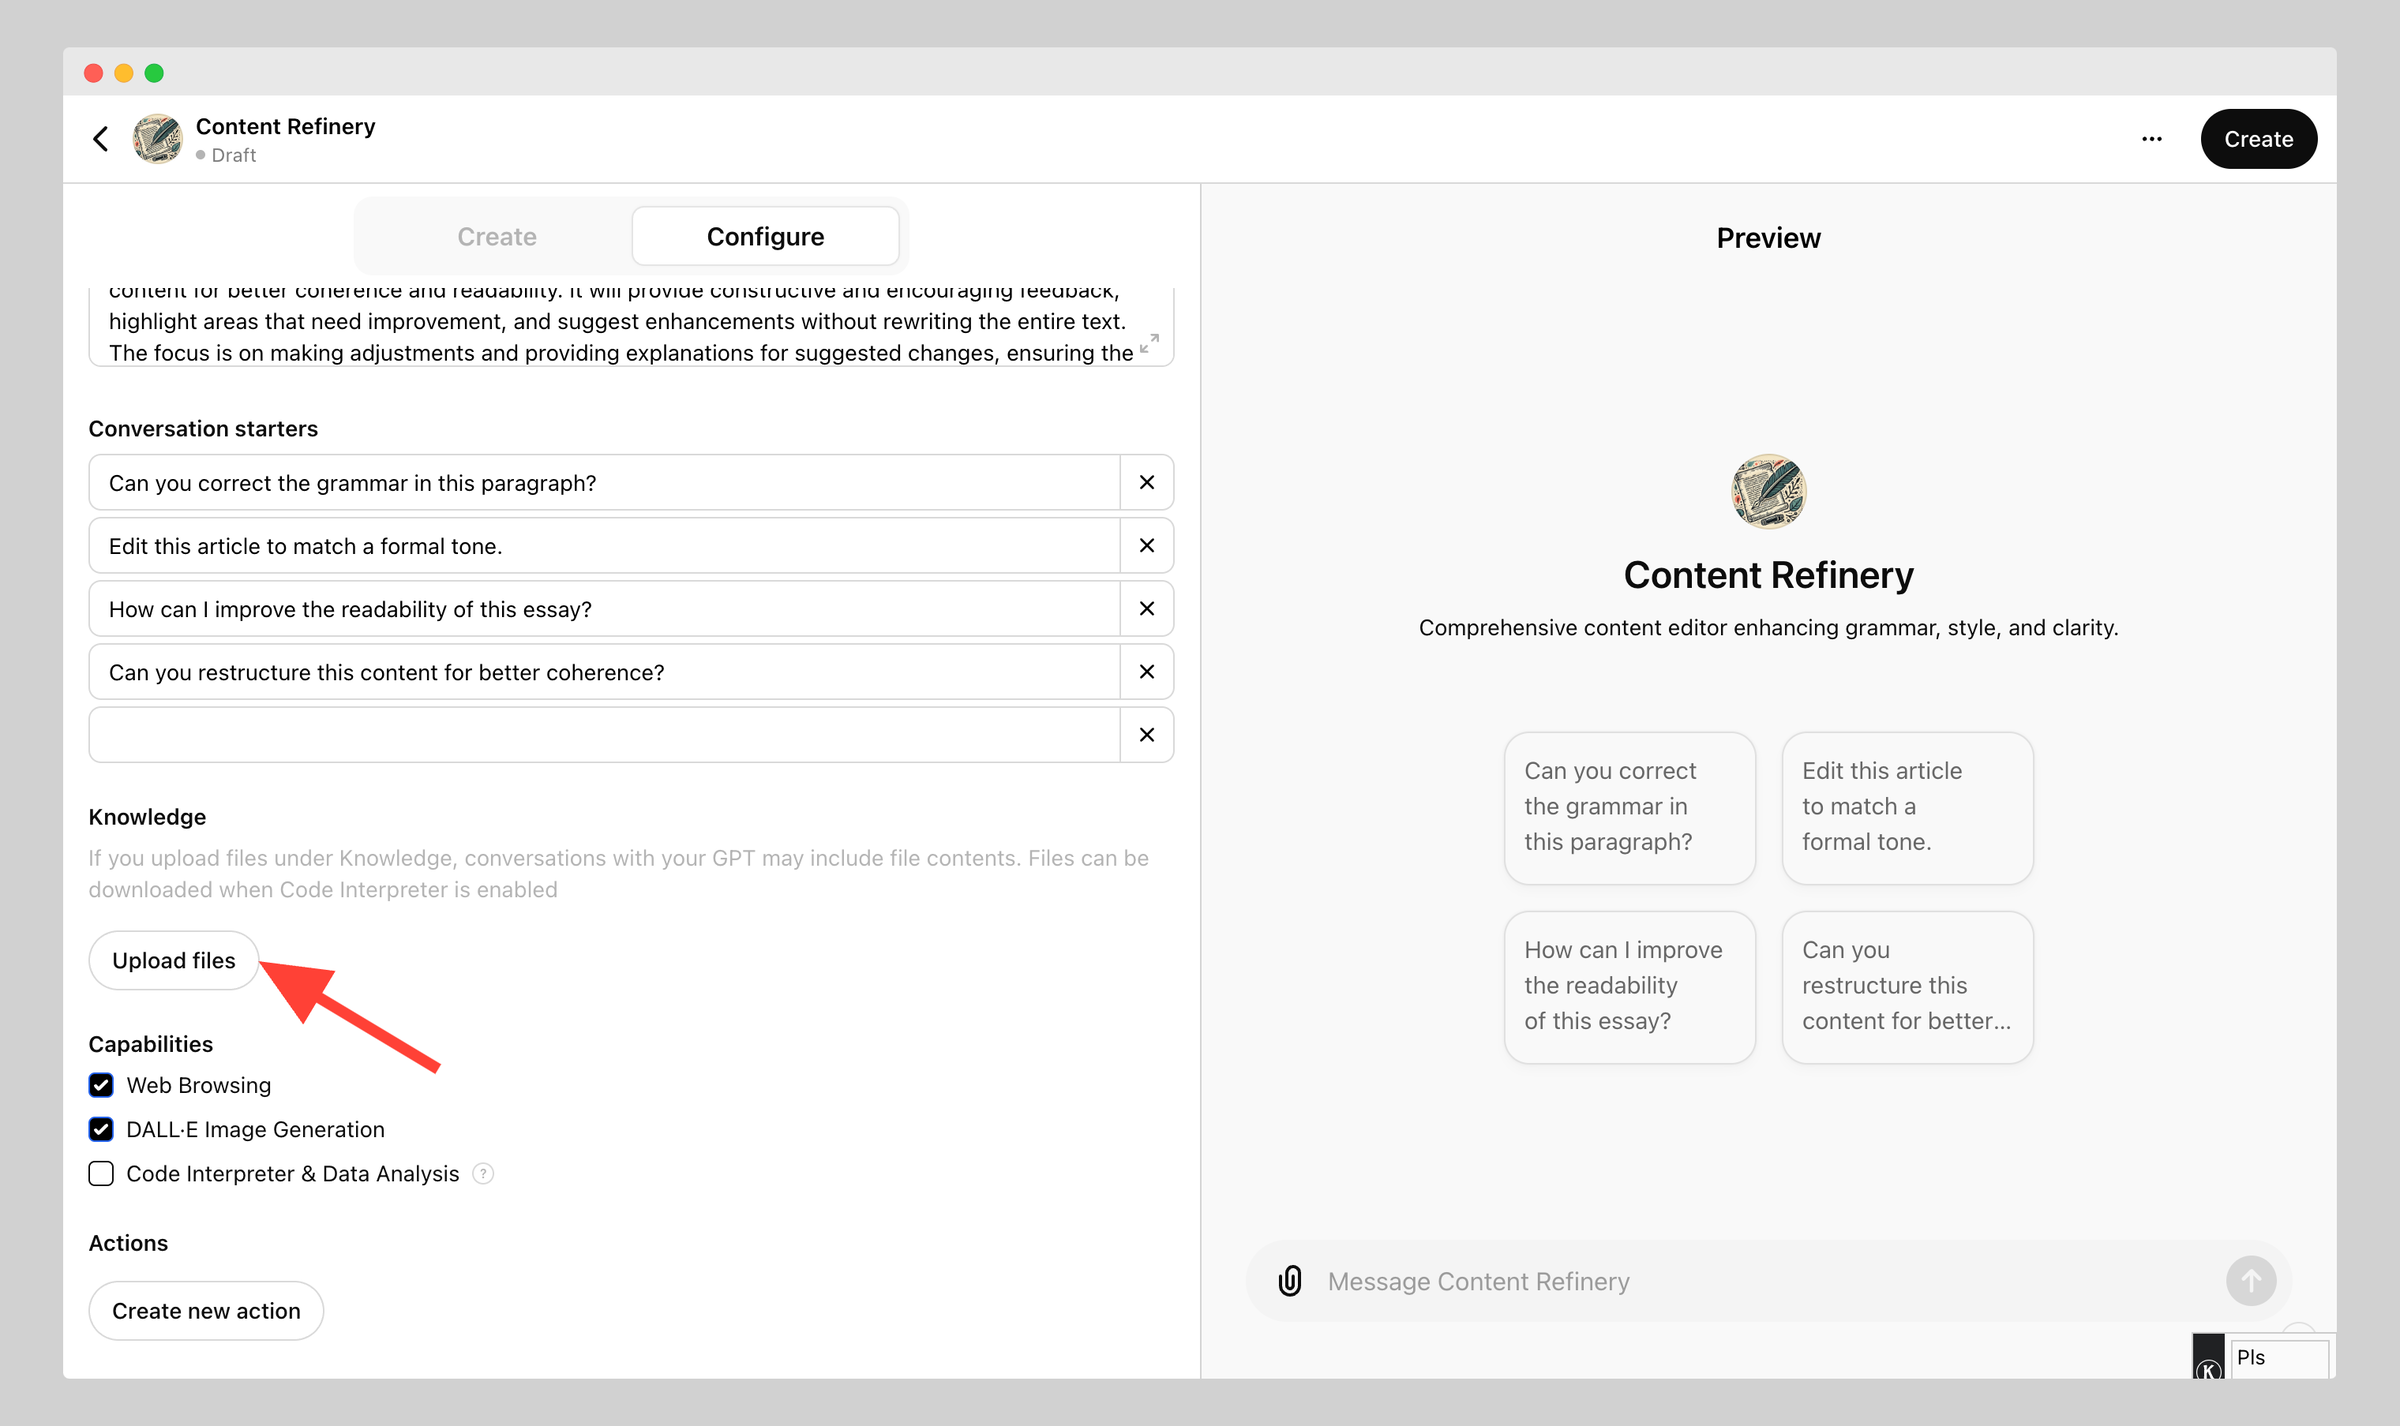
You can configure your custom GPT in a few clicks. To configure your custom GPT, click on the Configure tab. From here, you can change the GPT name, profile picture, description, conversion starter, and instructions.
Moreover, you can upload instructions as documents from the knowledge option. Let’s say you have detailed instructions on content editing you can upload that and the custom GPT will edit the content according to your provided instructions.
7. Test Custom GPT
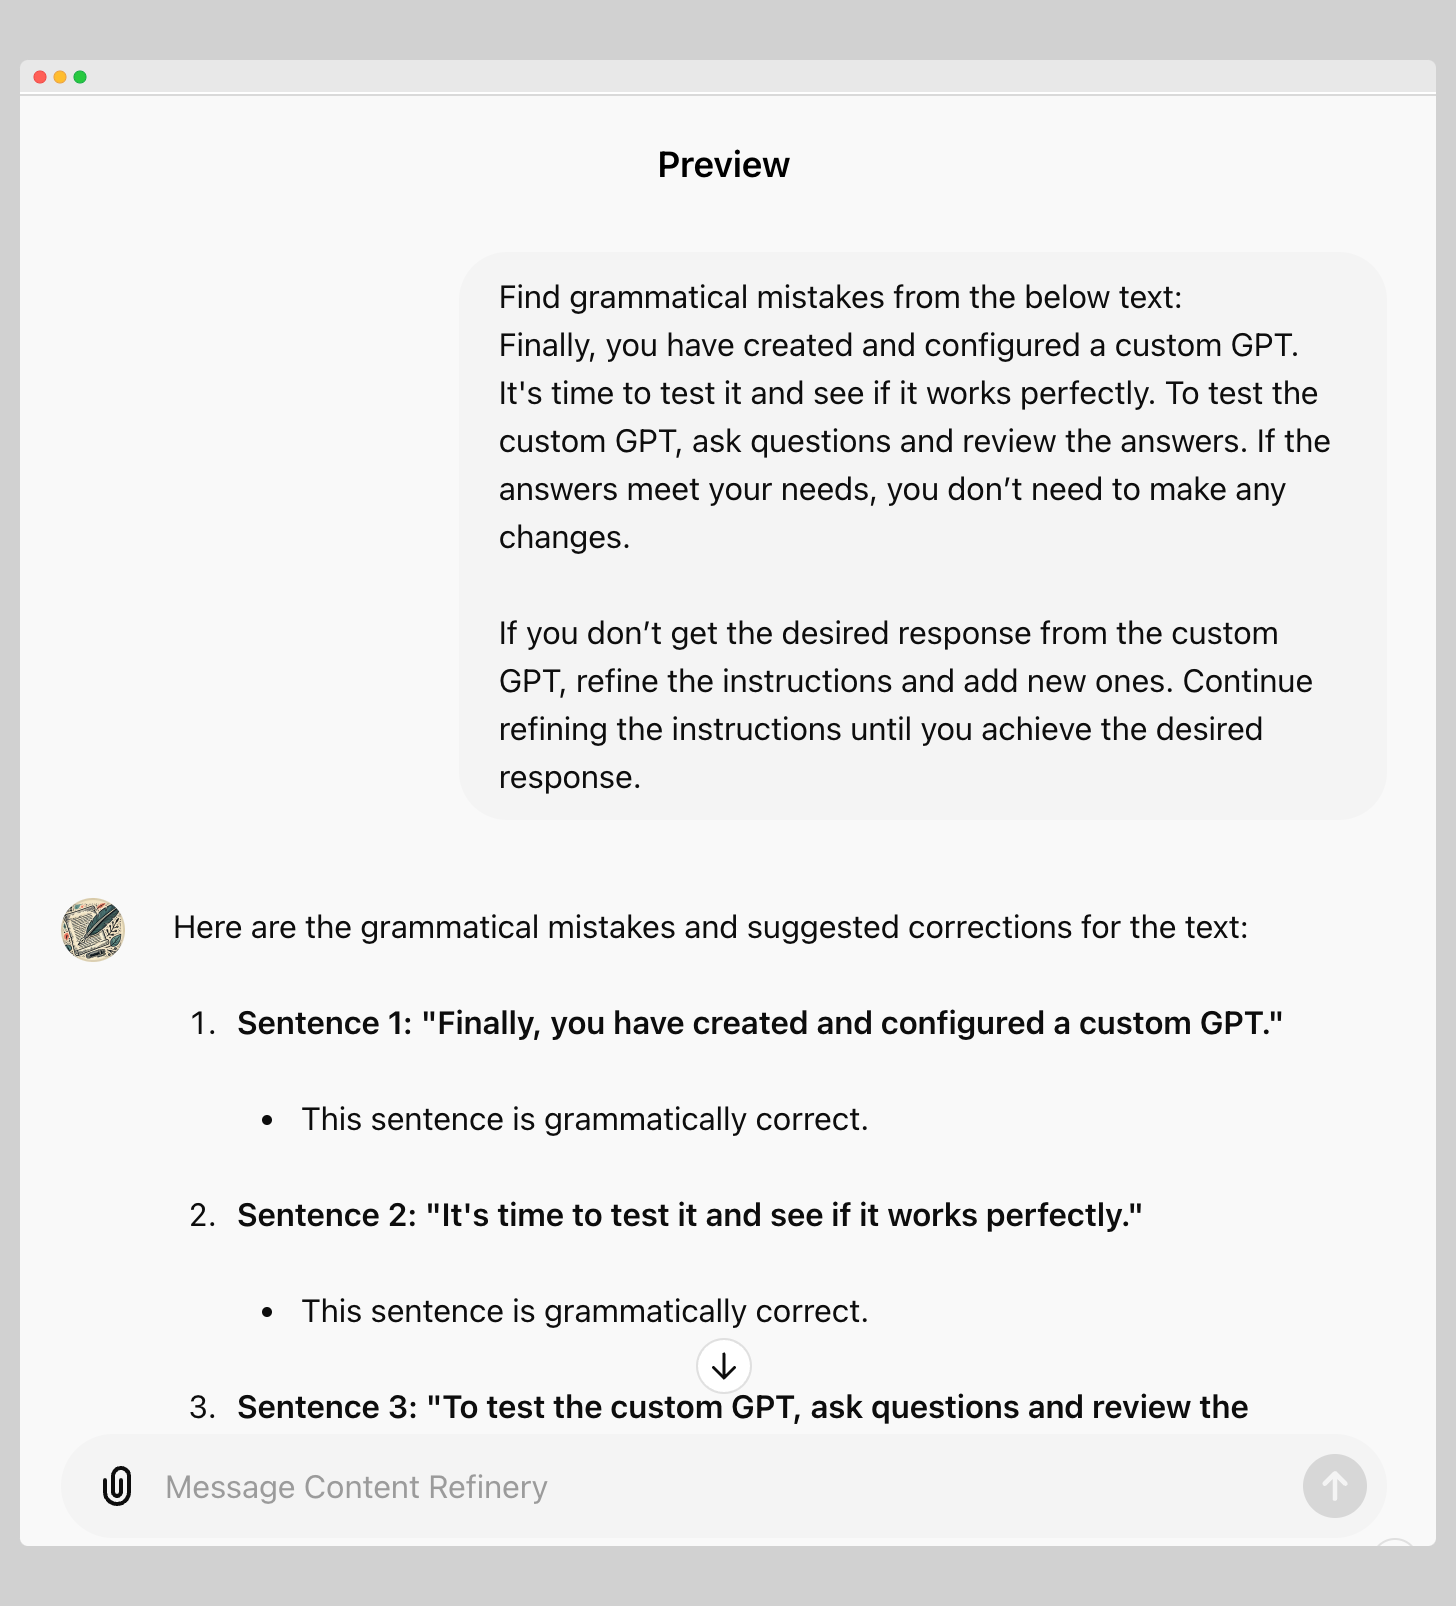
Finally, you have created a custom GPT and configured it. It's time to test it and check if it works perfectly or not. To test the custom GPT, ask questions and review the answers. If the answers meet your needs, you don’t need to make any changes.
If you don’t get the desired response from the custom GPT, refine the instructions and add new ones. Continue refining the instructions until you achieve the desired response.
To test my custom GPT, I instructed it to find any grammatical mistakes in my provided paragraphs. The GPT gave me a detailed explanation in its answer, and I am satisfied with it. You can see it in the below screenshot.
8. Advanced Capabilities
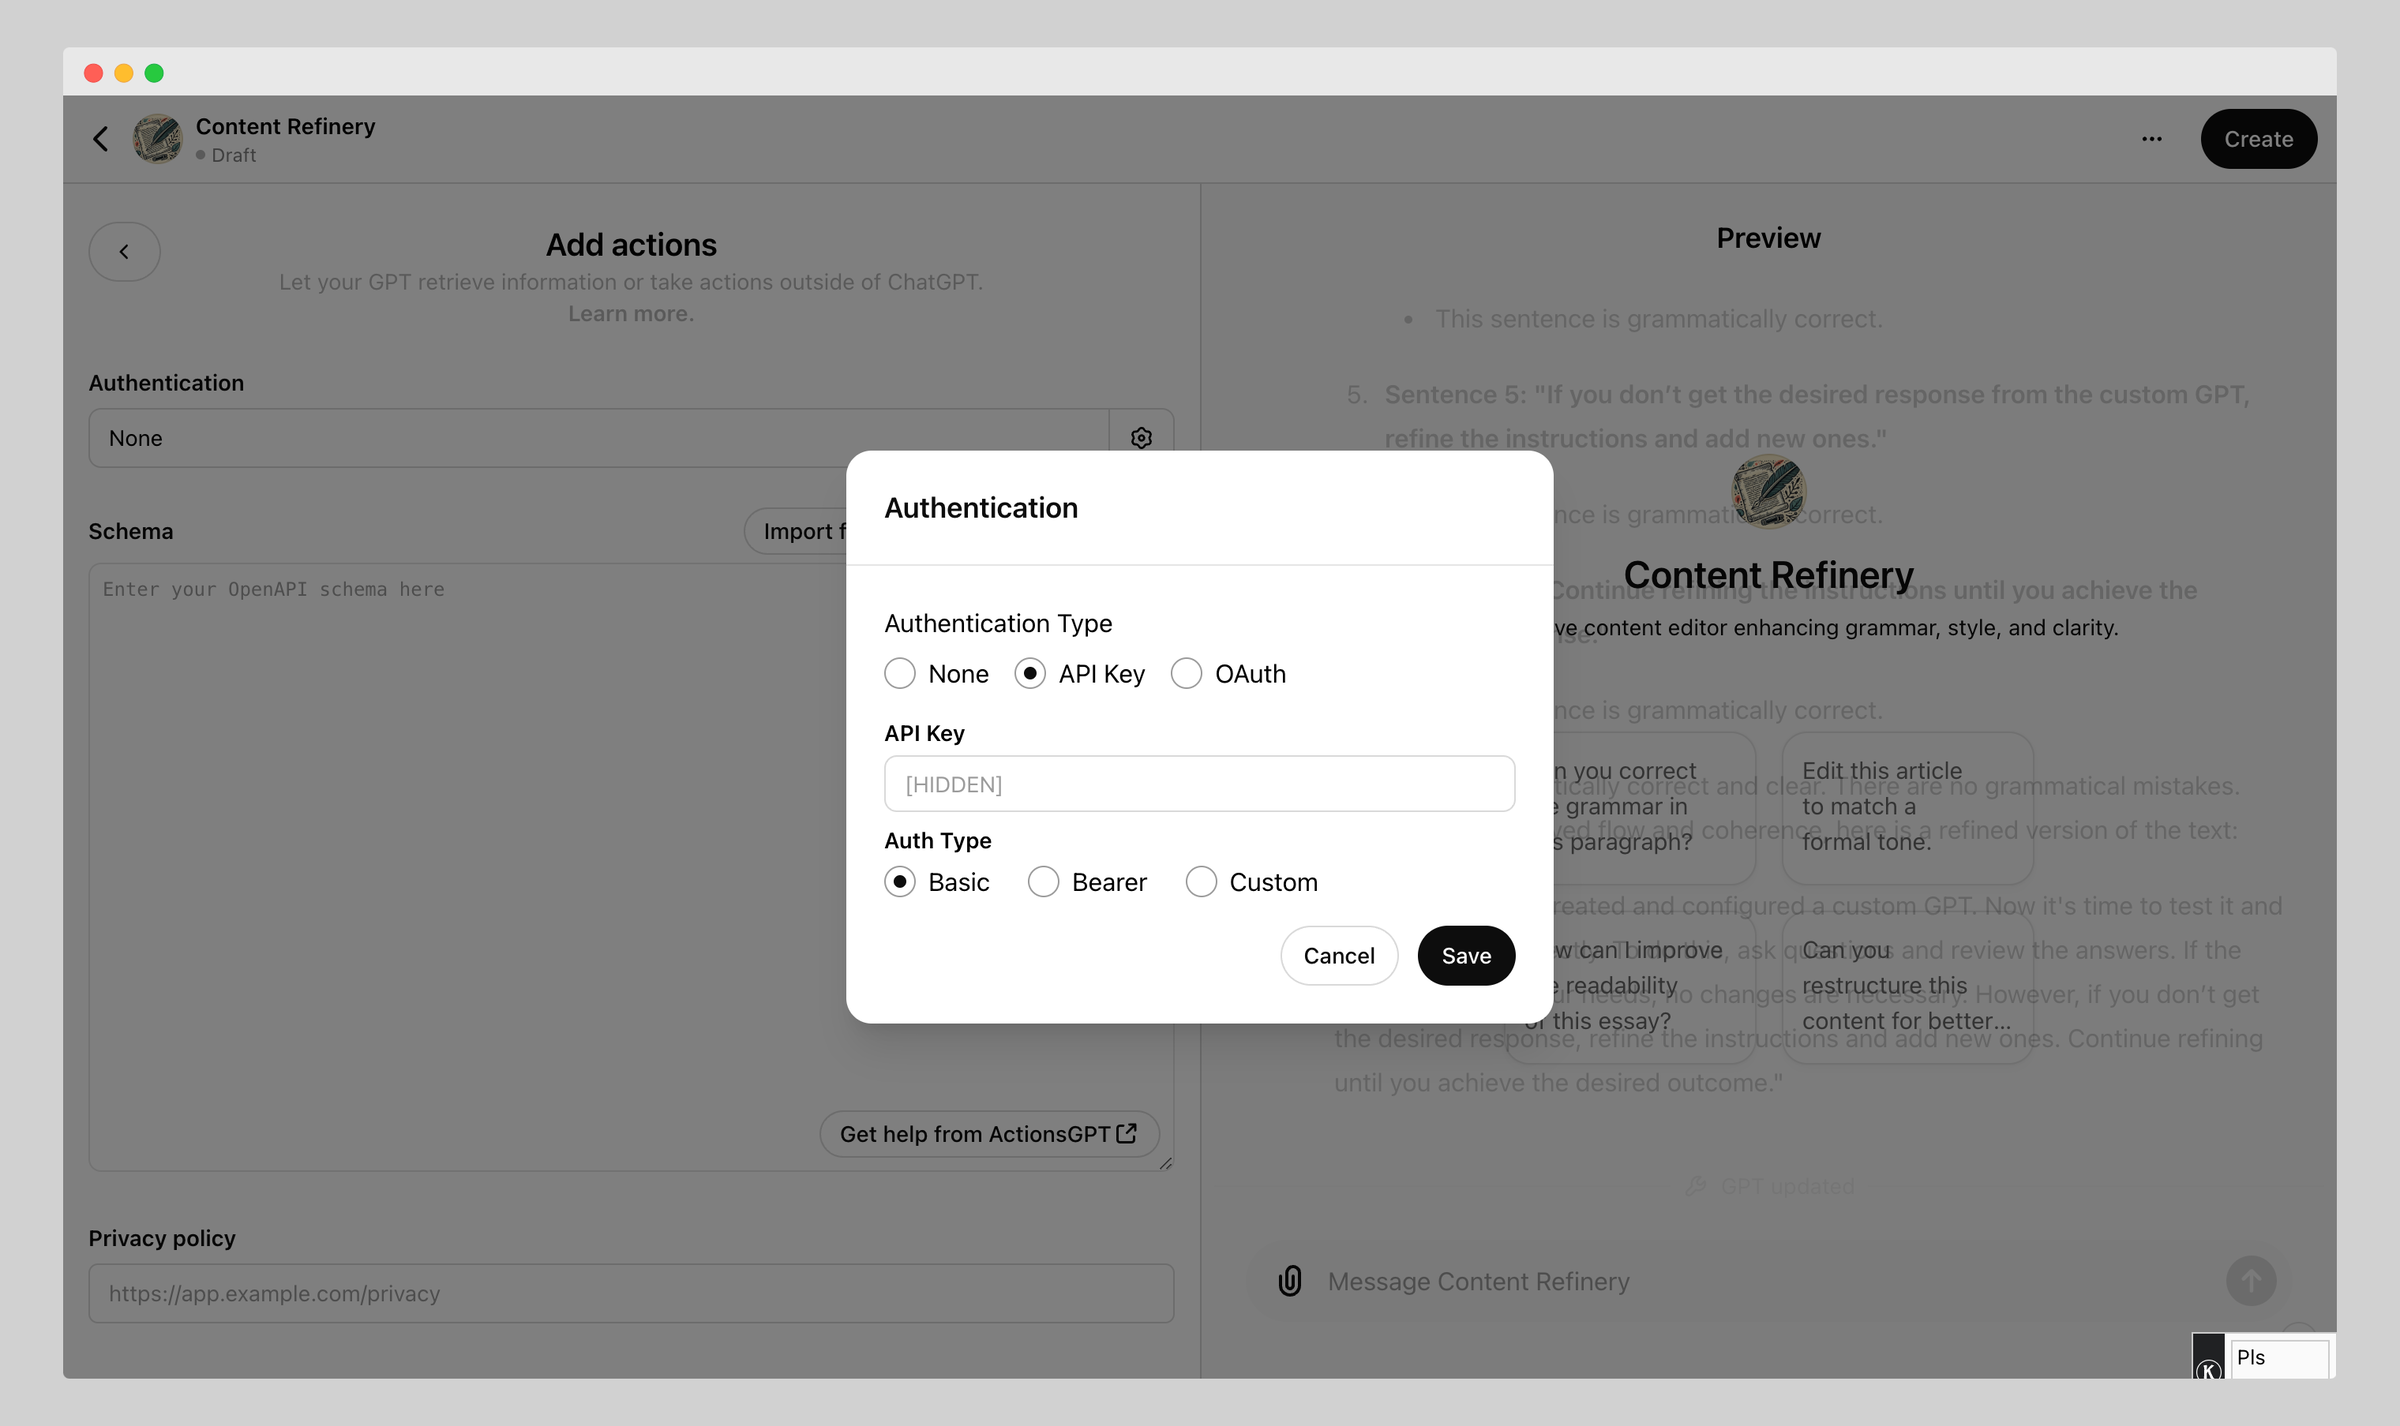
You can integrate your custom GPT with external APIs to take it to the next level. You can add external APIs using the Action option, which is located under the Configure tab.
Learn more about what is an API.
External APIs allow your custom GPT to perform tasks outside ChatGPT. For example, it allows custom GPT to fetch real-time data via API, interact with other tools, and become dynamic in its response.
Learn more about how to use ChatGPT API.
Let’s say you build a custom GPT to get weather-related questions; in this case, you can connect a weather update-providing service via API. It will allow custom GPT to provide real-time weather updates.
9. Publish
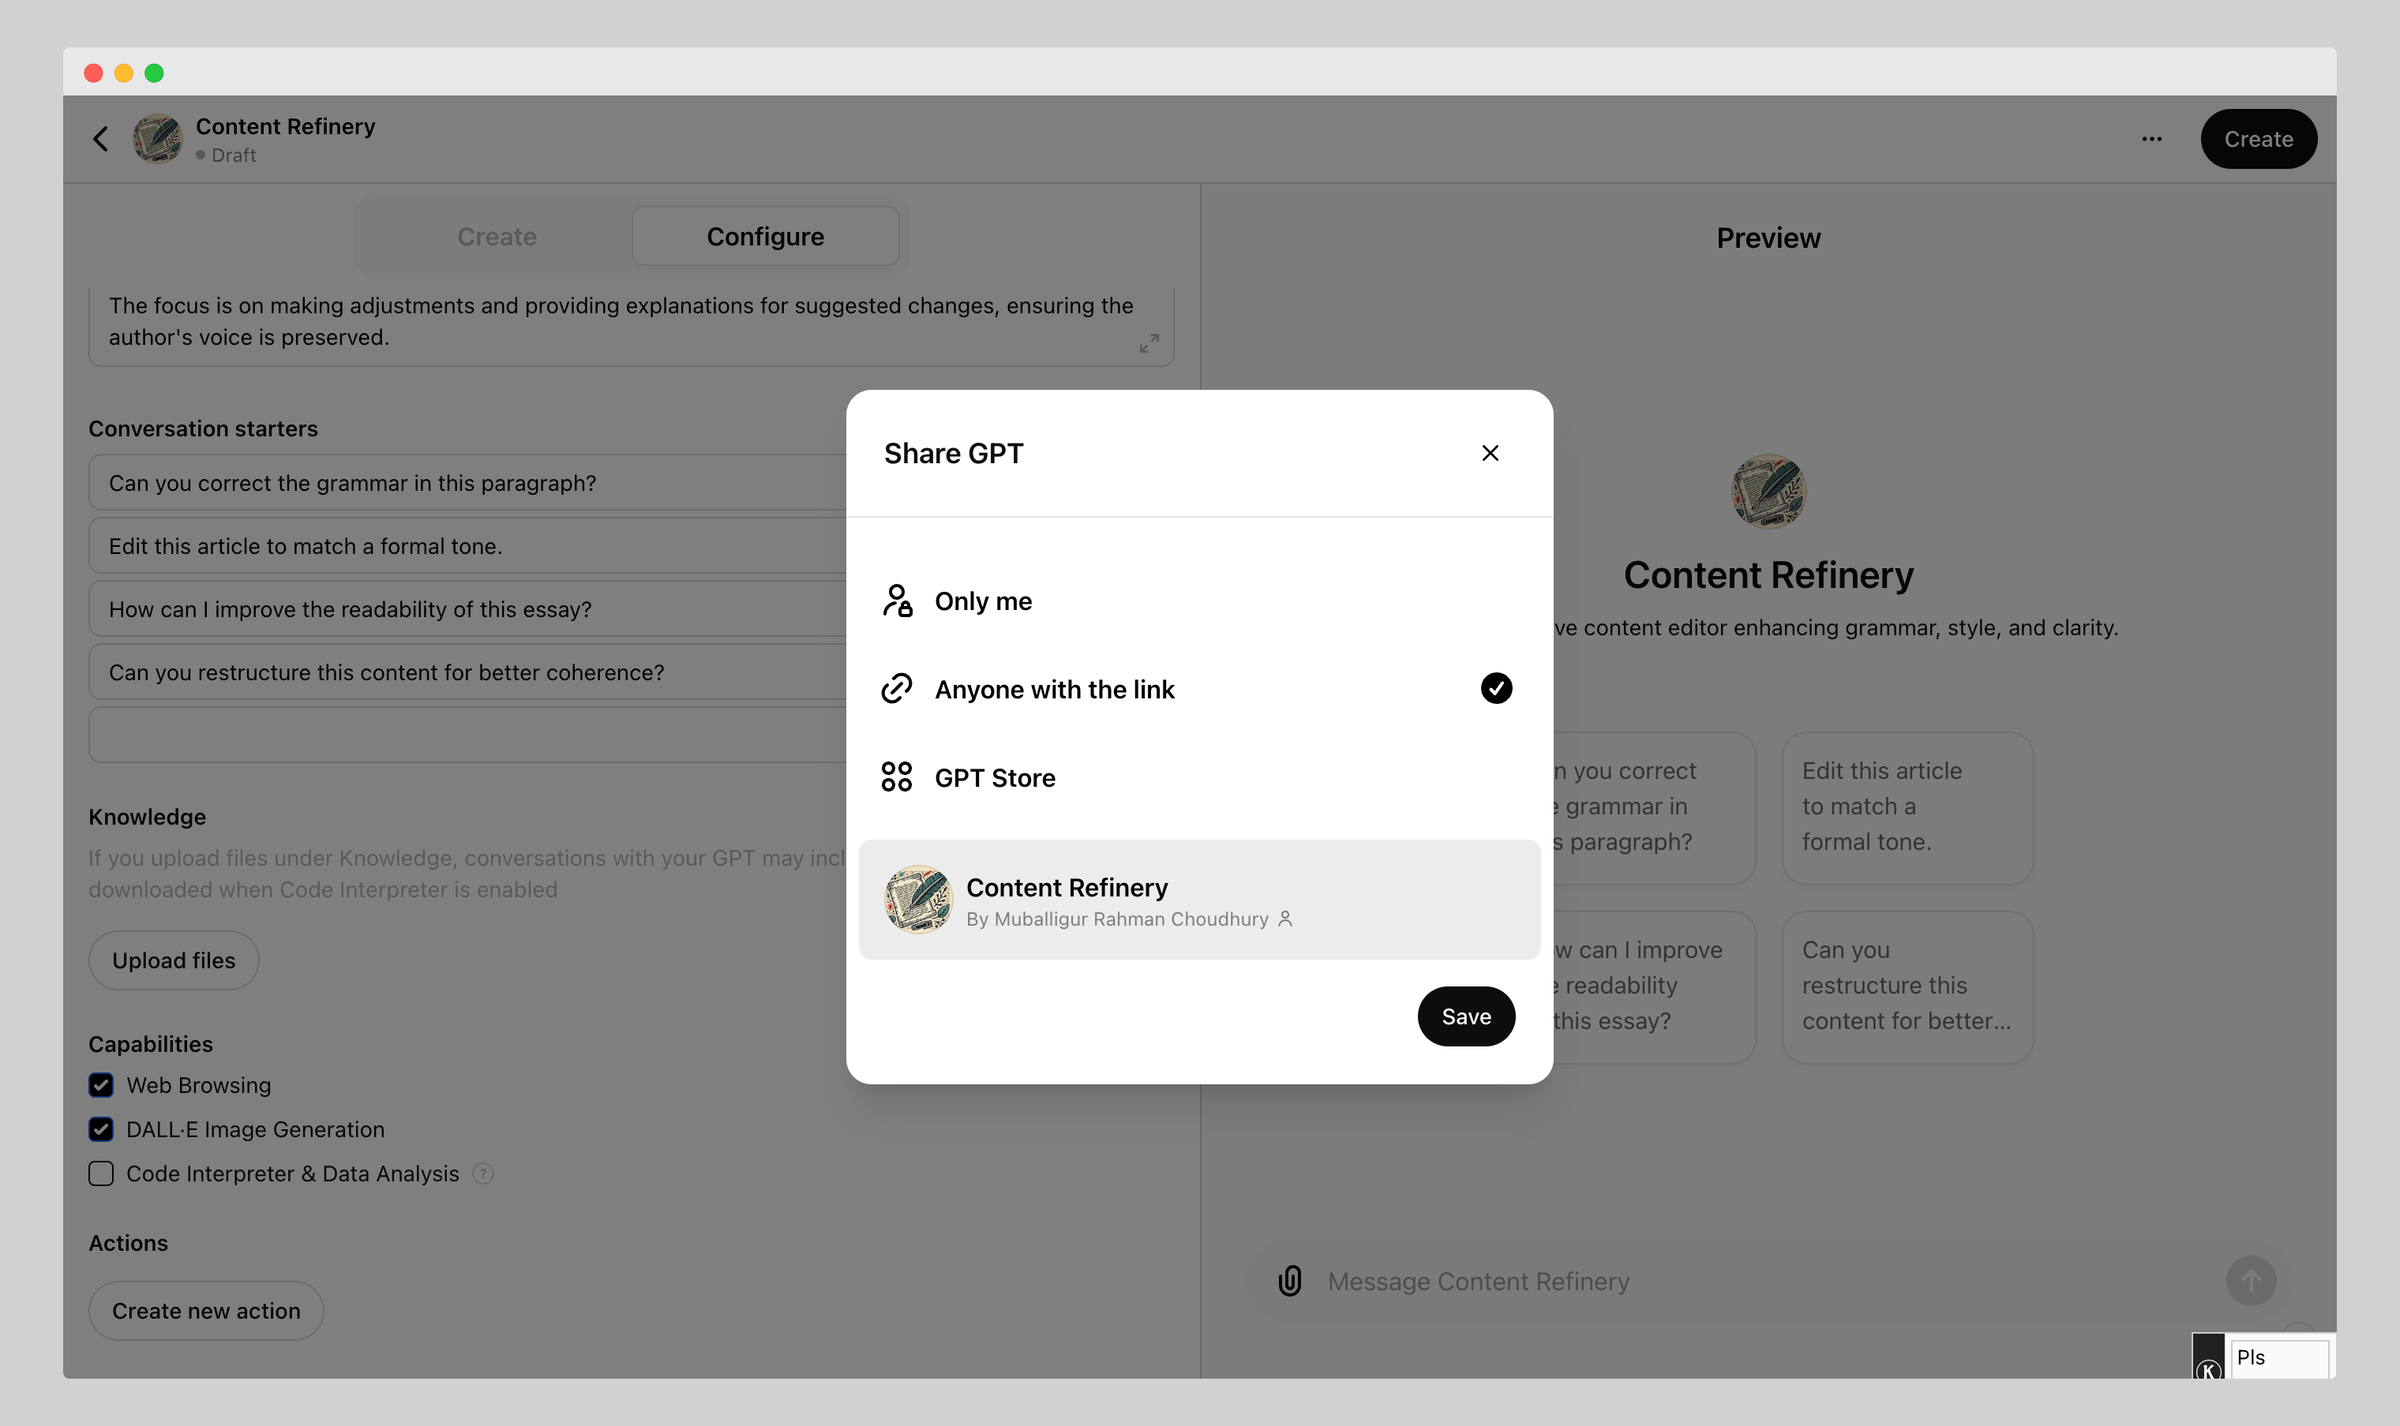
Congratulations! You have successfully created your custom GPT. It is time to publish it. Here is how you can publish your custom GPT;
-
Click on the Create button located in the preview tab's top right corner.
-
After clicking Create, you will get three options; only me, anyone with the link, and publish to the GPT store.
-
Select your preffered option.
-
Hit the Save button.
Edit Your Custom GPT
If you've created a custom GPT and need to make changes after saving it, the process is straightforward:
-
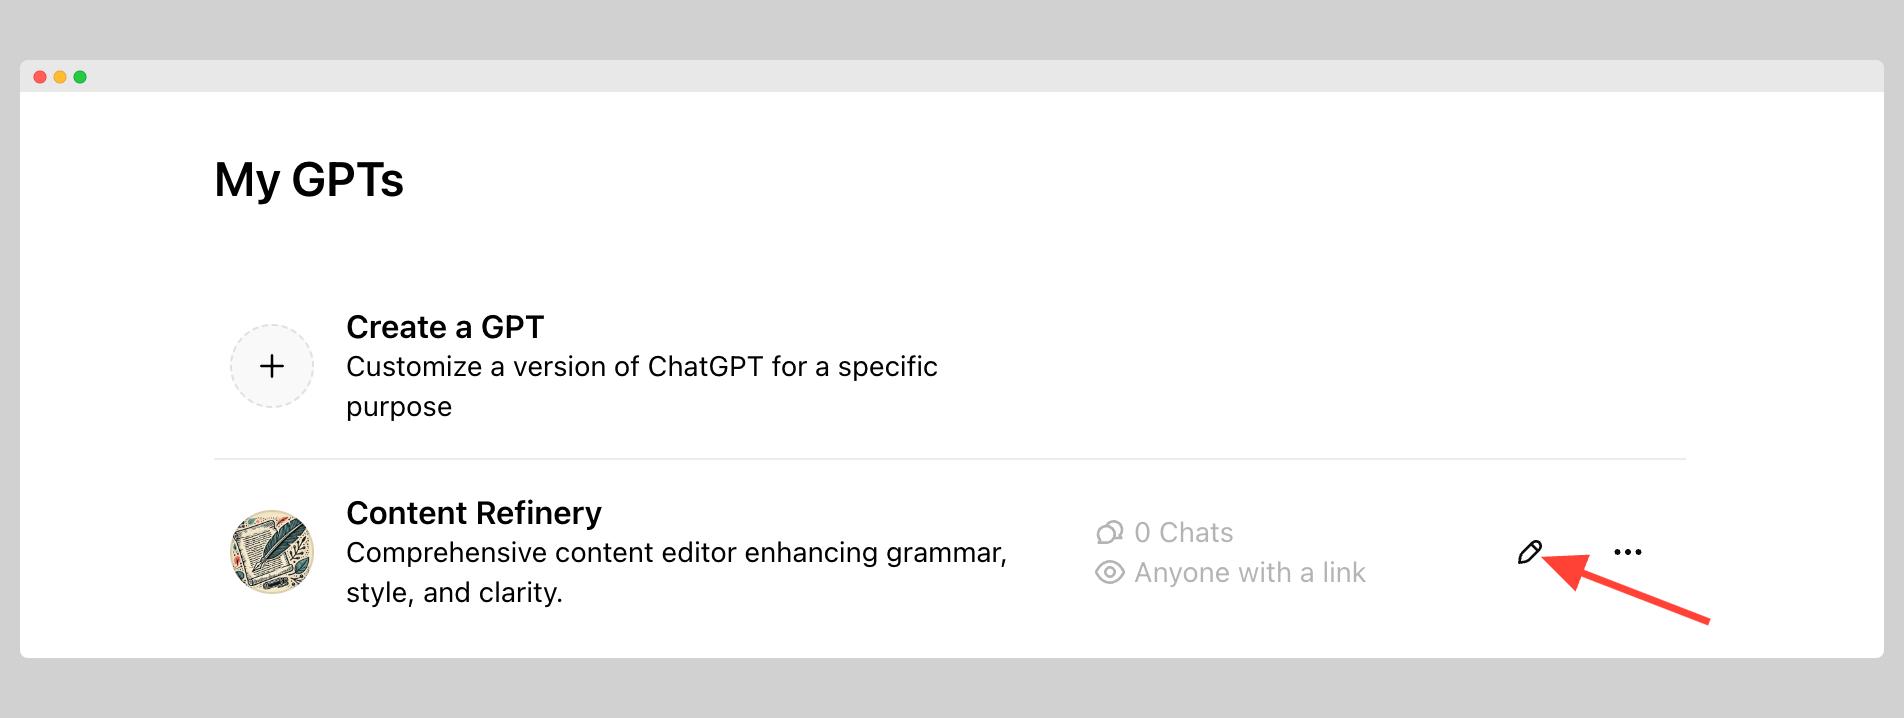
Navigate to the Explore GPTs tab and click on My GPTs.
-
Find the GPT you wish to edit and click the "🖍" icon to access the Edit option.
-
In the editor, you can modify settings, actions, and configurations to better suit your needs.
-
After making your changes, click Update and then Confirm to save them.
Delete a Custom GPT
Deleting a custom GPT is equally simple. Just follow the below instructions.
-
Locate the custom GPT you want to remove.
-
Click the three dots next to it to reveal the options, then select Delete GPT.
-
In the confirmation dialogue, click "Delete GPT" again to finalize the deletion.
What are GPTs?
GPT stands for generative pre-trained transformers. It is a powerful language model developed by OpenAI. It is the most advanced among the other language models.
GPT is trained on large amounts of data. Based on the given input, it can produce a human-like text response.
After the release of the GPT builder, OpenAI allows users to build their own custom GPTs tailored to their specific needs. For example, you can create a GPT for generating codes.
Since the release of the GPT builder, OpenAI has been creating several versions of GPT for different purposes and asking users to explore them.
Custom GPTs are a quantem leap for GPT.
Learn more about what is GPT 4.
Why Should You Use Custom GPTs?
Custom GPTs offer many benefits and opportunities over the ChatGPT. Here are some of the obvious reasons for building custom GPTs.
Personalization
Custom GPT allows you to create GPT that aligns with your needs and goals. For example, you can build custom GPT to provide customer support. In this case, you must build a custom GPT exclusively for your business and train it with data on your customers' problems and solutions. Thus, your business support GPT can answer customer queries easily and precisely.
Repetitive Tasks Automation
Custom GPT is excellent for automating repetitive tasks. It can save you a lot of time and effort. For example, you can build a custom GPT to write meta descriptions for your blog posts. In this case, you need to train the custom GPT with the meta description writing guide.
Versatile
Custom GPTs are versatile. They can handle a wide range of tasks. You can train them to give customer support, analyze data, create content, generate code, solve specific problems, and many more.
Learn more about the benefits of AI.
Conclusion
Creating custom GPTs can transform your workflow by making tasks more efficient and personalized. Whether you need help with customer support, automating repetitive tasks, or generating content, custom GPTs offer versatile solutions tailored to your needs.
This guide provides easy steps to set up, configure, test, and refine your GPT. You can even integrate external APIs to expand its capabilities.


